

Data integration between Salesforce and SQL Server has always been a challenging task. It is widely used for different business objectives like data analysis or data enrichment, or any other.
If the company uses SQL Server database, for such company it is a way more convenient to manipulate any external data and perform more efficient reporting in SQL Server. For this case, data import from Salesforce to SQL Server is a perfect data integration solution.
Another situation is when a company needs to get a full (single) customer profile (360-degree view), which is usually displayed in CRM. For this case, the data integration in the reverse direction, from SQL Server to Salesforce, is a better option. As SQL Server is synchronized with Salesforce, thereby enriching it with data and forming a more complete picture of the client.
In this article, we’ve decided to describe 5 different ways on how you can connect Salesforce to SQL Server or vice versa and export necessary data from one source to another. These 5 ways include data loading via Import and Export Wizards, SSIS Data Flow, ODBC Drivers, Skyvia Data Integration and Skyvia Connect.
Table of contents
- Import and Export Wizards
- ODBC Driver and Linked Server
- SSIS Data Flow
- Skyvia Data Integration
- Skyvia Connect and Salesforce Connect
In our article, we will pay close attention to methods 4 and 5, and describe in detail all nuances of data migration when using these methods.
1. Import and Export Wizards
SQL Server has a whole ecosystem of native and third-party tools, and, of course, this includes tools for importing data from other sources. Let’s start our list with the standard SQL Server and Salesforce tools for importing data – SQL Server Import and Export Wizards.
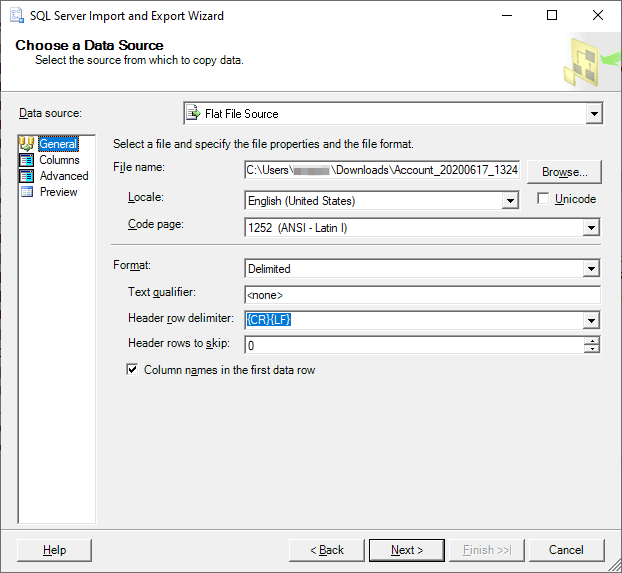
SQL Server Import Wizard allows importing data from a number of data sources by default – from other SQL Server databases, Oracle, Flat Files, like CSV, an Access Data Source, PostgreSQL, MySQL, or Azure Blob Storage. The import of data directly from Salesforce, however, requires a third-party ADO.NET provider for Salesorce or an ODBC driver.
The other way is to export Salesforce Data to CSV first and then import it to SQL Server, using the SQL Server Import Wizard. There are a number of Salesforce native tools for exporting Salesforce data to CSV files, both cloud, like Dataloader.io and locally installed, like the Data Loader tool. The latter can be downloaded directly from Salesforce. You can find it in Setup, under Platform Tools. Click Data Management and select Data Loader.
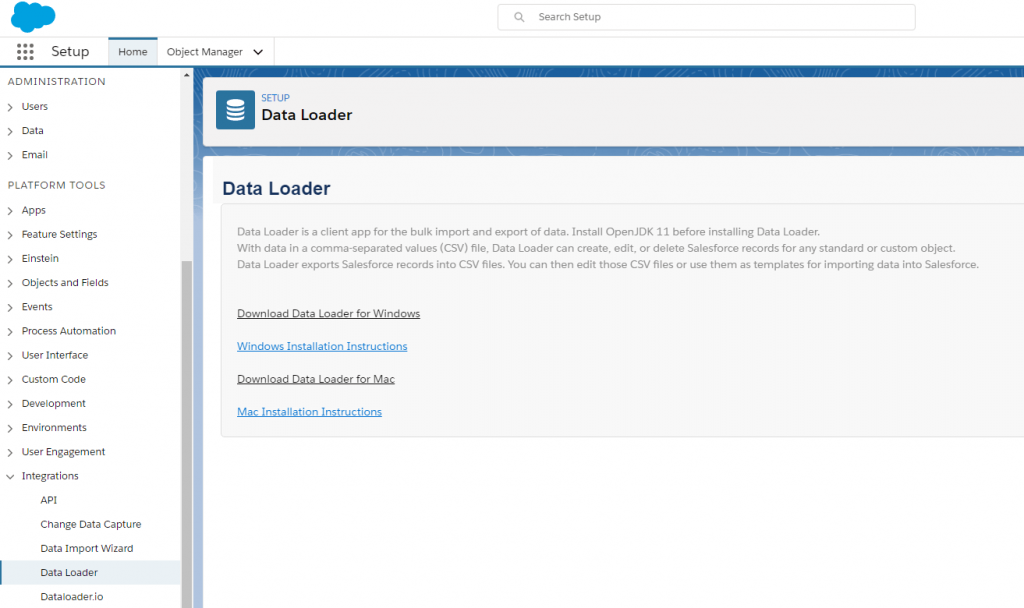
You need to download an appropriate version of Data Loader from there, install it, log in to Salesforce and then export data from the necessary objects. After this, you can use SQL Server Import Wizard to import them to SQL Server tables. More information on SQL Server Import Wizard can be found in Microsoft documentation.
Please note that this way of data integration is unidirectional. You cannot migrate data in the reverse direction.
2. ODBC Driver and Linked Server
Another SQL Server tool for connecting external data is linked servers. Linked servers allow SQL Server to read data from external data sources and execute SQL commands against them. You can link another data source to SQL Server via OLE DB or ODBC interface.
There are quite a few ODBC drivers for Salesforce on the market. For example, you can use Devart Driver for Salesforce. Its documentation includes a detailed tutorial on how to create a linked server to Salesforce in SQL Server Management Studio. The bi-directional data integration is not foreseen in this method.

3. SSIS Data Flow
SQL Server Import Wizard is a part of SQL Server Integration Services (SSIS) – a powerful data integration solution that can perform a broad range of data migration tasks. If you need more than simple import of Salesforce data to SQL Server as is, for example, you need to transform data inbetween, you can use SSIS for it.
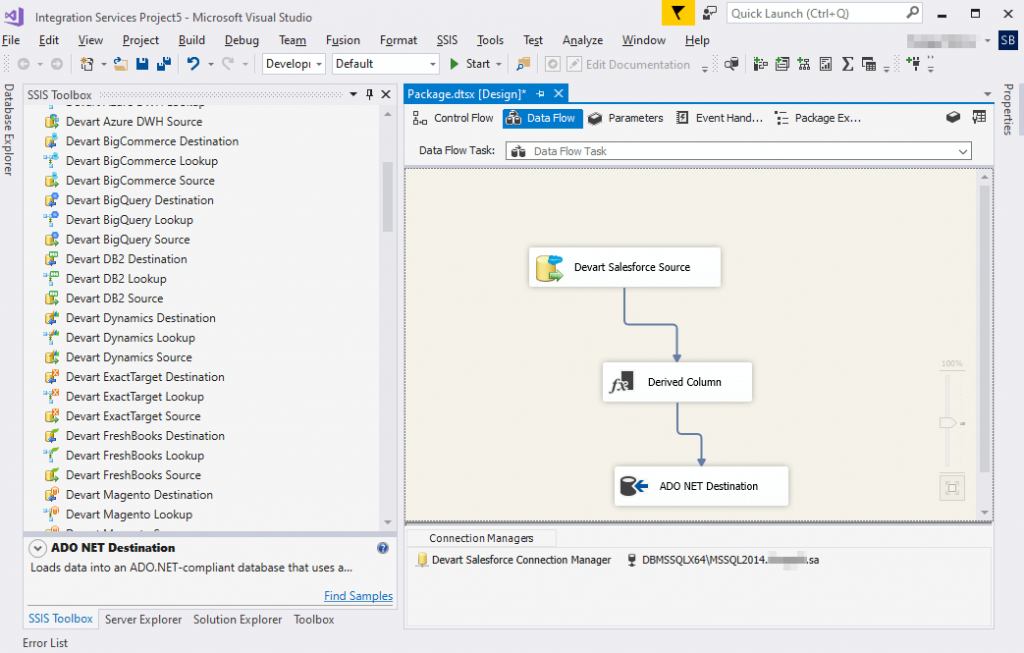
In SSIS, you configure your Data Flow task by adding Data Flow components to a diagram, linking them and configuring column mapping. Note that if you want to load data directly from Salesforce, you will need third party SSIS components. For example, you may use Devart SSIS Data Flow Components for Salesforce.
First, you need to create an Integration Package and, second, create a Data Flow task in it. Then add a Devart Salesforce Source component on the diagram and configure it thoroughly to get the necessary Salesforce data. If needed, add the respective transformation components and connect them with links. Finally, you can use the standard ADO.NET Destination component with an ADO.NET connection to load data to SQL Server.
In a similar way, you can also load data in the reverse direction, from SQL Server to Salesforce, or even configure bi-directional data flow with the SQL Server Integration Services.
4. Skyvia Data Integration
Skyvia offers several products (ways) to integrate Salesforce and SQL Server data. In this section, we will start with the Skyvia Data Integration (ETL/ELT solution) and, in the next section, will go on with the Skyvia Connect (Web API Server), which works in conjunction with the Salesforce Connect through OData protocol. These ways are quite effective both for small mom-and-pop businesses and for large Fortune 500 companies.
Skyvia Data Integration is a great option if you need to physically load data between different data sources. By creating connections to both Salesforce and SQL Server via Skyvia, you can easily import, replicate or synchronize your data in both directions. Skyvia is fully managed, minimal setup is required. For convenience and better understanding, we describe use cases of data import and replication below.
Data Import (ETL)
Import scenario allows applying various data transformations and loading modified data into SQL Server even if the structure in SQL Server does not match the structure in Salesforce. Data can be migrated in the reverse direction – you can export Salesforce data to SQL Server the same way.
We take the Customers table of SQL Server as an example and export its data to Accounts and Contacts in Salesforce. The problem of such an operation is to preserve the relations of the SQL Server data when importing them to Salesforce. When we import data of the Customers table to Accounts and Contacts, the relation should be created between the corresponding Account and Contact in the Salesforce database. This is easy with Skyvia. When inserting data from one table to multiple Salesforce objects, it builds such relations automatically.
STEP 1: CREATE A CONNECTION TO SQL SERVER AND SALESFORCE IN SKYVIA
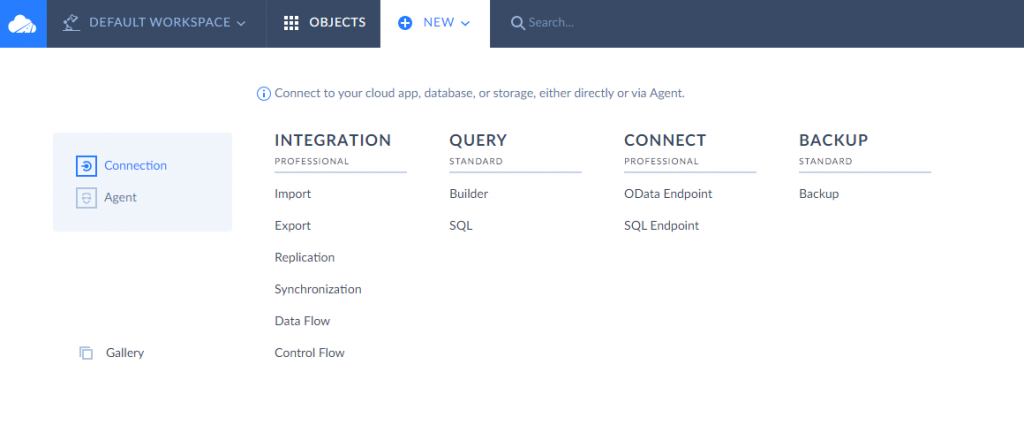
Create a new connection by clicking +NEW in the top menu and selecting Connection in the menu on the left.
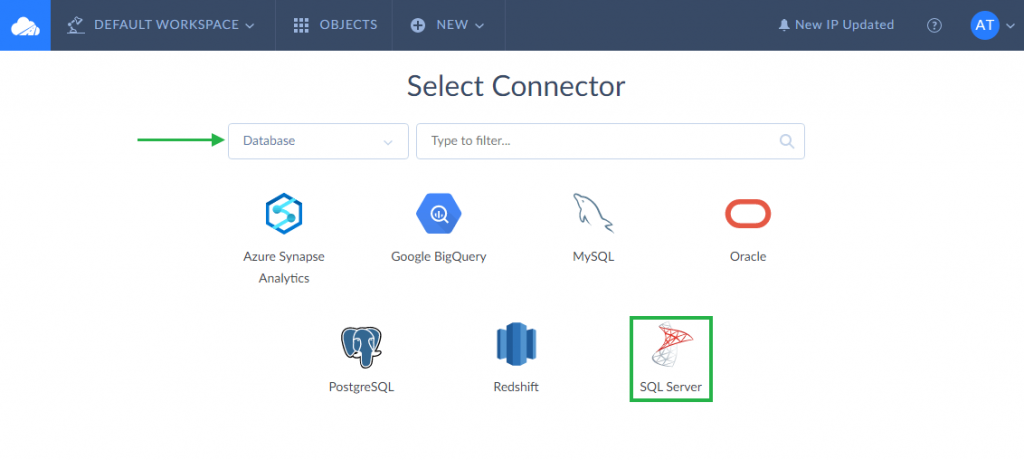
Select Database category from the drop-down list on the left and choose SQL Server from available databases.
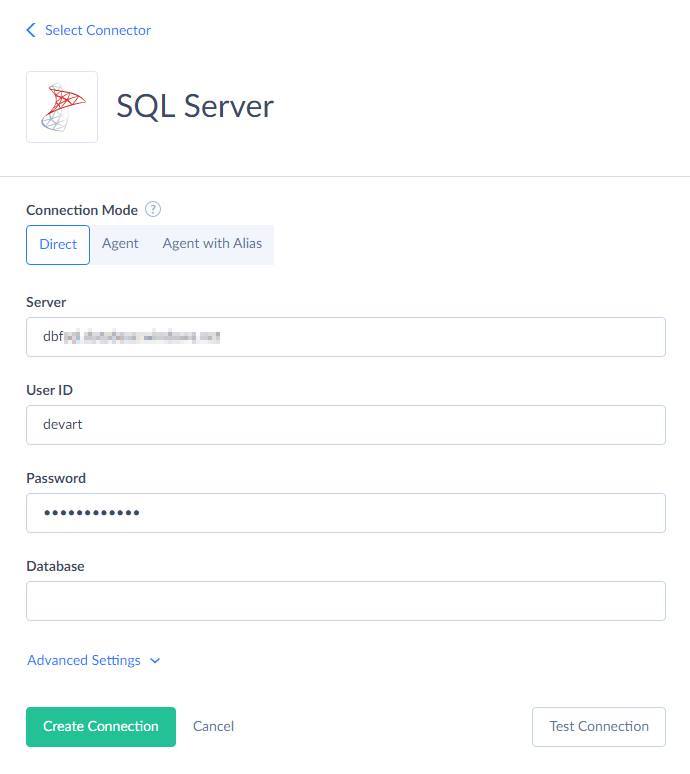
To connect to SQL Server, select Connection Mode (Direct, Agent, or Agent with Alias) and according to the selected mode, specify required parameters. More about agent connections you can read here. More about SQL Server connection settings you can find in the Databases topic.
The same way as described above you create a connection to Salesforce. You just need to select another category from the drop-down list and among available cloud apps choose Salesforce.
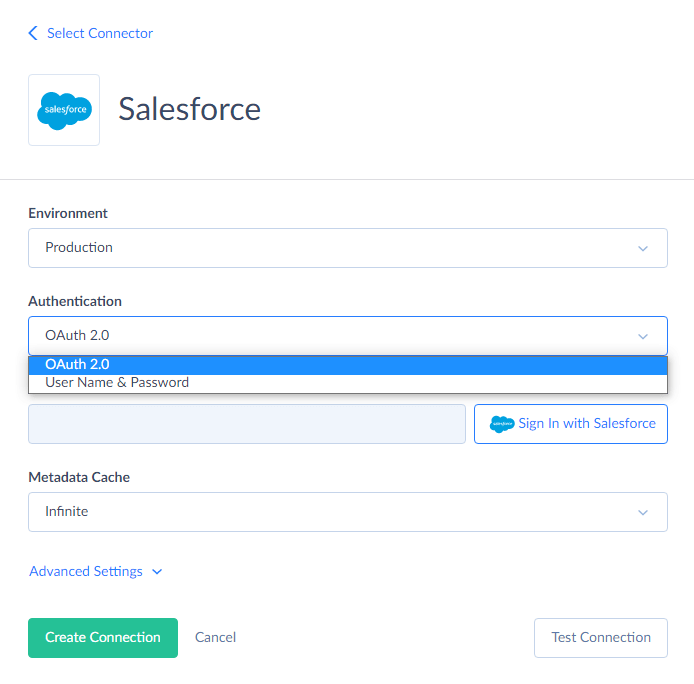
To connect to Salesforce, use either Salesforce User Name and Password or OAuth authentication. If you do not want to store your Salesforce credentials in Skyvia, we recommend to try the OAuth method. After clicking Sign in with Salesforce , Salesforce login window pops up. You sign in via web browser and automatically receive an access token. After that, you save the connection.
When two connections are created, we proceed with creating an import package to quickly and conveniently export data from SQL Server to Salesforce.
STEP 2: CREATE AN IMPORT PACKAGE TO MIGRATE DATA
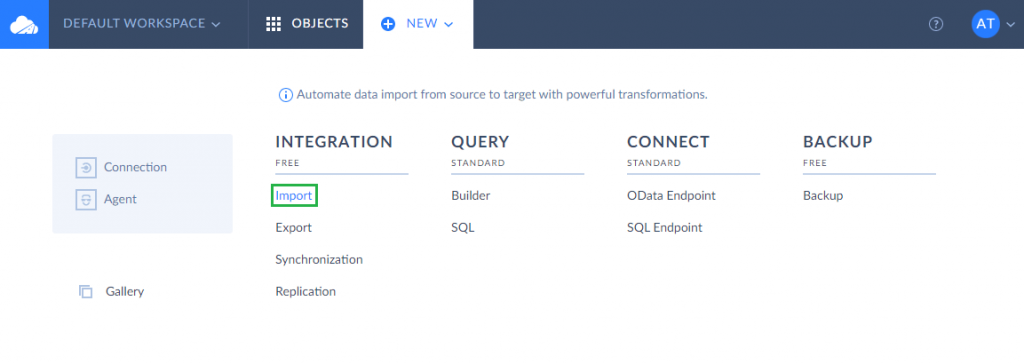
Create a package by clicking +NEW in the top menu and selecting Import in the Integration column.
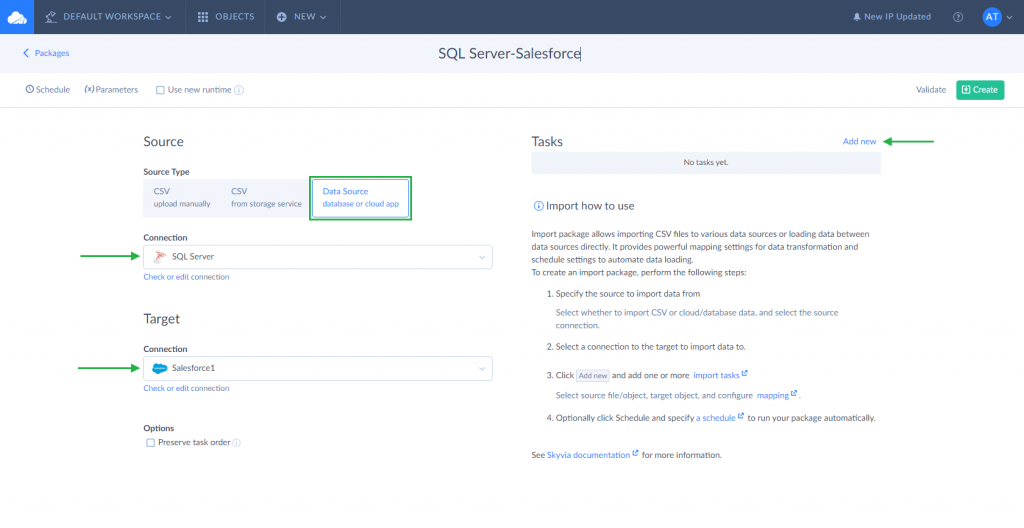
In the opened package editor, select Database or cloud app source type. In the Connection drop-down list, select SQL Server as a source. Below select Salesforce connection as a target and after that click the Add new link, which helps you to add and configure tasks.
A task in the package is a unit of ETL process (data extraction, transformation and loading). When creating an import package, we need to add a task for each SQL Server table.
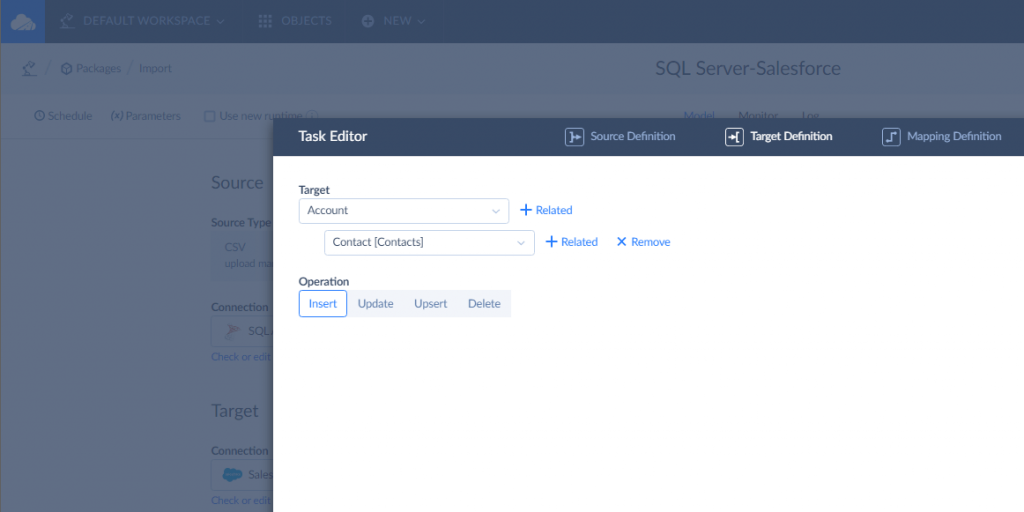
In the task editor, you can set up filters, add data from related tables, use various types of operations. Skyvia supports not only INSERT operation for data import, but also UPSERT, UPDATE, and DELETE.
Skyvia also offers numerous types of mapping among them Column, Expression, Lookup (Source and Target Lookup), Constant, Relation, External ID and other types of mapping.
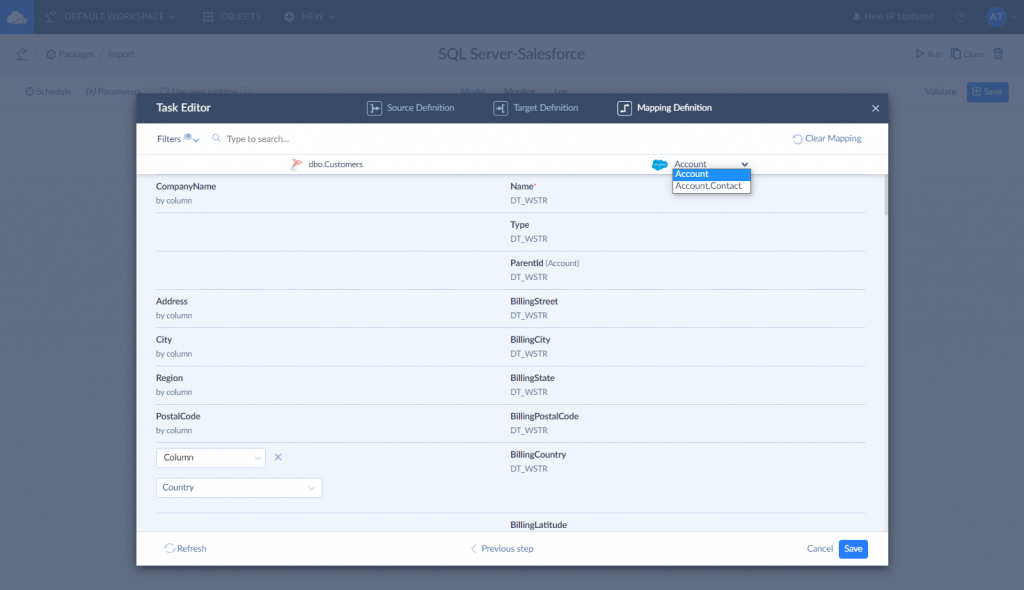
In our case, we need to map the Customers table columns (SQL Server) to the target Account and Contact object fields (Salesforce). Some columns of Customers table, such as Phone and Fax, are mapped automatically to Account object fields. For others, we use simple column mapping – each field of the source table is mapped to the corresponding target object field. We map the CompanyName column to Name, the Address column to BillingStreet, the City column to BillingCity, etc.
To map Contact object fields, click the target table name (Account) and select Account.Contact from the drop-down list in the upper right corner. Below you can see how the mapping process looks like.
After you have saved your task and clicked Create, your import package is ready for execution. Finally, click Run to start package execution.
Please pay attention that Skyvia allows you to set a schedule for a package to execute it automatically. This might be useful if you want to configure data loading operations to run periodically or if you want to delay an operation to a later time.
You can check the results of the package run by downloading an Excel file on the Monitor tab. You can find out information about successful and failed records in detail. The package is considered successful if the package run has loaded all the records successfully and failed either when at least one record has not been loaded successfully or when the package has not been executed completely (for example, when its connection became invalid).
You can read more about the nuances on how to create and configure an import package in Skyvia and how to automate the data migration process here.
Data Replication (ELT)
To replicate data, you do not need to create tables in SQL Server yourself. Using Skyvia, you create a replication package, which automatically creates tables in the database itself. However, please note that replication doesn’t allow any data transformations. It is also unidirectional, which means you can replicate your data only in one direction – from Salesforce to SQL Server.
First, open a replication package using +NEW menu. Second, select Salesforce as source, SQL Server as target. As soon as you select Salesforce, the table with Salesforce objects will appear on the right. Choose the objects you want to replicate data from. Each of the selected objects you can easily edit and filter its data according to specified conditions to replicate them correspondingly to SQL Server database.
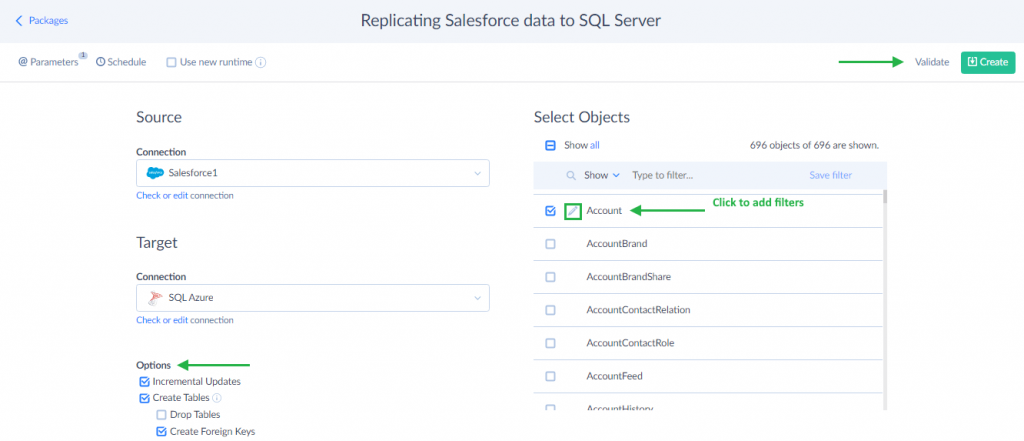
You can also select an incremental replication option allowed by Skyvia in this type of package if needed.
What can incremental replication give you? If you leave Incremental Updates check box selected as shown on the screenshot, Skyvia does not perform a full replication (copying of all the data) each time the package is executed. Instead it performs a full replication only the first time the package is run. During subsequent replications, Skyvia detects data that were changed in Salesforce since the last package execution and then applies these changes to SQL Servers database.
5. Skyvia Connect and Salesforce Connect
Skyvia Connect is a great option if you want to display only necessary data from SQL Server to Salesforce by request. Using this product, you create an SQL Server OData endpoint and link SQL Server data to Salesforce via the Salesforce Connect.
Salesforce Connect is a feature similar to SQL Server linked servers. Linked servers allow you to work with external data from SQL Server, like with its own database, and Salesforce Connect allows you to work with external data from Salesforce as with Salesforce own objects.
There are many ways to create an OData endpoint for SQL Server. Most of the ways involve developing a service, caring about security, hosting and domain, obtaining respective certificates, deploying, administering or maintaining. As a result, in order to get an endpoint available from the Internet, you need to take many preliminary steps.
With Skyvia, you do not need to build a web API manually. You need to create a connection to SQL Server the data of which you want to publish, configure your endpoint, set up security settings and get your ready-to-use endpoint URL. So you do not need to care about hosting, deployment and administration. Skyvia helps you to automate the process. What is also important to know is that you can create both public and private endpoints and optionally limit IP addresses, from which the data of the endpoint can be accessed. This feature is foreseen in the endpoint security settings.
STEP 1: CREATE ODATA ENDPOINT TO SQL SERVER IN SKYVIA
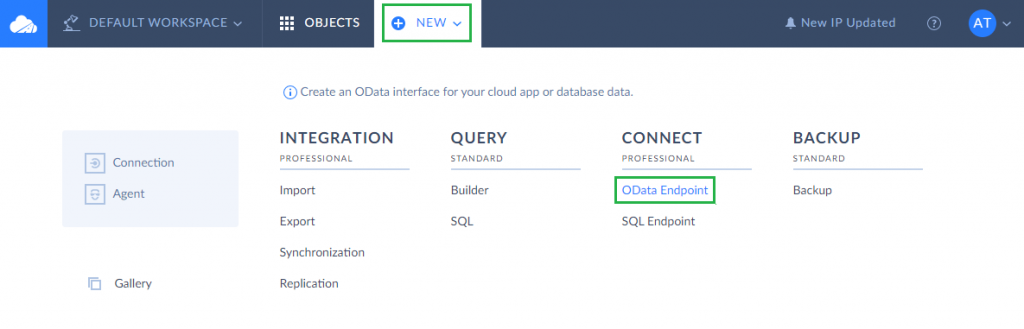
To create an OData endpoint, click +NEW in the top menu and select OData Endpoint under Connect.
Skyvia offers two types of endpoint editor mode — simple and advanced. The advanced mode allows visually designing your OData endpoint, adjusting entities, customizing associations between entity types. As an example we select an advanced mode and open the OData Endpoint Wizard.
As the Wizard first step, you need to select SQL Server connection if you have created it earlier in Skyvia. If you haven’t, create it by clicking the +Add new button on the right and specify such SQL Server parameters as Server, User ID, Password and Database in the opened window.
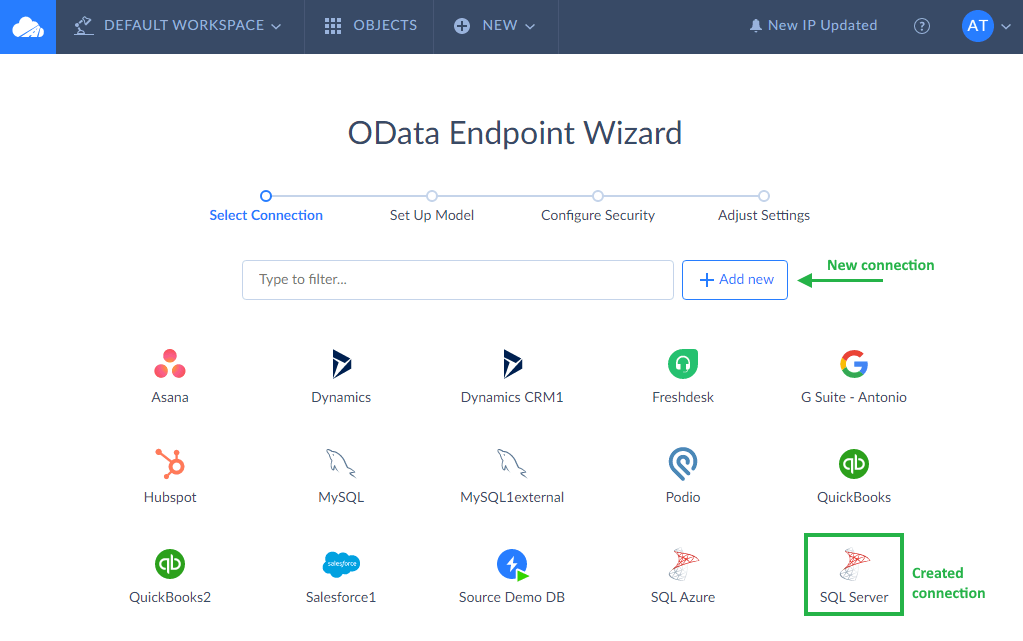
On the Wizard second step, define which data to publish via the endpoint — add SQL Server tables to the endpoint by dragging them from the list to the diagram. You can see how it looks on the screenshot below.
When you drag a table to the diagram, Skyvia automatically creates the corresponding entity set and entity type. Skyvia also automatically creates relationships (associations) with other entity types on the diagram. If necessary, you can edit or delete the generated relationships or even create your own custom ones.
You can freely configure OData entities of your endpoint, which means you can change the generated names of entity types, their properties and entity sets. Additionally, you can exclude data source columns from entities so that they are not available via the endpoint and many more.

On the Wizard third step, you optionally change endpoint security settings. Namely, you can add user accounts with passwords to make your endpoint data available only for authenticated users. Additionally, you can allow access to your endpoint only for the specific IP addresses.
On the Wizard final fourth step, specify the new endpoint name and configure additional settings such as an OData protocol version and endpoint access mode.
Skyvia Connect supports OData v1-v3 (ATOM format used for returned data and metadata) and OData v4 (JSON format used for returned data and metadata).
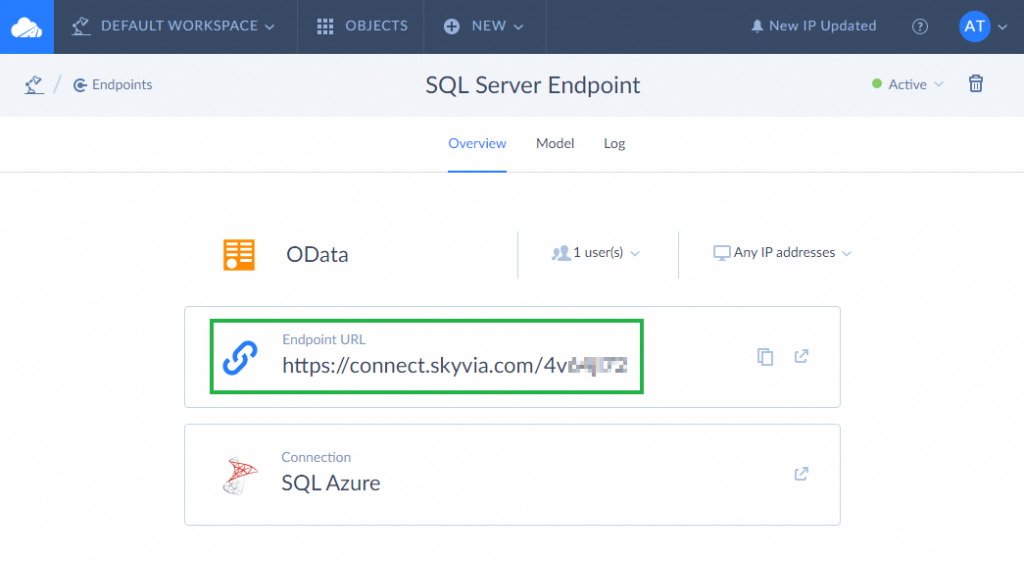
After the endpoint has been created, you copy its URL on the Overview tab and use it in Salesforce Connect (see step 2)
STEP 2: LINK SQL SERVER DATA TO SALESFORCE VIA SALESFORCE CONNECT (SALESFORCE LIGHTNING)
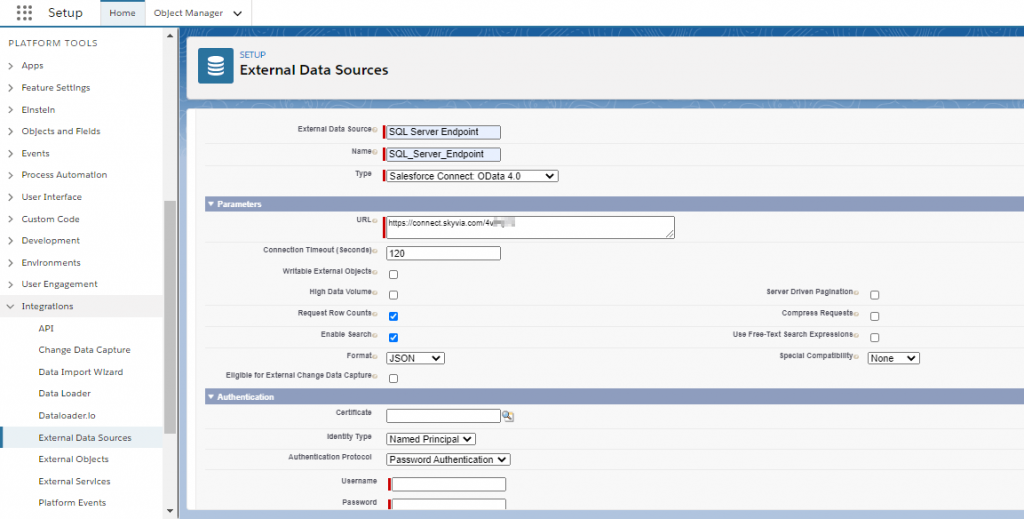
With Salesforce Connect, you link SQL Server data obtained via the OData protocol in Skyvia to Salesforce as external objects and then work with these data as with usual SFDC objects.
For this, sign in to your Salesforce account and click Setup. In the menu on the left, under Platform Tools, click Integrations and then select External Data Sources. In the opened window, specify your OData endpoint name, select OData version, enter your endpoint URL copied from Skyvia, select corresponding checkbox if you use an endpoint to a writable data source and finally configure authentication settings if you created user accounts with passwords for your endpoint in Skyvia.
Select exposed tables you want to synchronize. This will create the necessary external objects automatically.
After defining external data source and external objects, you may add tabs for external objects in order to work with them via Salesforce UI.
To try Skyvia Connect yourself, register on our platform and receive a free plan automatically. You may also turn to our technical support for no-cost consultation.
There are surely a number of other methods to connect Salesforce data to SQL Server and in the reverse direction — SQL Server native, like bcp utility, and third-party tools. However, we cannot cover all the methods in a single blog article. We have focused on the most effective and reliable ones, and you can decide on your own which method is the right choice for you. We hope this article was useful. You are welcome to leave comments, suggestions and questions if you have any.
