Table of contents
- What is Salesforce?
- What is QuickBooks?
- Why Do You Need Salesforce and QuickBooks Integration?
- Method 1: Manual Integration Using Salesforce Connector by QuickBooks
- Method 2: Manual Integration Using REST API
- Method 3: No-code Skyvia Data Integration
- Data Integration Salesforce to QuickBooks Best Practices
- Summary
Sales and accounting teams use specific tools and services in their day-to-day work and closely interact to achieve business goals. They constantly exchange data between CRM and accounting systems. This article describes how to build data integration between two CRM and Accounting leaders, Salesforce and QuickBooks.
What is Salesforce?
Salesforce is one of the most popular cloud CRM tools for support, sales, and marketing management. Salesforce provides cloud services for sales and marketing, analytics, and reporting for better collaboration with partners and customers. Salesforce is an easy-to-use platform available worldwide. Its solutions cover the most critical business needs in one place. Salesforce open API offers flexible opportunities for integration with other services.
What is QuickBooks?
QuickBooks is a powerful accounting solution for managing and controlling finance-related processes. This accounting software helps to monitor company cash flow, control profit, and expenses, manage analytics and reporting, assisting with critical financial decision-making.
Why Do You Need Salesforce and QuickBooks Integration?
Accounting, sales, and other teams constantly collaborate and share data, including customer information, expenses, sales orders, and invoicing. Manual data exchange slows business processes and may lead to human errors.
Accounting and CRM data integration improves business productivity, optimizes company resources, and results in better reporting and forecasting.
QuickBooks integration with Salesforce eliminates manual operations, saves time, and mitigates the risk of human errors by automating repetitive routine processes.
With Salesforce and QuickBooks integration, you’ll be able to exchange financial information with your sales department.
QuickBooks solutions are represented by Desktop and Online versions. QuickBooks Desktop integration with Salesforce is possible with such solutions as DBSync and InterWeave.
In this article, we will pay more attention to the Online version and describe three QuickBooks Online and Salesforce integration options.
Manual Integration Method Using Salesforce Connector by QuickBooks
QuickBooks offers the manual method of integration with Salesforce. Salesforce Connector by Quickbooks is a tool to exchange data between Salesforce and QuickBooks Online Advanced. It pulls Salesforce opportunities into QuickBooks Online Advanced as invoices. It performs Import in one direction only and requires additional expenses.
To perform manual QuickBooks Salesforce integration, you should do the following:
- Get the Salesforce Connector by QuickBooks app from the QuickBooks Apps center.
- Authorize into QuickBooks Online Advanced account, accept the Terms of Service and Privacy Statement and let QuickBooks login to your Salesforce account.
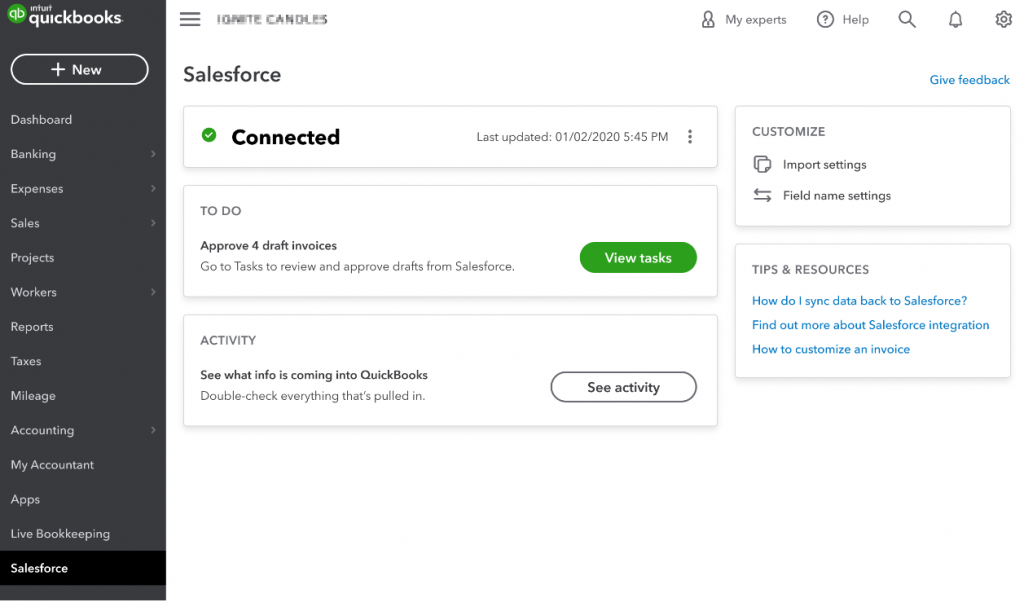
- Select Salesforce Opportunity records to be pulled by setting the filters by type and stage if needed.
- Select the item which should be created in QuickBooks from Salesforce opportunities.
- Map the source and target fields. If some Salesforce fields do not match QuickBooks fields, you can create custom fields in QuickBooks and map them.
Pros
- Quick and easy way to create document drafts ready for approval.
- No specific skills are needed to set up the integration.
- The integration app is QuickBooks authorized, no third-party apps are needed.
Cons
- The app is only available in QuickBooks Online Advanced and for Salesforce Professional and higher subscription plans.
- No flexible integration options. It allows syncing only Salesforce Opportunity records. Thus, it is not helpful if you need to integrate other objects.
- Only manual integration launch is available. It does not offer real-time integration or automatic execution.
Integrate QuickBooks with Salesforce Using REST API
This integration method provides flexible opportunities for Salesforce QuickBooks integration.
The QuickBooks Online Accounting API allows integration for any app supporting REST API with QuickBooks and Salesforce in both directions in real-time.
This method requires specific technical skills and deep REST API knowledge.
You need to use the REST API to access QuickBooks online, which is documented on developer.intuit.com.
To set up integration with QuickBooks using REST API perform the following steps:
- Create a developer account in QuickBooks. Sandbox company will be created automatically in this case.
- Create an app and define the scopes. Scopes help you to manage access to your accounting data.
- When the app is created it gets unique credentials: Client ID and Client Secret.
- The app needs to obtain an access token to exchange data with QuickBooks Online. If users grant permission, QuickBooks OAuth 2.0 Server sends an authorization code back to your app. This code is exchanged for access tokens. These tokens are tied to users’ now authorized QuickBooks Online company.
- Before performing any transaction via API you have to create the common basic predefined entities in QuickBooks such as accounts, tax codes, and customers.
Now you can perform API calls to QuickBooks and make integration actions as per the API Reference. You can refer to commonly used use cases documented by QuickBooks.
Salesforce offers several web interface options to access its data, REST API is one of them. To access your Salesforce data using REST API, you need a Salesforce org with API access and the API Enabled user permission within that org.
To connect to Salesforce data via API you should do the following:
- Sign up with the Developer edition. Developer edition provides you with the Salesforce org for development and testing. If you already have a sandbox or development org, you can use it for Salesforce REST API integration.
- Confirm that you have API Enabled as permission for your user profile by following the instructions in User Permissions in Salesforce Help. For Developer Edition, this permission is assigned by default.
- Create a Connected App. Sign in to Salesforce, click Setup –> App Manager –> New connected App and insert the basic information about your app according to the instructions. Then you have to enable OAuth Settings for API Integration.
- Get a Consumer Key and a Consumer Secret.
In the Salesforce Setup menu, enter App Manager in the Quick Find box, and then select App Manager. Click the dropdown menu for the connected app that you created and select View. Copy the Consumer Key and Consumer Secret values and save them for later use in this quick start. - Set up authorization. Send a request to the Salesforce OAuth endpoint following the recommendations.
Now you can perform API calls to Salesforce and make integration actions per the API Reference. You can refer to a commonly used examples documented by Salesforce.
Webhooks and Triggers
You can use another type of API for QuickBooks Salesforce integration. This method allows implementing real-time, one-direction integration using webhooks.
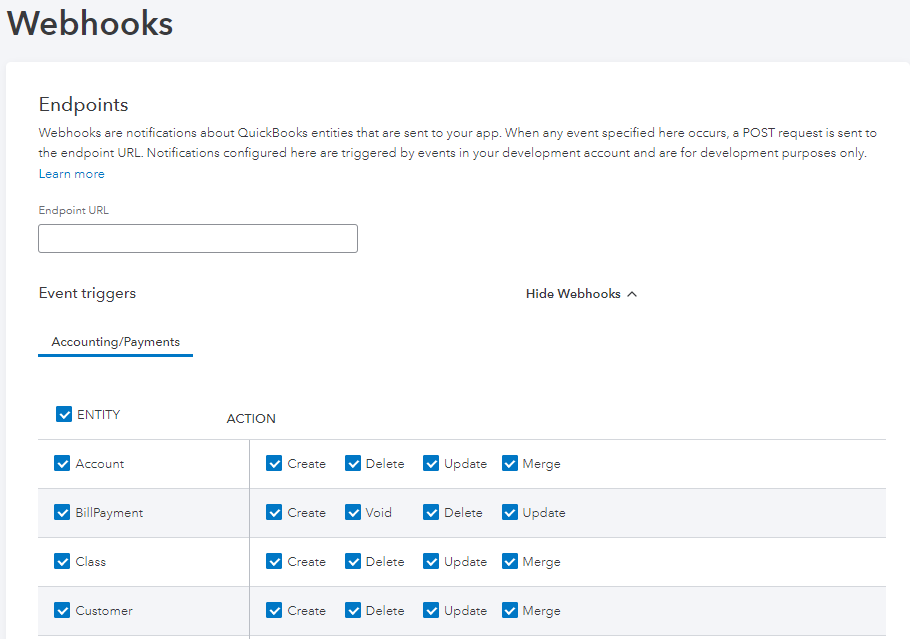
Webhook is a feature that works the following way: when something in the data has changed, webhook sends the notification about these changes. To implement a webhook you have to configure the entity and the event to notify you about and establish a URL on the receiving end to accept the data.
To use webhooks in QuickBooks, you need to configure an endpoint QuickBooks servers can call whenever the notifications are triggered. You have to configure webhooks separately for sandbox and production environments.
The details on how to use webhooks in QuickBooks are available in QuickBooks documentation.
Salesforce also supports the entities’ changes tracking and notifying process. Salesforce has a built-in tool called Apex Triggers. Apex triggers enable you to perform custom actions before or after changes to Salesforce records, such as insertions, updates, or deletions. You can learn more about Salesforce triggers in Salesforce developer docs.
Pros
- It is flexible, you can access any available object and perform any possible data-related operation.
- You fully manage your integration and decide what web service to use and how to set the integration up.
- You can develop your app and meet your specific requirements.
- Real-time integration is supported using webhooks.
Cons
- You need a developer account in QuickBooks and Developer edition in Salesforce to use this method.
- It requires programming skills.
- It is complicated and requires a lot of time and resources for development and testing.
No-code Integration Salesforce and QuickBooks using Skyvia Cloud Connections
There is a no-code method to automate Salesforce and QuickBooks Online data integration in both directions, which offers flexible integration opportunities and does not require specific skills.
Skyvia offers a reliable solution for QuickBooks Salesforce integration. You set up the integration manually and then it works automatically according to the settings.
We will describe the simple bi-directional Salesforce QuickBooks integration use case. We will insert new records into QuickBooks Customers from Salesforce Contacts data and vice versa.
- Sign up with Skyvia for free to start implementing your use case.
- Create a connection with QuickBooks.
- Click +NEW –> Connection in the top menu and select QuickBooks connector.
- Click +NEW –> Connection in the top menu and select QuickBooks connector.
- On the Connection Editor page, specify a connection name and Select QuickBooks environment.
- Optionally, change the Metadata Cache parameter value. This parameter determines for how long the cached metadata for the connection is considered valid.
- Click Connect to QuickBooks, enter your QuickBookscredentials and click the Sign In button. Select a QuickBooks company, wait until the token is generated, and then click Create Connection.
3. Create a connection to Salesforce.
- Same as for QuickBooks, click +NEW –> Connection in the top menu and select Salesforce connector.

- Specify a connection name, select Salesforce environment, and authentication type.
- If you have selected Username & Password, you need to specify your Salesforce username, password and security token. To generate the security token, log in to the Salesforce website, click Setup, then select My Personal Information -> Reset My Security Token.
- If you have selected the OAuth 2.0 authentication type:
Click Sign In with Salesforce. In the opened window, enter your Salesforce credentials and click Log In. After the OAuth token has been generated, click Create Connection. - You can optionally specify the advanced settings.
If you need help with connection to Salesforce, please visit https://docs.skyvia.com/connectors/cloud-sources/salesforce_connections.html
4. Create an Import package.
- Click +NEW and select Import in the top menu.
- Rename the package, otherwise it remains untitled.
- On the left select the ‘Data Source database or cloud app’ Source type.
- Select your Salesforce connection as a Source and QuickBooks connection as a Target.
- Click Add task on the right to create Import task.
5. Specify the Source settings. In the new Task Editor window on the Source definition tab select the Simple task editor mode.
Select the Contacts table and specify the filters if necessary.
You can use Advanced mode. When the query or command is ready, click Next to proceed.
More details can be found in the Import task creation manual.
6. On the Target Definition tab select the Customers table as a target and choose the action you need to perform against the target table.
7. As Salesforce and QuickBooks tables have different structures, the fields should be mapped. You can do it on the Mapping definition tab. Skyvia allows using different mapping types. You can map column to column directly. Or use the expression, if you need to cast the data type or set the processing condition. Detailed descriptions of all available mapping types are available here.
After the mapping is completed, Save the task and then Save the package.
8. You can run the package manually or set the schedule for the package to run automatically.
9. After the package run is completed you can check the run result in the package run history on the Monitor and Log tabs.
10. To perform the import in the opposite way from QuickBooks Customer to Salesforce, you have to create another Import package according to the above steps. In this case, you select QuickBooks as a Source and Salesforce as a Target, add the Import task, map the needed fields, and set the schedule if needed. It is not recommended to overlap the schedules if both packages process the same tables.
That’s it; we have performed Salesforce Contact and QuickBooks Customer bi-directional integration.

Other Skyvia Opportunities
Skyvia offers another option for bi-directional integration –Synchronization package. It copies all the data from Source to Target and vice versa during the same run. This way is possible when the objects support this type of integration.
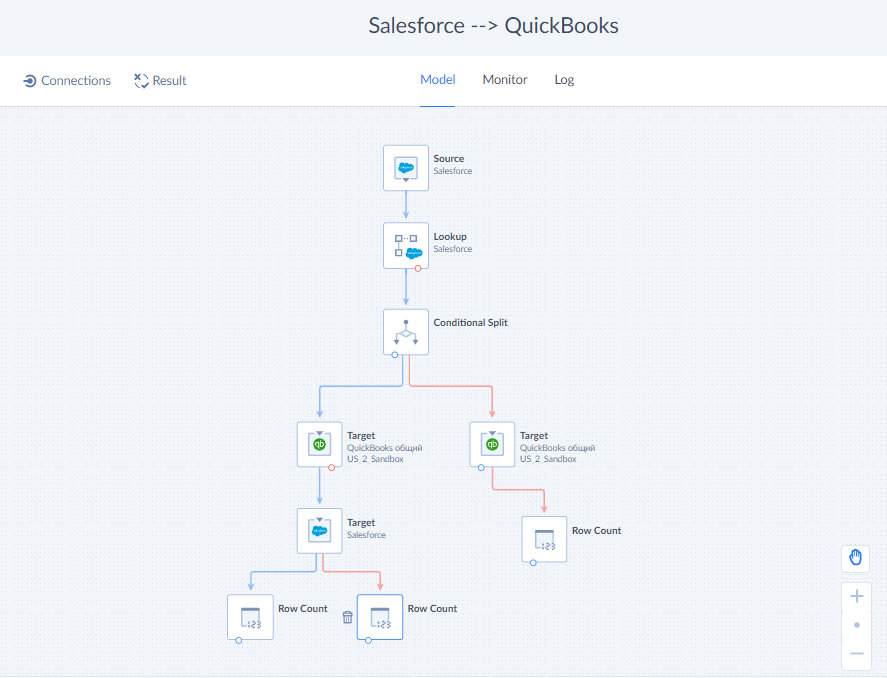
For more complicated data pipelines Skyvia offers more advanced integration scenarios using Data Flow or Control Flow. These tools allow creating the complex flows with data splits, conditions and other data manipulation opportunities. Data Flow and Control Flow data pipelines allow integrations not only for Salesforce and QuickBooks, but for a number of other connectors.
This approach may seem more advanced and it may require technical skills, but you can use a simple Data Flow guide or you always can get help and answers to any questions from Skyvia support.
Pros
- Skyvia Cloud Salesforce QuickBooks Integration is available from any place in the world.
- It does not require any additional application installation. You save the storage space and do not threaten company security.
- You don’t need any specific knowledge and skills to build the integration between Salesforce and QuickBooks in Skyvia.
- It is safe. All the actions performed by Skyvia are limited by the permissions granted to the user, on whose behalf the connection is created.
- You are free to choose what objects to integrate and what operation to perform.
- Skyvia integration does not limit the number of integrated tables, it doesn’t matter if the object is default or custom.
- It has no data volume limits, you pay for successfully processed records count.
Cons
- This approach requires some time and resources for integration set up.
- It does not support real-time integration, like webhooks. However, you can set the integration schedule close to real-time sync, running every several minutes or more frequently.
- Only QuickBooks Online version is supported, however the Desktop version support is under development right now.
Skyvia is a freemium cloud data integration tool, so you can register and start integrating Salesforce and QuickBooks data right now. You can also learn more about available scenarios here or on the official QuickBooks marketplace.
Data Integration Salesforce to QuickBooks Best Practices
- Make sure your Salesforce and QuickBooks subscriptions and versions support the planned integration. QuickBooks has online and desktop versions.
- Plan your integration scenario. Think of the use case logic. Carefully think about what objects you will integrate, what data you will exchange, what actions you will perform, and what result you expect.
- Plan whether the integration should be performed in one direction or should be bi-directional.
- Plan the frequency of the integration executions. Think of whether it should be real-time, manually launched on sporadic occasions, or you need to run it by schedule.
- Make a decision on what integration type to choose based on the above prerequisites.
- Evaluate the ROI of the integration.
- Think about how QuickBooks and Salesforce business processes will change after the integration is implemented. Evaluate the processes’ compatibility.
- Think of the most relevant testing scenarios and test the integration carefully.
Summary
Sales and accounting teams collaborate in day-to-day activities using different tools to achieve business goals. Data exchange between both teams is necessary to perform business tasks. Thus, integration between Salesforce and QuickBooks is a great solution to reduce the amount of manual routine operations and mitigate the risks of human mistakes.
This article described several Salesforce QuickBooks Online integration options and analyzed their pros and cons. The manual method is perfect for the simple one-way integration case to import Salesforce opportunities to QuickBooks. REST API integration is more flexible, but it has many requirements and prerequisites for implementation. The golden mean, in this case, is the no-code integration with the no-code cloud data integration with Skyvia. It is a relatively simple online tool for QuickBooks Salesforce integration. It does not require programming skills and coding for setup. It gives wide opportunities for different scenarios implementation. It allows the implementation of bi-directional integration and other complex use cases.
You can find more details about Skyvia data integration opportunities here.
You can register in Skyvia for free and start implementing your Integration use case.