

Summary
- Skyvia for rapid no-code cloud integration.
- Qlik Replicate for strict enterprise on-premise scenarios.
- Airbyte for developer-heavy teams seeking open-source control.
- Striim for near real-time sub-second streaming.
Many years ago, I used to work at a company where data only lived in SQL Server. Today, they have cloud storage, Salesforce, and more. Like them, if SQL Server is just a piece of your analytics puzzle and you want to easily scale analytics along with growing cloud-native workloads, SQL Server to Snowflake can be a viable solution.
But how can you do that?
This article gives you four tool options. But first, let me give you a full disclosure: We are the team at Skyvia. We build a cloud-based ETL/ELT integration tool, so of course, we want you to use it. However, we are engineers first. In this guide, we are not going to tell you that Skyvia is the perfect solution for everyone. Instead, we’ll honestly compare our product with market leaders based on real technical specs, hands-on tests, and specific use cases.
Let’s begin.
How Did We Test These Integration Methods?
We spent 40 hours preparing the test data, making the connections to SQL Server and Snowflake, creating the pipelines and timing them, and seeing the results in Snowflake. You will see real screenshots from the tools and real data pipeline results.
Our Sample Data
But first, I prepared sample data with the structure below:
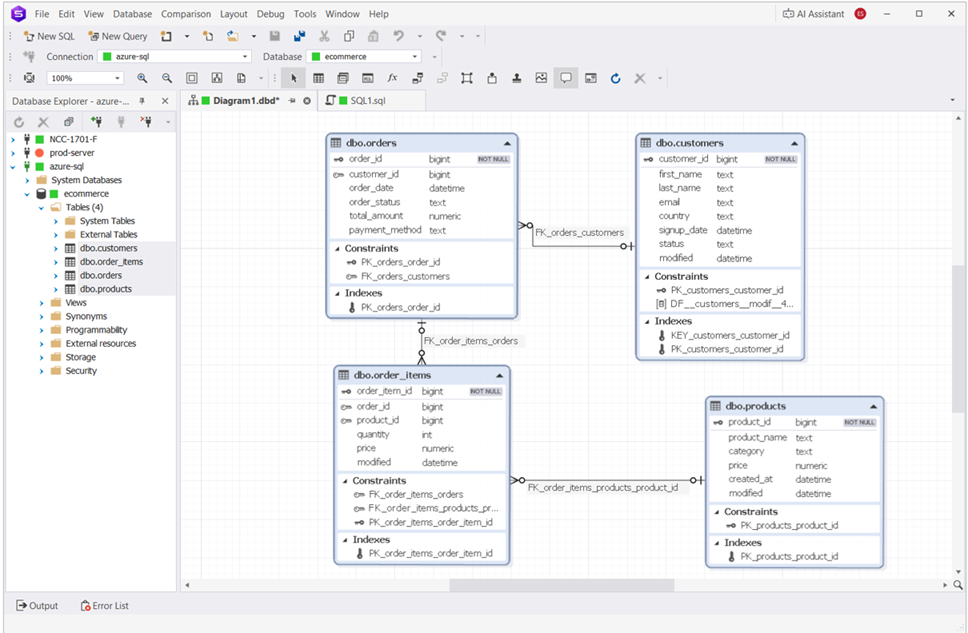
That’s a SQL Server database in Azure. It has 651 customers. These names are not from real people. You can preview some of them below:
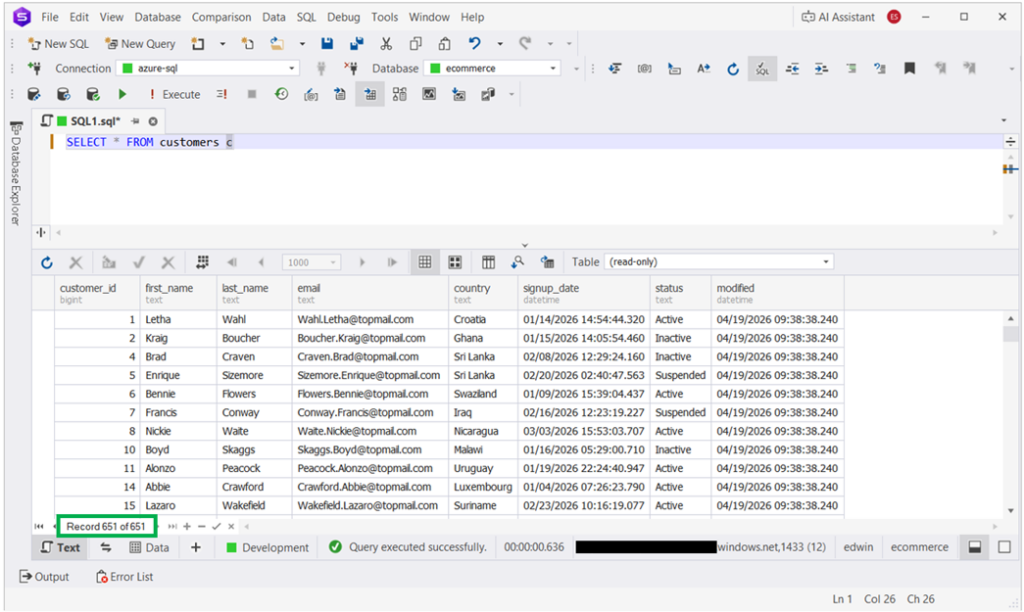
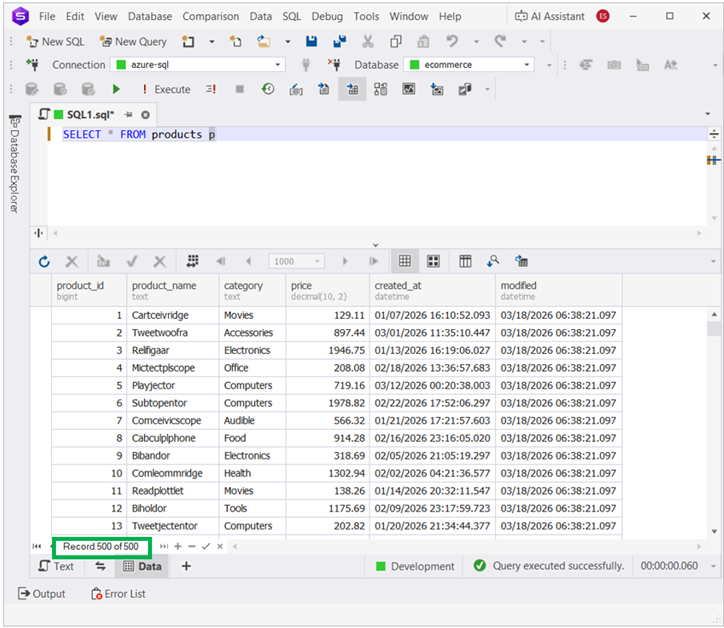
I also have 500 products, and 13 of them can be seen below:
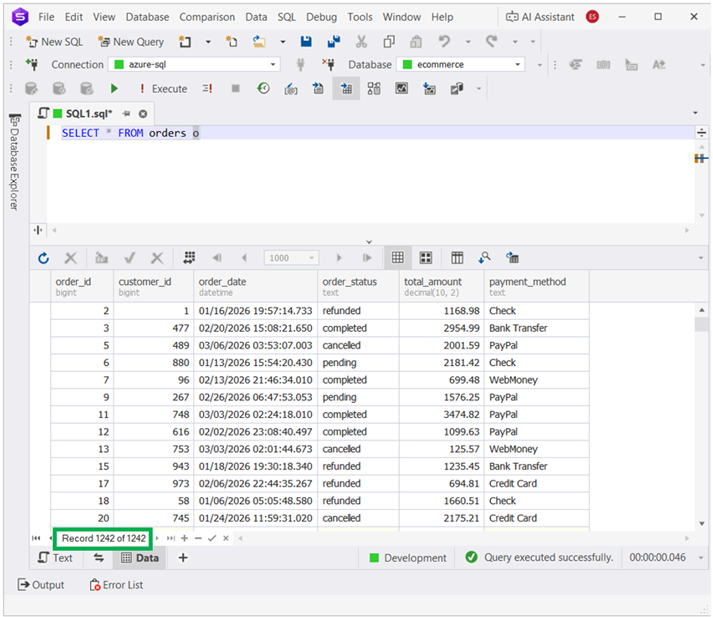
Most of the customers were used in 1242 orders. You can see a few of the orders below:
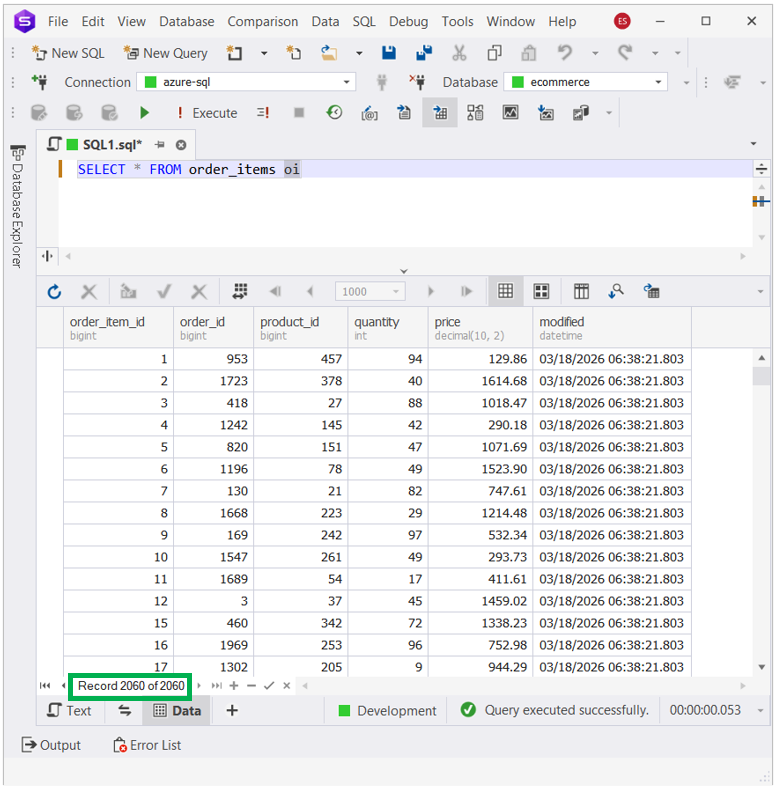
Finally, these orders have a combined 2060 order items with products from the table above.
Using this small sample, you will see how data will move from SQL Server to Snowflake using Qlik Replicate, Airbyte, Striim, and Skyvia. Each has its own strengths, and one of them may fit your business case.
Snowflake Database Structure
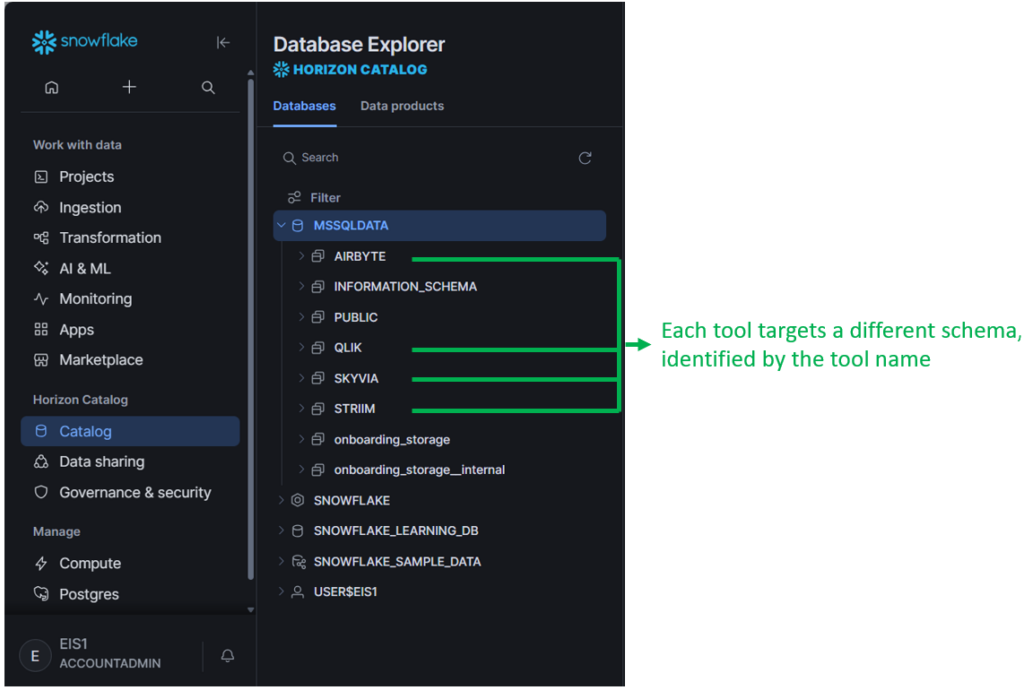
We organized the database in Snowflake so that each tool will migrate data into its respective schema. This also assures us that no tool will overwrite another’s copy of data. That way, you will also see how these tools will stage and write the final results in Snowflake.
See the schema organization below in Snowflake. These schemas are empty from the start. No tables, stages, or other Snowflake objects.
I have used Snowflake before in a similar test. It requires Multi-factor Authentication (MFA), so a username and password authentication won’t work. I already have a setup for it when I migrated HubSpot to Snowflake. You can check the setup from there to avoid connection problems.
For this test, I still need to add permissions to a new Snowflake database with several schemas. I used the one below.
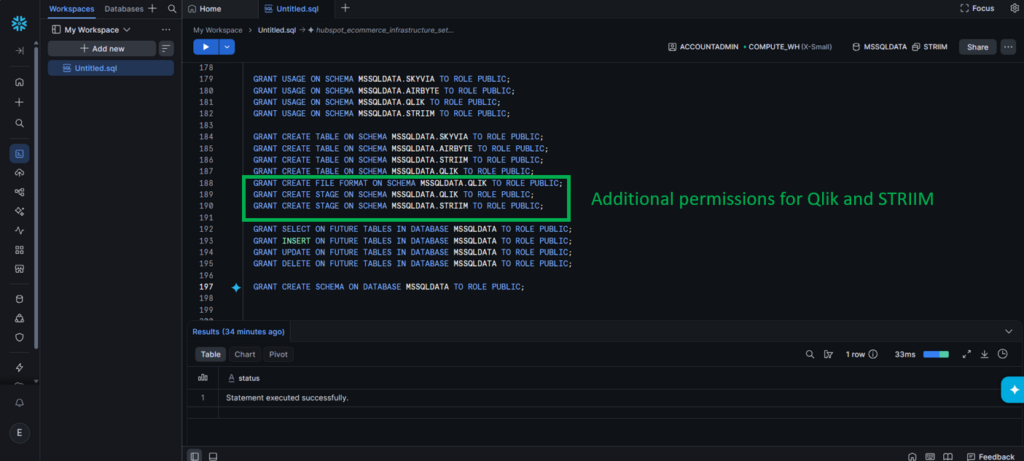
Qlik Replicate and Striim will have extra permissions, and you will see why later.

Why Should You Migrate from SQL Server to Snowflake?
Organizations typically replicate SQL Server data to Snowflake when they need to combine it with data from many other systems, support larger-scale analytics, enable cloud-native workloads, or reduce the operational complexity of managing a growing analytics platform.
This doesn’t mean that SQL Server is bad at data warehousing. Their architectural differences and your actual requirements may prompt you to choose Snowflake. Let’s compare SQL Server’s Symmetric Multiprocessing and Snowflake’s Massively Parallel Processing:
| Aspect | SQL Server (SMP) | Snowflake (MPP) |
|---|---|---|
| Architecture | One server with many CPUs and memory | Many compute nodes working together |
| Scaling | Mostly vertical (bigger machine) | Mostly horizontal (more machines) |
| Query execution | Parallel threads on one server | Query split across many nodes |
| Storage | Attached to the SQL Server instance | Shared cloud storage, separate from compute |
| Compute | Single SQL Server instance | Multiple independent virtual warehouses |
| Concurrency | All users compete for the same server resources | Different warehouses can serve different users simultaneously |
I have worked with a company with SQL Server as their only source of different datasets. It’s enough for their needs. Snowflake may be the answer if SQL Server’s SMP no longer meets your reporting and data analysis needs.
What Are the Comparison Criteria for Migration Tools?
How would you choose? The most common criteria are the ones below. So, your team should evaluate based on your requirements, not according to marketing.
- Data Capture Method – Does the tool use query-based extraction or log-based Change Data Capture (CDC)? Log-based CDC generally has less impact on the source database and is better suited for near real-time replication.
- Infrastructure Requirements – Is it a fully managed SaaS solution, or does it require self-hosted agents, gateways, Docker containers, or virtual machines?
- Ease of Setup – How quickly can you configure a working pipeline? Consider connector availability, authentication, schema mapping, and ongoing maintenance.
- Performance and Scalability – Can the tool handle large tables, high transaction volumes, and growing datasets without significant performance degradation?
- Pricing Predictability – Is pricing based on rows processed, compute time, connectors, or subscriptions? Consider how costs will change as data volume grows.
Which Tools Are Best for Specific SQL Server Use Cases?
Summarized below is how each tool compares on specific use cases:
| Use Case | Best Tool |
|---|---|
| No-Code Cloud Integration | Skyvia |
| Enterprise Legacy and Strict On-Premise | Qlik Replicate |
| Developer-Heavy Teams | Airbyte |
| Real-time Streaming | Striim |
In the next sections, you will see in detail why we chose one over the other based on the use case.
What Is the Best Tool for No-Code Cloud Integration?
No-code cloud integrations mean you don’t need to code just to make a pipeline work. Though most of the tools in this guide have either fill-in-the-blanks or point-and-click features, the tool we chose here only needs people who are a bit techy or companies that barely have technical people. Though this is also attractive to developers who need quick wins.
We chose our own for this use case.
Skyvia
Skyvia is a cloud-first data integration platform, so work centers on using the browser. In this test, I used the Skyvia Replication.
It needs two connections: one for SQL Server and another for Snowflake. Then, those connections will be used in the Skyvia Replication as source and target. The tables to replicate are specified there too.
Let me show you what I have prepared.
Preparing the SQL Server to Snowflake Pipeline Using Skyvia
The SQL Server database I used is in Azure. I made a Skyvia connection for that with configurations illustrated below:
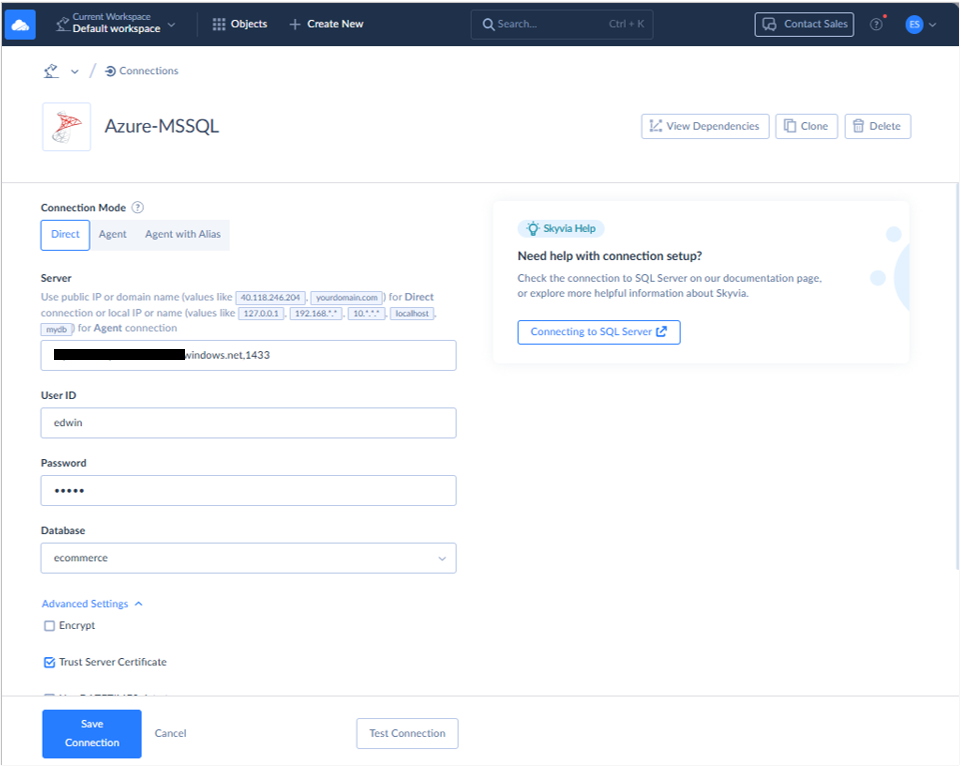
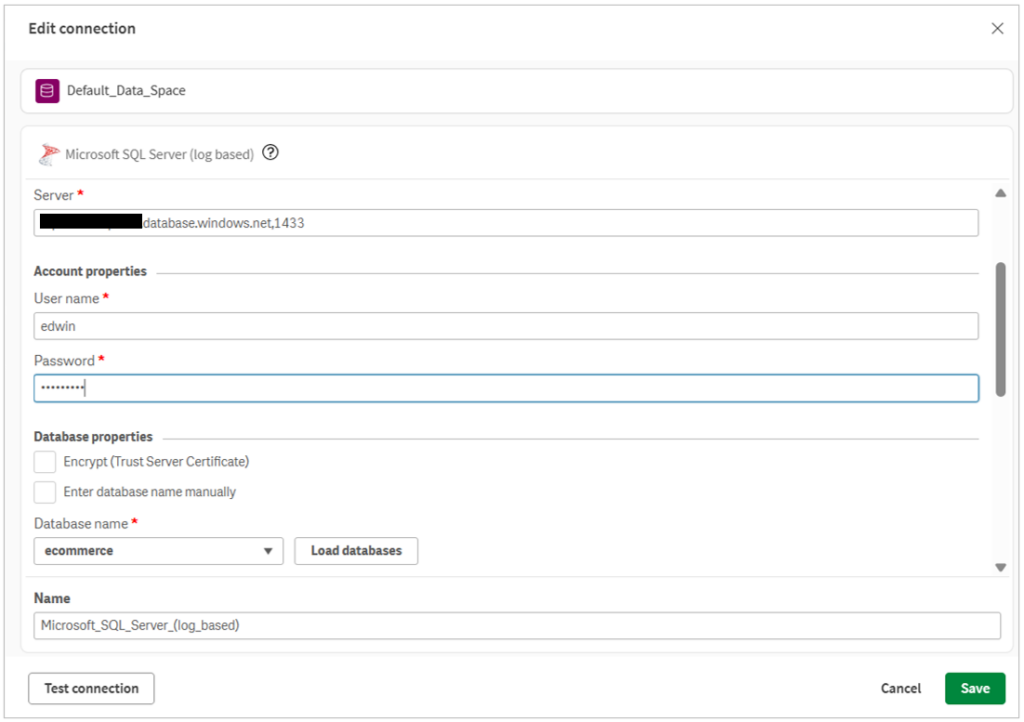
The important parts there are the Server (in Azure), the User ID, Password, and Database name.
Then, I prepared the Snowflake connection with the following configuration:
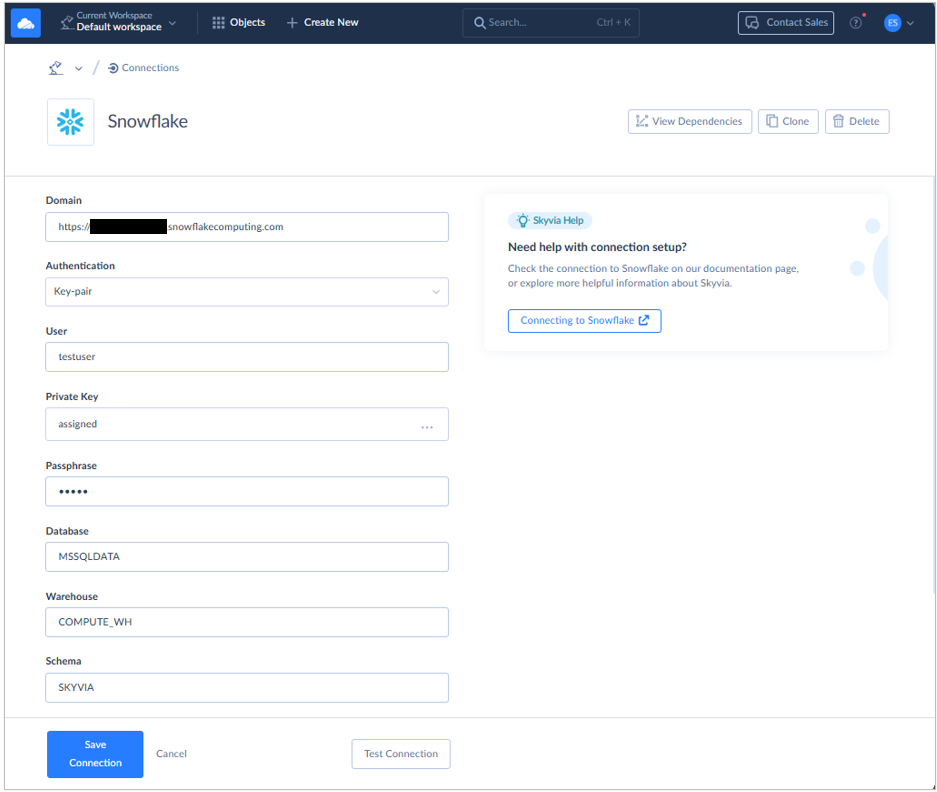
It needs the Snowflake URL, username, Key Pair authentication, a Private Key file, Passphrase, Database, Warehouse, and Schema. Note the SKYVIA schema because we want the replication process to write there.
Finally, the Replication pipeline. I used the SQL Server and Snowflake connections I made above. Then, I selected the customers, products, orders, and order_items tables.
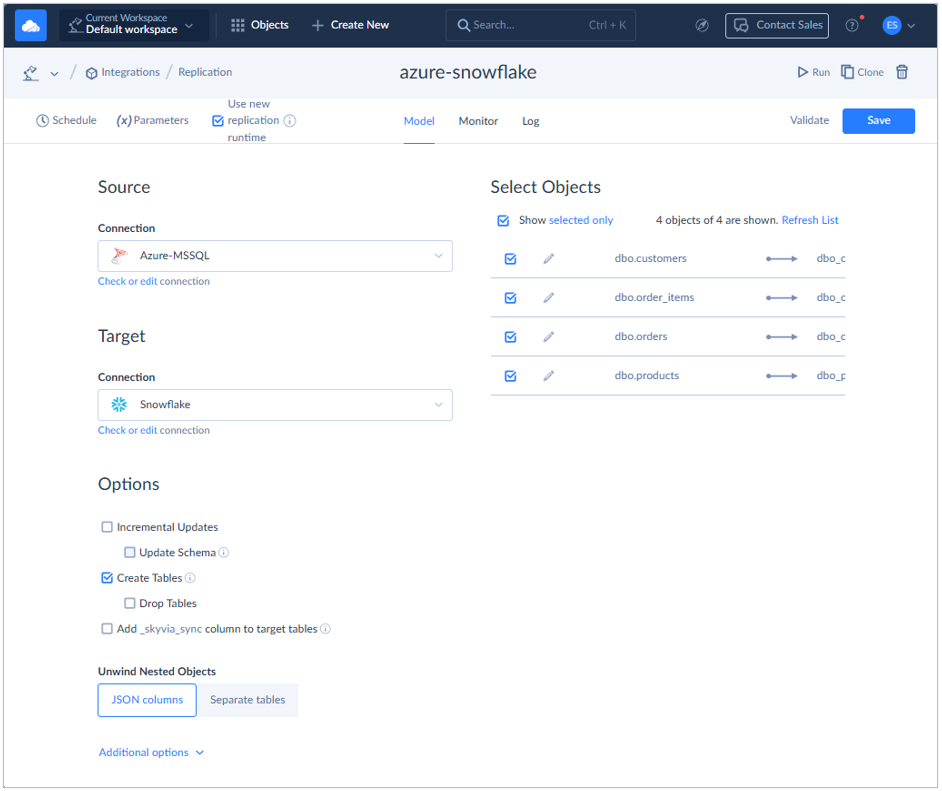
Because I’m used to setting this up, it only took me 5 minutes. Newbies can do this in 15 minutes. This is why Skyvia is for getting pipelines moving in a short time.
For more details on how to set this up, check out the tutorial video below:
The Runtime Results
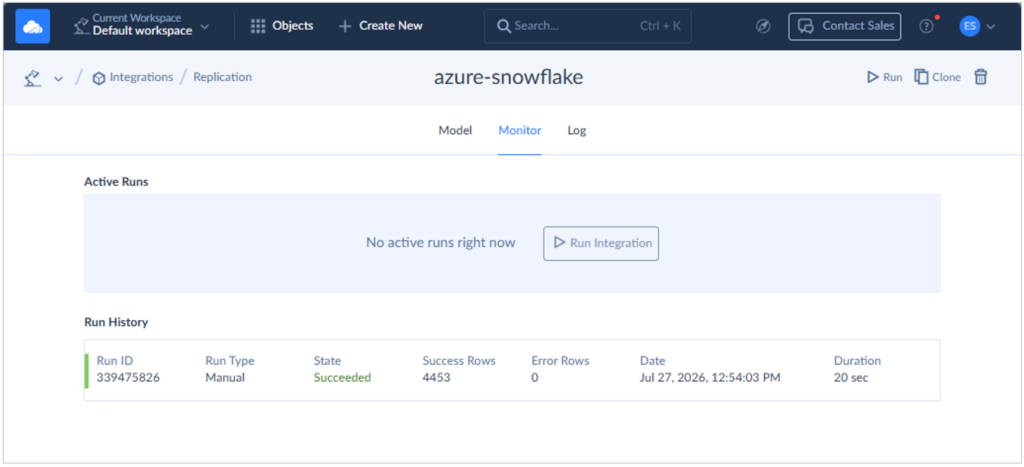
Note the runtime results below. It took the process 20 seconds to do the initial load to Snowflake.
Upon checking, the row numbers uploaded to Snowflake are the same as our test data earlier.
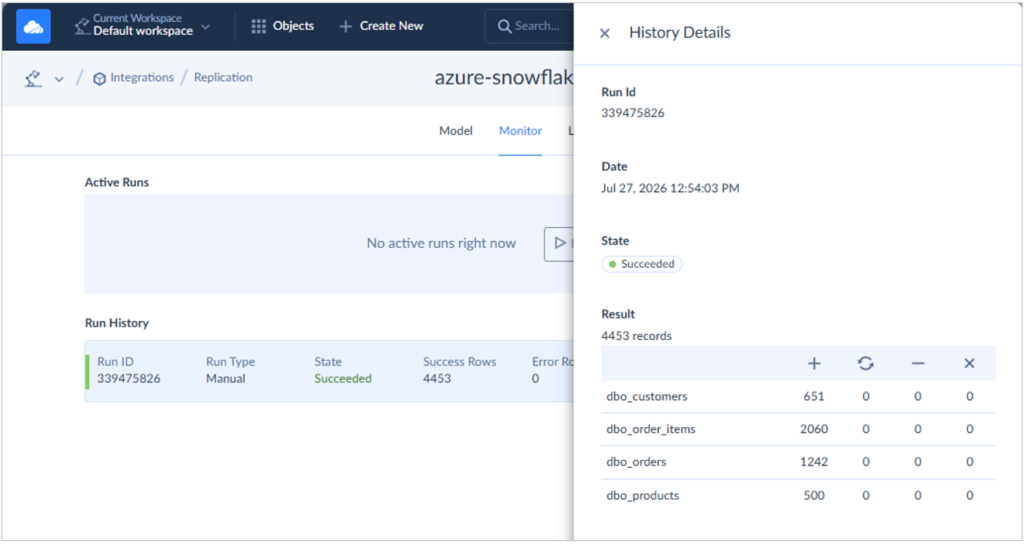
Skyvia prefixed the table names with the schema name used in SQL Server.
Validating the Results in Snowflake
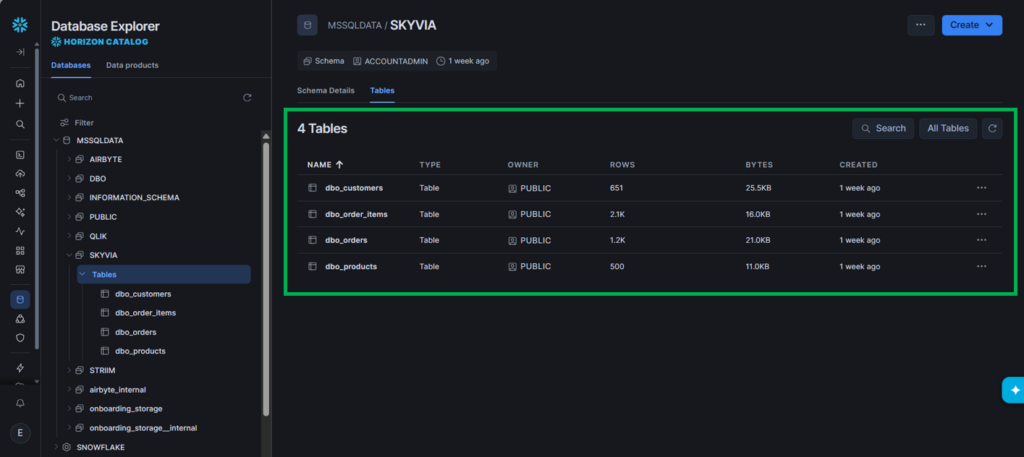
The results we’ve seen in Skyvia are also in Snowflake. The 4 tables and their row counts are the same as the sample data earlier.
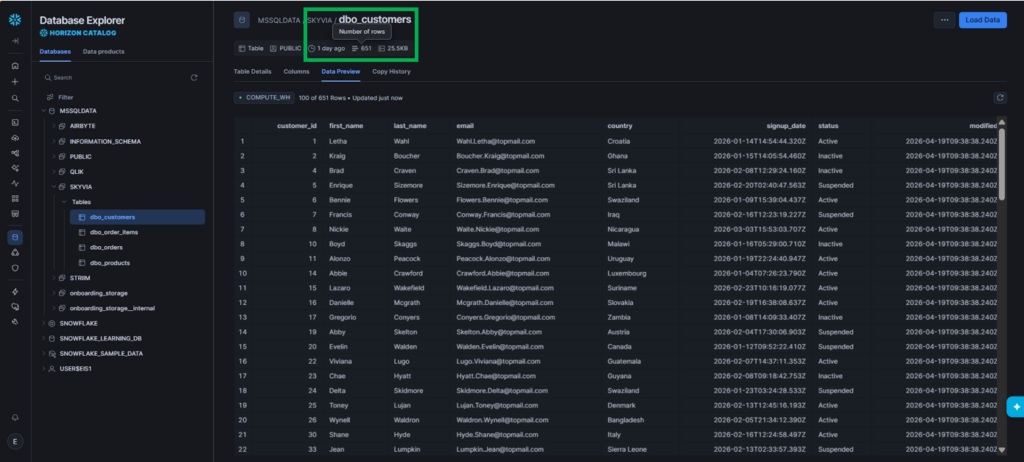
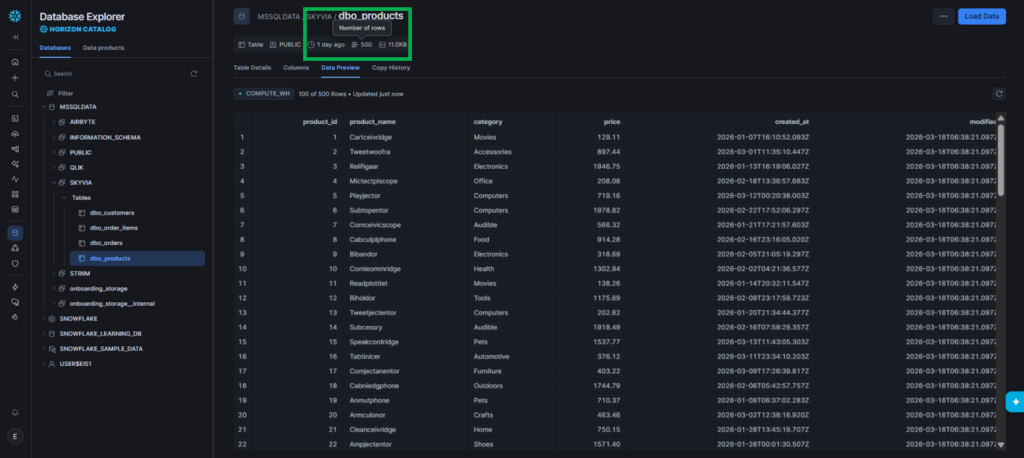
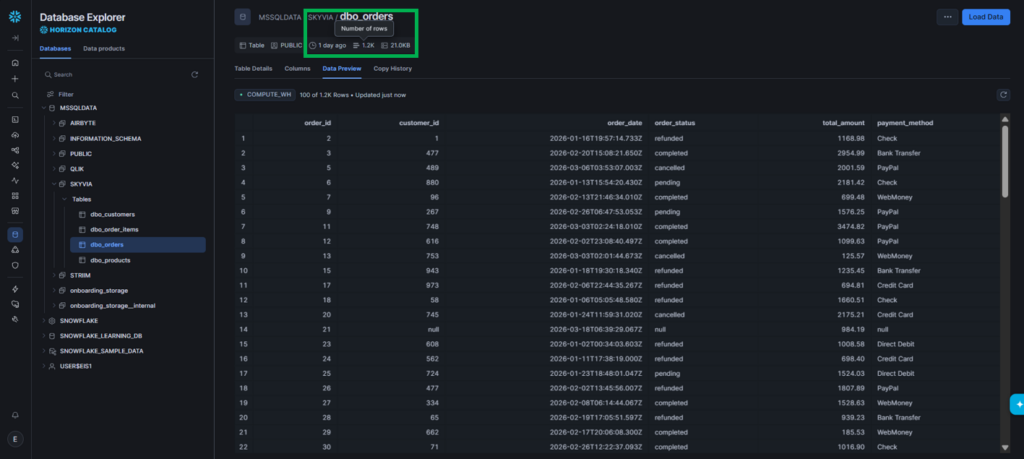
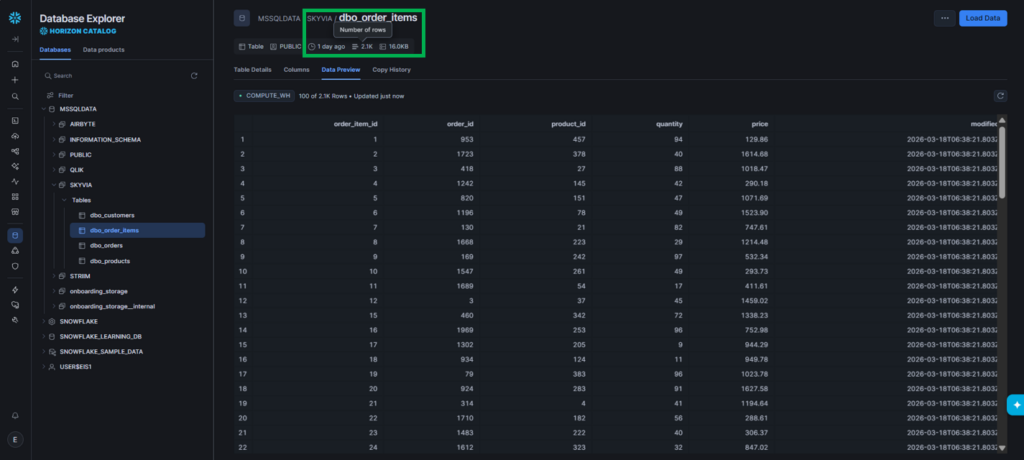
Here’s a preview of the uploaded customers. Boxed in green are the row counts, which is 651 customers.
Then, below is for products:
And then, for orders:
Finally, for order items:
The data was replicated as is for 20 seconds and verified in Snowflake.
Best for
Best for data-driven teams that want to get reliable pipelines running quickly without a long implementation cycle. A good fit for data engineers, analysts, IT teams, RevOps, and consultants who value fast setup, no-code workflows, and the flexibility to manage both analytics and operational data use cases.
Rating
- G2 : 324 reviewers rated 4.8/5
- Capterra : 116 reviewers rated 4.9/5
Pricing
I used my free tier account in this test, which is enough to process 5k rows of SQL Server data going to Snowflake. Skyvia also offers Basic, Standard, Professional, and Enterprise plans for more rows processed, better integration scenarios, better scheduling, and improved mapping functionality.
For more details, visit the Skyvia pricing page.
Pros
- Visual data pipeline builder with wizards and drag-and-drop features.
- No coding required; cloud-hosted with zero infrastructure to manage.
- Predictable pricing based on volume/credits rather than variable “active rows”.
Cons
- Not for highly-regulated companies requiring a 100% air-gapped, on-premise deployment with no outbound internet connection.
- Not built for real-time webhooks; the minimum scheduled sync frequency is 1 minute (incremental). Consider Striim for real-time processing.

What Is the Best Tool for Enterprise Legacy & Strict On-Premise?
If your company follows strict compliance and needs to house the data on infrastructure disconnected from the internet, a cloud-only SaaS platform like Skyvia is not an option. That’s why we chose Qlik Replicate.
Qlik Replicate
Qlik Replicate was previously known as Talend Data Integration before it was acquired. You can choose between fully-managed and on-premises services.
Similar to Skyvia, it needs two connections and a pipeline project.
Preparing the SQL Server to Snowflake Pipeline Using Qlik Replicate
I used the same SQL Server and credentials in Qlik Replicate to configure the SQL Server connection. See it below:
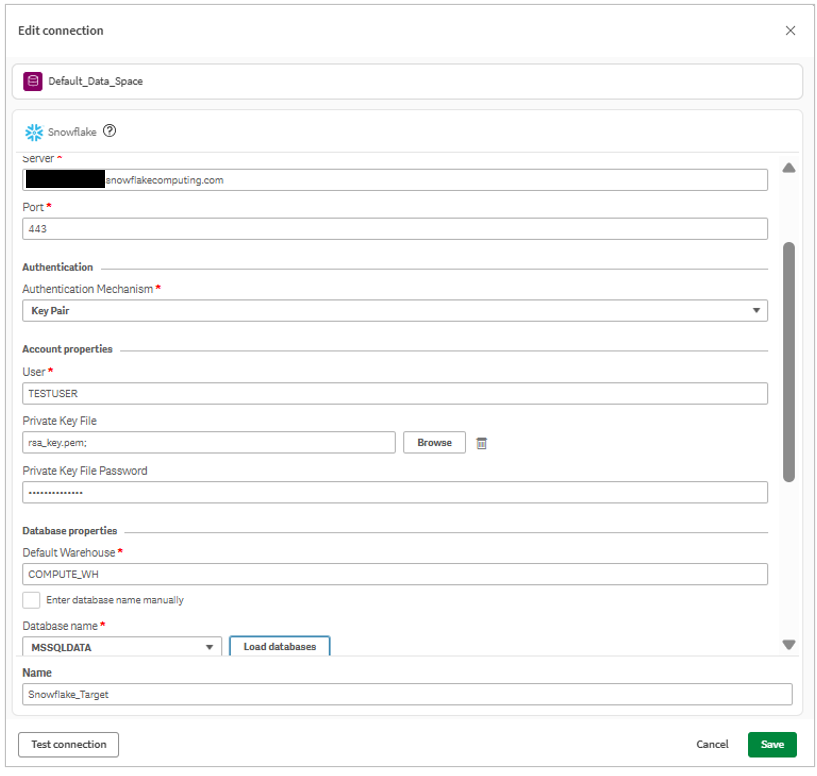
I also used the same configuration in Snowflake. Check it out below:
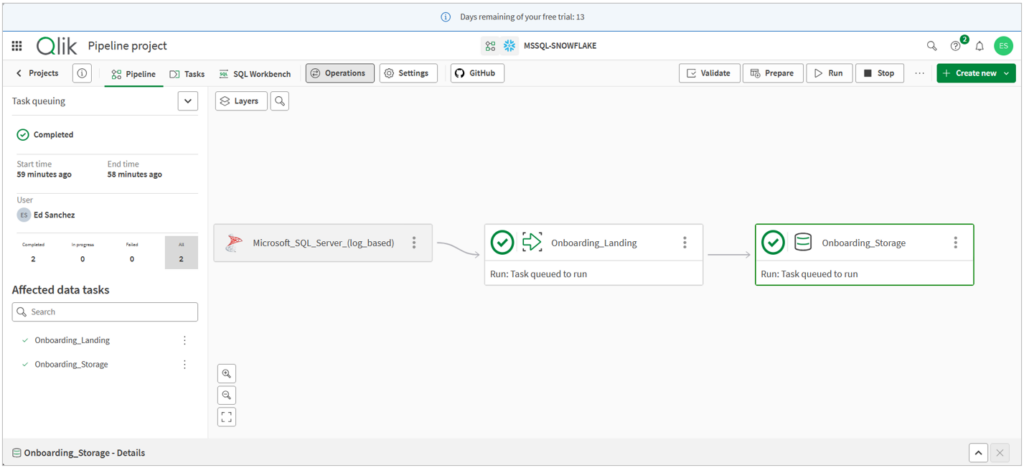
For Qlik, the pipeline will write the tables under the QLIK schema in Snowflake. Below is the pipeline design from SQL Server to Snowflake:
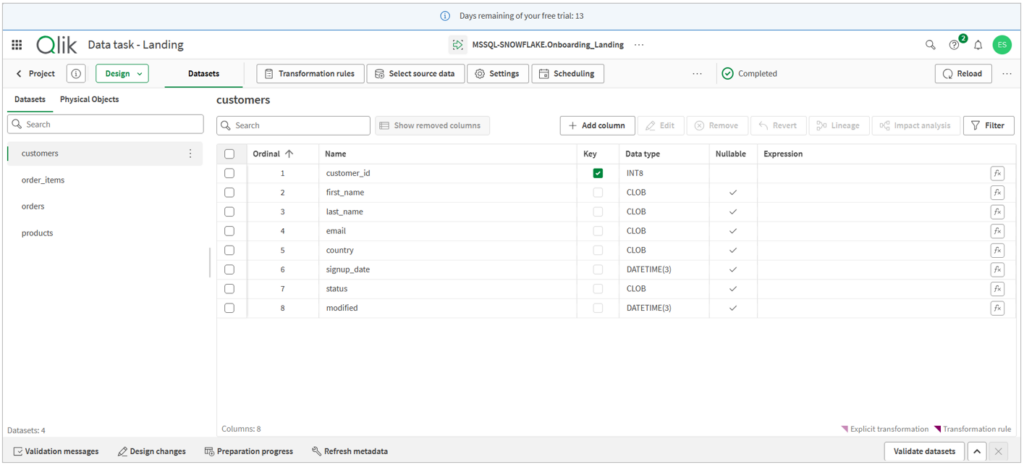
For the middle component (Onboarding_Landing), I set the same tables to replicate:
The Runtime Results
Though my Qlik Replicate setup is correct, I have to contend with permission errors. Qlik has a detailed log when an error occurs, so you have to dig in per line. I saw the permission error as having insufficient privileges in the QLIK schema in Snowflake. One of them is the following:
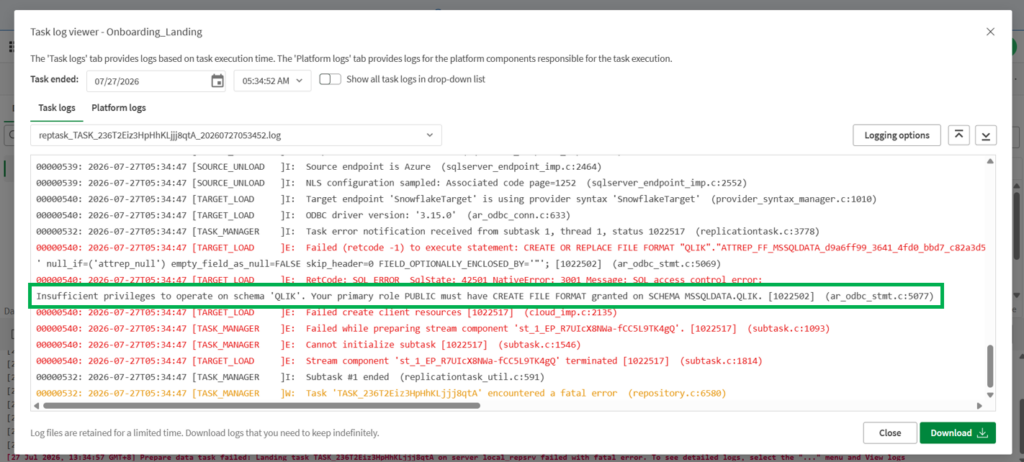
That’s why earlier, I mentioned additional permissions for Qlik in Snowflake, and those are CREATE STAGE and CREATE FILE FORMAT permissions. Because of these, we know that Qlik stages the SQL Server data first before writing to Snowflake tables. I have to add permissions after I made the pipeline.
Setup time: 20 minutes including debugging and adjustments to Snowflake permissions. Newbies can probably do this in an hour.
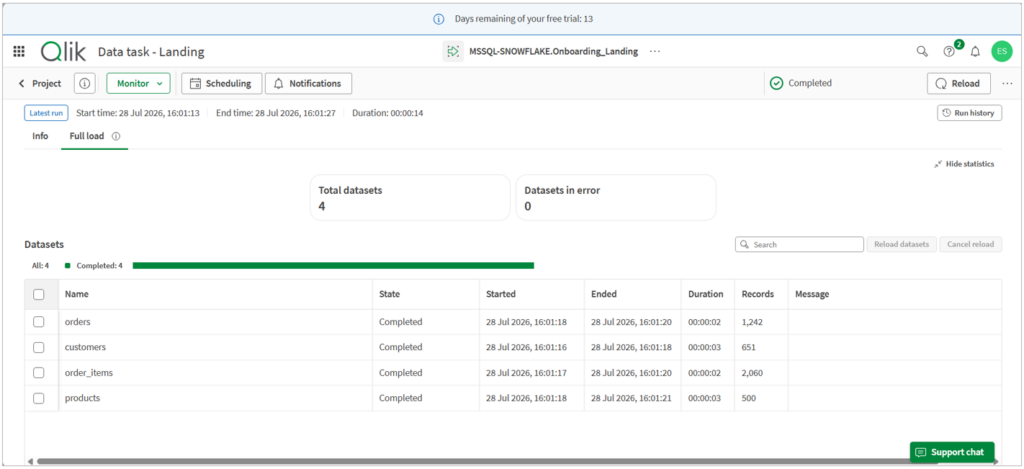
When it ran, it took 14 seconds to do the initial upload, and the row counts per table are consistent with the earlier counts in SQL Server. See below:
Validating the Results in Snowflake
Aside from creating a stage and 2 file formats in Snowflake, Qlik also wrote 4 temporary tables (with a _ct suffix after the table name) in the QLIK schema. You can see them below.
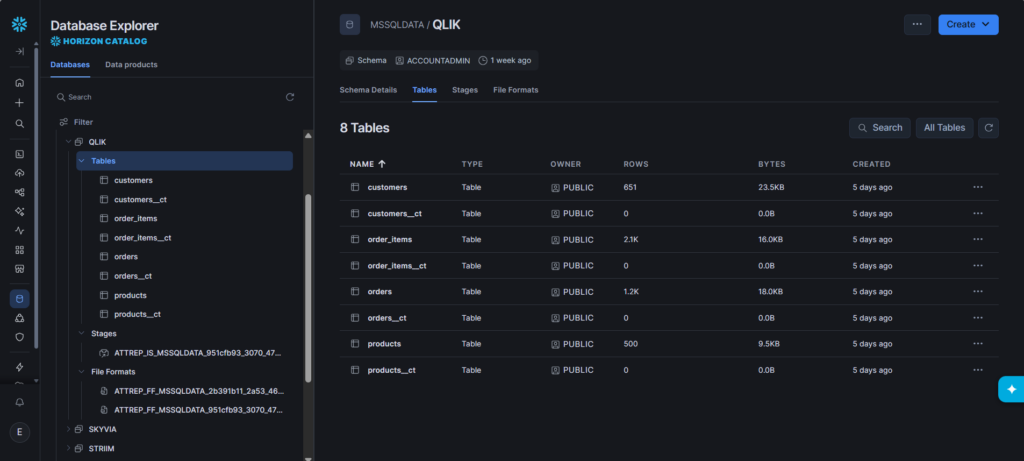
They were empty after the replication.
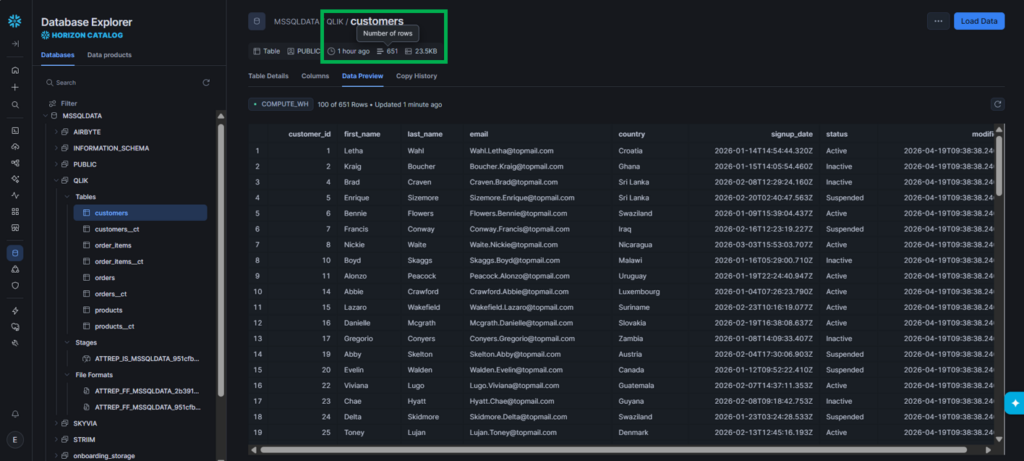
I previewed the actual tables, and below is a portion of the 651 customers:
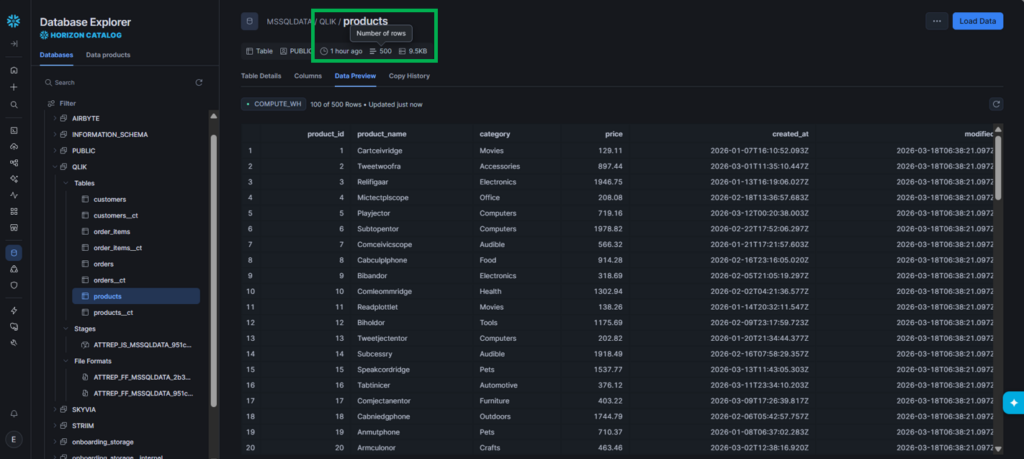
And below is for the 500 products:
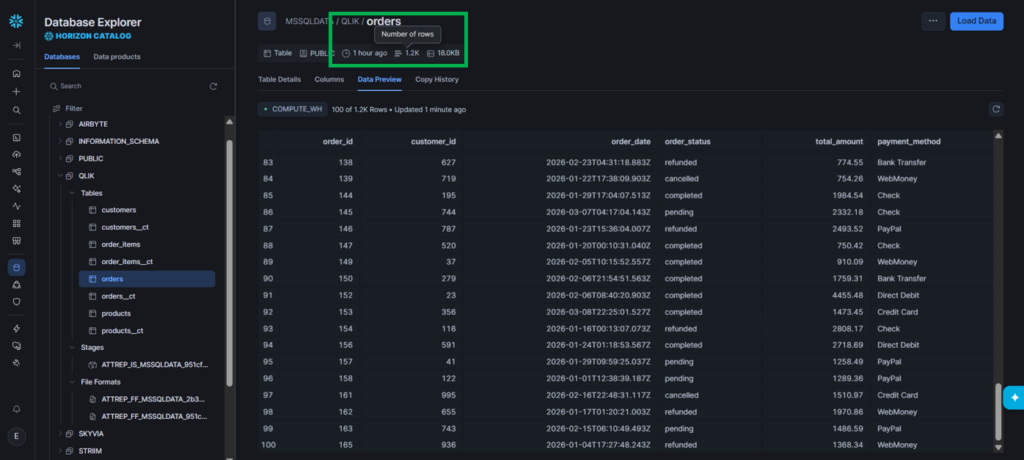
Orders have 1.2K rows:
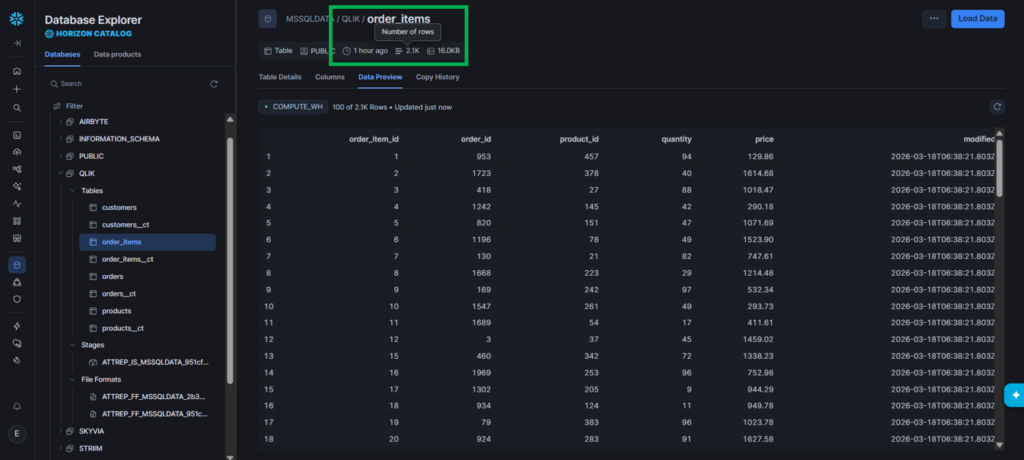
Finally, order items:
Qlik didn’t clean the temporary staging objects after processing. But it did the job.
Best for
Enterprise-level data pipelines with huge datasets across cloud and on-premises environments. Also for teams who can manage a more involved installation and setup process. Ideal for users who value an all-in-one solution with strong governance and management features.
Rating
- G2 : 13 reviewers rated 4.6/5
- Capterra : 24 reviewers rated 4.3/5
Pricing
No publicly posted figures for different plans, including Starter, Standard, Premium, and Enterprise. You must contact Qlik sales for a quote.
For more details, visit their data integration pricing.
Pros
- Ultimate control over enterprise security; highly efficient log reader for SQL Server.
- All-in-one data management – data integration, data quality, automations, analytics.
- Uses wizards and drag-and-drop design.
Cons
- No free tier or developer accounts, and very expensive; requires specialized training and heavy infrastructure management for on-premises setup. Not for startups and midsize businesses.
- Less friendly for lightweight or low-touch use cases where simpler tooling could suffice.
What Is the Best Tool for Developer-Heavy Teams?
If you’re a developer like me, you might want to check out an open-source, developer-friendly option for SQL Server to Snowflake replication. Our choice for this is Airbyte.
Airbyte
Airbyte has a fully managed offering in Airbyte Cloud. You can also install Airbyte in your chosen infrastructure. So, you can also use Airbyte on-premises like Qlik Replicate.
But here, we will use PyAirbyte. With this, you don’t need to have an Airbyte account, neither installation of Airbyte itself. Just the Airbyte Python library, Docker, and Python.
I didn’t use Docker in PyAirbyte before. But here, SQL Server and Snowflake Airbyte connectors are developed in Java. Java and Python are very different. Airbyte’s solution is to make the two connectors reside in Docker containers. I didn’t know this before, so I used the Snowflake Python library in my HubSpot to Snowflake test.
The difference this time? The code I made is shorter, because many of the features are abstracted in the built-in connectors.
Preparing the SQL Server to Snowflake Pipeline Using PyAirbyte
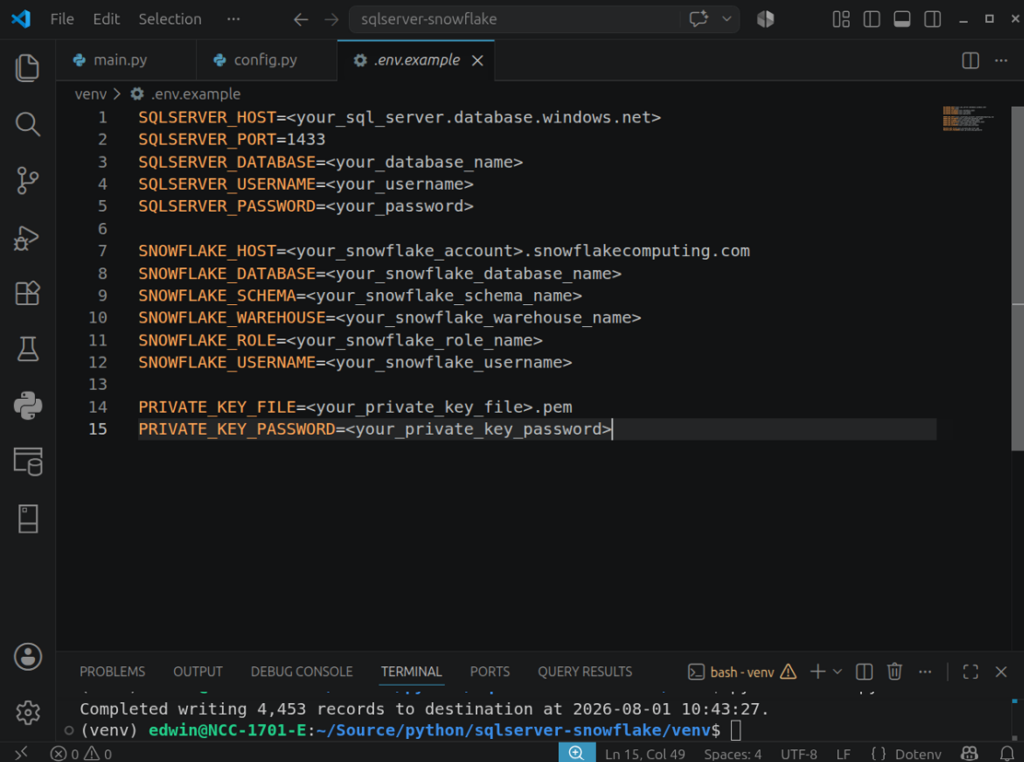
I started with the .env file for the setup configuration. You can see the sample below:
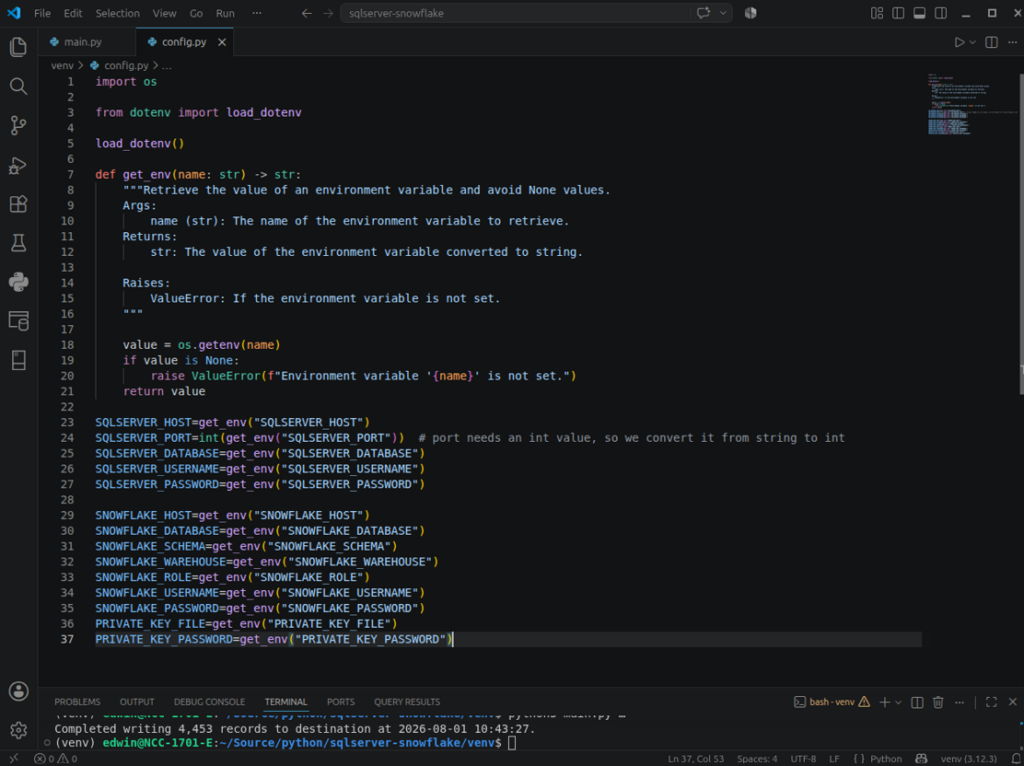
The above .env file is loaded, and each item is a Python variable. See below:
The pipeline is simple:
- List down the tables to replicate in a Python array.
- Initialize the SQL Server connection source using the configuration earlier.
- Initialize the Snowflake connection destination.
- Make a full refresh replication from SQL Server to Snowflake.
That’s it. You can see that below:
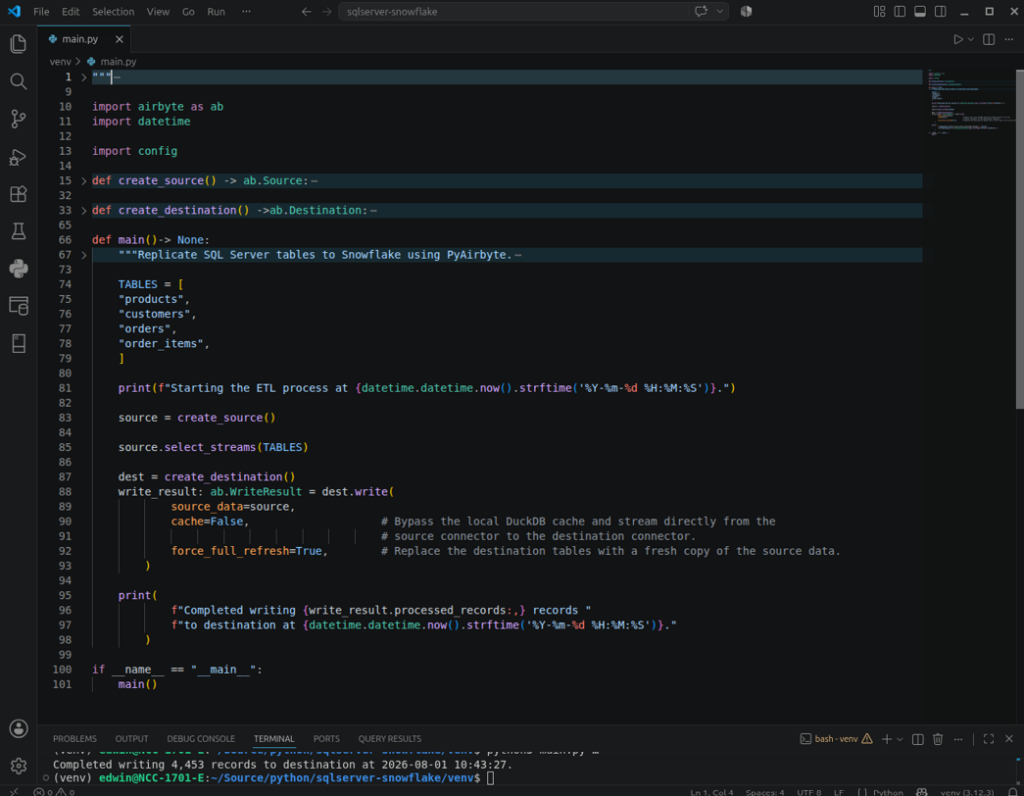
Moreover, the initialization of the source and destination are defined in two separate functions. Note the correct config parameters for Snowflake, because one missing item here will break the connection. The Private Key file is loaded separately into a string, because the Snowflake Airbyte connector will not open the file for you.
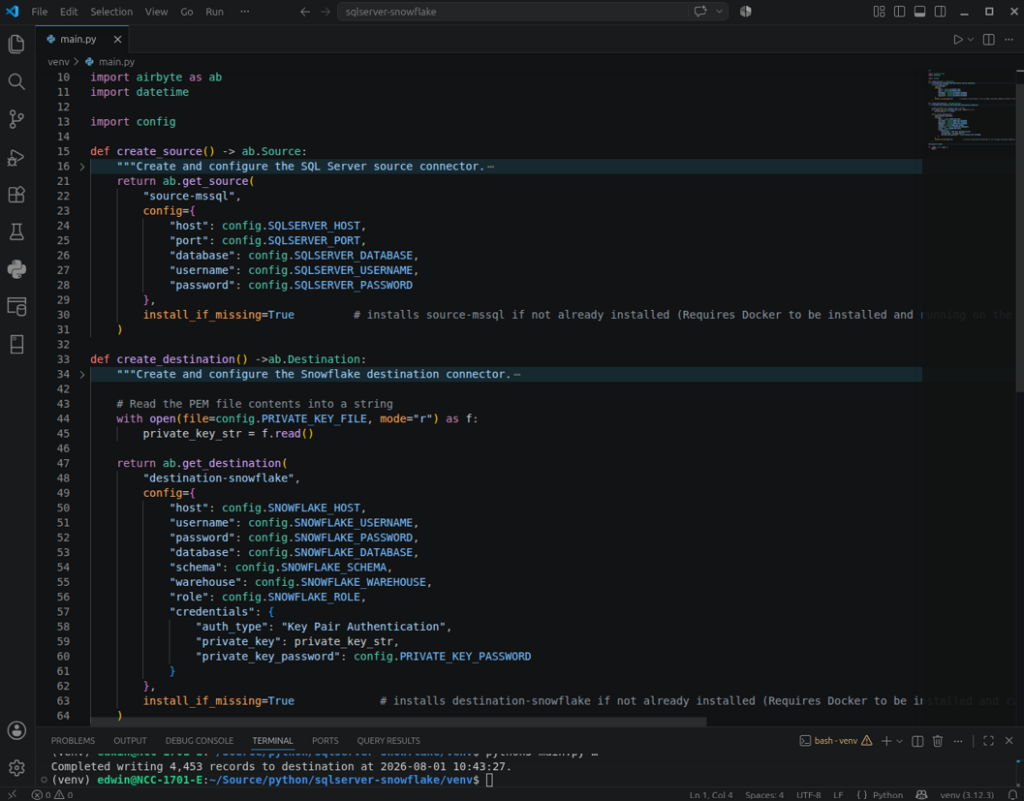
Development time: 3 days, including debugging, testing, and fixing.
The Runtime Results
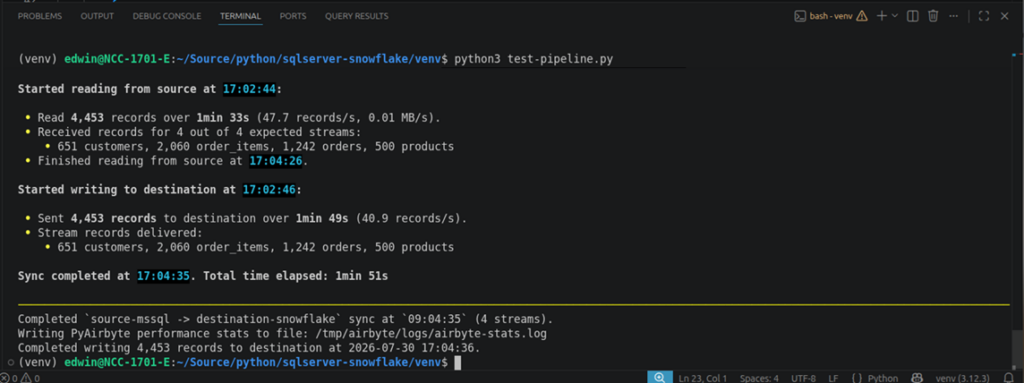
Shown below is the output in my Linux Terminal. It says it took 1 minute and 51 seconds for an initial load. However, the line in the main() function to select the streams (source.select_streams(TABLEs)) took 6 minutes. So, the actual duration was 7 minutes and 51 seconds.
Validating the Results in Snowflake
The Airbyte Snowflake destination connector staged the SQL Server data in a separate schema (airbyte_internal). Check it out below:
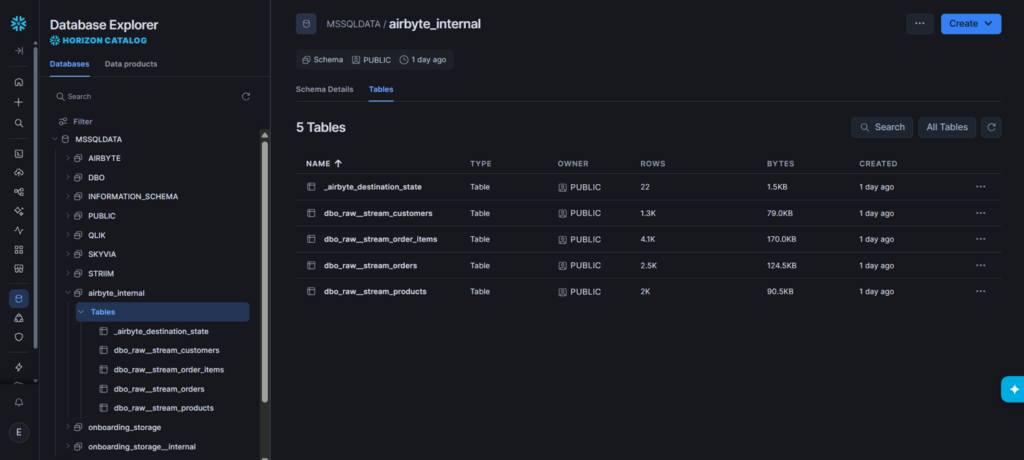
So, I have to provide the CREATE SCHEMA permissions for that too. That’s why extra permissions are needed for Airbyte aside from Qlik.
But here’s the catch: We wanted the results written in the AIRBYTE schema, and I defined that in the configuration. But Airbyte followed the schema from the source, which is DBO. So, the result was not written in AIRBYTE, but in the DBO schema. See it below. The AIRBYTE schema is empty, and the DBO schema has the tables.
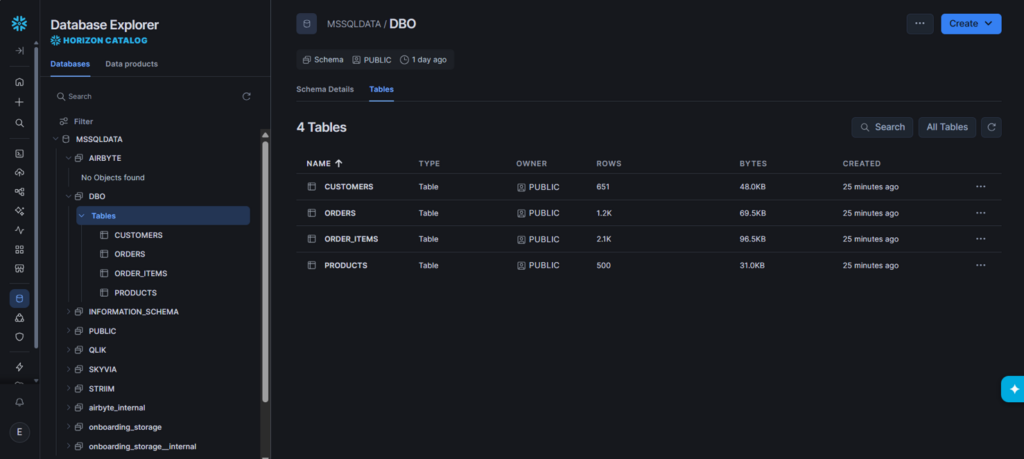
The written tables and their row counts are the same as what the other tools did. This is a small caveat for me. If this is alright with you, we’re in agreement that the pipeline is a success.
It also added 4 columns for each table. Most probably, this is for incremental updates later on.
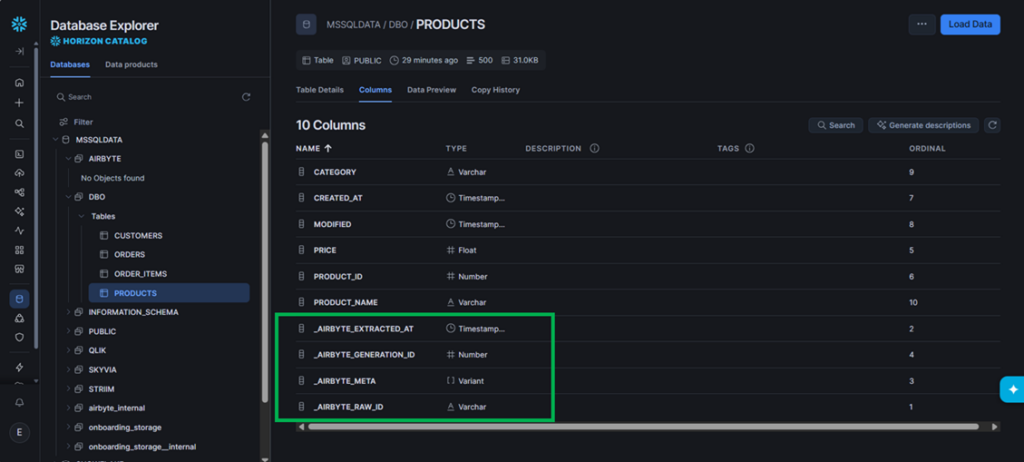
Meanwhile, below is a preview of the 500 products:
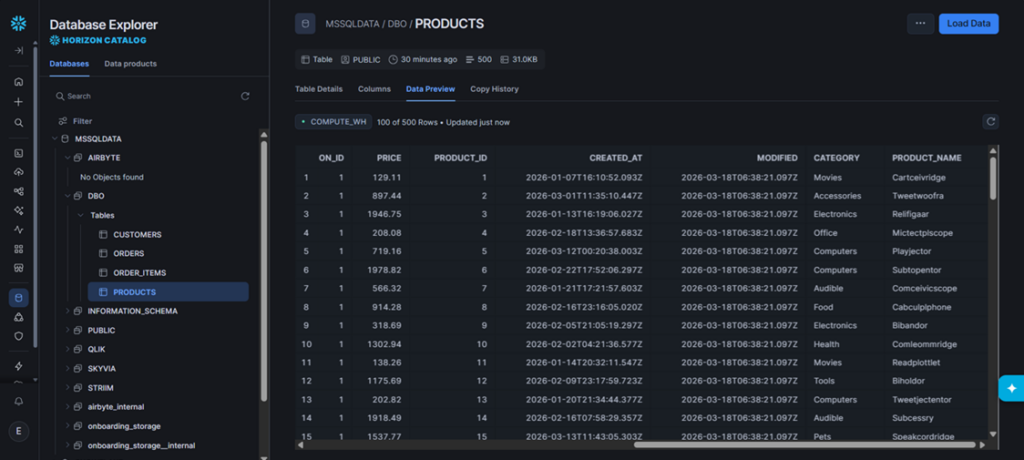
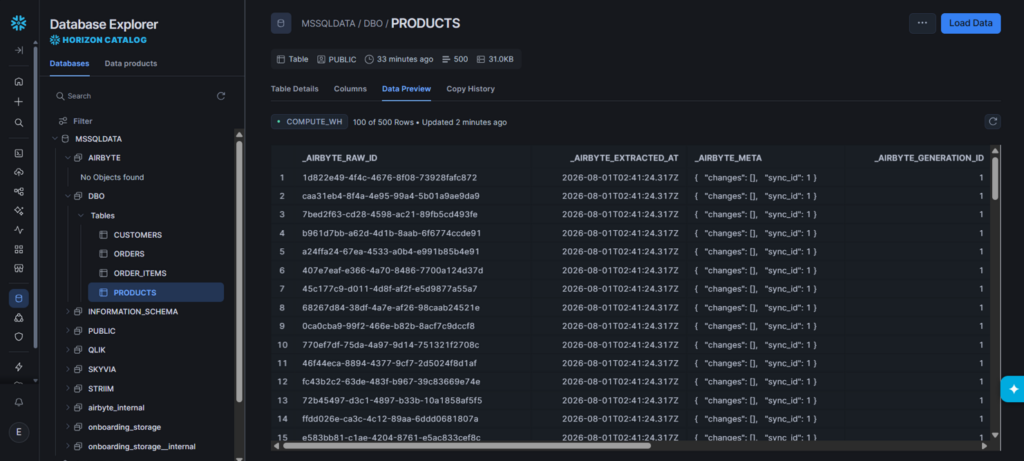
Along with the real data, the Airbyte-added columns have the following data:
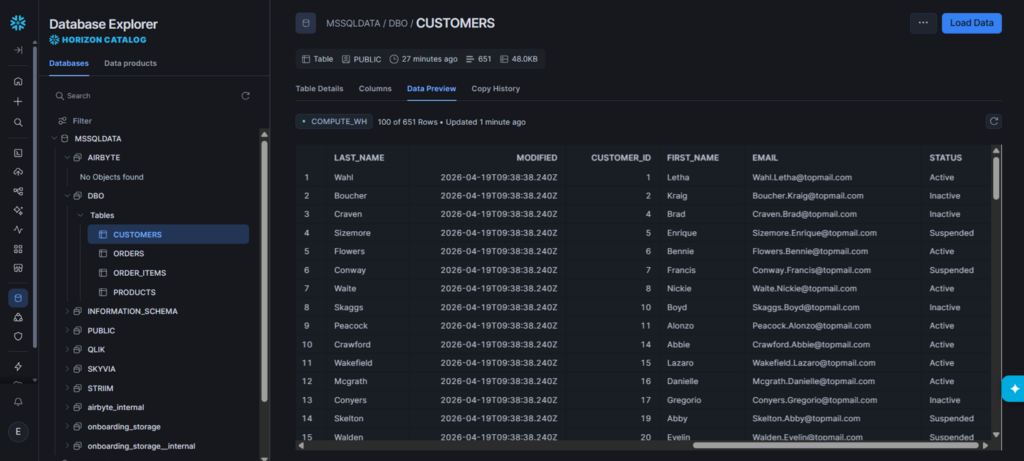
Meanwhile, below is a preview of the 651 customers:
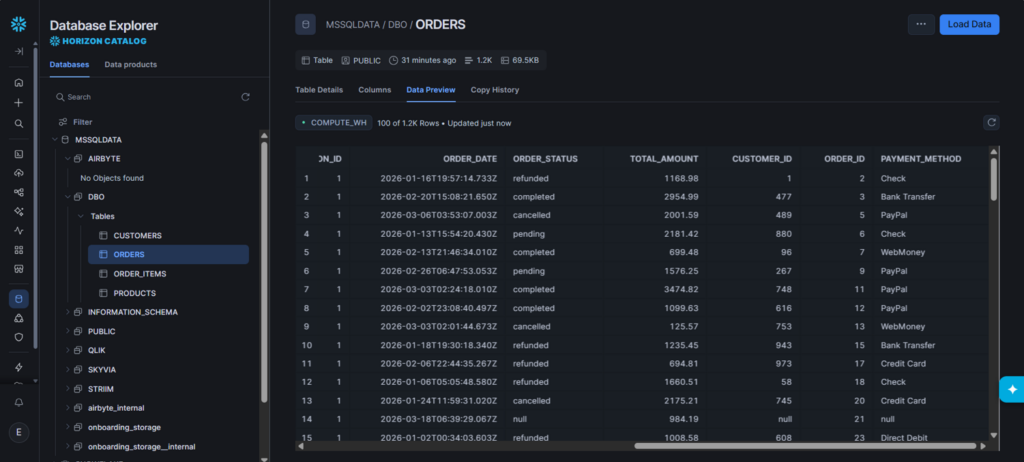
And the 1.2K orders:
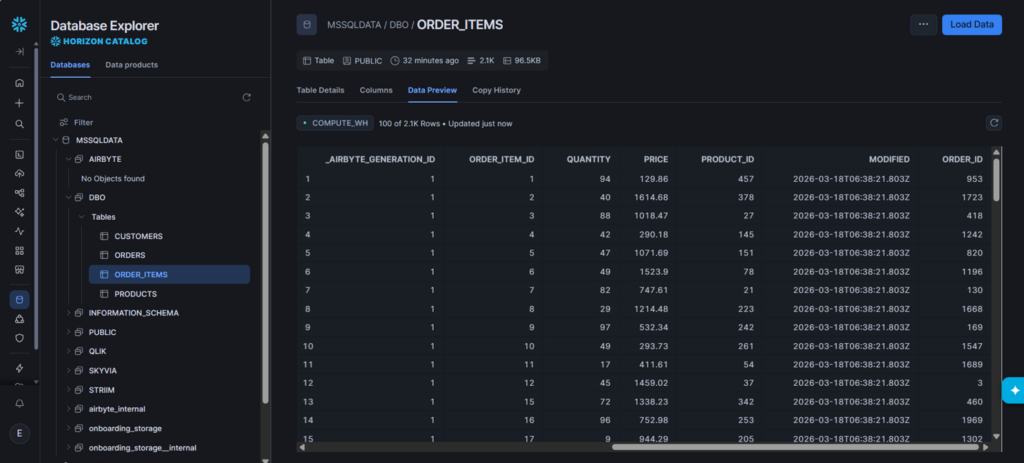
Finally, the 2.1K order items:
The missing piece for this pipeline is the schedule. You can create a cron job to schedule it to run in autopilot. With Skyvia and Qlik, scheduling is built-in.
Note to developers: PyAirbyte’s default behavior is to cache the source data into DuckDB, but that one failed my test. I did a straight copy to move data from SQL Server to Snowflake.
If you want to get your hands on this Python data pipeline, you can clone my GitHub repository from here.
Best for
PyAirbyte is for developers who need flexible pipelines without reliance on an Airbyte account and want to avoid maintaining a self-hosted Airbyte Core. But if you want a fully-managed service with open-source roots, you can try Airbyte Cloud.
For on-premises setup, you can install Airbyte Core on your chosen infrastructure.
Rating
- G2 : 77 reviewers rated 4.4/5
- Capterra: no reviews yet.
Pricing
- Free: for PyAirbyte and Airbyte Core/OSS
- Paid: for Airbyte Cloud. Pricing plans include Standard, Plus, and Pro, using capacity-based pricing. You need to contact sales for a tailored quote. For more details, visit the Airbyte pricing page.
Pros
- Open source and developer-friendly.
- Offers the highest flexibility in developing data pipelines with PyAirbyte.
- Easy, no-code replication for non-developers using Airbyte Cloud/Core.
- Build your own connector using the Connector Builder or using Airbyte CDK.
Cons
- High Maintenance: Without a fully-managed service, your team will manage API rate limits, error handling, debugging, and more. This can take time.
- Infrastructure burden: If you self-host, expect to manage scaling, monitoring, and upgrades. Costs may be higher than having a cloud-managed service.
- Connector fragility: When APIs change, connectors will break. You may need a custom connector in cases like these. Expect downtime until you fix the problem.
What Is the Best Tool for Real-Time Streaming?
If your company has a dashboard that needs updating in a snap, you need real-time streaming. Our candidate for that is Striim.
Striim
This is my second time using Striim. I have a developer account there, but SQL Server is a premium connector, and it’s disabled for free accounts. The solution I did is to register for a Striim Cloud account under trial, so I can use the SQL Server connector.
I will only show how pipelines are made in Striim.
Preparing the SQL Server to Snowflake Pipeline Using Striim
Designing the pipeline in Striim is graphical. You drag and drop a source and a connector, connect the two, and configure each.
Striim uses a few reader adapters for SQL Server, but I used the DatabaseReader. I can’t make the others work. Setting up connections is through JDBC. This is somewhat a developer’s way of connecting, but for me, the instructions are clear.
I used the same SQL Server configuration below:
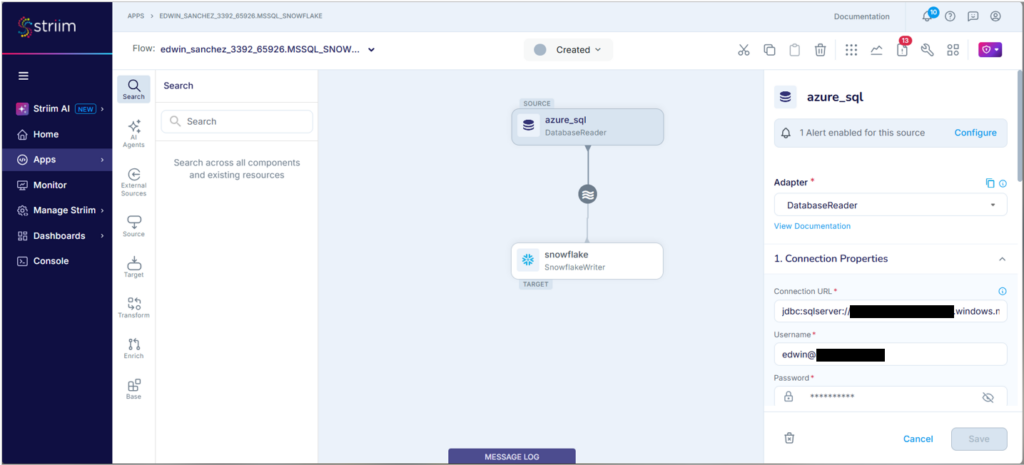
The difference is in the username. It should be in the format <username>@<instance_name>. Using username only will fail.
Choosing the tables may not be so friendly with non-techy people. As per instructions, I type the table names in a box, or use schema + wildcards. I used dbo.* as seen below, meaning all tables under the dbo schema. You should also enable Create Schema.
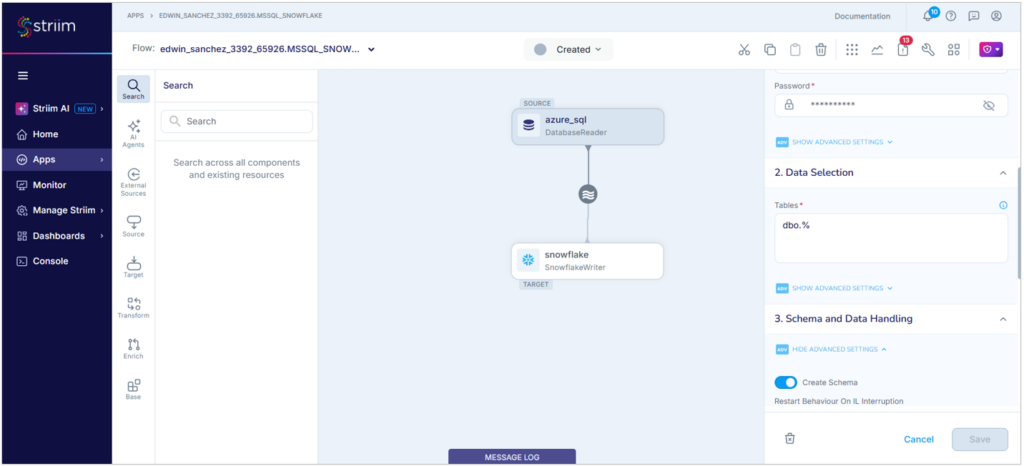
Moreover, you need to name the output. I used the name mssql_initial_load. This will be used as the input in the Snowflake destination.
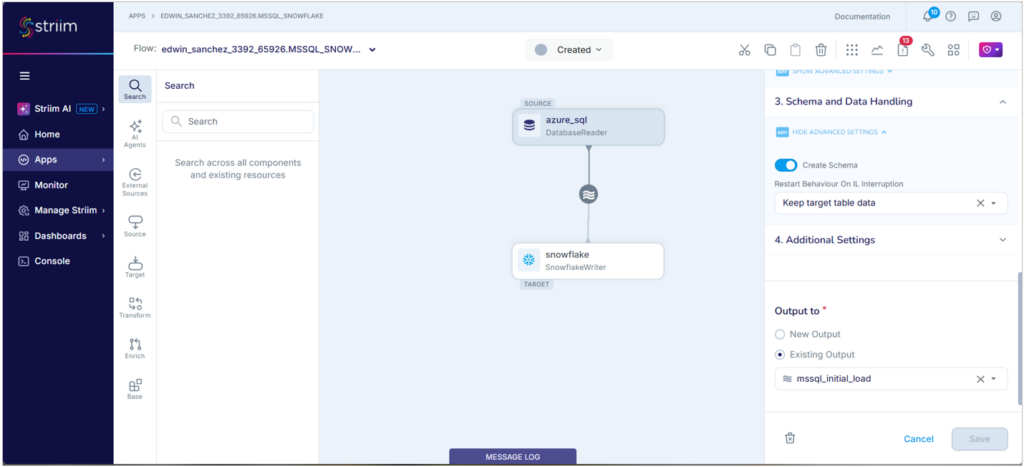
For Snowflake, it starts by specifying the input (mssql_initial_load) from the output of the SQL Server source. Then, specify the SnowflakeWriter adapter.
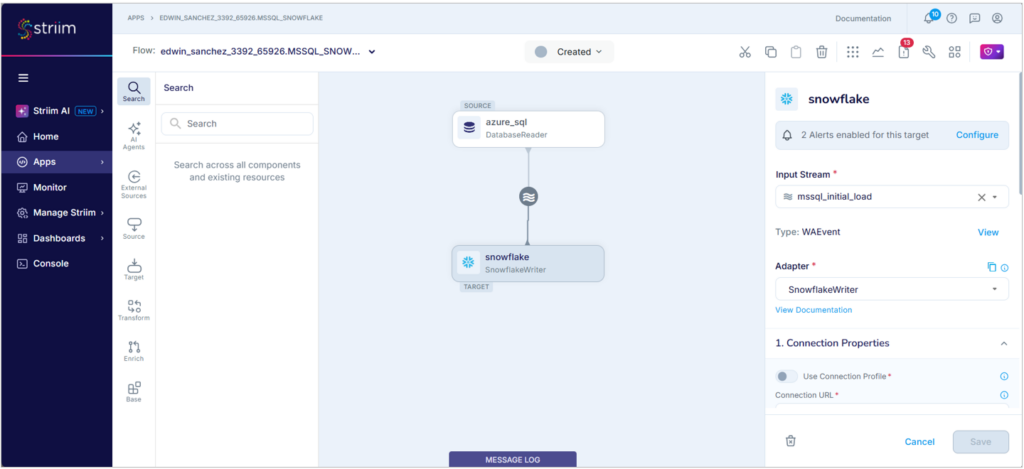
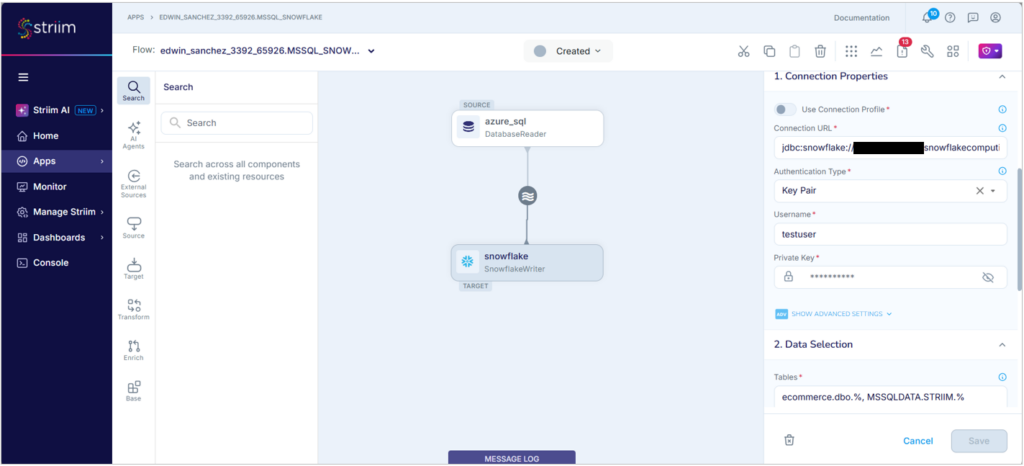
The connection string is also in JDBC format. The rest of the credentials are the same as the other tools.
The one that confuses me at first is the Tables selection. It should be in the format <source database>.<source schema>.<table name or wildcard>, and its counterpart in the target, which is formatted as <destination database>.<destination schema>.<table name or wildcard>.
It took me a while following the Striim docs, but in the end, this setup is correct.
The Runtime Results
I had 10 errors before I made it right. Three of them are shown below:
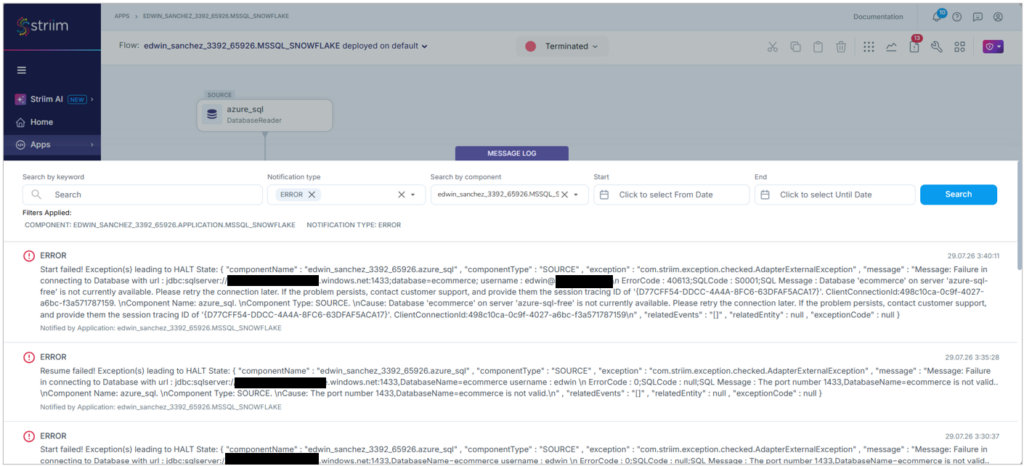
The error is not what it seems. For example, from the above, I got the “port number 1433 … is not valid.” That port number used to work with the other tools. In the end, the username format is to blame. I used the format <username> at first. It was good when I changed it to <username>.<instance name>.
When I finally got it right, I deployed it, and it ran for 12 minutes (see the green box below).
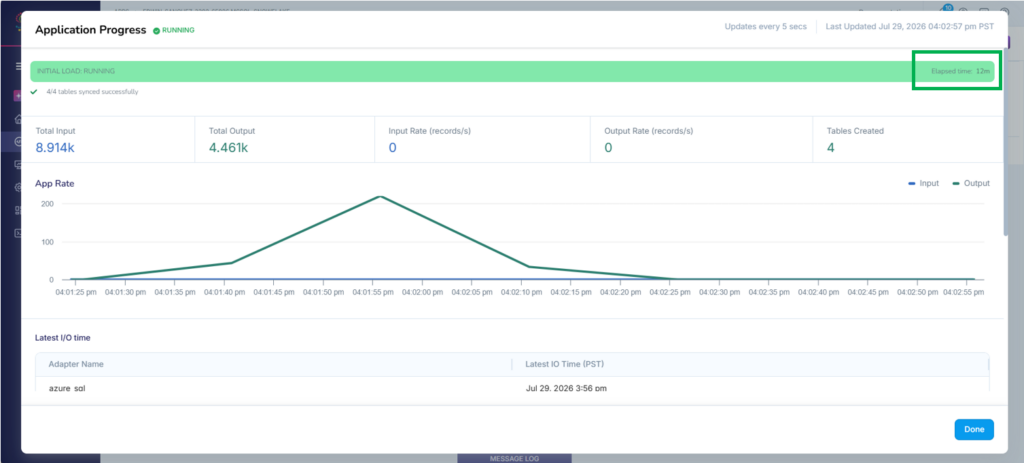
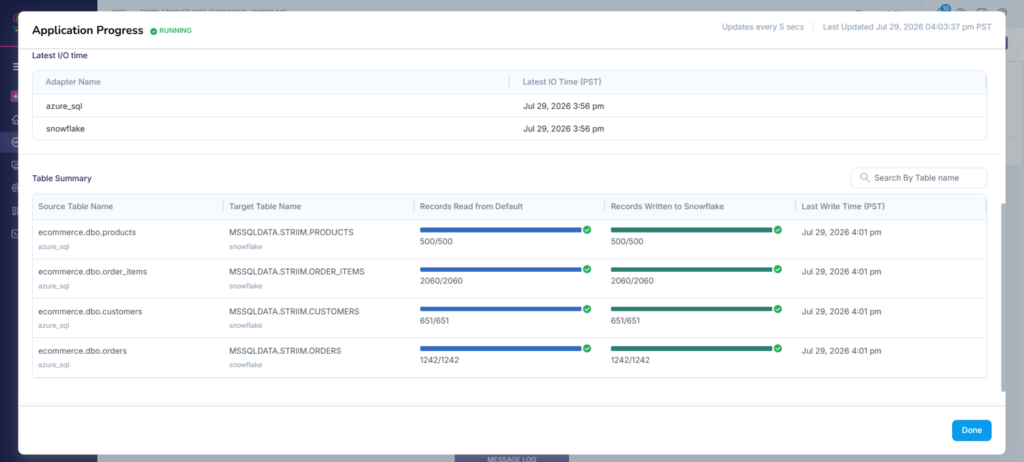
The replicated tables and their row counts are the same as with the other tools.
Setup time: 2 hours, including debugging.
When I get used to Striim pipeline projects, I’m sure I can do it faster.
Validating the Results in Snowflake
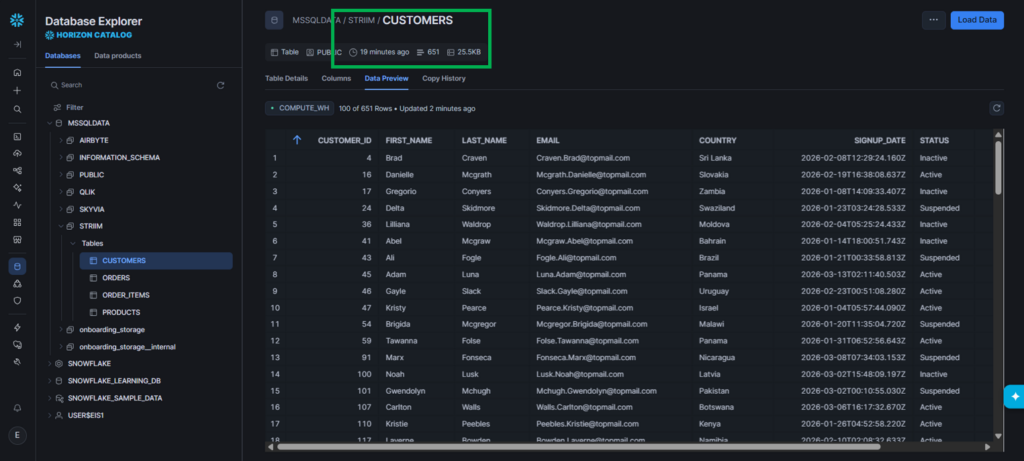
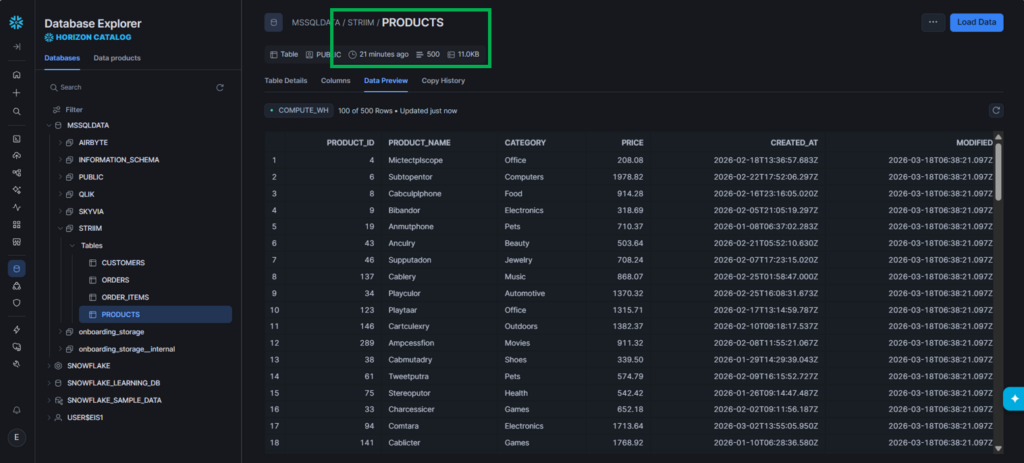
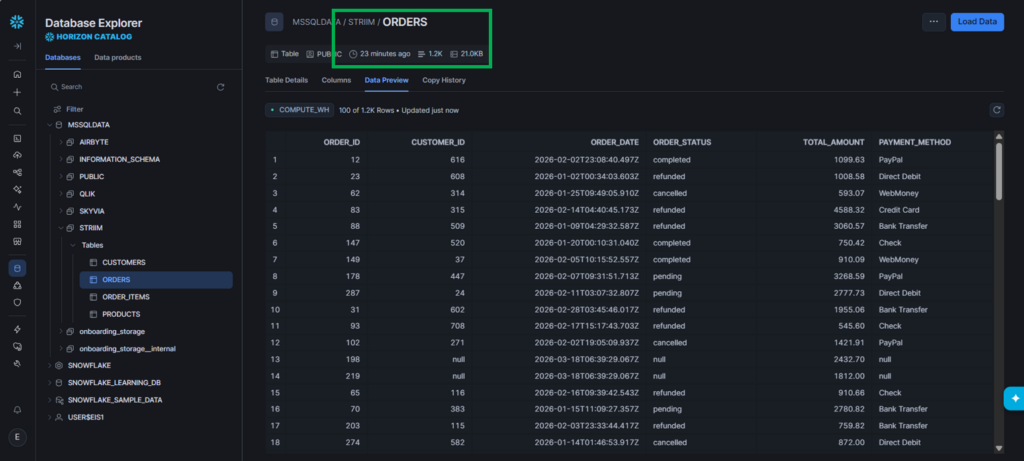
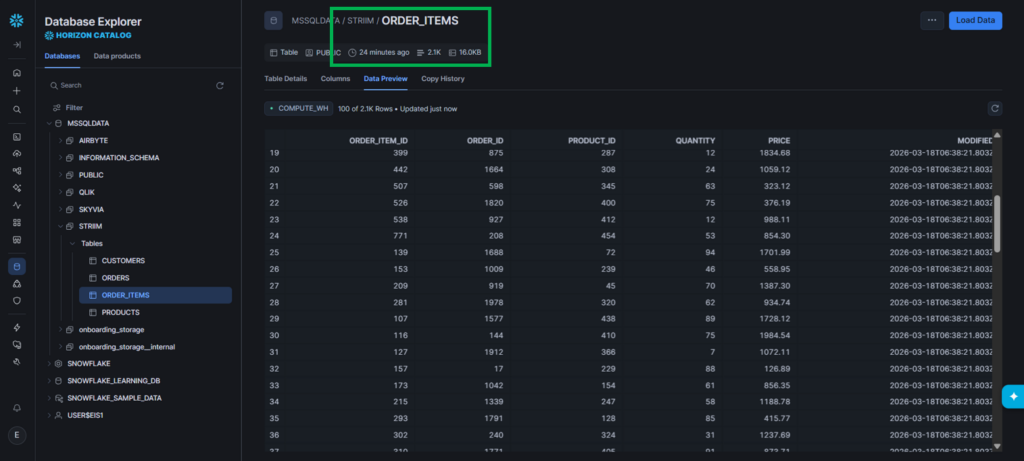
Were the tables replicated in Snowflake under the STRIIM schema? It did, as you can see below.
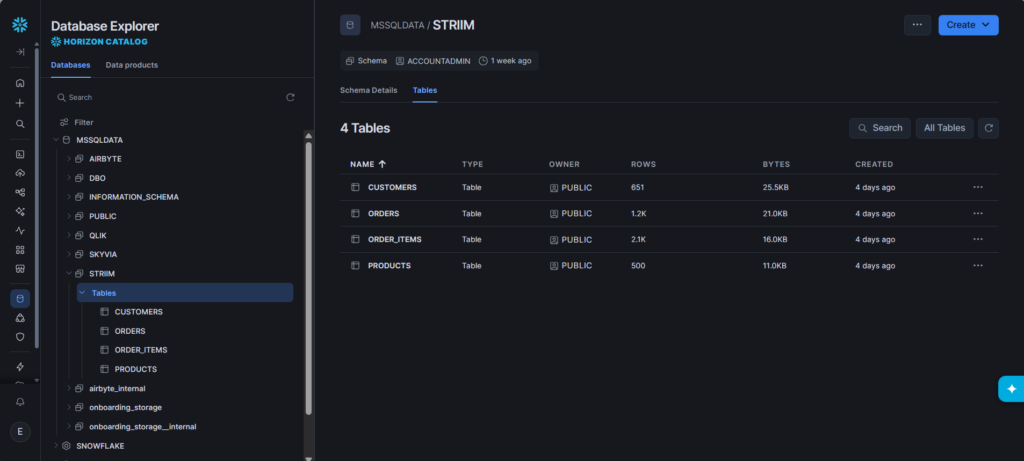
I preview the 651 customers, and it’s there.
Also, the 500 products:
Then, the 1.2K orders:
And finally, the order items:
From here on, the Striim pipeline will keep on running. It will wait for changes in SQL Server and immediately reflect them in Snowflake in a shorter time compared to the initial sync. Unlike the other tools, this one is either running or not. The methods with the other tools are batched. When it’s done, it’s done until the next schedule.
Best for
When data freshness is a big deal in your organization, Striim is a good choice.
Rating
- G2 : 1 reviewer rated 5/5
- Capterra : 3 reviewers rated 5/5
Pricing
Striim offers a free Developer account for learning and small-scale use cases up to 25 million events/month. But if you need to connect to SQL Server, this connector needs a paid account. You can have a trial for Striim Cloud (fully managed) or Striim Platform (self-hosted). Prices are not published for both Cloud and Platform plans.
You can check their pricing page here.
Pros
- Real-time data pipeline design using a graphical designer or wizard.
- A choice between fully-managed and self-hosted deployments.
- 100+ high-performance connectors.
- Free developer account with access to 200+ preview application connectors.
Cons
- Higher pricing: Striim is an enterprise-grade platform, and the pricing reflects that.
- Complexity: Complex setup and tuning for self-hosted deployments
- Needs UI improvement: Choosing datasets to replicate is prone to error compared to competitors.
How Do the Top Integration Tools Compare?
Below is a simple comparison of the top tools we considered for SQL Server to Snowflake integration:
| Tool/Criteria | Skyvia | Qlik Replicate | Airbyte | Striim |
|---|---|---|---|---|
| Architecture | Fully SaaS | SaaS or On-Premises | SaaS or On-Premises | SaaS or On-Premises |
| Pricing Model | Tiered/Capacity | Custom Enterprise | Tiered/Capacity | Tiered/Capacity or Free | Tiered/Capacity |
| Setup Time (Our Test) | ~5 mins | ~20 minutes | ~3 days | ~2 hours |
| SQL Server CDC Support | Yes (Log-based) | Yes (Log-based) | Yes (Log-based) | Yes (Log-based) |
| API Complexity | Visual Wizard | Visual Wizard | Developer CLI/UI or Visual Wizard | Advanced UI |
How Can I Migrate Data Manually Using BCP and Snowflake?
There is another way to do SQL Server to Snowflake if you can’t avail of tools or you can’t code in Python or another language. However, it’s manual.
The Manual Steps
The flow is like this:
- Export a table into a CSV file using SQL Server’s BCP command or another tool like dbForge Studio for SQL Server Express Edition (Free).
- Using your browser, sign in to Snowflake.
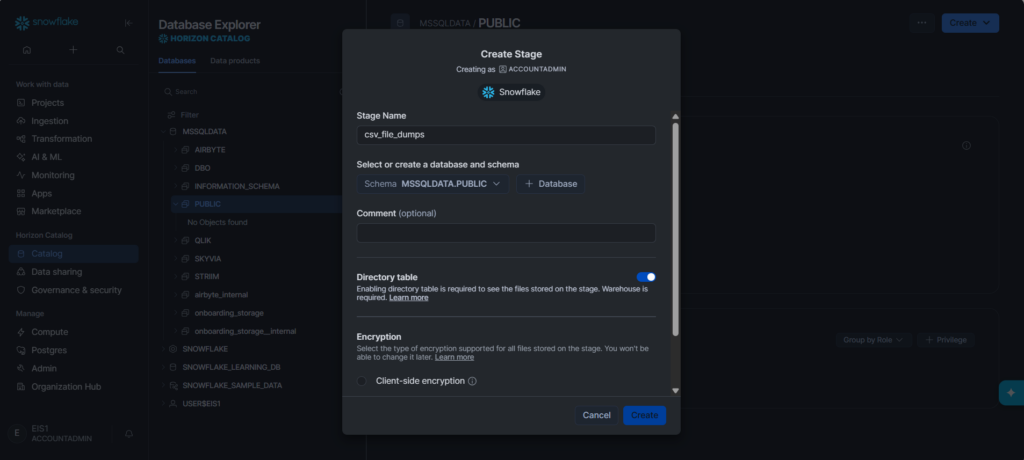
- In your target Snowflake database, create a stage to store your CSV files. You will only do this once. After you upload your first CSV file, you can skip this step in the next uploads.
- Load the CSV file into your target table using the Snowflake UI or using COPY INTO.
That’s it.
Real Example of Using SQL Server to Snowflake Manual Methods
Below is what I did using BCP:
Syntax:
BCP <table name> OUT "<target path and filename.CSV>" -S <your SQL Server instance> -d <database name> -T -c -t ","Open the Terminal or the Command Prompt and follow the syntax above. The -T parameter means it will use my Windows account to connect to the database. If you don’t have that, use – U <your SQL Server username> and -P <your password>. Contact your database administrator to know which one applies to you. The -t “,” simply tells BCP that each column should be delimited by a comma.
Below is a sample from my own setup.
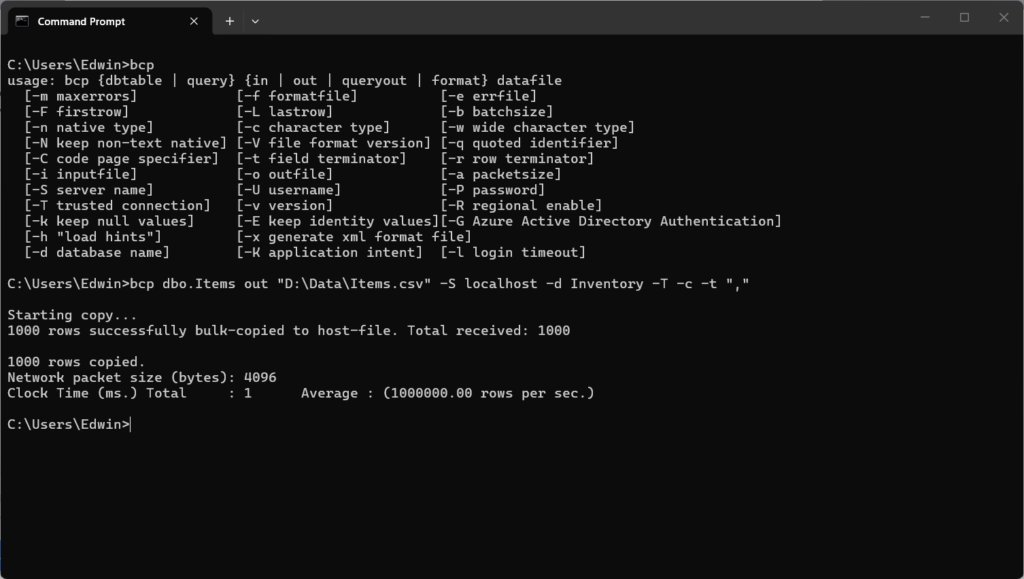
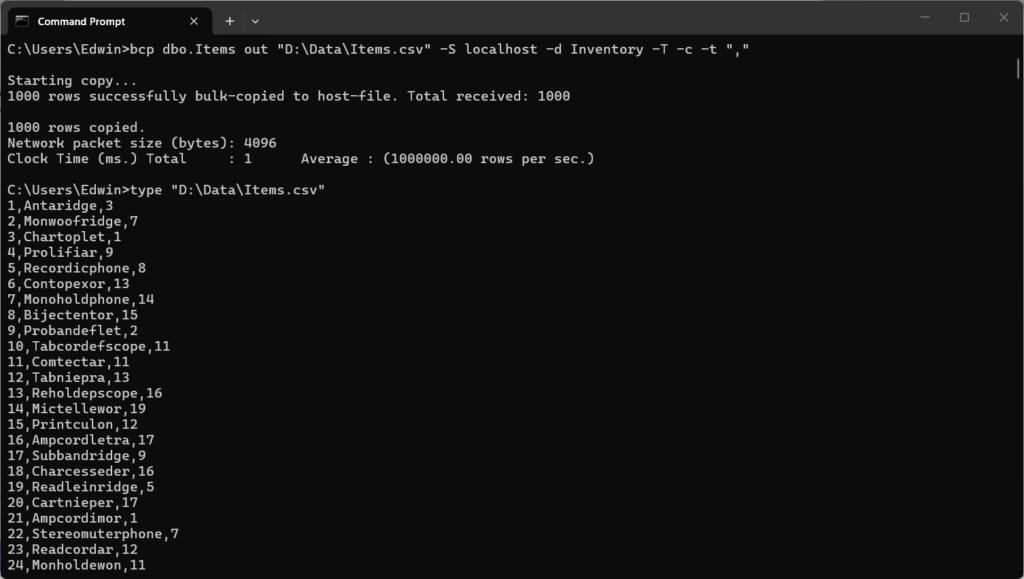
It exported 1000 rows of inventory items into Items.CSV. Below is a preview of the data in the Terminal:
In Snowflake, I created a stage using the web UI:
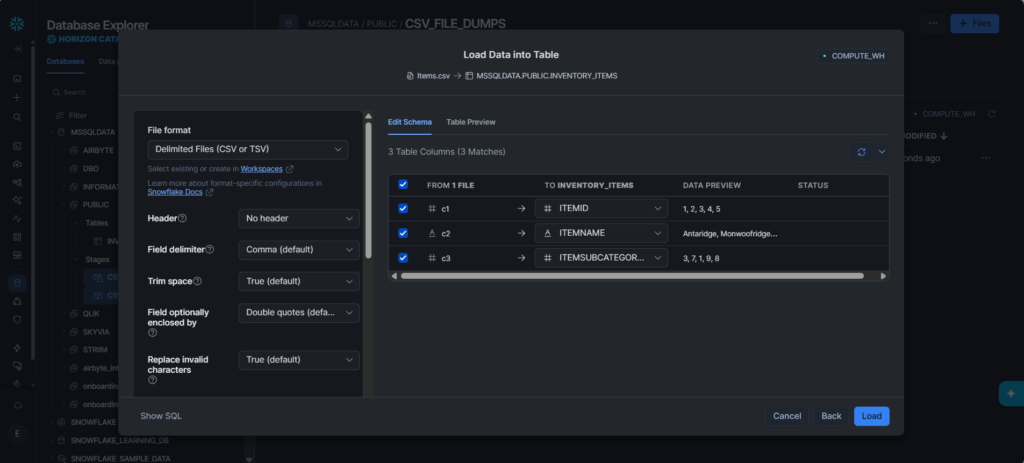
Using the web UI, I uploaded the file by clicking the + Files button, then dragging the CSV file into the prompt. Then, I uploaded the CSV file to the target table. I have to specify that there’s no header, the delimiter is a comma, and then map the values into my table columns. Finally, click Load. Here’s a sample:
Alternatively, this can be done using COPY INTO. Here’s what I did:
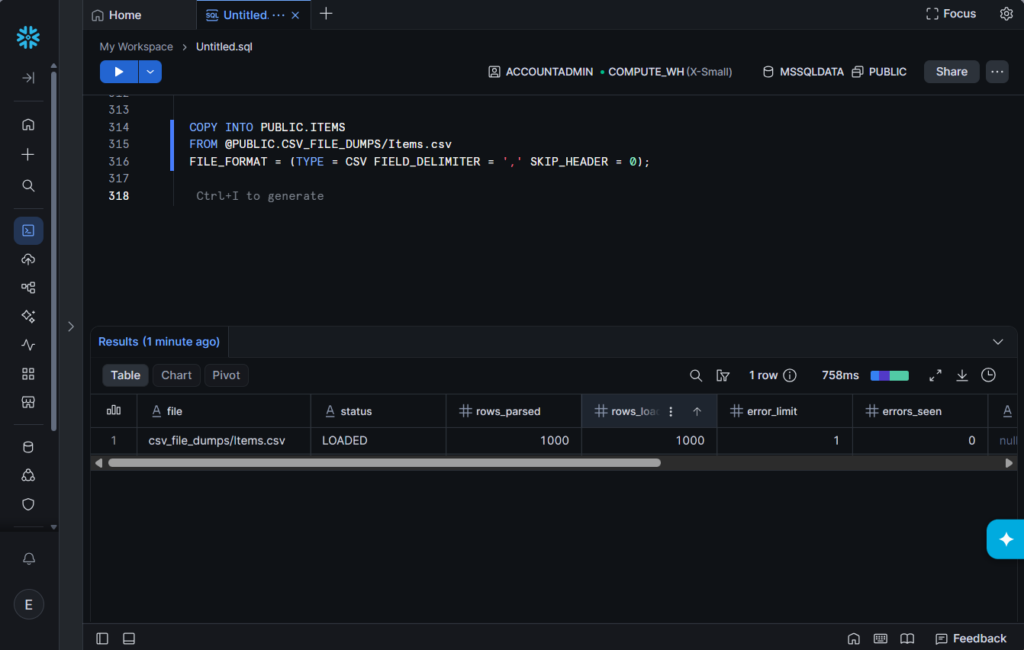
The important elements here are the target table (Items table), the stage name and the path/filename of the CSV file, and the formatting options. I used the same formatting as the web UI: No header (SKIP_HEADER=0) and comma-delimited (FIELD_DELIMITER=”,”).
Here’s the result of the uploaded CSV using the web UI:
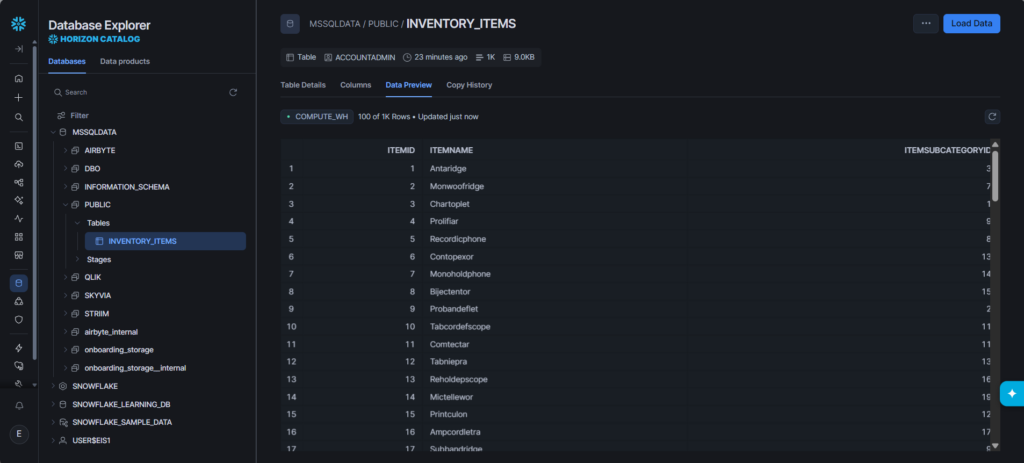
It’s similar to the COPY INTO, but the table name is different (ITEMS instead of INVENTORY_ITEMS).
The Caveat
While this manual option works, there are problems with it:
- You will do this repeatedly depending on the number of tables to migrate. That’s hard.
- When table columns change in SQL Server, manually change in Snowflake before uploading the new CSV with the added/removed columns.
Tedious?
Sure thing. That’s why moving to automated tools is the logical next step.
Conclusion: What Should Be Your Next Step?
We have presented the tool options for you. Skyvia is for SMBs and No-code integrations. Qlik Replicate is for enterprises and strict requirements. Meanwhile, Airbyte is for developer-heavy teams, and Striim is for real-time requirements.
Based on what you saw, which one do you think is for you?
If you fall into the category of needing a rapid, maintenance-free, and cost-effective cloud sync without managing infrastructure, try connecting SQL Server to Snowflake with Skyvia. You can set it up in 15 minutes.

FAQ for SQL Server to Snowflake

Can I migrate data from SQL Server to Snowflake for free?
Yes. Open-source tools like Airbyte Core or PyAirbyte can migrate data at no licensing cost. You’ll still need to cover infrastructure and Snowflake usage costs.
Do I need to open my firewall to sync an on-premises SQL Server to Snowflake?
Usually yes. The replication tool must be able to connect to both SQL Server and Snowflake. You may need to allow outbound or inbound traffic depending on your deployment.
What happens if I add a new column in SQL Server during the replication?
It depends on the replication tool. Some automatically detect schema changes and update the destination, while others require a schema refresh or manual intervention.
Which tool is best for migrating massive, legacy enterprise databases?
Enterprise-grade tools such as Qlik Replicate and Striim are designed for high-volume migrations, CDC, and minimal downtime. The best choice depends on your performance, budget, and feature requirements.
How long does it take to set up a SQL Server to Snowflake integration?
Most no-code replication tools can be configured in under an hour. Custom Python may take longer, depending on authentication, network setup, and data transformation requirements.