

Summary
- After 40 hours of hands-on testing, our analysis reveals that the three best HubSpot ETL tools for 2026 are Skyvia for fast no-code workflows, Fivetran for automated enterprise ELT, and Airbyte for developer-heavy open-source customization.
Is it still fun to combine HubSpot CSVs with billing data and other data sources through VLOOKUPs? If you grew tired of these, it’s time to consider a data warehousing solution with one of the best HubSpot ETL tools that fits your needs.
But searching for the right tools may lead you to a sea of technical jargon when you only need to automate the data warehousing process.
In this article, we will consider different HubSpot ETL tools with real, working examples. For a senior developer, this is one of the best ways to choose a tool.
But here’s the thing: We are the Skyvia team. We built our own no-code ETL platform, so naturally, we are a bit biased. However, we aren’t going to pretend we are an independent reviewer and magically rank ourselves #1 for everything. Instead, we honestly compare our product with market leaders like Fivetran, Airbyte, and Talend based on real technical specifications, pricing models, and specific use cases.
Ready?
How Did We Test and Evaluate These HubSpot ETL Tools?
This is another 40-hour test which is similar to the Databricks review we did. We moved HubSpot contacts, companies, and deals using real data pipelines made with Skyvia, Fivetran, Airbyte, and Talend. The destination is a very well-known data warehousing solution: Snowflake.
We didn’t read their marketing pages and documentation; then rephrase the wording here.
I used my free HubSpot account and my own standard Snowflake access. Like the other reviews, I’ll give you screenshots of actual connector and pipeline configurations, and in the case of Airbyte, a working Python project. You will see their outputs and how long it took to move the data. And like the other reviews I did, I will share my experience working with the tools.
Our HubSpot Test Data
My free HubSpot account allows me to have 1000 contacts. That’s on paper, but it only allowed me 999 rows. You can check it below with my name as the account owner:
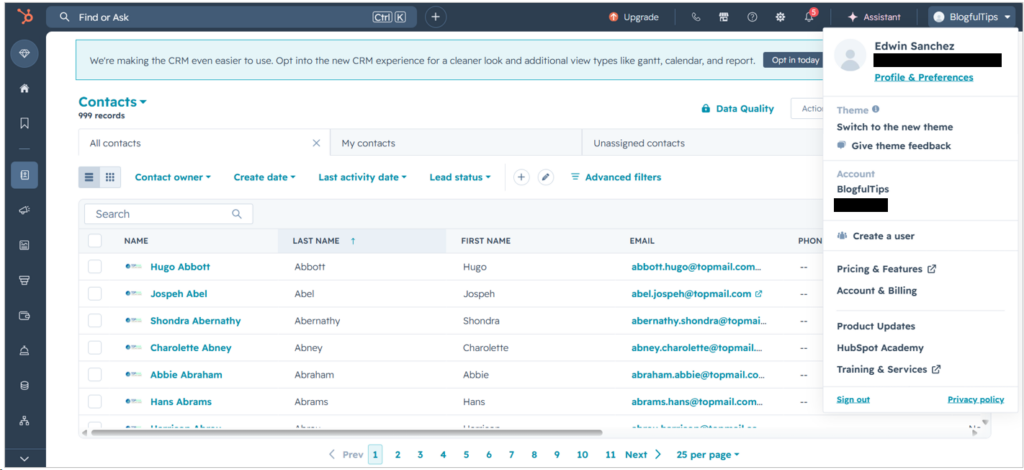
Note that names and email addresses above are fictitious. You can see the number of contacts I have and expect that in the output of the pipelines.
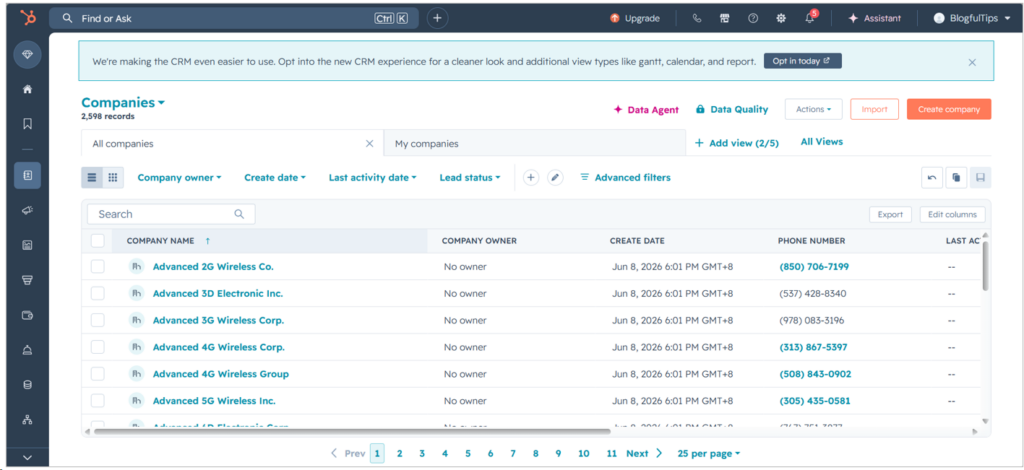
Meanwhile, below is a portion of my 2,598 test companies:
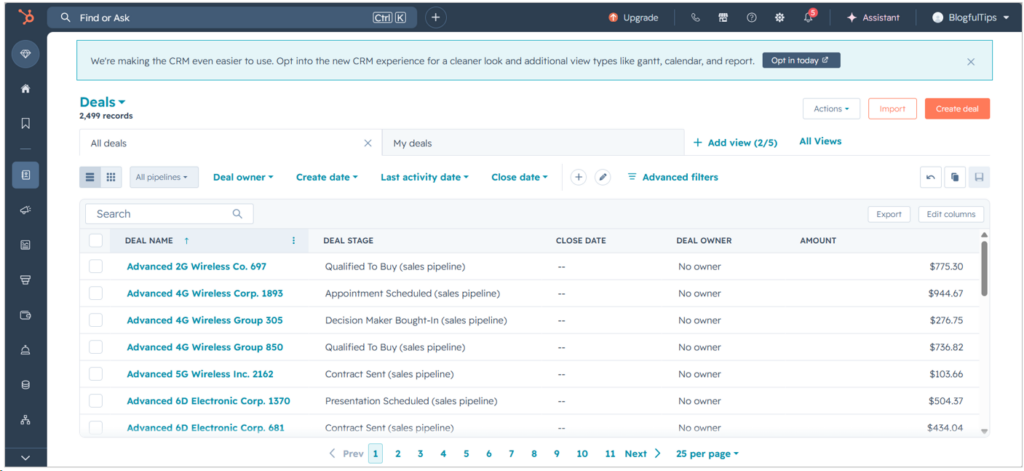
And finally, my 2,499 sample deals:
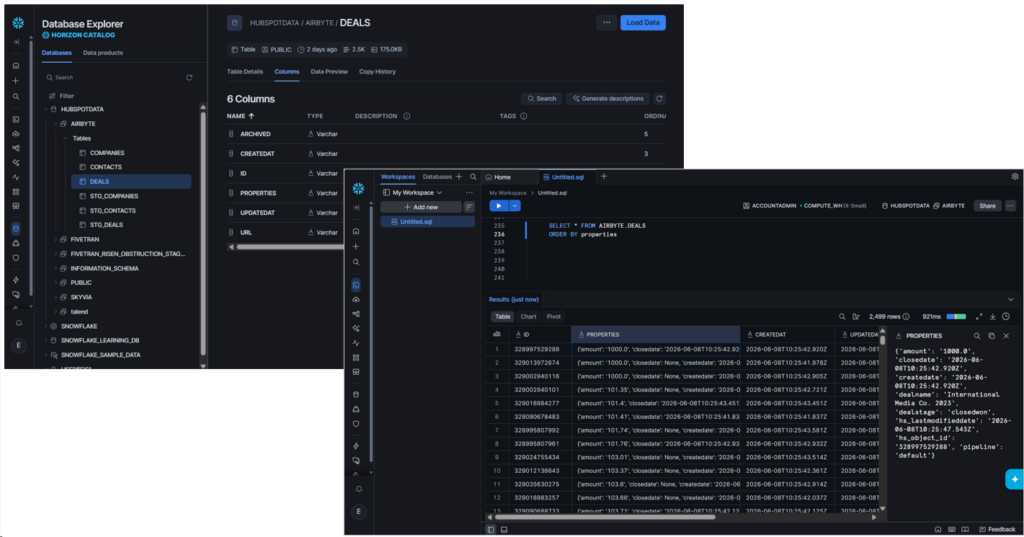
Note that HubSpot stores column information as nested JSON structures. This is good on HubSpot’s part because additional columns don’t need major downtime to deploy them. You will see later how different tools will extract them based on the results in Snowflake.
Expected Output in Snowflake
Like the other reviews I did, each tool will use a separate schema in Snowflake. So there’s one for Skyvia, Fivetran, Airbyte, and Talend, as seen below:
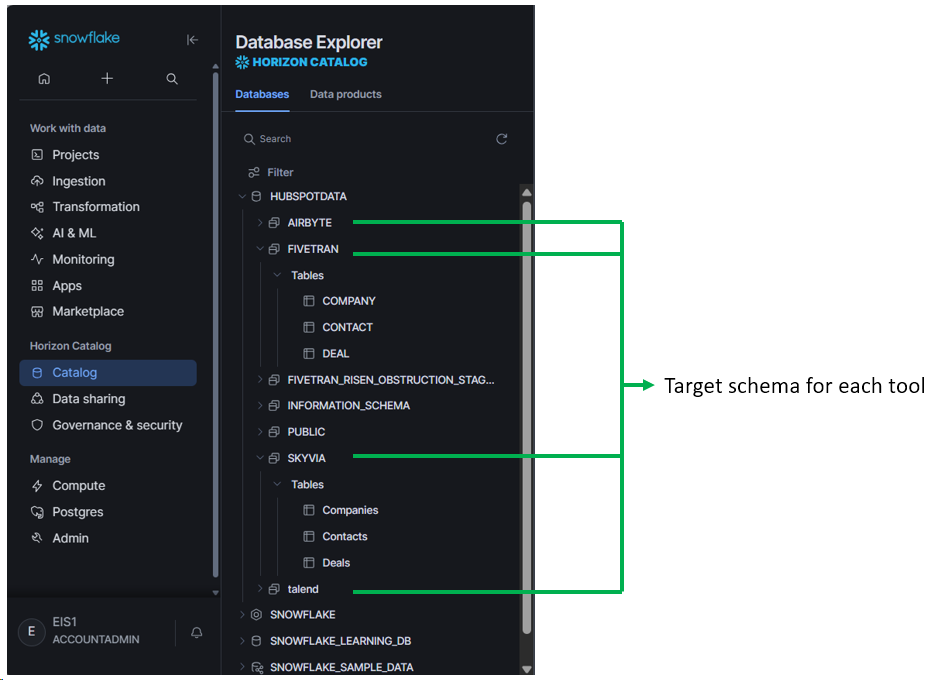
This will mean that there are repetitions of the same table names in different schemas. But we will also see how each tool will write the tables and flatten the nested JSON columns or if they will retain it as is. There are already differences based on the name casing of the schema and table names used by each tool.
The Snowflake Problem
Working mostly with Skyvia, I already have existing HubSpot and Snowflake connections. Both were working until now.
The Snowflake connection broke because Snowflake forces MFA, or Multifactor Authentication. So, the username/password authentication now fails. I tried creating the Snowflake connection in Talend, and I encountered the same error. This made me pause for a while and conclude that it will also happen in Airbyte and Fivetran.
The Solution I Found
I decided to use a Key Pair authentication where I need to create a private and public key file using OpenSSL. I followed the instructions here and used an encrypted private key file with a passphrase. Then, in Snowflake, I set the RSA_KEY_FILE for the user ID I’m going to use with the tools to connect to Snowflake:
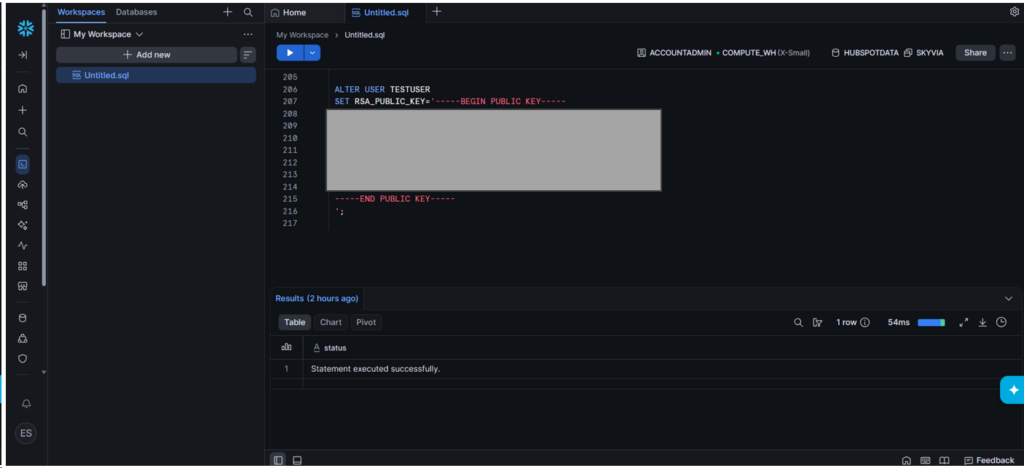
I used the user TESTUSER as seen above.
I’ve encountered the following, so take note:
- I can’t use a Snowflake account with administrative privileges. I tried my own account out of laziness with the ACCOUNTADMIN role, and Snowflake immediately rejected the connection.
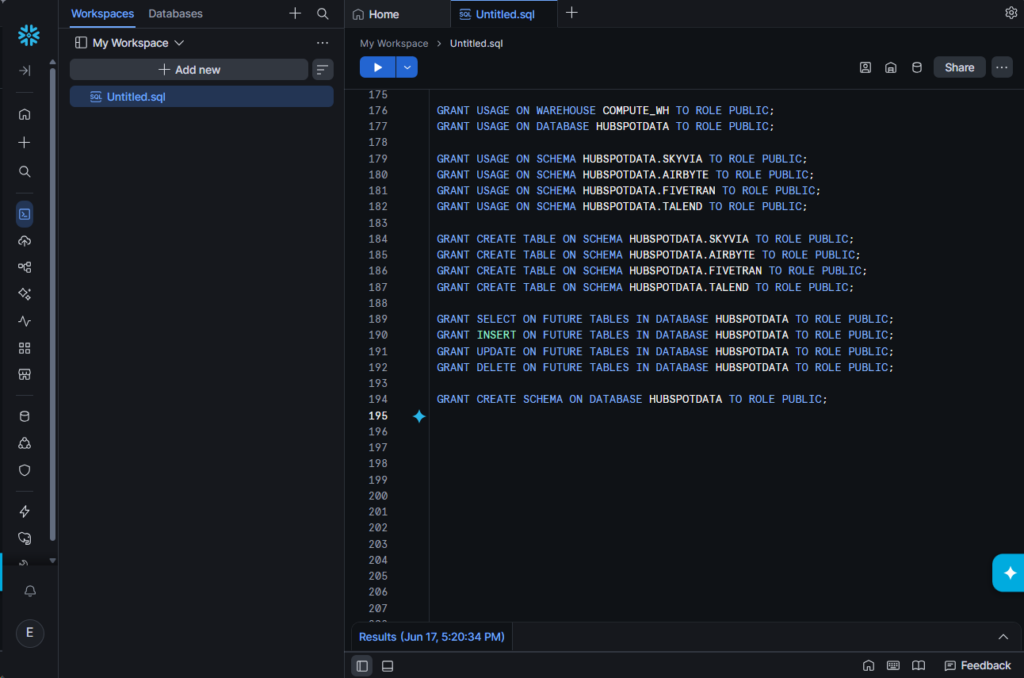
- So, I created TESTUSER and GRANT USAGE, CREATE TABLE, SELECT, INSERT, UPDATE, DELETE, and FUTURE TABLES permissions to the role.
- The role I used (PUBLIC role for test purposes) should have access to the compute warehouse, database, and the 4 schemas I made for each tool.
- Fivetran will create another schema for processing purposes, so the CREATE SCHEMA permission should be given.
Below are the commands I issued:
I didn’t set all these permissions in one go. As I go along configuring the connectors for each tool, I add the applicable permission as the error is triggered.
The bottom line: The MFA enforcement is good for Snowflake security and our pipeline, though it added additional security setup.
Meanwhile, I reused my existing HubSpot connection in Skyvia because it’s still working. For the rest of the tools, I will have to configure them.
How Do the Top HubSpot Data Integration Platforms Actually Compare?
To give you an idea about the tools we will use, here’s a HubSpot ETL tools comparison table:
| Tool | Best For | Pricing Model | Minimum Sync Frequency | API & Setup Complexity | Primary Deployment |
|---|---|---|---|---|---|
| Skyvia | No-code ETL/ELT/Reverse ETL | Fixed-tier (Per Data Volume/Connector) | 1 minute | Visual Wizard (No-Code) | Fully Cloud-Native |
| Fivetran | Enterprise ELT | Consumption-based (Per Monthly Active Row) | Near real-time | Low-Code / Managed / Code using Fivetran API/CDK | Cloud-Managed/Hybrid |
| Airbyte | Open source, developer-heavy | Airbyte Cloud: Compute-based (Credits) Airbyte Core: Free PyAirbyte: Free | Custom (via Cron) | Airbyte Cloud: Visual Airbyte Core/PyAirbyte: Requires CLI / Code for custom setups | Self-Hosted or Cloud |
| Talend | Enterprise, high-volume workloads | Custom Enterprise Quoting | Near real-time | Mix of visual and custom setups | On-Premise or Cloud |
I used trial accounts for Talend and Fivetran, the Skyvia free tier, and PyAirbyte for this review.
Which HubSpot ETL Tool Is Best for No-Code Workflows?
HubSpot ETL tools classified under these criteria are easy to use, and users of these tools prefer wizards and configurations instead of coding.
Skyvia
Skyvia is a cloud-native data platform that offers a variety of data management tools without coding. Teams without dedicated data engineers prefer Skyvia for its no-code approach.
Though I had a rough start with the Snowflake connection, once it was resolved, everything else was easy. Like the other reviews and tests I did, Skyvia gave me the easiest way to produce a pipeline capable of replicating HubSpot data to Snowflake because this is the tool I used the longest.
A Real HubSpot to Snowflake Example Using Skyvia
I need two connections, one for HubSpot and another for Snowflake. Then, I used these two in Skyvia Replication as the source and target.
Let me start with the connectors.
Connector Setup
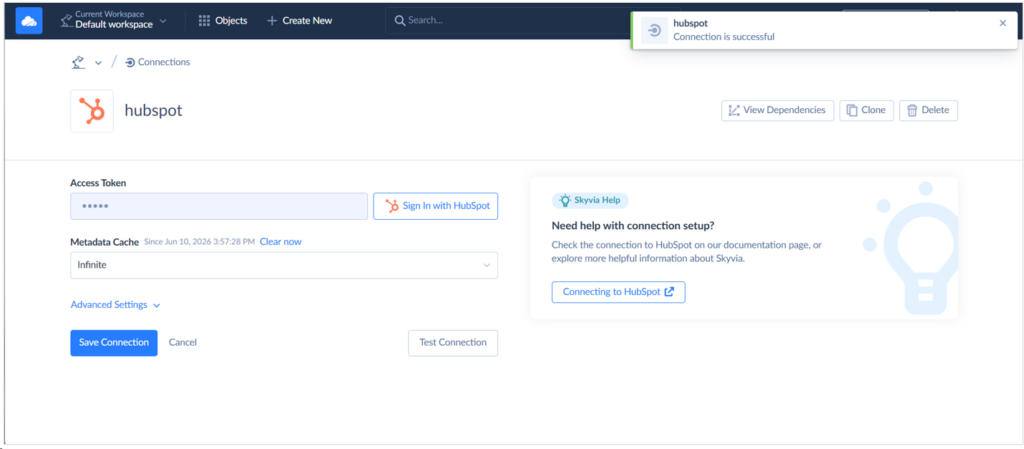
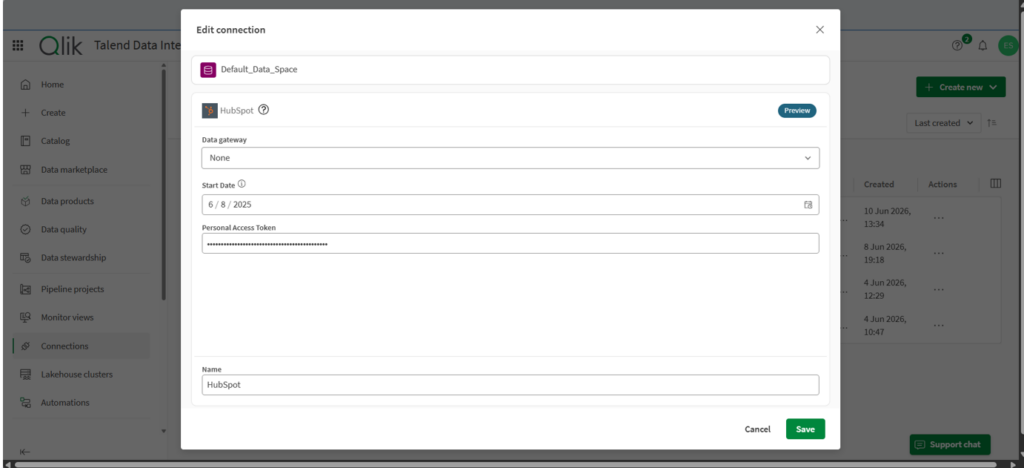
HubSpot is pretty easy to set up, as it only requires a HubSpot login to get the Access Token. Below is my successful connection to HubSpot:
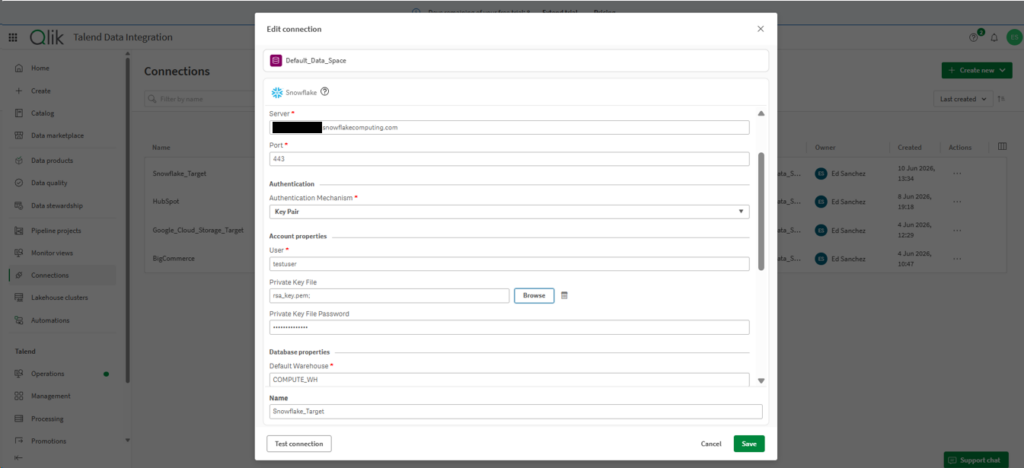
I used Key-pair authentication in Snowflake, though OAuth is also working. Do not try the Basic or username/password authentication because it will only fail.
Below is my Snowflake connection after I changed the authentication method. It connects successfully, as seen below:
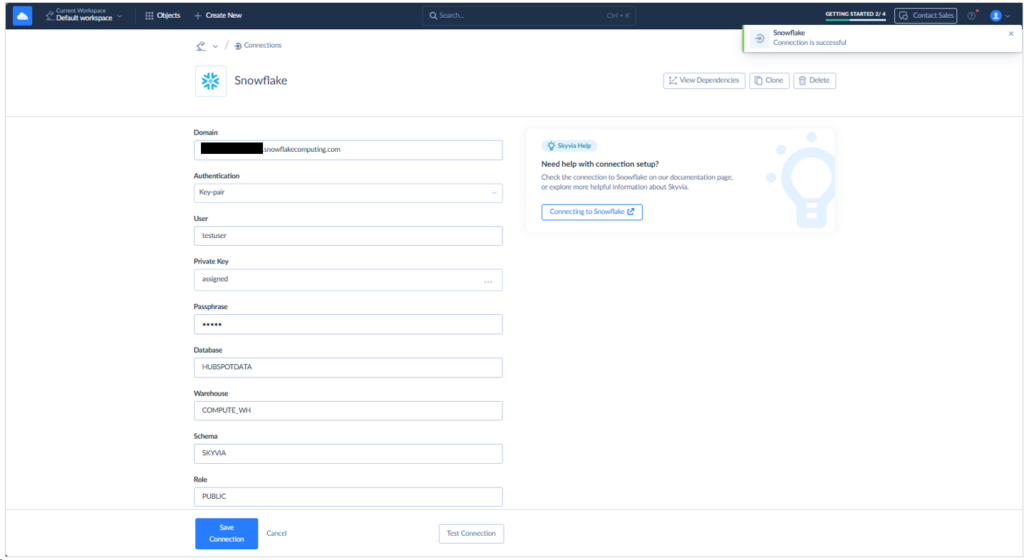
Note that I explicitly set the Schema to SKYVIA. The tables that Skyvia will write to Snowflake will be stored under this schema. If you already have many Skyvia connections, I suggest you name your connections properly.
Pipeline Setup
While Skyvia offers a variety of ways to integrate HubSpot and Snowflake, I used Replication because it fits the purpose, and it’s the fastest I can make. See below when I set HubSpot as the Source, and Snowflake as the Target. Then, I chose Companies, Contacts, and Deals. I named this replication “hubspot-snowflake” and saved it.
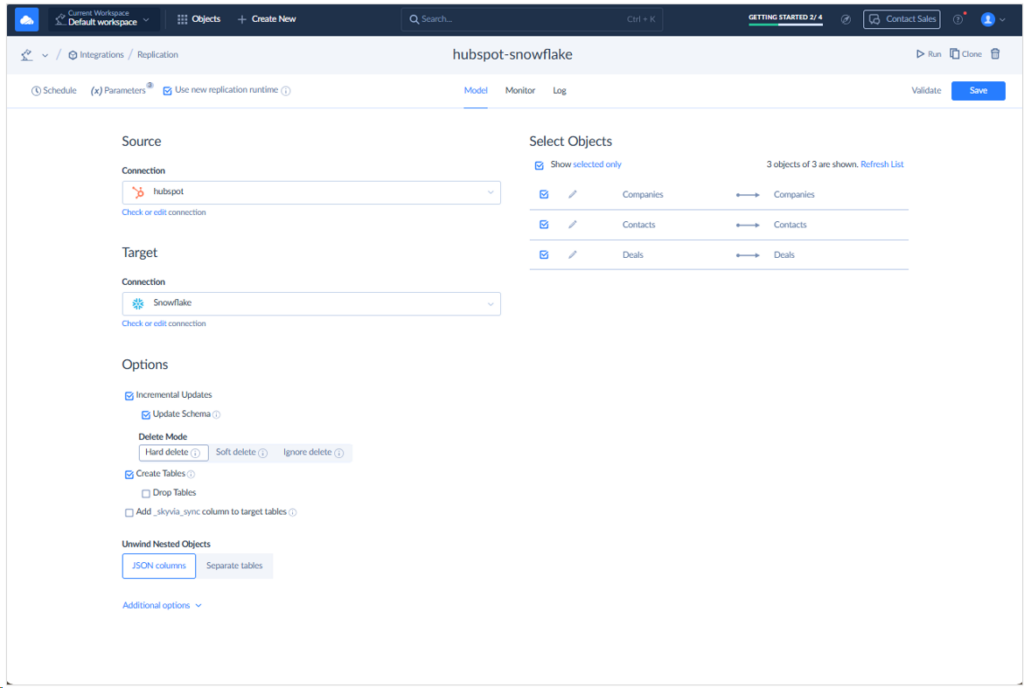
I prepared the above in 15 minutes since I also need to deal with Snowflake permission errors as they come. With the new config to Snowflake, other pipelines that will target this warehouse will have a complete replication pipeline in 5 minutes.
Runtime Results and Observations
It took only 38 seconds to replicate the rows from HubSpot to Snowflake.
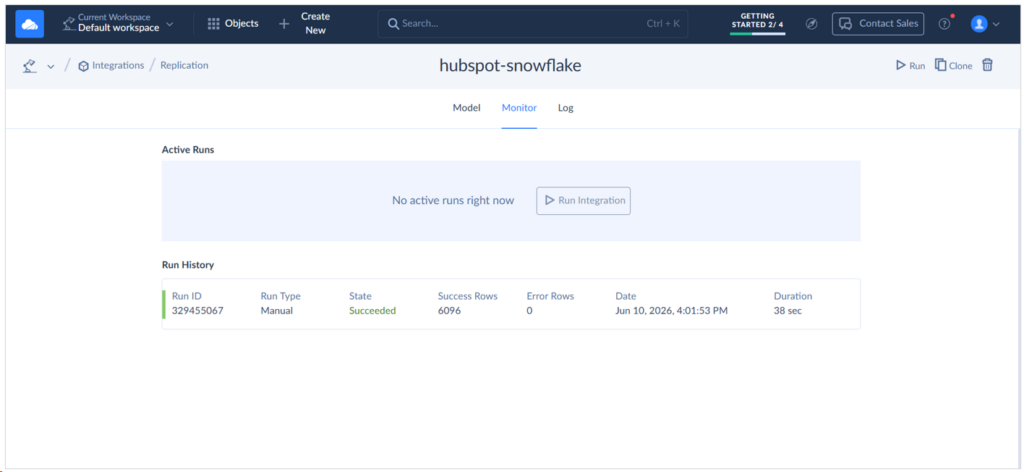
And the number of rows replicated is consistent with my HubSpot data. See below:

Results in Snowflake
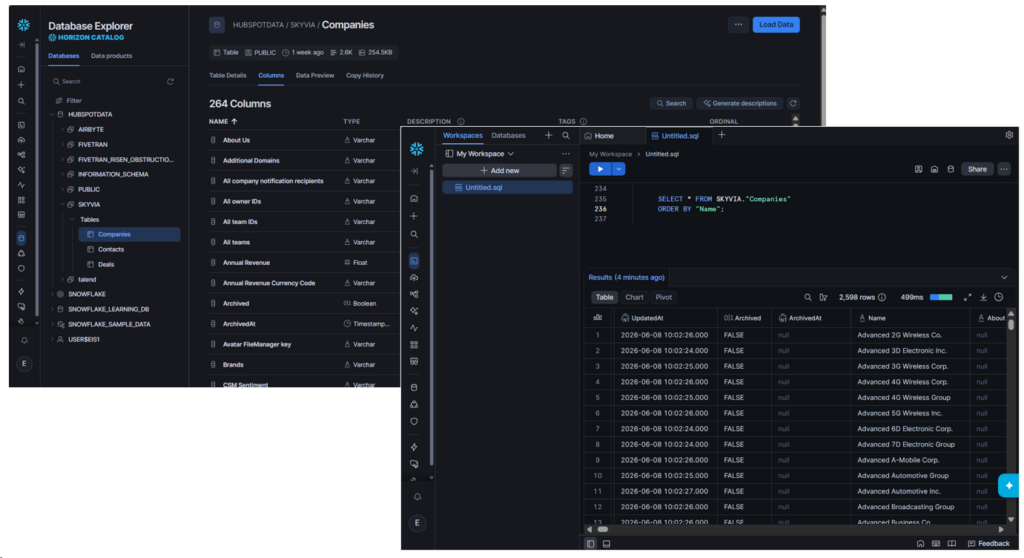
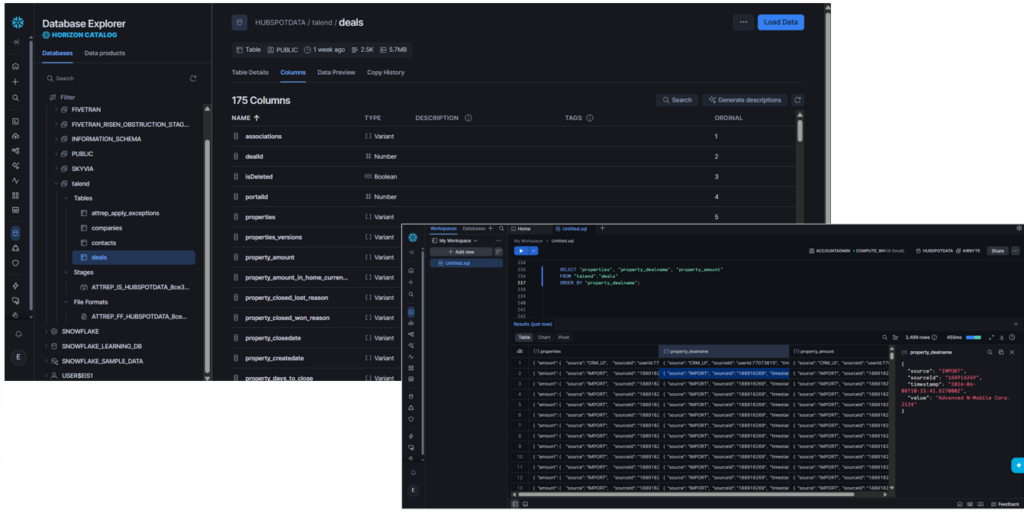
Did it really work? Checking in Snowflake’s Database Explorer reveals 3 new tables under the SKYVIA schema.
The Companies table in HubSpot has 6 columns with 1 nested JSON column. Upon checking, Skyvia flattened the nested JSON column, and the target table has 264 columns for easy querying and reporting. The company data I expect is also there. See below:
HubSpot Contacts also has 6 columns. Skyvia replicated it with 402 columns. Names I expect are there. Check it out below:

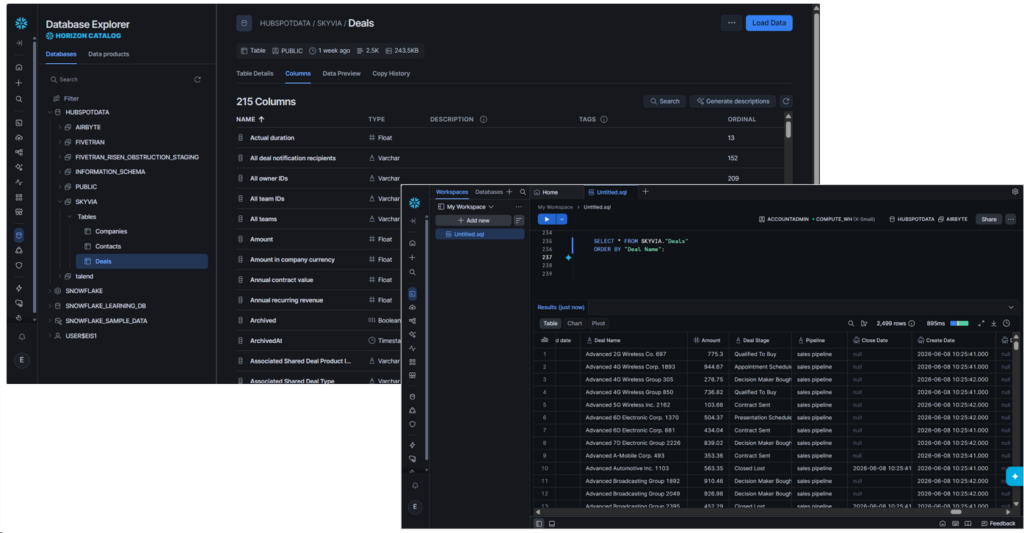
HubSpot Deals also has 6 columns. After flattening the JSON column, it resulted to 215 columns.
Every time HubSpot adds JSON items to either Companies, Contacts, or Deals, the nested JSON column expands its items. The Skyvia team adds this new info as a new column. Note this design decision as it will affect your pipeline.
Best For
Teams that want minimal barrier to entry and no-code pipelines will benefit best with Skyvia. Though Skyvia will readily capture the attention of businesses of different sizes (from SMBs to Enterprises) without senior developers, it’s actually good for anyone who wants to get out of manual exports/imports quickly.
Rating
- G2 : 300 reviewers rated 4.8/5
- Capterra : 116 reviewers rated 4.9/5
Pricing
I used the free tier in this review with a 10k limit on processed rows. That’s enough just to prove a real, working pipeline for HubSpot to Snowflake. But Skyvia offers Basic, Standard, Professional, and Enterprise plans. As you move up to the higher plan, you will have more rows allowed monthly, more scheduled integrations, better integration scenarios, and improved mapping functionality.
You can try the Basic plan at $79/month. Refer to the Skyvia pricing page for additional information.
Pros
- Learning curve is minimal with a clean, intuitive user interface. It’s the most minimal of the tools I tried.
- There’s a free plan you can try out before committing to a paid plan.
- Most sources and targets are here, including HubSpot, Snowflake, Salesforce, and more.
- Supports ETL, ELT, reverse ETL, backups, replications, import/export, syncs, automation, and API support.
- Documentation is enough. It helped me troubleshoot the Snowflake issue by myself.
Cons
- Being cloud-native, Skyvia is not for you if you operate under heavily regulated, on-premise environments like banking and healthcare. Talend or Airbyte Core might be a better fit.
- Free plans are limited to 10k rows. I often hit this limit during tests, and I have to wait for a month for it to reset.

What Is the Best HubSpot ETL Tool for Developer-Heavy Teams?
Teams with Python or Java developers may choose an open-source option. Both Fivetran and Airbyte have APIs and Connector Development Kits (CDKs).
Fivetran
With Fivetran, you can choose between no-code or full coding. I chose the no-code route as I only have 40 hours to test and Airbyte already got the most hours. I think this is my second or third time using Fivetran.
A Real HubSpot to Snowflake Example Using Fivetran
I’m using a trial account, and I have 14 days to finish the pipeline and make screenshots. Like in Skyvia, I started with configuring my HubSpot and Snowflake configurations. When you say Connections in Fivetran, it is the pipeline with source data. You have to prepare a Destination to complete the connection. It’s kind of different with Skyvia, but it’s just the terminology.
Connector Setup
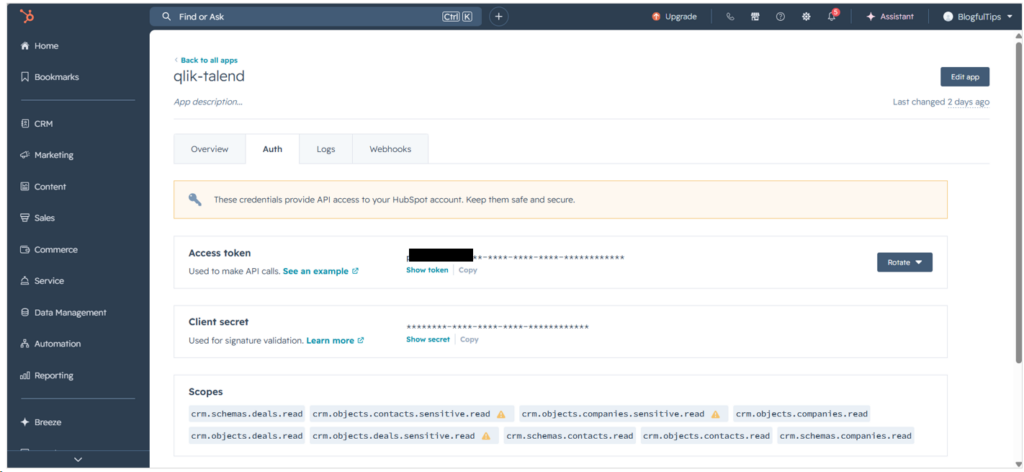
Configuring the HubSpot source is different from Skyvia. I have to open both Fivetran and HubSpot in separate tabs in the browser. In the HubSpot page, I made a Private app with read permissions scopes for companies, contacts, and deals. With that, I got an Access Token and Client Secret. These should go to the corresponding boxes in the HubSpot source configuration. But Fivetran will issue a Webhook URL, and that URL should go to the same Private app under Webhooks -> Target URL.
See what I did below and follow the arrows:
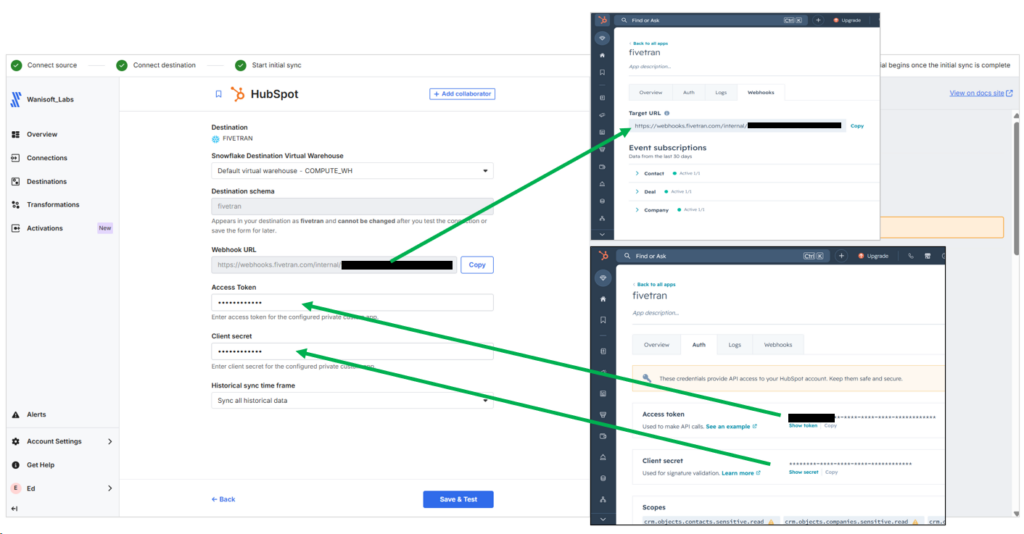
Configuring the Snowflake Destination is basically the same with Skyvia. Below is my setup in Fivetran:
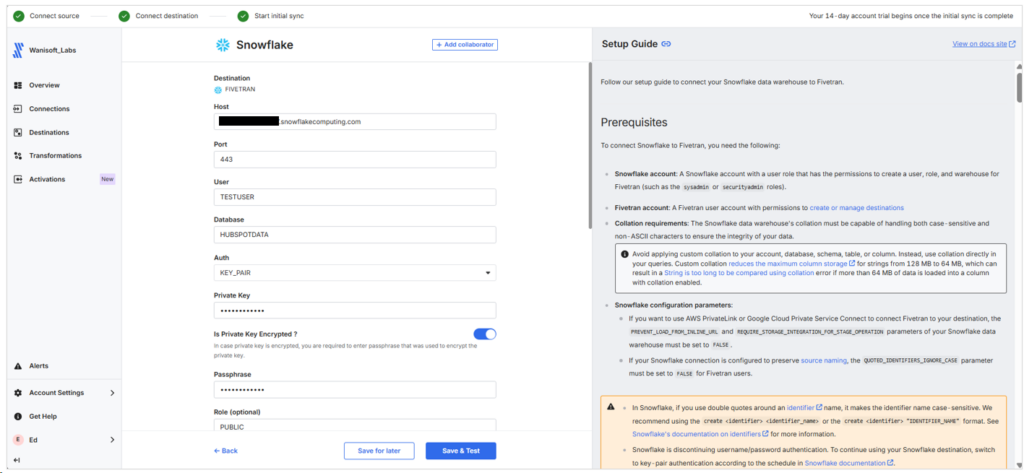
What I don’t like about Fivetran is the naming of sources and targets. It can’t be renamed after saving. Fivetran uses the name I gave for the Snowflake target as the schema name. I made a mistake with the naming 3 times just to target the FIVETRAN schema in Snowflake. So, I have to redo the setup 3 times too.
Pipeline Setup
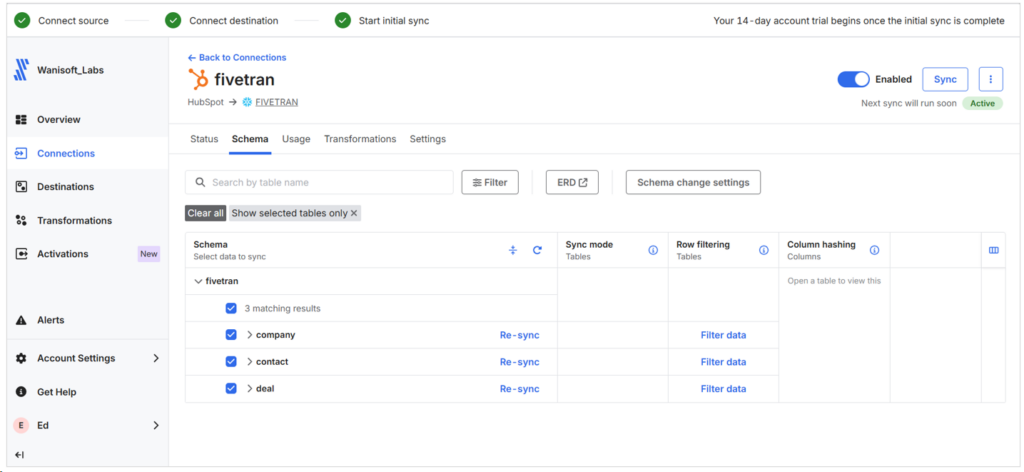
I chose the same 3 HubSpot objects for this Fivetran pipeline. The Schema change settings is where Fivetran shines. That’s where automatic schema change handling is configured.
It’s also a replication of the 3 HubSpot objects, and below is my setup:
It took me 20 minutes of setup time, including the redo of the Snowflake destination.
Runtime Results and Observations
Initial sync took 58 seconds, as shown in the Connection Status below:
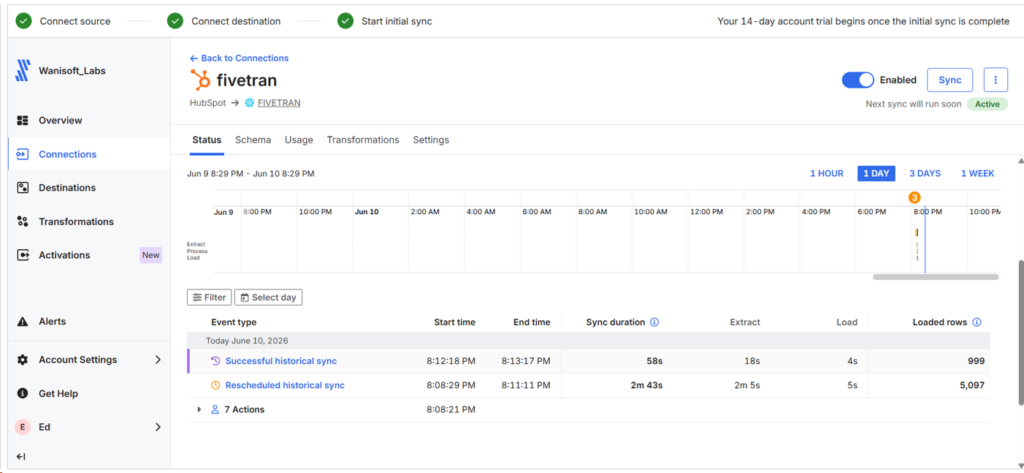
I notice that the Extracted rows are bigger than what the other tools did, but the loaded rows are consistent. See each table rows loaded below:
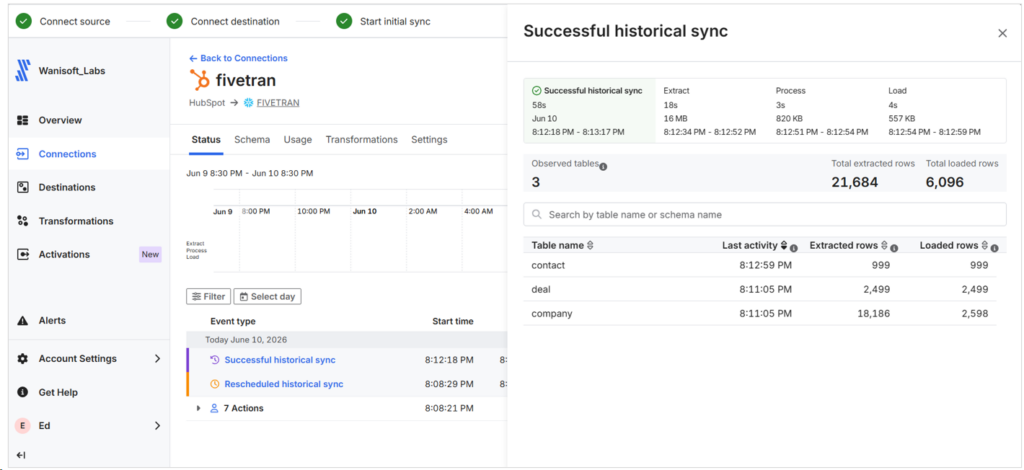
It could be soft-deleted rows but I’m not sure.
Fivetran created a schema in Snowflake called FIVETRAN_RISEN_OBSTRUCTION_STAGING. Most likely it’s a staging area for Fivetran processing, but it’s empty of tables after the pipeline finishes the initial sync.
Results in Snowflake
Fivetran did lesser columns compared to Skyvia. Target column names are prefixed with PROPERTY_. This tells us that it came from the PROPERTIES column in HubSpot, a JSON column. The Company table has 56 columns, and the expected company data are there. See below:

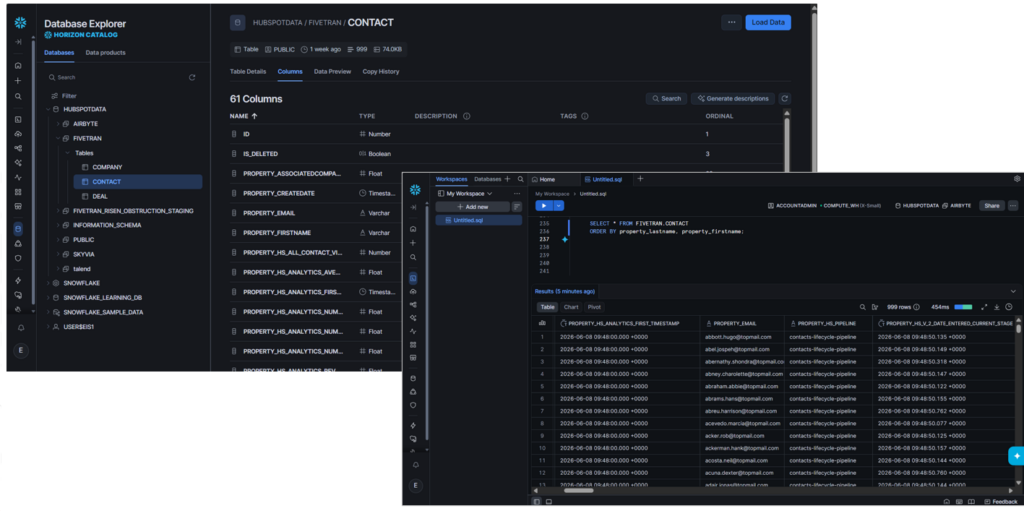
Meanwhile, it’s 61 columns for the Contact table:
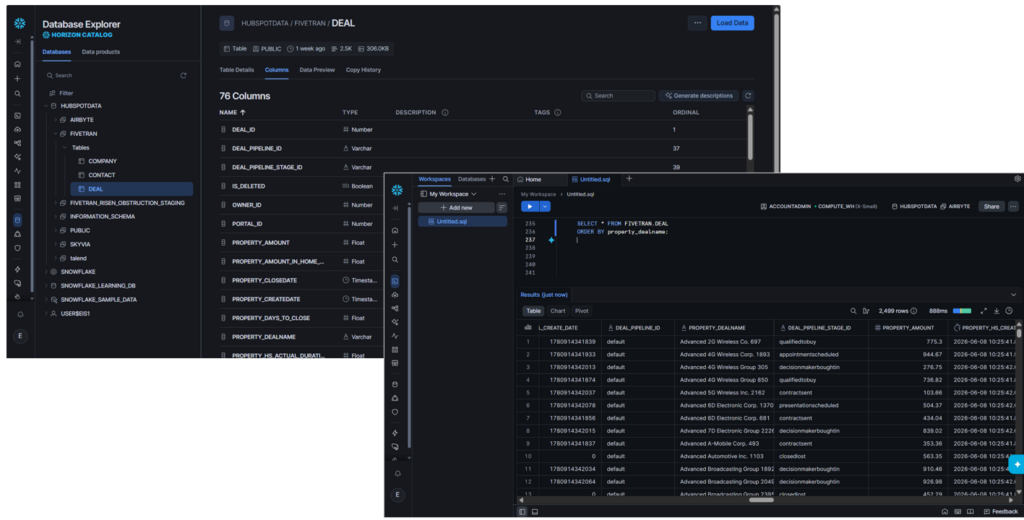
And 76 columns for the Deal table:
In the end, the replication is a success using Fivetran.
Best For
Teams that require strong, automated ELT pipelines with low maintenance costs, particularly on schema modifications. It’s most at home in mid-market and enterprise environments.
Perfect for big data companies, particularly those that prioritize fast scaling, broad connectivity options, and hassle-free schema management.
Rating
- G2 : 782 reviewers rated 4.3/5
- Capterra : 25 reviewers rated 4.4/5
Pricing
Fivetran bills users based on Monthly Active Rows (MAR) – their usage-based model.
- Free Tier. Up to 5k model runs per month for 500k MARs
- Standard Plan. “Pay as you go” includes unlimited users and faster sync intervals.
- Enterprise & Business Critical Tiers. Adds granular access controls, private networking, and compliance certifications (e.g., PCI DSS).
You need to monitor usage and costs. It may spike with growing row volume, frequently changing schemas, and real-time sync needs. Multiple connectors, each tracking MAR separately, can complicate budgeting.
For more details, visit Fivetran’s pricing page.
Pros
- Setup is simple with a few clicks and no coding
- Automatic schema migration with minimal maintenance
- Heavy on security and compliance
- Offers cloud and hybrid setups
- Developers can use the Fivetran API and CDK for flexible pipeline setups. This is available even with the 14-day trial.
Cons
- Pricing unpredictability. MAR-based billing can spike unexpectedly with growing data volumes.
- Not practical for startups and medium-sized businesses
- Fivetran API and CDK require a paid plan after the free trial ends.
Airbyte
Airbyte is an open-source data platform, and it offers a fully-managed cloud service with Airbyte Cloud, self-hosted with Airbyte Core, and a Python library independent of the Cloud and Core offerings.
I used PyAirbyte again in this test as I’m already familiar and I don’t need Airbyte accounts.
A Real HubSpot to Snowflake Example Using Airbyte
The full source code and instructions for this PyAirbyte project can be found on GitHub. You are welcome to visit and try it.
I used Visual Studio Code and Python 3.12.3 to develop this project. It is capable of:
- extracting companies, contacts, and deals from HubSpot with paging.
- caching the extracted data to DuckDB. Allows 3 retries if extraction fails.
- inserting rows into staging tables in Snowflake.
- comparing the staging tables to the live tables, allowing an UPDATE if rows exist and INSERT if rows don’t exist. In other words, an UPSERT.
The Custom HubSpot Connector
Below are the needed imports in the pipeline inside the Python project.
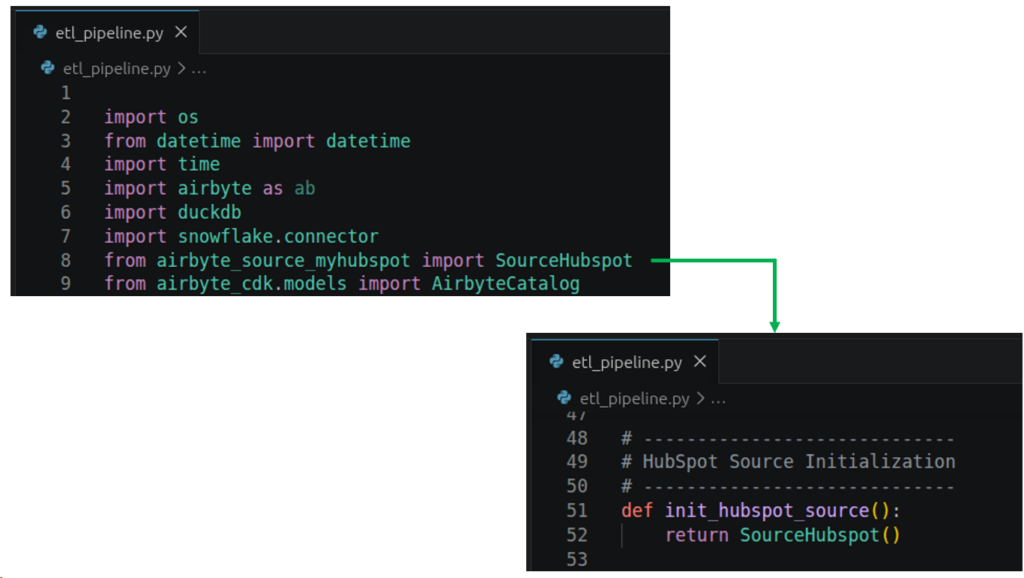
Notice the SourceHubspot import and its initialization below it. This means that we will use a custom HubSpot connector. Here’s why: I encountered a “SyncMode is not defined” error that I can’t fix in time. Even if I use force_full_refresh = true and WriteStrategy is REPLACE during read().
So, below is the code for the custom connector:
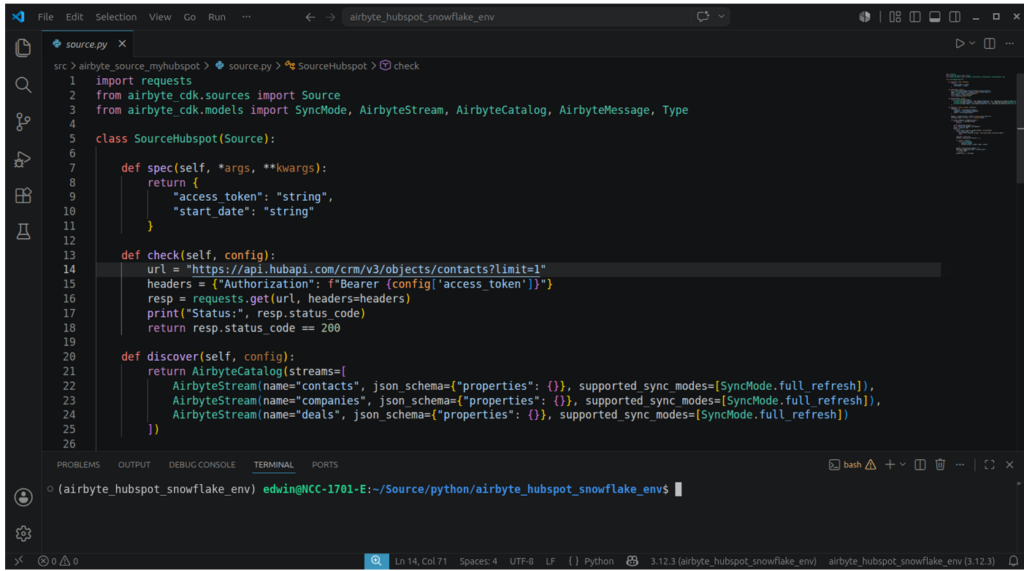
The methods spec(), check(), discover(), and read() are required by PyAirbyte for custom connectors.
- spec() returns the connection config access token and start date. This is not used in my code, but is required by PyAirbyte.
- check() tests a HubSpot connection given an access token. Any endpoint can be used for checking. In the above code, the contacts endpoint is used.
- discover() returns the available streams, and in the above code, it restricts our connector to contacts, companies, and deals. These are the only streams we need in this test. Notice the properties are also empty ( {} ). This means all columns. It will capture columns added by HubSpot on subsequent runs.
- read() extracts the streams and records from HubSpot. See code below.
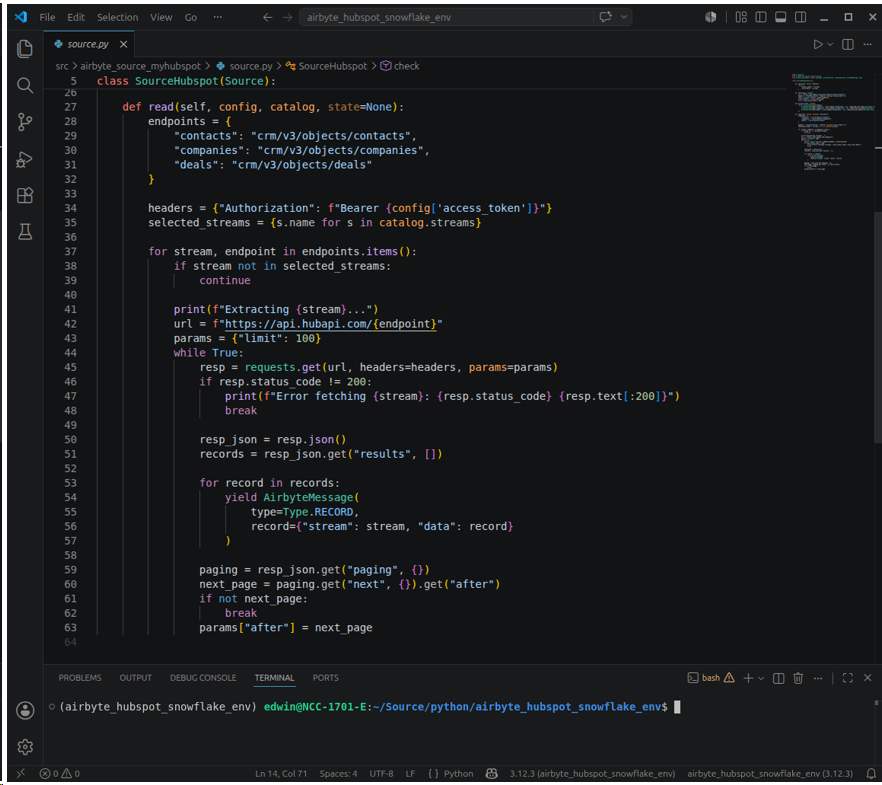
In the above code, it fetches rows of streams limited to 100 rows per page on every API request (params = {“limit”: 100}). It fetches per page until no more pages are available.
Snowflake and HubSpot Configuration in Code
Meanwhile, the project used the Python Snowflake connector, not the Airbyte destination-snowflake. Here’s why: destination-snowflake uses Java, and we’re using Python here. We can’t mix both.
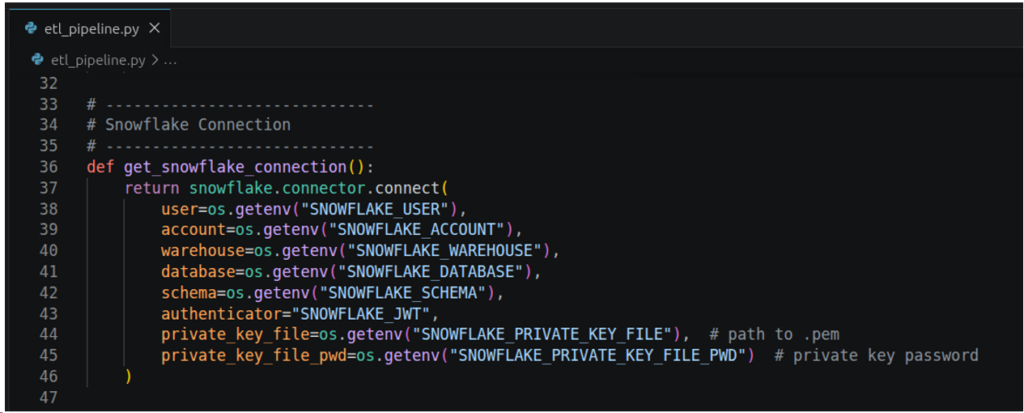
The above connection parameters are needed to connect to Snowflake using Key-Pair authentication. Miss one of the parameters and it won’t connect to Snowflake. The value passed to each parameter should be a value of an operating system environment variable. If it’s not defined, execution will stop. The schema for this project will use the AIRBYTE schema.
Below is the needed configuration to connect to HubSpot.
Pipeline Setup
The pipeline extracts HubSpot data and caches it to DuckDB, similar to what the official Airbyte HubSpot connector is capable of. Unlike in the BigCommerce PyAirbyte project I did last time, HubSpot has a nested JSON column which can be tricky if we go straight from HubSpot to Snowflake. If you’re planning to flatten and further transform the nested JSON column, caching it to DuckDB before transforming is a safe move.
See a portion of the code below:
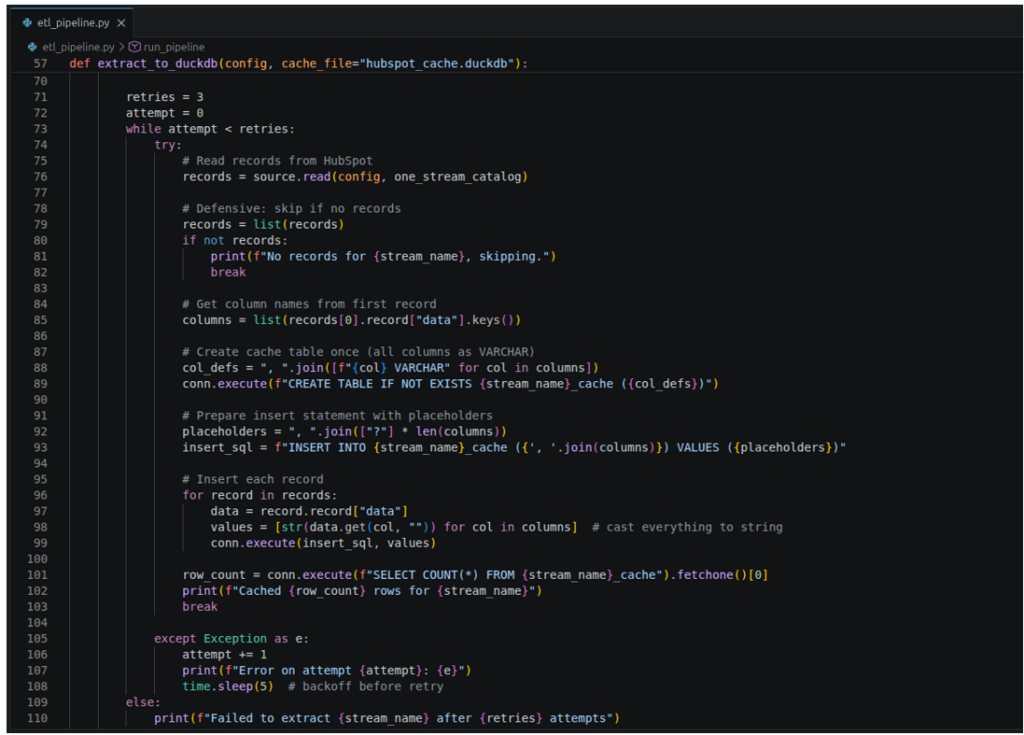
It creates a table in DuckDB for every HubSpot stream it encountered and inserts the rows there. It retries if there’s an error.
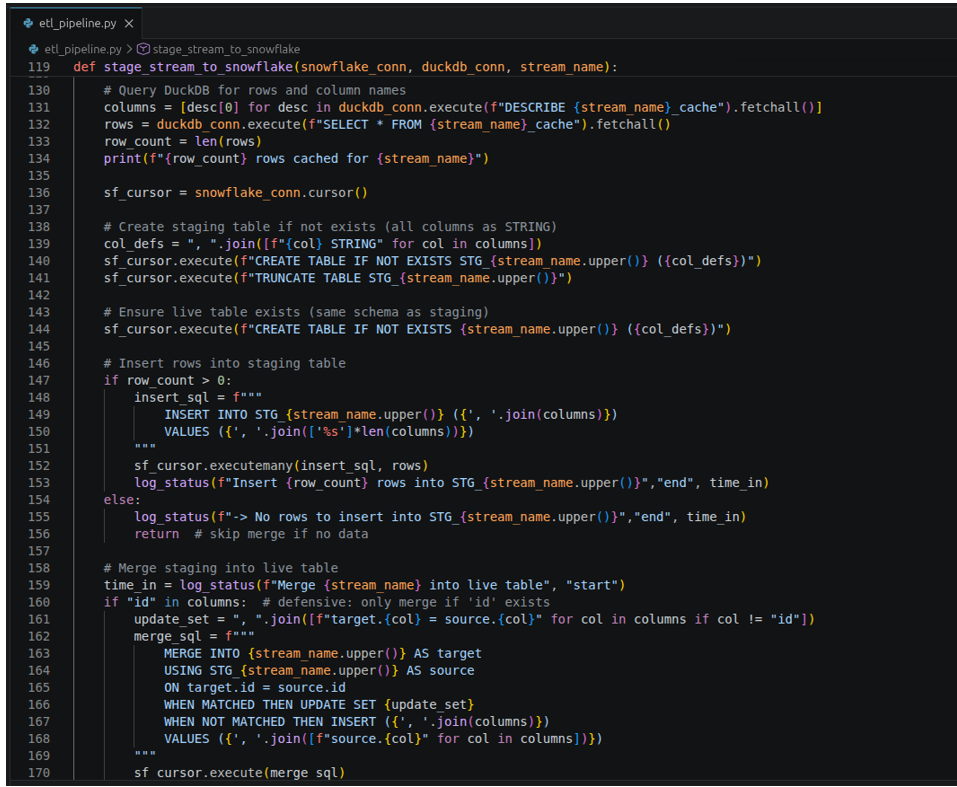
Then, it will stage the results to Snowflake staging tables to prepare for an UPSERT. It uses Snowflake MERGE to do that. See below:
Runtime Results and Observations
The output below is in my Linux Mint Terminal. It’s detailed with rows processed and duration for each table. It took 72 seconds to finish the pipeline; not too far from the duration it took the other HubSpot ETL tools.

The rows processed for Contacts, Companies, and Deals are also consistent with the other tools.
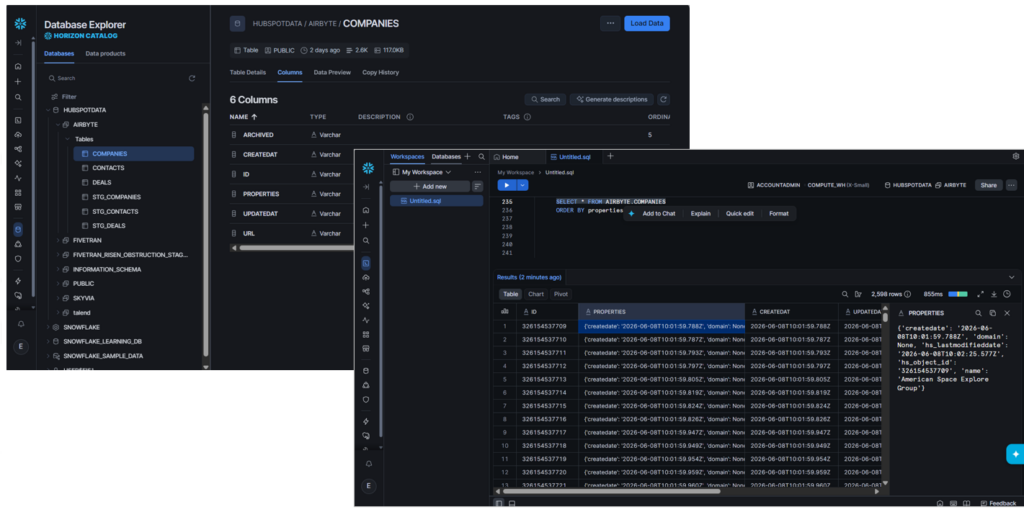
Results in Snowflake
Whatever the table or object is, HubSpot allocates 6 columns. So, 6 for contacts, 6 for companies, and 6 for deals. The replicated JSON data is unflattened. This has a big advantage: If HubSpot adds a new item in the JSON payload, the pipeline won’t break in the next run. It is resilient to schema changes. In other words, it handles schema drifts.
This approach prioritizes pipeline safety. But you need to parse the JSON every time you query. Tools like Skyvia and Fivetran prioritize convenience and handle the schema drift in a different way.
Below is the replicated data for Companies:
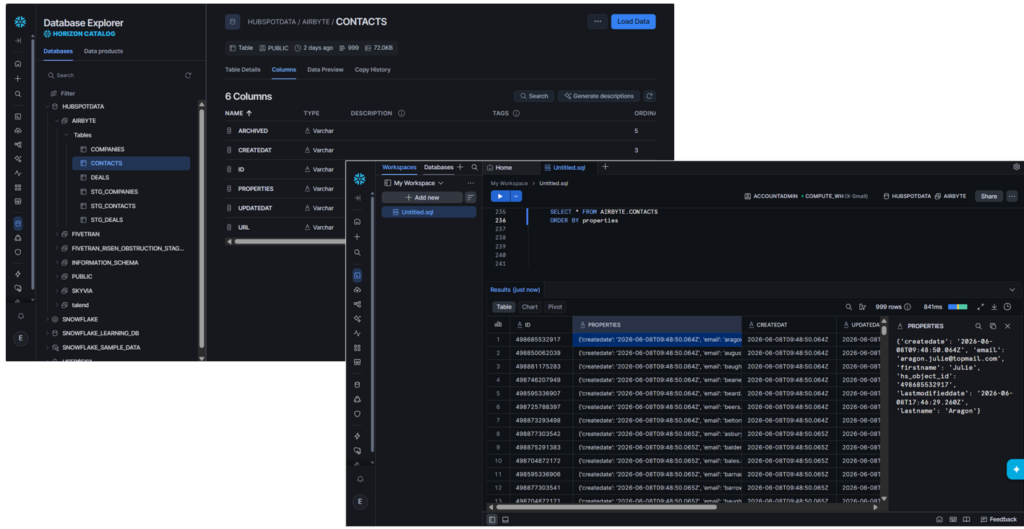
For Contacts:
And finally, for Deals:
Best For
Airbyte Cloud is more suited to SMBs and enterprise-level organizations that require an open-source solution and a way to make custom source connectors without coding.
On the other hand, if your company requires an on-premise solution and you have a team of experts, Airbyte Core is a good fit.
Finally, PyAirbyte is for developers who need flexible pipelines without reliance on an Airbyte account and want to avoid maintaining a self-hosted Airbyte Core.
Rating
- G2 : 76 reviewers rated 4.4/5
- Capterra: no reviews
Pricing
Airbyte Core, PyAirbyte, and the Airbyte API are always free and open source.
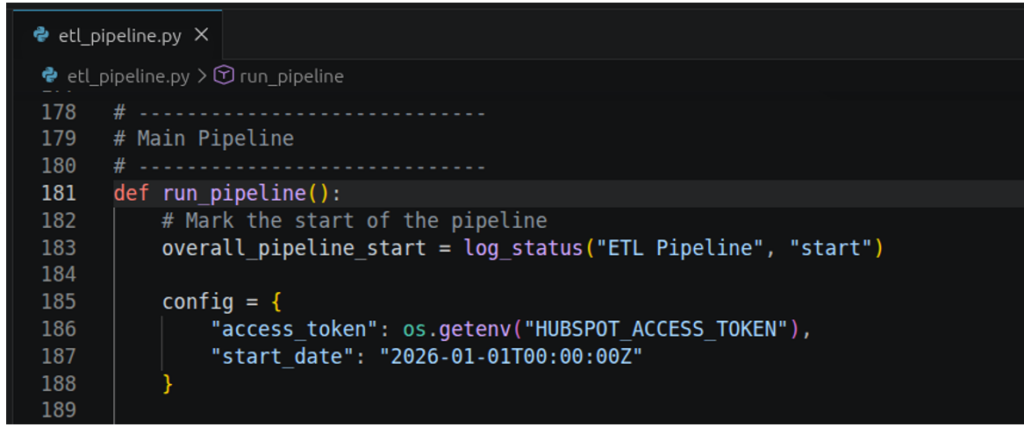
Airbyte Cloud pricing plans include Standard, Plus, and Pro, using capacity-based pricing. You need to contact sales for a tailored quote. For more details, visit the Airbyte pricing page.
Pros
- Offers the highest flexibility in developing data pipelines with PyAirbyte.
- Open source and developer-friendly.
- Offers both self-managed (Airbyte Core) and fully-managed (Airbyte Cloud) solutions.
- Easy, no-code replication for non-developers using Airbyte Cloud/Core.
- Custom connectors (build your own) using the Connector Builder or using PyAirbyte.
Cons
- High Maintenance: Coding takes time. You will manage API rate limits, error handling, debugging, and more.
- Connector fragility: APIs change often, and community connectors may lag. You may need a custom connector in cases like these.
- Infra burden: If you self-host, expect to manage scaling, monitoring, and upgrades. Costs may be higher than having a cloud-managed service.
Which HubSpot Integration Is Best for Enterprise and On-Premise Needs?
Are you working for a bank, pharmaceutical company, and the like? Are huge datasets an everyday thing, and regulatory compliance is a must? Your tools should fit this use case. Qlik Talend is one of them.
Talend
Talend, or Qlik Talend, offers data integration with agile data warehouse automation at scale, with a focus on trusted enterprise-ready data. Deployment is flexible: cloud and on-premises.
A Real HubSpot to Snowflake Example Using Talend
I need a work email to register for a trial in Talend Data Integration. I’ve tried this a few times, and it’s easy to create replications. Though being easy, finishing the pipeline took a bit longer due to the security issue in Snowflake. It took me 15 minutes instead of 7 – 10 minutes.
Connector Setup
Before Talend can use a HubSpot connection, it needs a Private app defined in HubSpot. This will provide the Access Token. Check out the Private app for Talend below:
From there, I copied the Access Token and pasted it into the Talend HubSpot connection as seen below:
Talend’s HubSpot connector is in preview, but I got it working as expected, unlike the BigCommerce connector I tried a while back.
Below is the Snowflake connection and its configuration using Key-Pair authentication. I used the same Private Key File I’ve used with the other tools.
Test connections for both HubSpot and Snowflake are good.
Pipeline Setup
I created a replication Pipeline Project in Talend by setting the source to HubSpot and the target to Snowflake. Then, I configured the replication to include the Companies, Contacts, and Deals as seen below:
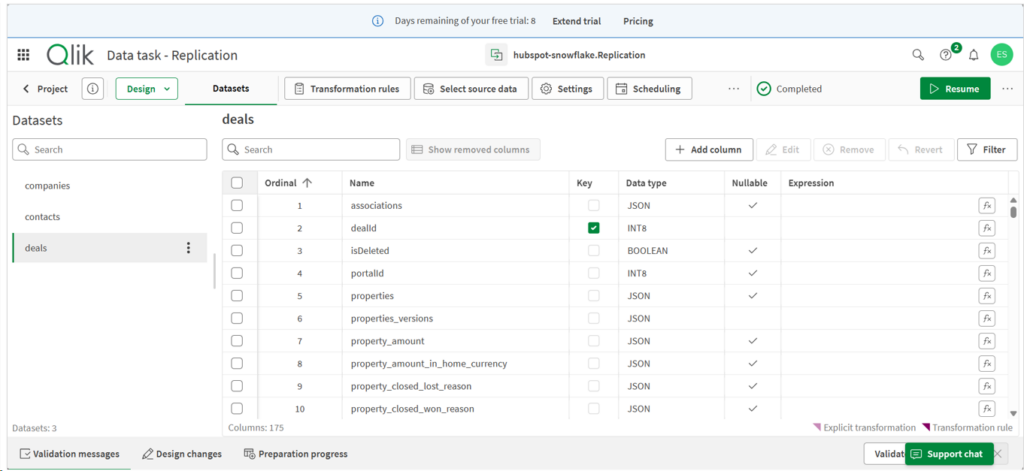
The wizard made it easy to configure the pipeline project.
Runtime Results and Observations
It took 1 minute and almost 20 seconds for the initial sync. The results are the same as the other tools.
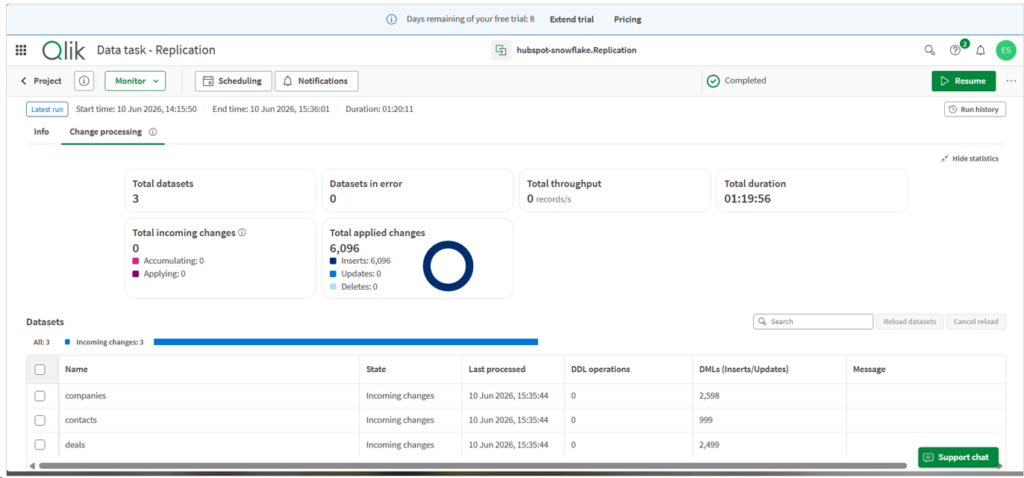
The good thing I notice here is I can see the total duration and the rows processed for each dataset on one page. I don’t need to click to see the details.
Results in Snowflake
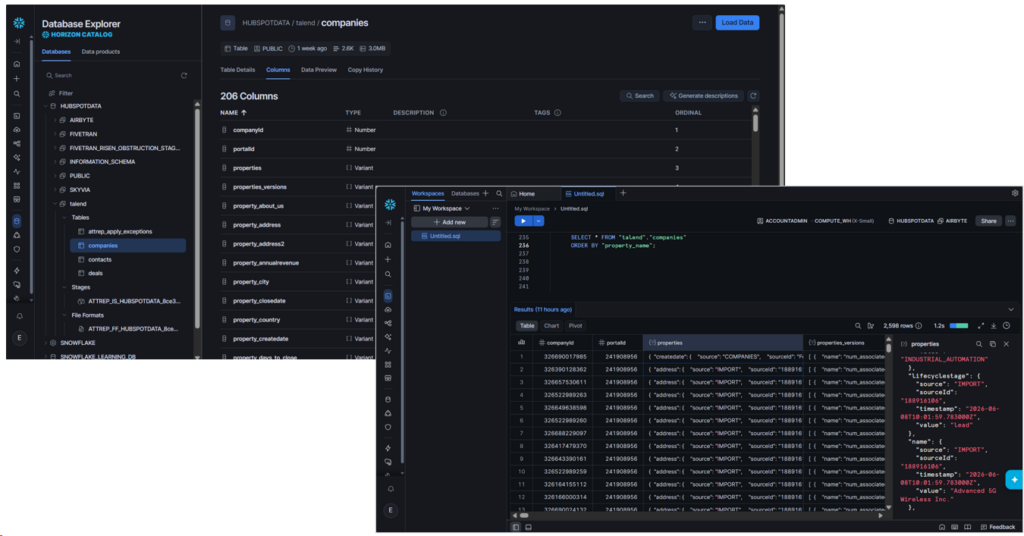
Among the four tools used here, Talend is the only one that created a Snowflake Stage and CSV file formats before finalizing the rows in the target tables.
Surprisingly, the Companies data are mostly JSON columns with a VARIANT data type. See it below:
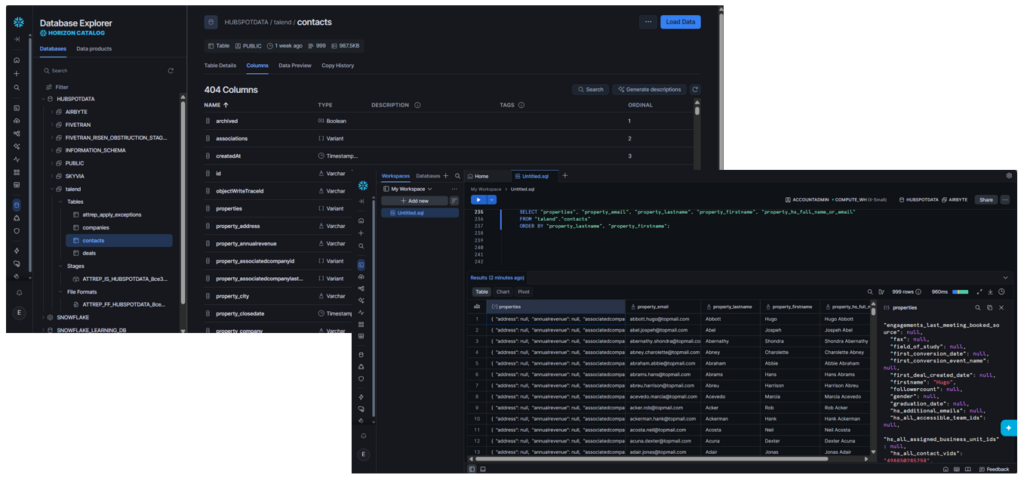
Contacts are different, though. Relevant information is flattened, but there’s a properties column that’s unflattened:
Finally, deals have unflattened JSON columns. See below:
Because of the unflattened columns, querying the tables in Snowflake needs flattening the JSON columns every time.
Best For
Enterprise-level data pipelines with huge datasets across cloud and on-premises environments. Ideal for users who value an all-in-one solution with strong governance and management features, and who can manage a more involved installation and setup process.
Rating
- G2 : 13 reviewers rated 4.6/5
- Capterra : 24 reviewers rated 4.3/5
Pricing
Pricing plans include Starter, Standard, Premium, and Enterprise, but there are no publicly posted figures for each. You must contact their sales for a quote.
Pros
- Drag-and-drop pipeline design
- Handles streaming and batch at scale; tight governance. Ideal for enterprise use cases.
- All-in-one data management – data integration, data quality, automations, analytics
- Very detailed processing logs that you can still configure and lessen, if desired.
Cons
- No free tier or developer account option
- Replicated HubSpot data in Snowflake needs flattening for tabular reports.
- Less friendly for lightweight or low-touch use cases where simpler tooling could suffice.
- Expensive for startups and midsize businesses
How Do You Actually Set Up a HubSpot Data Pipeline in 3 Steps?
I used the Skyvia Replication to replicate a copy of HubSpot companies, contacts, and deals into a Snowflake data warehouse. You saw screenshots of the connectors and the data pipeline earlier, but this is how it can be done in 3 steps:
Step 1: Create and Configure the HubSpot and Snowflake Connectors
I prepared the HubSpot and Snowflake credentials, especially the private key file for Snowflake.
From my Skyvia workspace, I clicked + Create New in the upper portion of the page. Then, I clicked Connection and selected the HubSpot connector. I configured it by signing in to HubSpot to get the access token. Then, I tested the connection and saved with a descriptive name. I used “hubspot” as the connection name.
I repeated the same step with Snowflake but using its credentials.
Step 2: Create and Configure the Skyvia Replication
I followed the wizard in this step, but manually setting it up is also easy for me.
From my Skyvia workspace, I clicked + Create New in the upper portion of the page, then clicked Replication. I set the source to the HubSpot connection I made in Step 1. Then, set the target to the Snowflake connection.
I didn’t change the Behaviour and Schema settings. Then, I chose the HubSpot objects contacts, companies, and deals. There are 148 HubSpot objects available for me during this test, but I only chose the 3.
I didn’t setup a schedule and just saved it.
Step 3: Create a Runtime Schedule
The Skyvia Replication I made is a one-time run for testing purposes. But if you want a hands-free, automatic run of the HubSpot to Snowflake replication at your preferred time, you can create a schedule for the pipeline.
You can make a schedule by clicking Schedule from inside the Skyvia pipeline you made. For example, this is exactly what it looks like coming from the HubSpot to Snowflake replication I made:
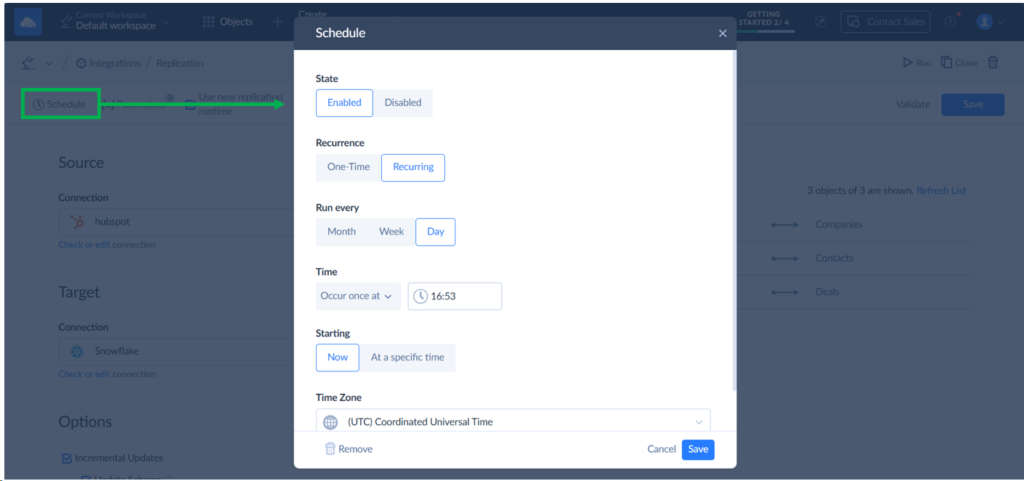
This can be set to Run every Month to every Day and can run at intervals of up to 1 second.
Are You Ready to Choose Your HubSpot ETL Solution?
So, you got working data pipeline examples for Skyvia, Fivetran, Airbyte, and Talend. All four HubSpot ETL tools handled the move to Snowflake successfully. You saw where they excel.
This proves that no perfect tool exists. It all depends on your use case and needs.
To recap, Fivetran has a hybrid setup and a developer API and CDK. Airbyte gives you options: cloud, self-hosted, and independent pipeline development that is open source. Talend fits you if you have enterprise-level data pipeline needs. But if you need a pipeline in 3 steps before lunch, there’s Skyvia for you. No scripting, no CLI, just a working pipeline for HubSpot to data warehouse.
Register for free in Skyvia today, and start creating pipelines immediately.
F.A.Q. for ETL Tools for HubSpot

Why do some HubSpot ETL platforms get so expensive over time?
Costs scale with rows synced, connectors, and frequency. As data volume grows, usage charges rise quickly.
Can I extract HubSpot Custom Objects with these tools?
Yes, but only if the tool supports HubSpot’s custom object endpoints. Free tiers and trials may exclude them, depending on the tool.
Should we build a custom HubSpot API integration or buy an ETL tool?
Build for control; buy for speed, managed infra, and support. The trade-off is effort vs expense.
Do these ETL tools also push data back into HubSpot?
Most are extract-only. Some offer reverse ETL features, but write-back is limited compared to read.
What is the fastest sync frequency I can get for a HubSpot pipeline?
There are 1-minute syncs or near real-time in paid plans; free tiers may restrict to hourly or daily syncs.


