

Summary
- Manual Export: A simple one-time approach using CSVs and S3, but not reliable for recurring or large-scale data loads.
- Custom Scripts: Flexible and powerful with Python or AWS Glue, but requires ongoing maintenance to handle API limits and schema changes.
- Skyvia (No-Code): An automated approach that handles schema, incremental updates, and API limits without manual effort.
- Verdict: Use Skyvia for scalable pipelines; manual for one-offs, scripts for full control with engineering support.
Salesforce is great at what it’s built for — managing relationships, tracking deals, keeping everything in one place.
But once you try to run serious analytics, things start to slow down. Reports time out, historical trends are hard to track, and complex queries just aren’t what it was designed for.
That’s the data silo problem.
The usual way out is to move that data into a warehouse like Amazon Redshift. It’s built for scale, runs on SQL, and can handle the kind of queries that would bring a CRM to its knees.
This guide walks through three ways to get there: the manual route (CSV exports), the code-heavy approach (APIs and AWS tools), and the smarter option using Skyvia.
We’ll break down what each one looks like in practice — where it works, where it breaks, and which one actually fits your setup.
Why Move Salesforce Data to Amazon Redshift?
You’ve got Salesforce full of rich customer data, but trying to slice it for insights feels like juggling hot potatoes. Moving that data into Redshift changes the game entirely. Here’s why.
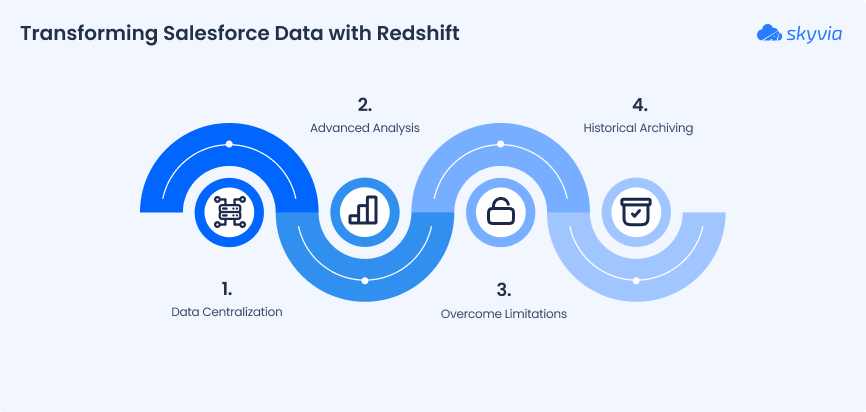
1. Unlock Advanced BI and Machine Learning
With Redshift as the playground, you can feed data into BI tools or machine learning models without slowing down Salesforce. That means smarter forecasts, better churn predictions, and dashboards that actually tell a story instead of just spitting numbers.
2. Overcome Salesforce Reporting and Storage Limitations
Salesforce is powerful, but large datasets and complex queries can grind your org to a halt. Redshift handles massive amounts of data effortlessly, letting you run heavy analytics without breaking a sweat or the Salesforce org.
3. Archive Historical Data for Compliance and Trend Analysis
Need to track long-term trends or meet regulatory requirements? By moving older records to Redshift, you free up Salesforce for daily operations while keeping a reliable, query-ready archive. It’s like moving seasonal inventory to storage. You still know exactly where everything is when you need it.

Method 1: The Manual Way (Native CSV Export)
Salesforce offers several native ways and tools for connecting Salesforce to Redshift:
- MuleSoft AnyPoint Platform. This is a Salesforce-owned solution for automatic data solution that allows Salesforce and Redshift integration, as well as with other apps and systems. It comes with an additional cost, depending on data sources and use cases, and there is no well-defined pricing published; you need to contact them for a quote.
- CSV Export and Import. A manual but cost-free alternative. You can use Data Loader or the Salesforce Data Export wizard to get CSV files of the objects that will be manually imported to Redshift. This method is available for Salesforce Enterprise, Performance, Unlimited, or Developer editions.
Option 1: Exporting Data via Salesforce Data Loader
Salesforce Data Loader is a client application for bulk import and export, available in the Enterprise, Performance, and Unlimited editions. It is a downloadable tool that supports up to 5 million records at a time.
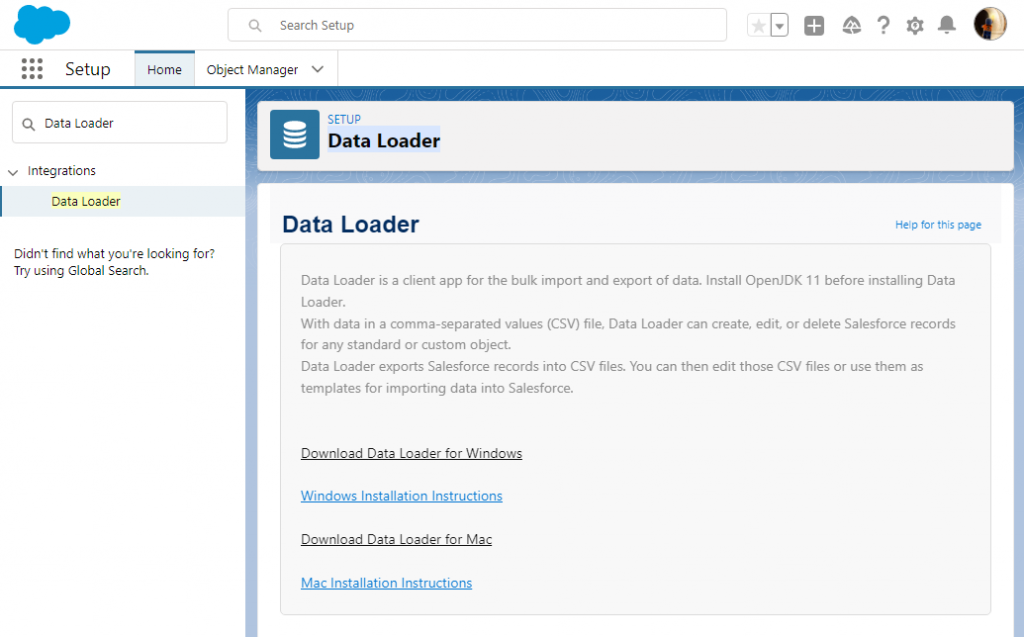
Before we start, download Data Loader and install it on your computer. Make sure that you have installed JRE and JDK: you can’t run Data Loader without them!
Then, do the following:
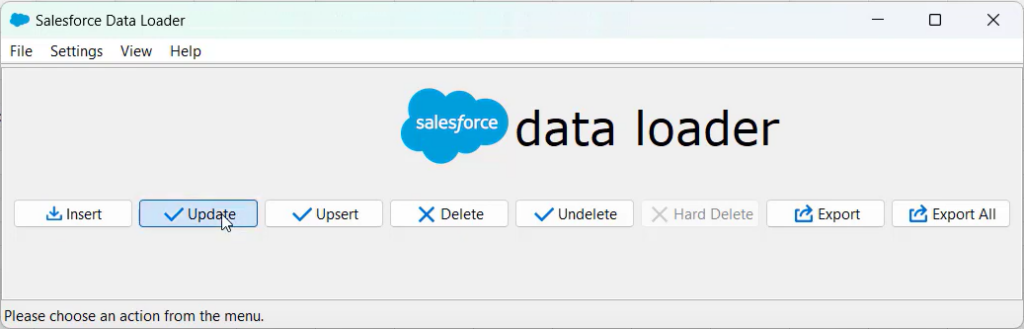
Step 1
In the Data Loader window, click Export.
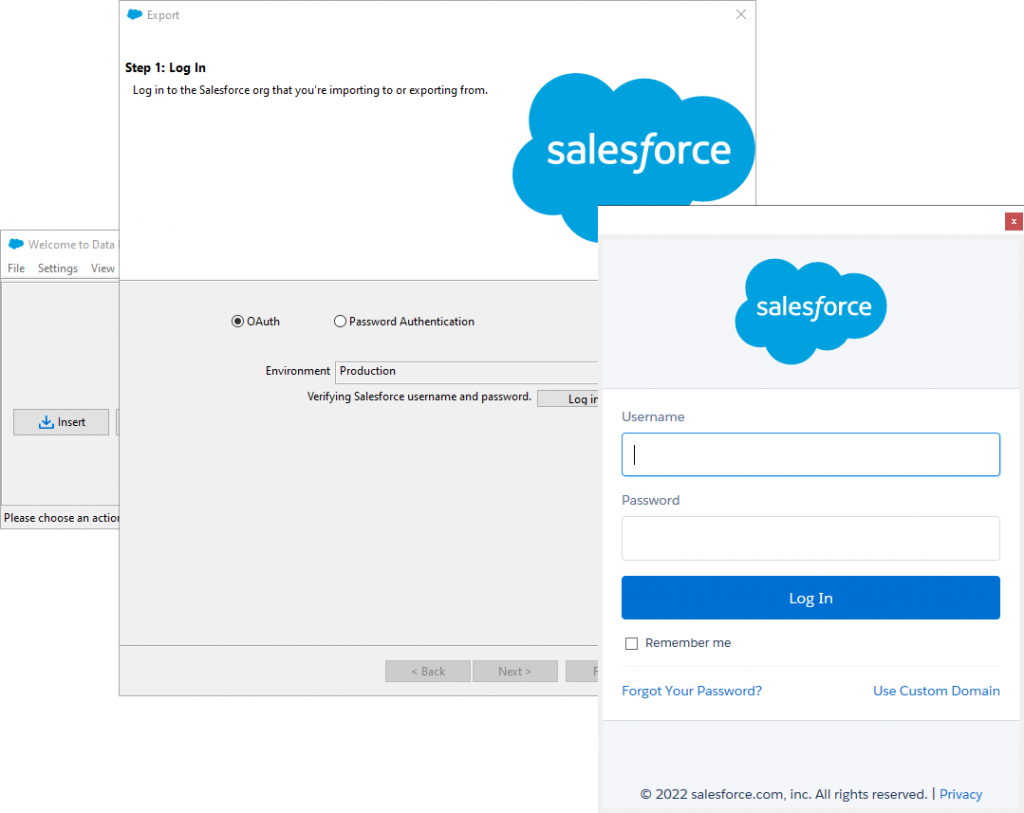
Step 2
A wizard will open, prompting you to sign in. Choose your environment from the drop-down menu and click Log In. Follow the authentication instructions on the screen to proceed.
Step 3
Select a Salesforce object to export data from and specify the CSV file name. Click Next. Data Loader allows users to export both predefined and custom objects. You can also change the location where the result file will be saved by clicking Browse.

Step 4
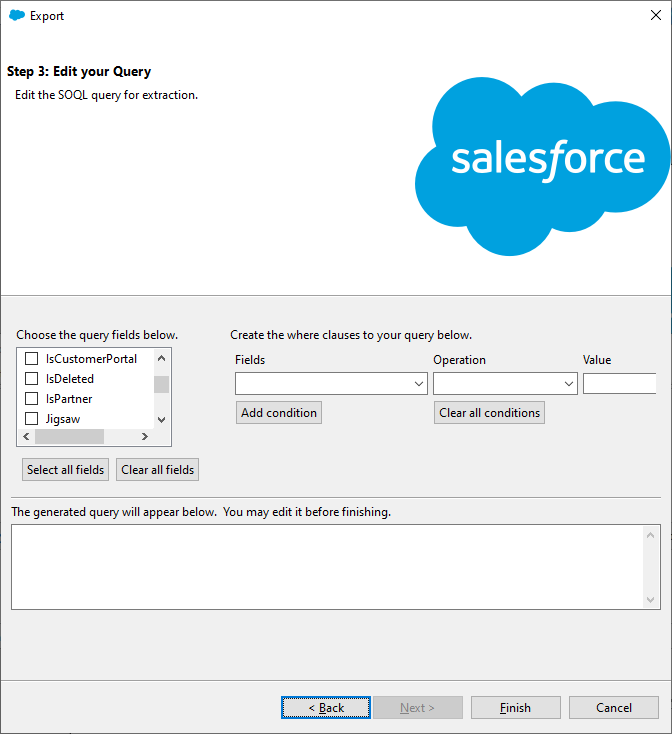
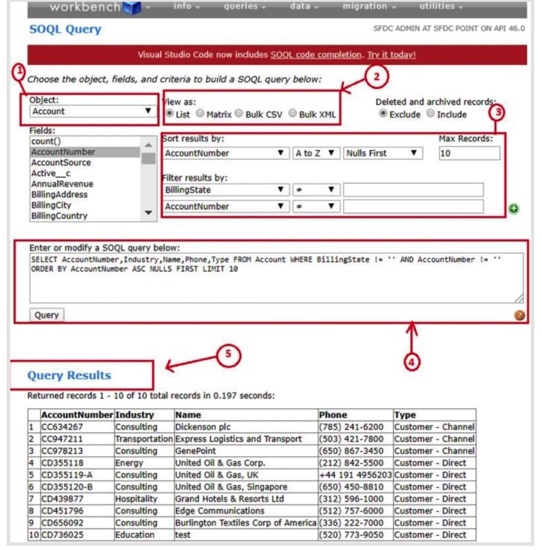
On the next wizard page, you can configure a SOQL query to use for exporting data. We only need to select the fields that we want to export, but if you want to filter data, you can also configure WHERE clauses. For our purposes, we can just click Select all fields, and then click Finish.
Step 5
Finally, click Yes to start the process. The data will be exported to the specified file.
Let’s go over one more option to export data before we bring it into Redshift.
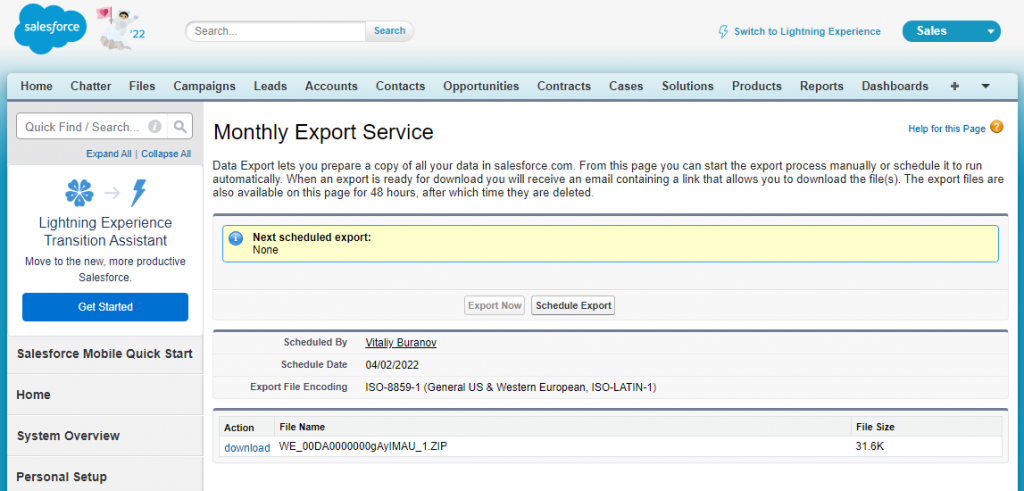
Option 2: Exporting Data via Data Export Wizard
To export data to CSV using the Salesforce Export Data feature, perform the following steps:
Step 1
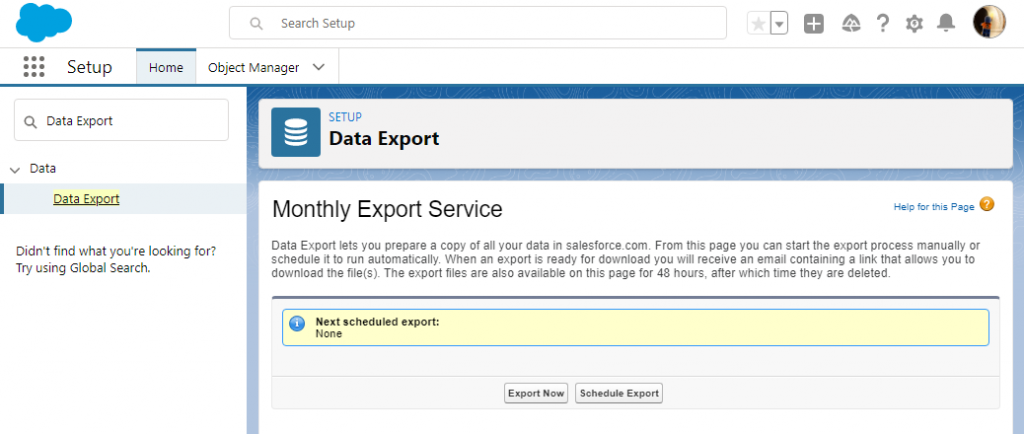
Open the Salesforce Setup by clicking the Quick Setup gear icon in the upper-right corner.
Step 2
Type “Data Export” in the Quick Find box and, under Data, click Data Export. On the next screen, select Export Now.
Step 3
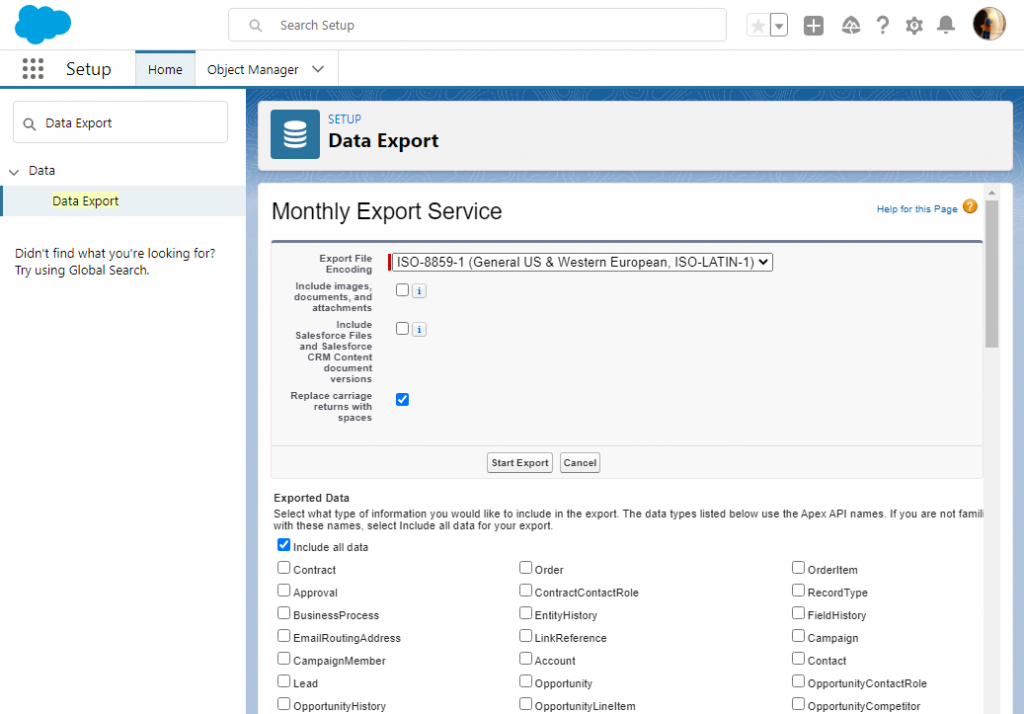
Select Salesforce objects to export and click Start Export. You can export both predefined and custom objects.
The data export will start, and after some time, you will receive an email with the link to the exported data:
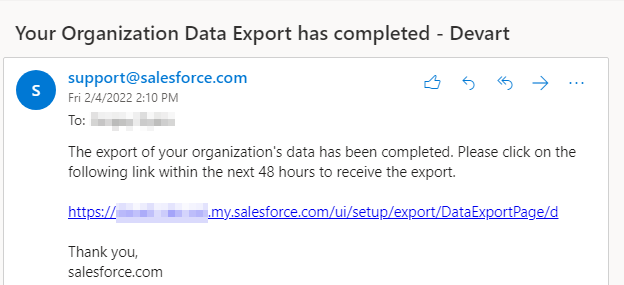
Step 4
Click this link to open the page where you can download the export results:
We are now ready to move to the importing process.
Best For
Ideal for organizations on tight budgets that need occasional data transfer and can manage manual processes.
The Workflow: From Data Loader to Redshift COPY
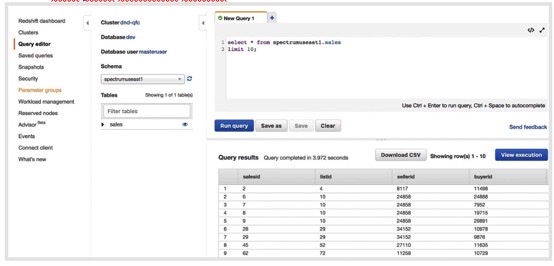
On paper, the process looks straightforward: export data from Salesforce, upload it to S3, and load it into Redshift.
In practice, this is where things start to break down.
First, you need to recreate the Salesforce schema manually in Redshift. Every column, every data type — all defined by hand. And if your Salesforce object has custom fields (it usually does), you have to account for those too.
Then comes the CSV step.
You export data using Data Loader, upload it to S3, and prepare it for import using Redshift’s COPY command.
Sounds simple — until you realize:
- You must manually map every single column. Salesforce exports fields alphabetically, which rarely matches your table structure. One mismatch, and the load fails.
- If a date or number format is off, the entire load can break. Redshift is strict. A single bad value can stop the whole process, forcing you to debug row by row.
- You’re responsible for S3 security and access. IAM roles, permissions, bucket policies — all need to be configured correctly. Misconfigure it, and either the load fails or you expose data unintentionally.
And that’s before you even think about automation.
The Hidden Risks
Even if you get the process working, the real issues show up over time.
- Human error. All it takes is one wrong file upload or an accidental overwrite to corrupt your dataset. There’s no safety net — mistakes go straight into your warehouse.
- Security exposure. Exporting Salesforce data means sensitive customer information ends up on local machines or shared storage. That’s a risk for GDPR, SOC 2, and internal compliance policies.
Method 2: The Developer Way (Custom API Integration)
You first need to plan how that data will be stored to move data from Salesforce to Amazon Redshift. Since Redshift is a database, you’ll need to create tables with the right columns and data types to match your Salesforce objects.
Note: Redshift can’t pull data directly from Salesforce. The data has to go through a “middle stop” like Amazon S3 or another supported service.
Common intermediate services include:
- Amazon S3
- DynamoDB
- Kinesis Firehose
Before starting:
- Obtain a Salesforce security token to authenticate API access
- Create a connected app in Salesforce to allow external communication
- Prepare the target schema in Redshift (tables, data types, relationships)
Load Data from Salesforce to Amazon Redshift
Once the groundwork is in place, the process becomes a multi-step pipeline:
- Extract data from Salesforce. Use REST or Bulk API to pull records from objects like Accounts, Contacts, or Opportunities.
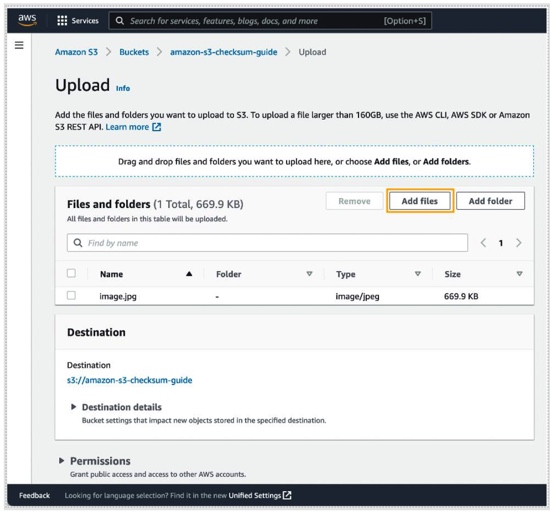
- Stage data in an intermediate storage. Typically, this means uploading the extracted data into an Amazon S3 bucket. This acts as the bridge between Salesforce and Redshift.
- Transform data if needed. Clean up formats, handle nulls, and align field types so they match your Redshift schema.
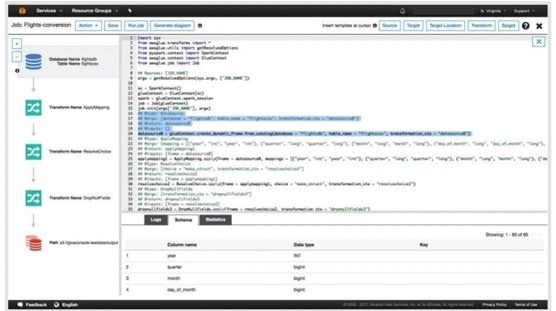
- Load into Redshift. Use the COPY command to import data from S3 into your Redshift tables.
Best For
Teams with strong in-house engineering resources that need highly customized pipelines and are comfortable maintaining them over time.
The Workflow: Handling APIs and Pagination
The flow sounds pretty straightforward at a high level.
You:
- Connect to Salesforce using the API
- Pull the data in batches
- Drop it into S3
- Run some transformations
- Load everything into Redshift with a COPY command.
It’s easy enough until you actually try to run it.
The Maintenance Nightmare: API Limits and Versioning
This is the part that usually gets underestimated.
- API limits. Salesforce enforces strict request limits. If your script doesn’t handle batching, retry logic, and backoff properly, you’ll run straight into 429 “Too Many Requests” errors.
- Version changes. Salesforce updates its APIs several times a year. When fields change or endpoints behave differently, scripts that worked yesterday can suddenly stop working.
- Engineering cost. This setup may look “free” on paper, but in the reali life, a senior engineer spends hours every month fixing failures, adjusting logic, and redeploying jobs.
Method 3: The Smart Way (No-Code Automation with Skyvia)
This is the point where you stop building pipelines and just run them.
With Skyvia, there isn’t just one way to move data from Salesforce to Redshift — the approach depends on what you’re trying to achieve.
The most common option for analytics is replication.
You connect Salesforce and Redshift, select the objects, and Skyvia automatically creates the corresponding tables in Redshift, including custom fields. There’s no need to define schemas or map columns manually. From there, data is kept up to date using incremental loading, so only new and changed records are transferred.
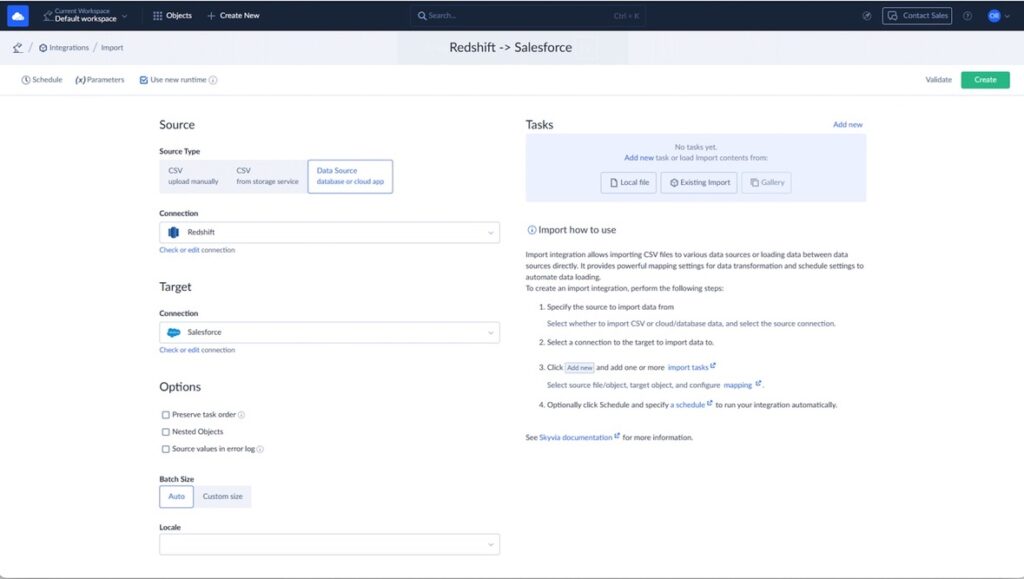
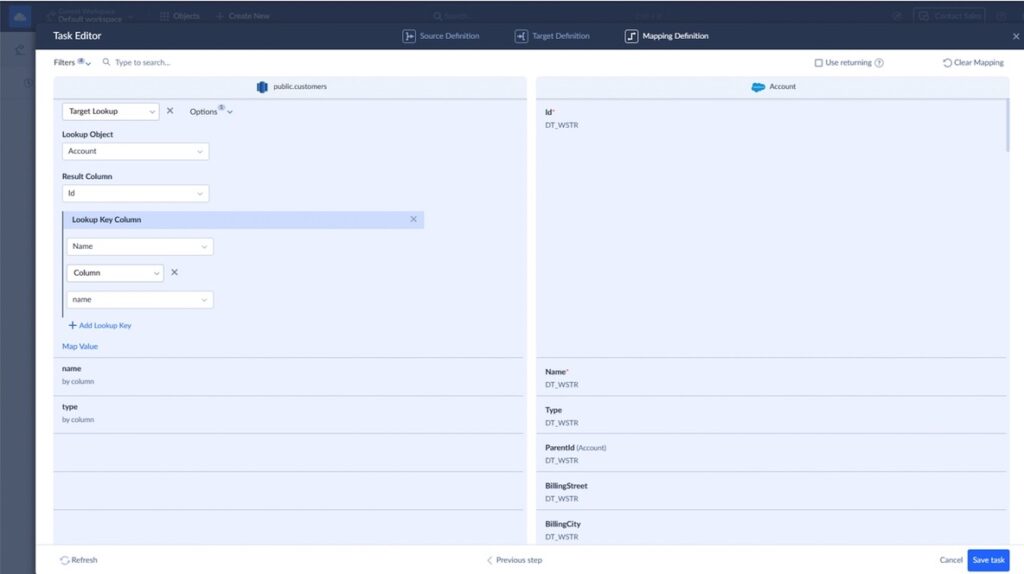
If you need more control over the process, you can use ETL via Import.
This allows you to define mappings, transform data during load, and adjust how fields are written to Redshift.
For more advanced scenarios, Skyvia provides a visual pipeline designer (Data Flow).
Here, you can build multistep transformations, combine data from different sources, and apply more complex logic without writing code.
In addition, Reverse ETL is available when you need to send processed data back to Salesforce or other systems.
Once you choose the approach, the setup itself is straightforward.
From there, it keeps the data in sync using incremental updates. Instead of reloading everything over and over, it tracks changes and only moves what’s new or updated.
That’s the shift from “build and maintain” → to “set up and let it run.” ously automated solution with minimal effort.
Creating Connections
Let’s describe how to configure replication in Skyvia. First, you need to register a Skyvia account. Then, create connections to your data sources, Salesforce and Redshift.
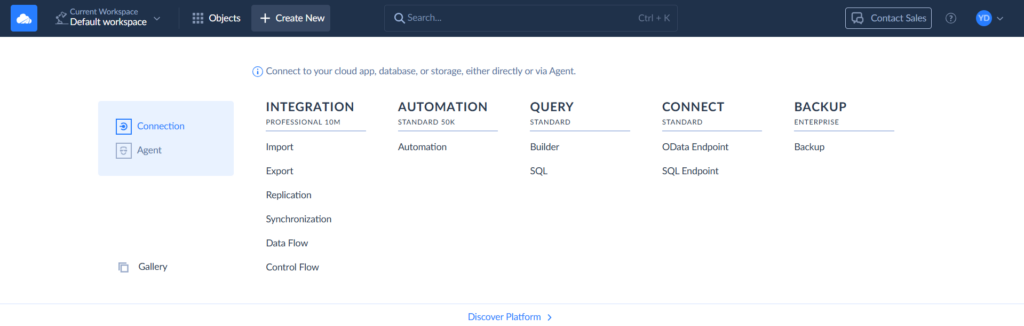
Step 1
To create a connection, select + Create New > Connection on the left. Then select the respective connector. Besides Redshift and Salesforce, Skyvia supports 200+ connectors.
Step 2
Signing via OAuth is the fastest way, and it is selected by default. To create a connection to Salesforce, click Sign In with Salesforce. Then you can enter the connection name and save the connection.

Alternatively, you can select the Username & Password authentication method. You will need to specify your username, password, and security token.
Step 3
To create a connection to Redshift, click + Create New > Connection and find Redshift. Fill in the fields required for this connection: Server, Port, User ID, Password, Database and Schema.
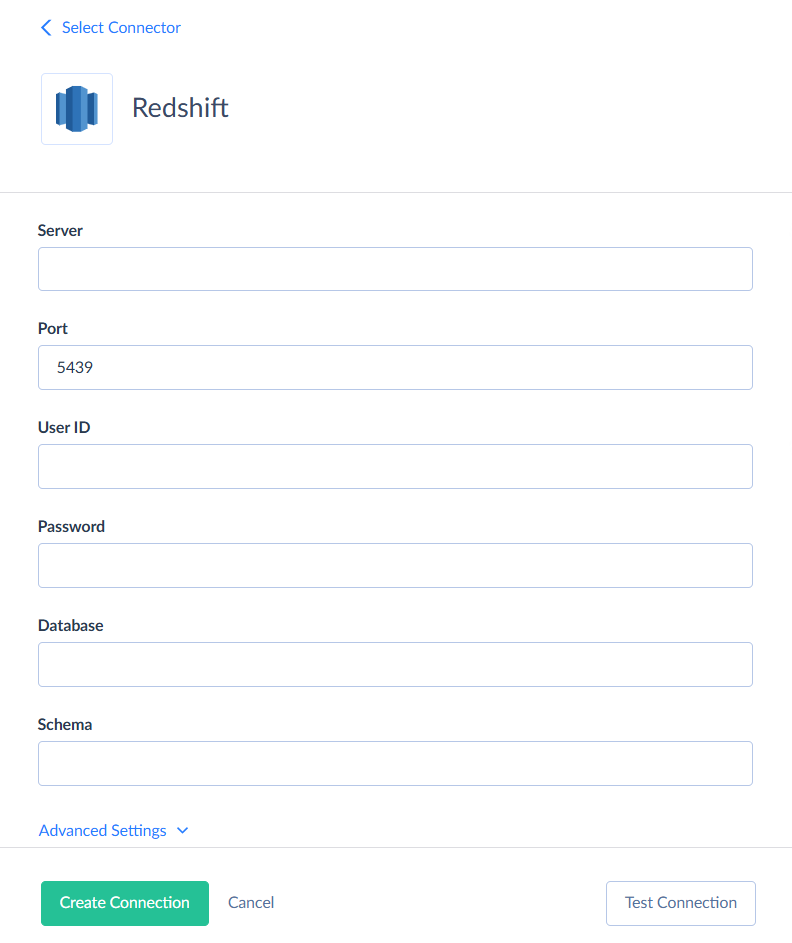
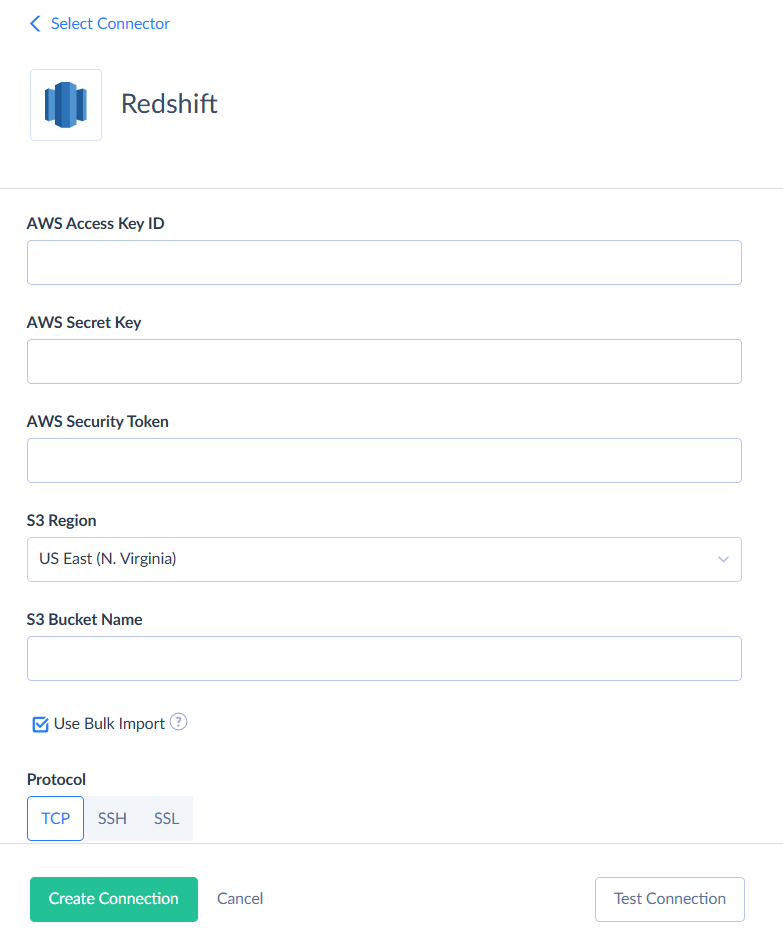
Don’t forget to also click Advanced Settings and enter the parameters for Amazon S3 storage.
After you’re done, click Create Connection.
Creating Replication Packages
Now, let’s move forward with building a Salesforce to Redshift replication pipeline.
Step 1
Select + Create New and then, under Integration, select Replication.
Step 2
Choose Salesforce as Source and Redshift as Target connection.
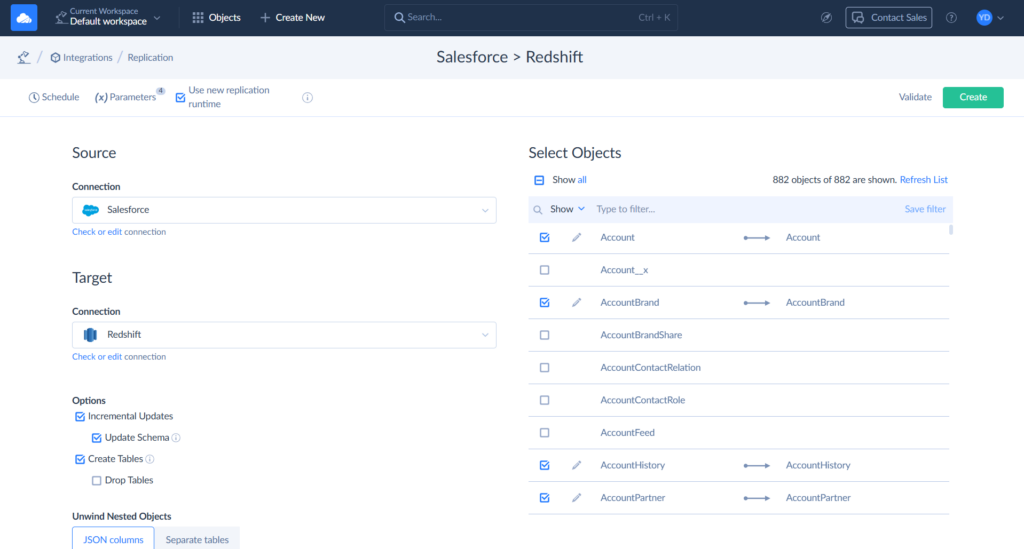
Step 3
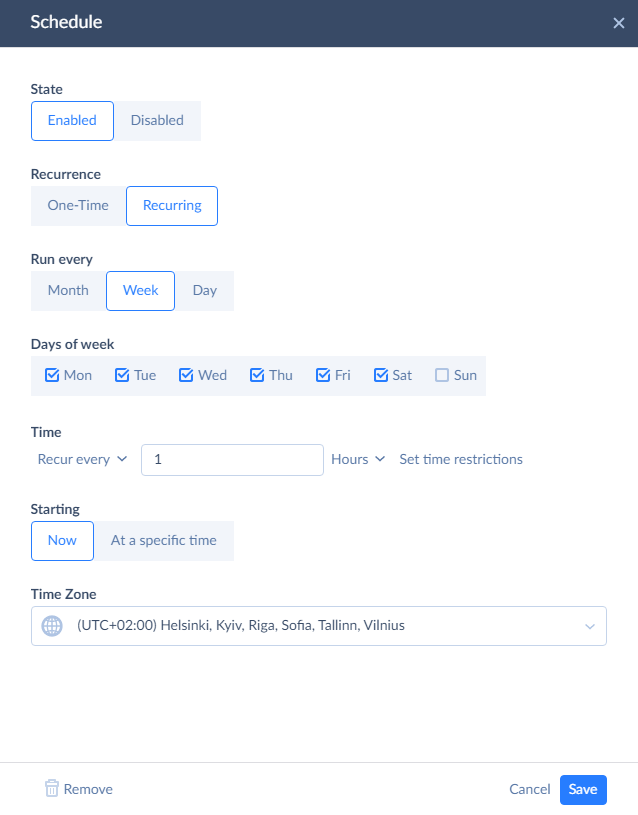
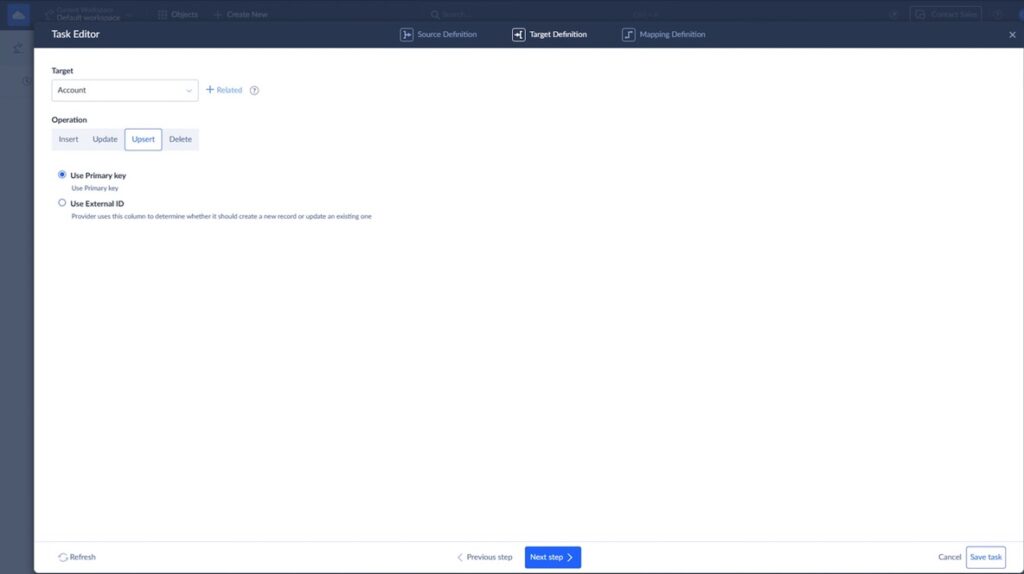
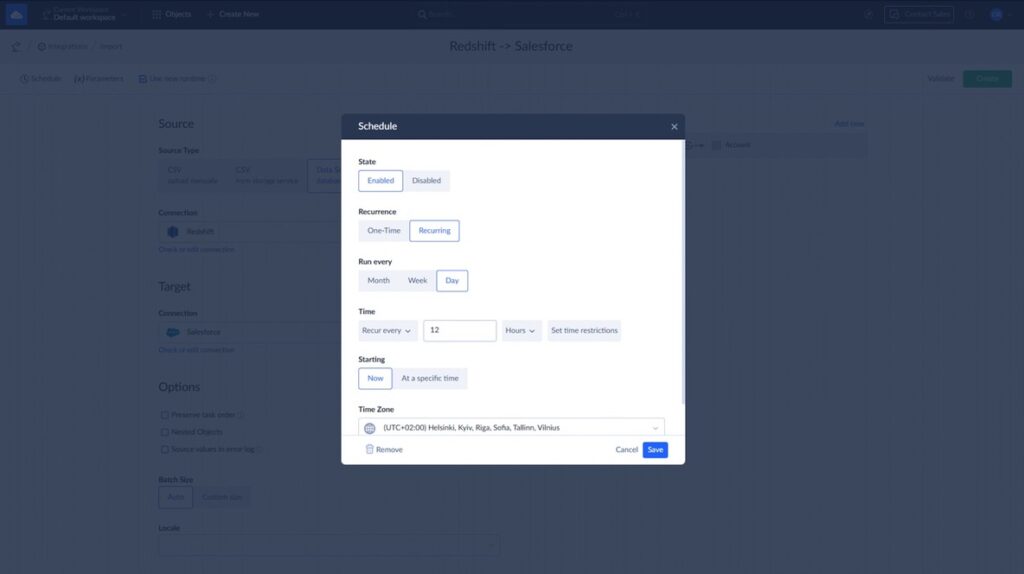
After selecting connections, all we need to do is to select the Salesforce objects to replicate. Then, you can also click Schedule and set automatic replication.
After this, Salesforce to Redshift replication will export data automatically, and it will keep data in Redshift up-to-date without any user interaction. It can be used for any Salesforce edition.
Best For
Best suited for businesses that want a hassle‑free, continuously automated solution with minimal effort. It’s especially well for SMB teams where a business user can get things running without writing code or relying on engineering. At the same time, it doesn’t box you in – if you want to go deeper, you’ve got room to work with query-based transformations, Control Flow for more advanced logic when your data workflows start to grow up.

Critical Integration Challenges (And How to Solve Them)
No matter which method you choose, the real problems don’t show up during setup.
They show up a week later. Or a month later.
When something changes and your pipeline wasn’t built to handle it.
Schema Drift
This one happens all the time.
Sales Ops adds a new field in Salesforce, like a “Lead Score” or a custom status field. Nothing unusual on their side.
But your pipeline? It wasn’t expecting that.
Manual / Code
The load breaks.
Best case, you get an error and have to update your schema manually.
Worst case, the pipeline keeps running, but silently skips the new field — and now your data is incomplete.
Either way, someone has to step in, update tables, adjust mappings, and redeploy.
Skyvia
Skyvia detects schema changes automatically.
New fields are picked up and added to the target table without manual intervention, so the pipeline keeps running as expected.
Data Type Mismatches
Salesforce and Redshift don’t always speak the same language.
Picklists, for example, don’t map cleanly to database types. Dates, booleans, and text fields can also behave differently depending on how they’re stored and exported.
Manual / Code
You have to handle this yourself.
That means defining mappings, converting types, and making sure nothing breaks during load. Miss something small — like a format inconsistency — and the whole job can fail.
Skyvia
Handles type alignment automatically during replication.
Fields are converted into compatible formats, so you don’t have to debug why a picklist or date field suddenly broke your load.
Deleted Records
This is the one teams forget about — until reports stop making sense.
A record gets deleted in Salesforce. What happens in your warehouse?
Manual / Code
Nothing… unless you explicitly build logic for it.
Deleted records stay in Redshift, and over time, your data drifts further away from reality. Fixing it means writing additional logic to track and remove or flag those rows.
Skyvia
Tracks deletions as part of the sync.
You can choose between soft delete (marking records as deleted) or hard delete (removing them entirely), depending on how you want your reporting to behave.
Bonus: Reverse ETL (Redshift → Salesforce)
Do you need to bring analytics results back into Salesforce so your team can actually use them?
Suppose you’ve already loaded and processed data in Redshift and now want to push Accounts and Contacts back into Salesforce. This is where Reverse ETL comes in.
With Skyvia, you can do this using an Import package with data mapping.
Step 1: Create an Import Package
In Skyvia, go to + Create New → Import.
- Set Source as Redshift
- Set Target as Salesforce
This defines the direction: warehouse → CRM.
Step 2: Select Source Tables and Target Objects
Choose the Redshift tables that contain your prepared data (for example, accounts_enriched, contacts_enriched).
Then map them to Salesforce objects:
- Redshift table → Account
- Redshift table → Contact
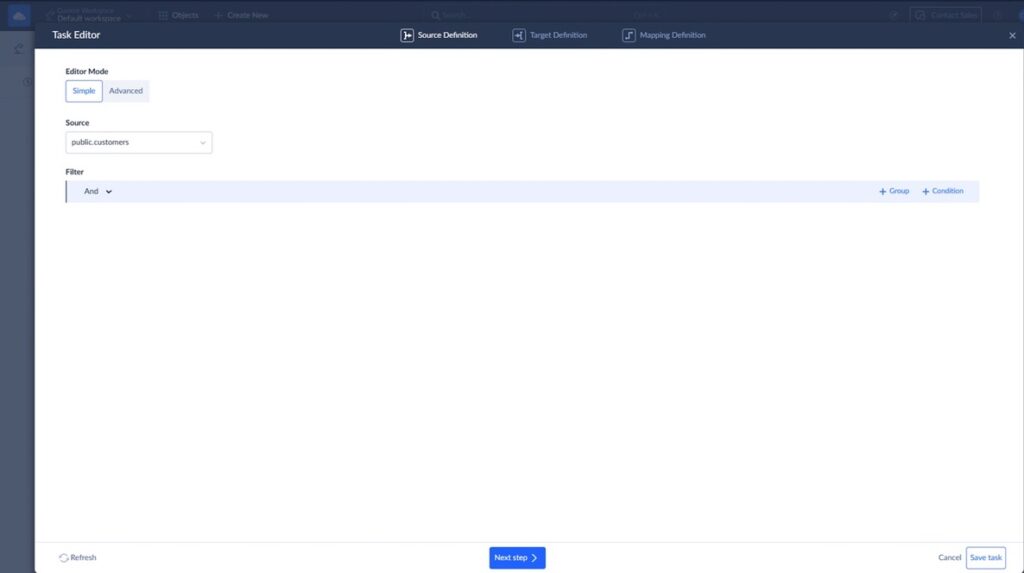
Step 3: Configure Data Mapping
This is the key step.
You define how fields from Redshift map to Salesforce fields.
Example:
- account_name → Account.Name
- industry → Account.Industry
- email → Contact.Email
- phone → Contact.Phone
You can:
- Match fields automatically
- Adjust mappings manually
- Apply simple transformations if needed
Step 4: Set Up Insert / Update Logic
Decide how records should behave:
- Insert new records
- Update existing ones (based on matching fields like Email or External ID)
- Or do both (upsert)
This ensures you don’t create duplicates in Salesforce.
Step 5: Run or Schedule the Import
You can:
- Run the import once (for a one-time sync)
- Or schedule it to keep Salesforce updated automatically
What You Get
- Analytics data from Redshift becomes available directly in Salesforce
- Sales and support teams work with enriched, up-to-date data
- No manual exports or copy-paste workflows
Choosing Your Method: A 360-Degree Comparison
At this point, the differences aren’t theoretical anymore.
Each method solves the same problem — getting Salesforce data into Redshift — but the trade-offs are very different depending on how much time, effort, and maintenance you’re willing to take on.
Here’s how they compare side by side:
| Method | Cost | Setup Time | Maintenance | Handles Schema Changes? |
|---|---|---|---|---|
| Manual | Low | Hours/ Day | High | No |
| Script | High (Dev Time) | Weeks | High | No |
| Skyvia | Fixed / Low | Minutes | Ner Zero | Yes |
Conclusion
Let’s bring it all together.
There are three ways to move Salesforce data into Redshift — and they solve very different problems.
Manual exports are fine when you just need to move data once. But the moment it becomes recurring, the cracks show fast.
Custom API pipelines give you full control. But that control comes with responsibility — ongoing fixes, API limits, and engineering time that adds up quickly.
And then there’s the no-code route.
Tools like Skyvia take care of the heavy lifting — schema, updates, retries — so you’re not constantly maintaining the pipeline behind the scenes.
The choice comes down to how much of this you want to own.
One-off task? Go manual.
Highly custom architecture? Build it.
Everything else — automation, scale, reliability — there’s a simpler way.
Don’t spend your time maintaining Python scripts. Set up a robust, auto-scaling Salesforce to Redshift pipeline in 15 minutes.

How to Load Data from Salesforce to Redshift: 3 Methods

What happens to my Redshift tables if I add a custom field in Salesforce?
Manual or scripted pipelines usually break or ignore the field. Tools like Skyvia detect schema changes and add new columns automatically.
How do I prevent the integration from hitting Salesforce API limits?
Use batching, pagination, and backoff-based retry logic. Or rely on tools that manage API usage automatically to avoid hitting limits.
Can I view Redshift data inside Salesforce without importing it?
Yes, using external data solutions like Salesforce Connect or API-based tools that expose warehouse data without full replication.
Is it cheaper to store data in Redshift or Salesforce?
Redshift is typically cheaper for large datasets and analytics. Salesforce storage costs are higher and not designed for heavy reporting workloads.
How do I handle Salesforce “Picklists” when moving data to Redshift?
Picklists are usually stored as text (VARCHAR). You may need to map values manually or standardize them during transformation.


