

Today, there are easier ways to import CSV to SQL Server. You can code less or use graphical tools. You can even get the CSV from cloud storage to your on-premise SQL Server. This post will focus on how you can do it in 3 easy ways.
Table of contents
- Why to Import CSV to SQL Server
- How to Import CSV File in SQL Server (3 Easy Ways)
- BULK INSERT
- SQL Server Management Studio Import CSV Tools
- ETL Tools – Skyvia Cloud Solution
- Conclusion
Why to Import CSV to SQL Server
I read about comma-separated-values, or CSV, in Wikipedia. Can you believe that CSV was supported back in 1972? For what reason?
To exchange data between 2 or more systems of different platforms and architectures. Today, the reason is still the same. Imagine you have 2 proprietary systems. One is using a proprietary NoSQL database like PayPal’s. And the other is using SQL Server. It’s like a Japanese talking to an Estonian. Understanding is almost impossible. What is the solution you will ask?
Export a CSV file from the NoSQL database. Then, import the CSV file to SQL Server. Rather than invent new software, exchange a mature and common file format. That will be easier and less time-consuming.
Here are common scenarios when CSV can be useful:
- Customers pay a service company through a bank. Then, the bank provides payment records to the service company using a CSV file.
- An operational system built in-house needs to be integrated into an ERP system.
- Several SharePoint lists need to be synced to a SQL Server database for data analysis.
- A biometrics system needs to be integrated into a human resources system for attendance purposes.
Though this can be done using JSON or XML, CSV is simpler to generate from the source. If the data requirement is non-hierarchical, CSV can be a good fit. What about the target system using SQL Server? It is rated 4.5 out of 5 in Gartner Peer Insights. SQL Server in the cloud or Azure SQL is also one of the top 3 DBMS of 2020. So, learning to import CSV to SQL Server is worth the effort. You will ask how to do it. The answer is described in detail below.

How to Import CSV File in SQL Server (3 Easy Ways)
Before we start, we need a sample CSV and a target table in SQL Server. Check it out in the screenshot below.
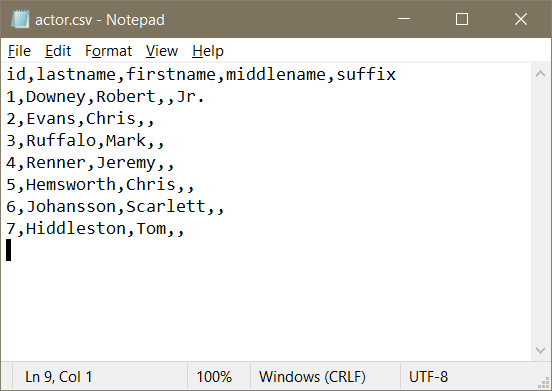
This will be used to upload to SQL Server using 3 of the different ways to import CSV. So, download a copy of the actor.csv file from here. Remember where you saved it. You’ll need it later in this tutorial.
Meanwhile, the target table is structured the same in SQL Server.
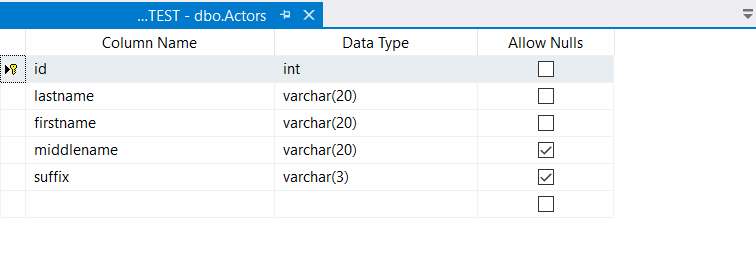
In this tutorial, I’m using the server name MS-SQLSERVER. And the database name is CSV-MSSQL-TEST.
Using BULK INSERT
BULK INSERT is a command in SQL Server to import data files into a database table. It can be used to upload various file formats, including CSV. If you love a little coding, this is the way to go. Here’s the code on how to bulk insert CSV into SQL Server:
-- truncate the table first
TRUNCATE TABLE dbo.Actors;
GO
-- import the file
BULK INSERT dbo.Actors
FROM 'C:\Documents\Skyvia\csv-to-mssql\actor.csv'
WITH
(
FORMAT='CSV',
FIRSTROW=2
)
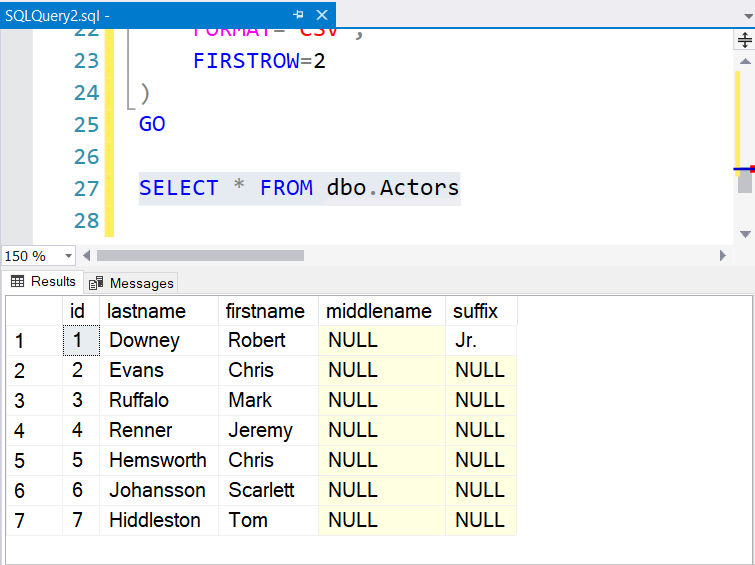
GOThe first command simply deletes all the records in the target table. Then, the BULK INSERT command includes the target table and the CSV file. The location of the CSV should follow the rules of the Universal Naming Convention (UNC). You also must tell SQL Server what file it’s dealing with. In this case, FORMAT=CSV because the file is in CSV format. Finally, specify what row the data starts. FIRSTROW = 2 because the first row contains the column names.
You can issue a BULK INSERT command from SQL Server Management Studio or any other SQL Server tool. Another way to do it is in PowerShell.
PROS AND CONS OF USING BULK INSERT
Pros:
- If you know the syntax, typing can be faster than using a GUI interface;
- No need to parse the data. BULK INSERT does it for you. If the target column uses a data type too small for the data, an error will occur;
- Scheduling of execution possible in SQL Server Agent;
- Also great for a one-time import job.
Cons:
- You cannot specify a CSV from cloud storage like Google Drive or OneDrive;
- Allows only SQL Server as the target database;
- Requires a technical person to code, run, and monitor.

Using SQL Server Management Studio Import CSV Tools
If you don’t prefer coding, another useful tool is the Import Data from SQL Server Management Studio (SSMS). Here’s how to import CSV to MSSQL table using SSMS.
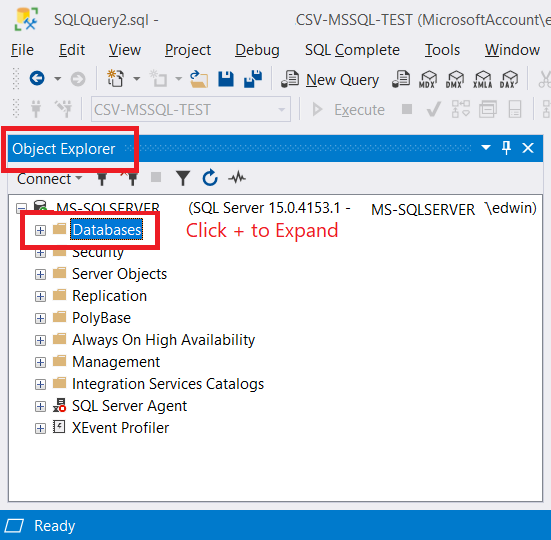
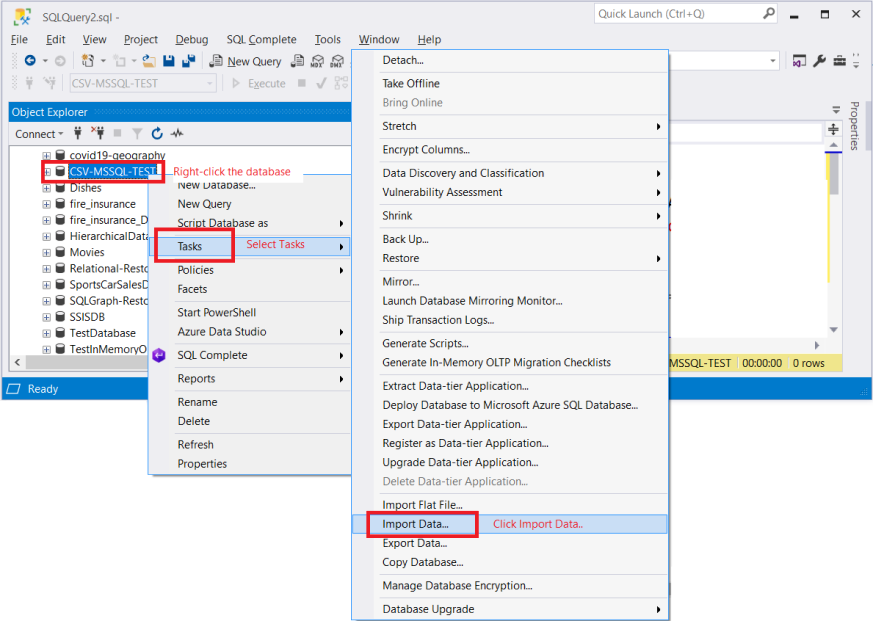
Step 1. From the Object Explorer, Expand the Databases Folder
First, you need to go to Object Explorer and select the target database. Expand the Databases folder. Check it out below.
Step 2. Select the Target Database
In this example, the target database is CSV-MSSQL-TEST. Right-click that database and then select Tasks. And then, click Import Data.
The SQL Server Import and Export Wizard window will appear with a welcome screen. From here, click Next.
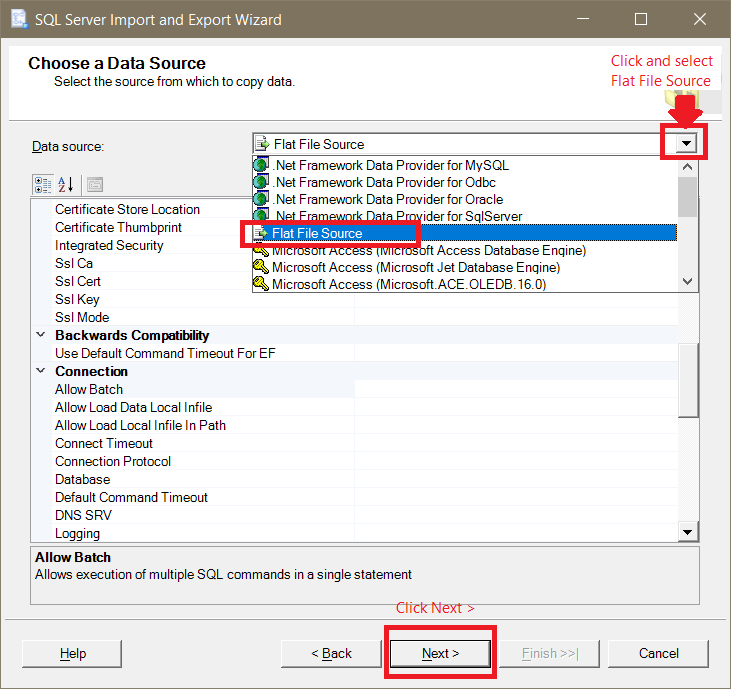
Step 3. Select a Flat File Source
This part will let you pick the data source. For this, click the drop-down list and select Flat File Source. Afterwards, click Next.
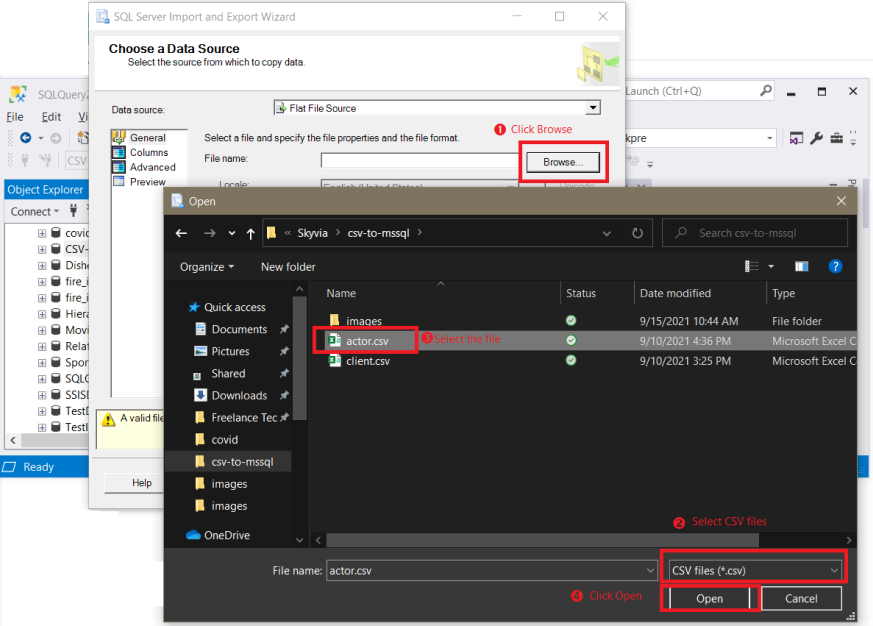
Step 4. Specify the CSV File
Now, you need to specify the file. Click Browse and specify the path of the CSV file as shown in the screenshot. If you have downloaded it, specify the download location. Then, in the file type, select CSV files (*.csv). And afterwards – actor.csv. Proceed further by clicking Open.
Step 5. Configure the Columns
Can’t SSMS detect the correct data types for each column? In our sample data, detection of the correct types and sizes is off. So, we need to set it up ourselves.
Pro tip: Whenever you import data from one platform to another, it’s best to match the correct types and sizes. Why? To avoid errors and headaches.
Let’s start by clicking Advanced. Then, you will see a list of columns. Click each and set the type and size.
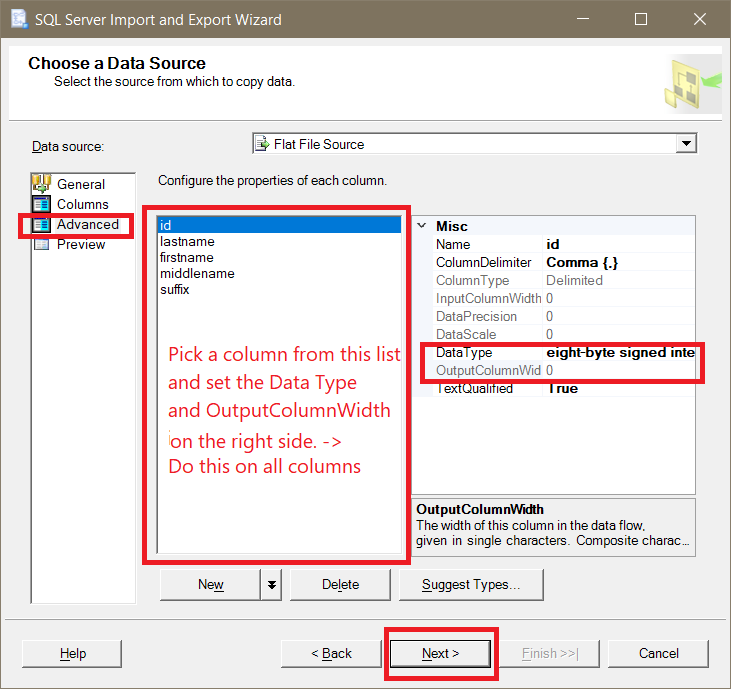
Based on the data types and sizes, refer to table below on what to set for each column.
| Column Name | DataType | OutputColumnWidth |
| id | four-byte signed integer [DT_I4] | N/A |
| lastname | string [DT_STR] | 20 |
| firstname | string [DT_STR] | 20 |
| middlename | string [DT_STR] | 20 |
| suffix | string [DT_STR] | 3 |
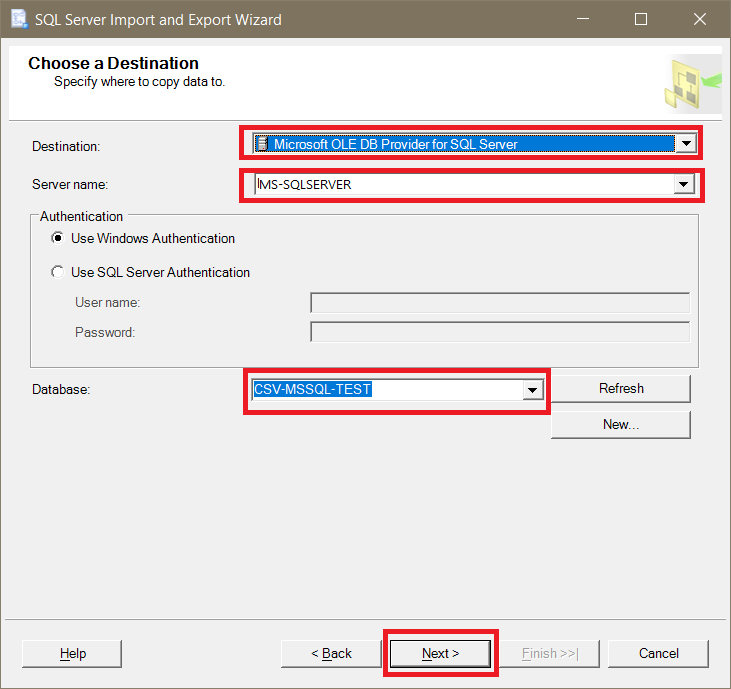
Step 6. Choose the Destination (SQL Server)
Now, you need to specify the SQL Server as the target of the import process. To do that, select Microsoft OLE DB Provider for SQL Server. Then, select the SQL Server name and enter the necessary credentials. Select the Database name and click Next.
Step 7. Specify the Database Table and Check Column Mappings
After selecting the database, you also need to specify the table. Choose the Actors table.
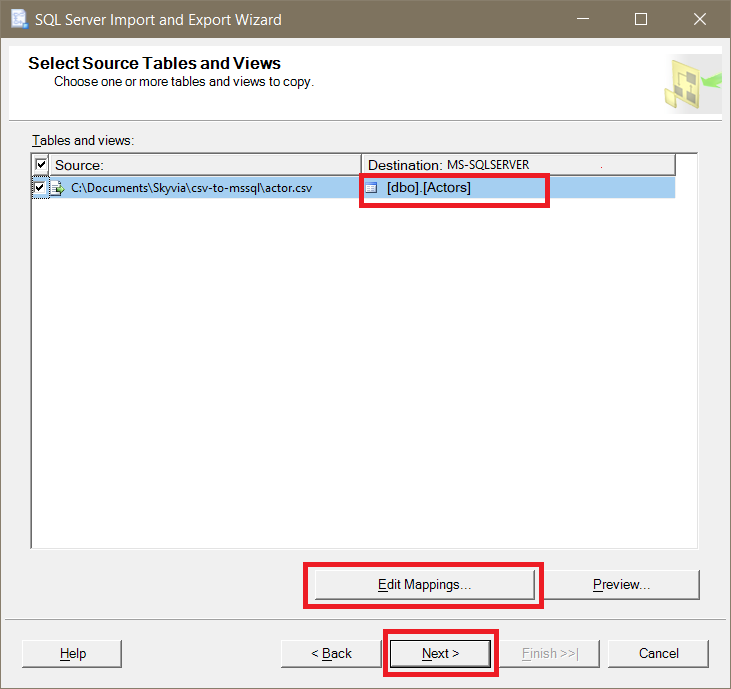
Then select Edit Mappings to see if the columns from the source match the target.
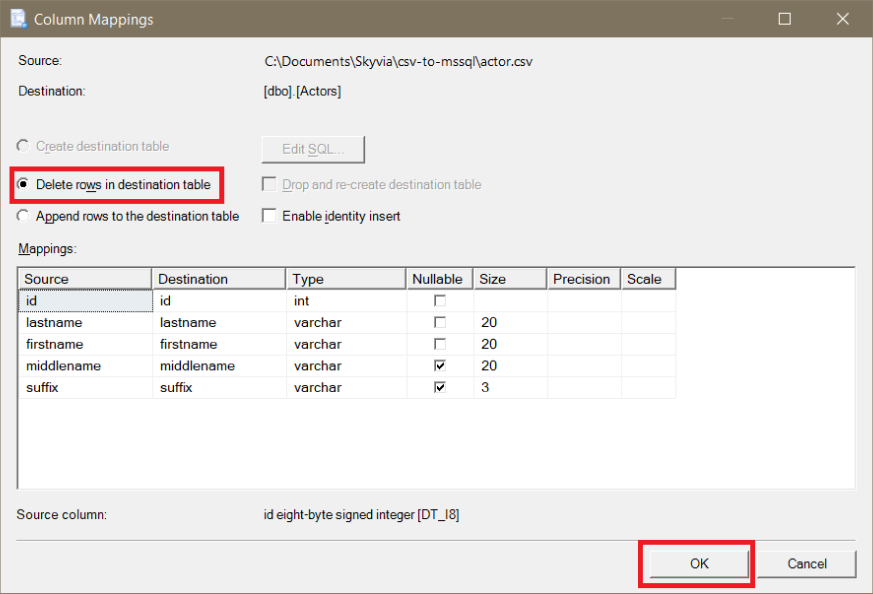
Once the Column Mappings window appears, check if the columns from the source and target match. You can either pick delete rows in the destination table or append rows. In our case, we want to start cleaning. If you attempted to import using BULK INSERT earlier, there is data present in the target table. And so, an error will occur. To avoid that, choose Delete rows in the destination table. And then, click OK.
Finally, to end our setup for the target table, click Next.
Step 8. Optionally Save to an SSIS Package or Run Immediately
You can save the entire import configuration to an SSIS package. If you choose this, you can schedule the package to run at regular intervals. In our case, we will just run it immediately. For better understanding, check out the next screenshot.
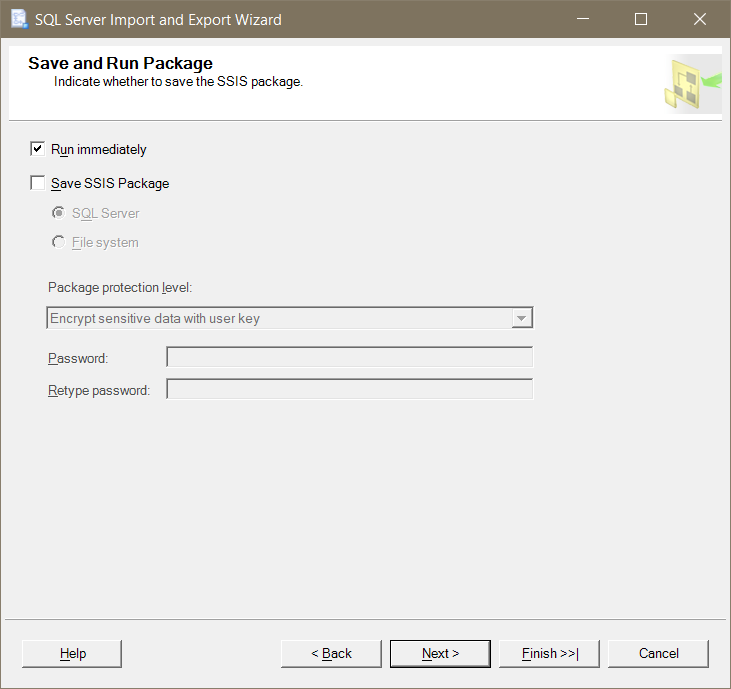
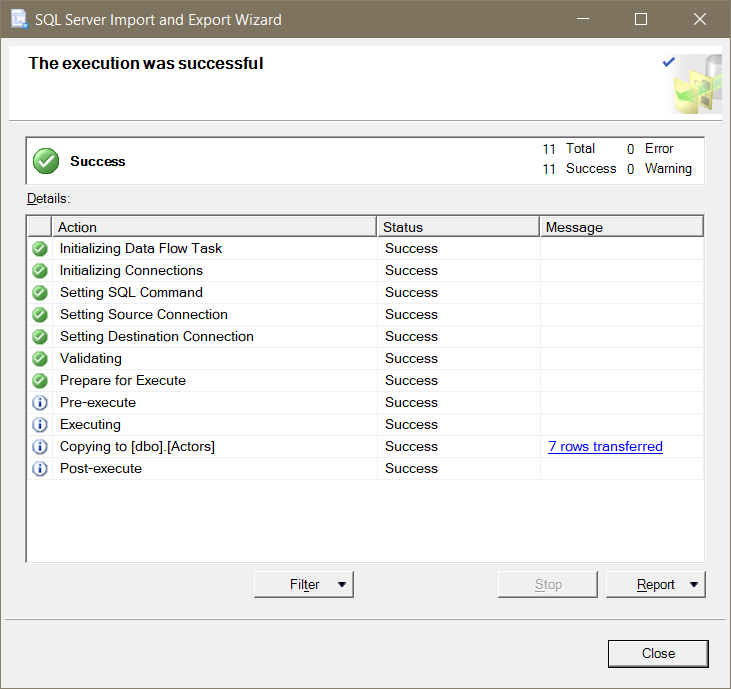
Then, choose Next to see a summary of your chosen settings. Or click Finish to run the import process. You will see the progress in the next window if you click Finish.
That’s it for importing CSV to SQL Server using Import Data in SSMS. You can also choose Import Flat File, but it will always dump to a new table. And you cannot save it to an SSIS package.
PROS AND CONS OF USING SQL SERVER MANAGEMENT STUDIO IMPORT TOOLS
Pros:
- No coding is required;
- If column mappings match source and target, it just works;
- Allows many data sources and destinations, not just SQL Server;
- Saving to SSIS catalog and scheduling is possible, but limited to what was defined;
- Great for a one-time import job.
Cons:
- If you don’t have the specifications of the column types and sizes in the CSV file, column mapping is cumbersome;
- No way to get the CSV from Google Drive, OneDrive, or a similar cloud storage.
Using ETL Tools – Skyvia Cloud Solution
Finally, we will use a cloud ETL tool to import the CSV file to SQL Server. One of the possible ways of importing CSV to SQL Server is from cloud storage like Google Drive. In this section, you will see how to use Skyvia to import the CSV file from Google Drive to SQL Server on a local PC. Before you can use it, you need an account on Skyvia and Google. Both are free to register.

The elements of a successful import using Skyvia are the following:
- Agent – you need an Agent to allow Skyvia to connect to a remote SQL Server.
- Connections – you need to define 2 connections: one for Google Drive and another for the remote SQL Server.
- Package – Skyvia uses packages to define tasks for the import process (like SSIS).
To start, you need to log in to Skyvia. You will be redirected to your default workspace. Then, from here, you can create all the 3 things above. Here’s how.
Step 1. Create an Agent
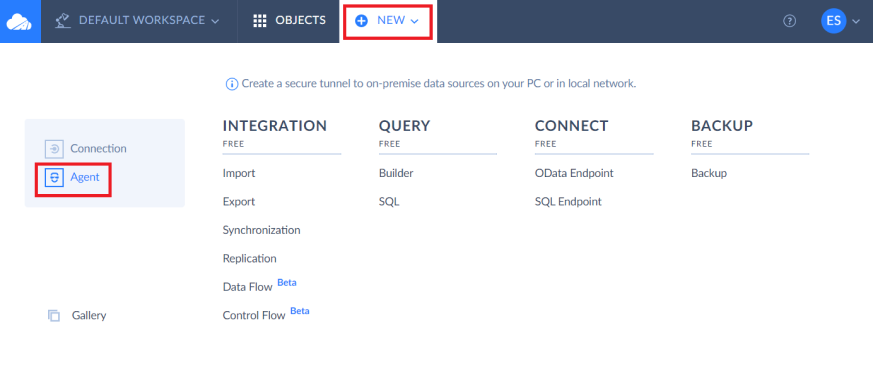
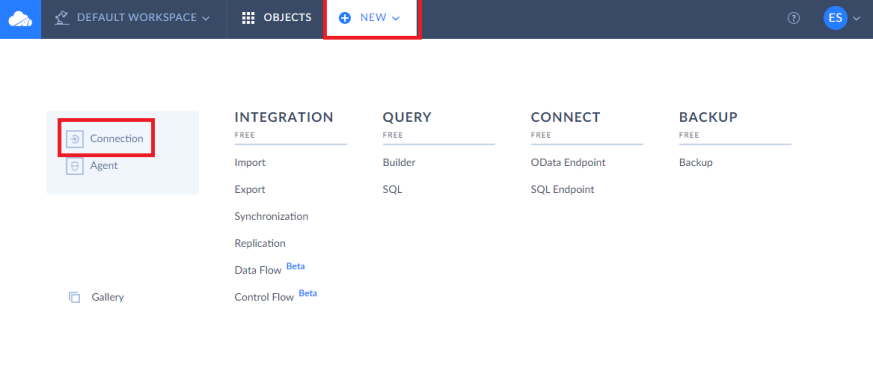
To create an Agent or a tunnel to a remote SQL Server, click NEW. Then, select Agent.
Once you’re on the next page, name your agent Skyvia-MyPC. Then, download and install the Skyvia agent. Please pay attention to where you install the agent. You will need this when you download the Agent Key. Finally, download the agent key file and store it where you install the Skyvia Agent.
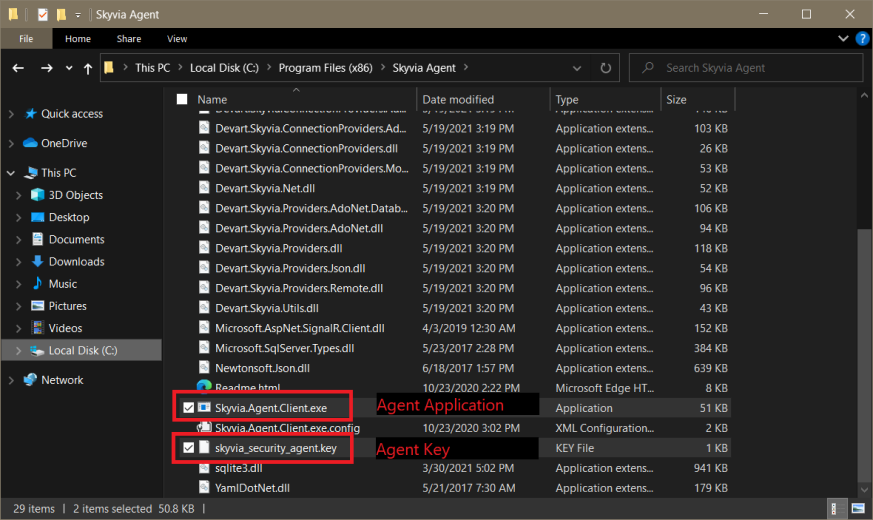
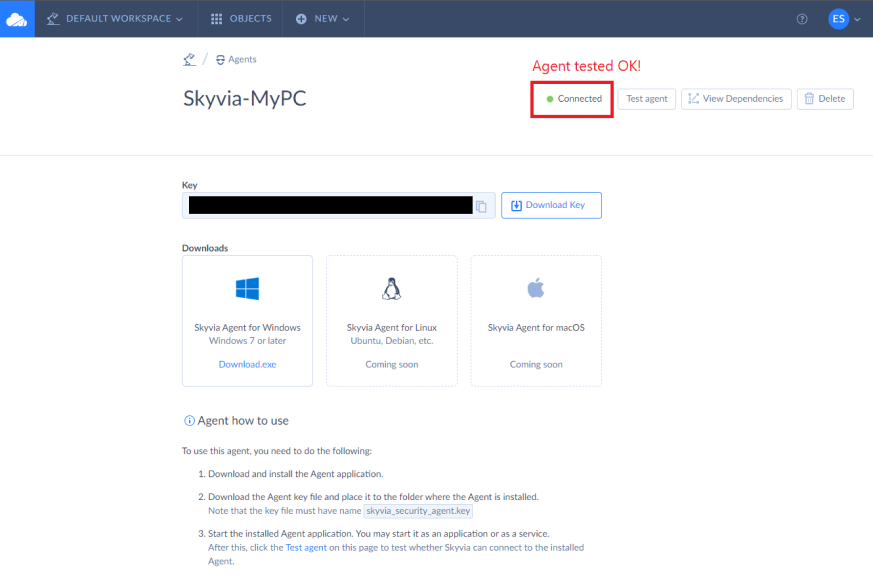
From here, your agent configuration has been completed. But you need to test it. So, run the installed Skyvia agent application. Here’s a screenshot of the installed Skyvia Agent and Key files.
Here’s what it looks like after running the agent.
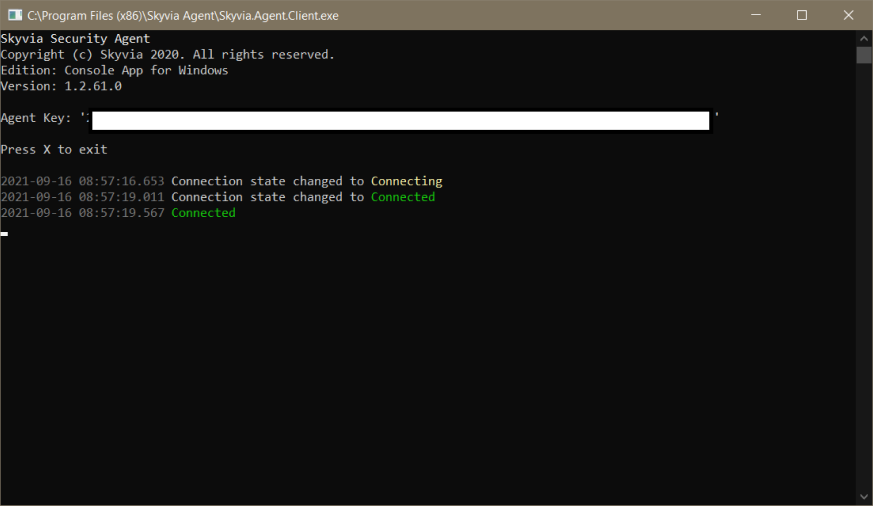
Once done, you can check the status on Skyvia. Here’s a screenshot of a good connection. This means that now it is possible to connect to your SQL Server from Skyvia.
Step 2. Create Two Connections for the Source and Destination
First, let us create a connection to Google Drive where the CSV is located. For this, click NEW and click Connection.
On the next page, you need to select a connector. Click Google Drive.
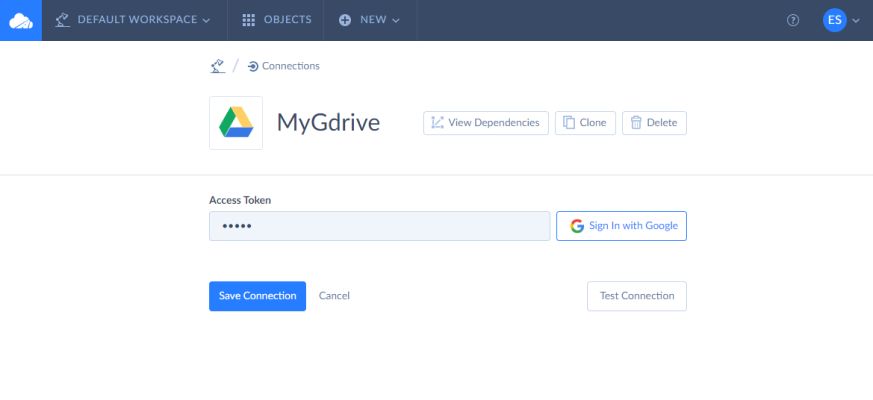
Then name the connection MyGDrive, and sign in to your Google account. Click Create Connection to create a connection. Here’s a completed Google Drive connection screenshot.
Second, let’s create a SQL Server connection.
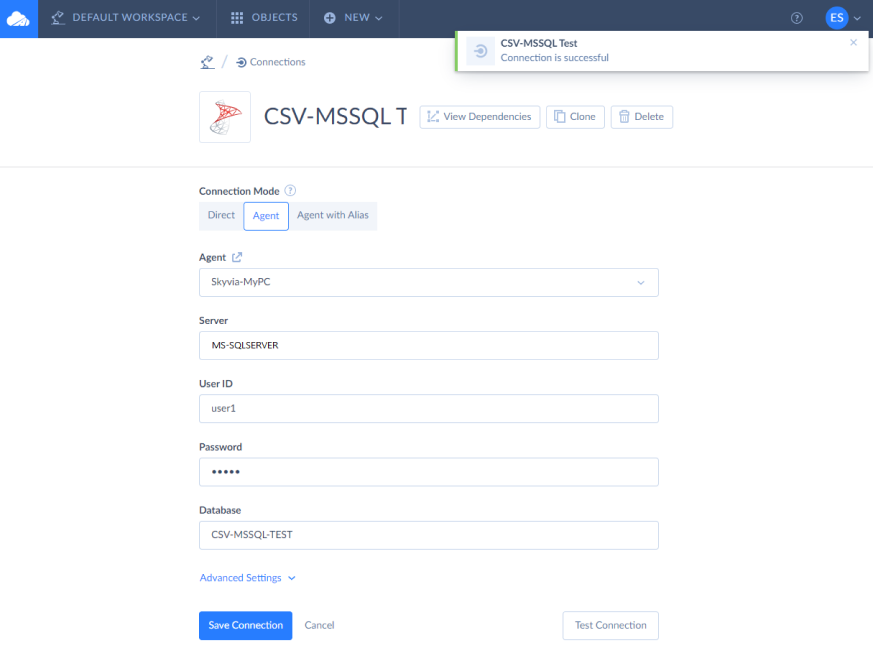
Click NEW again and select Connection. Refer to the screenshot above. Then click SQL Server. Name your connection CSV-MSSQL-TEST. After that click Agent and select the Skyvia-MyPC agent created earlier. Then enter the server name, credentials, and database name. Here’s a screenshot of a completed SQL Server connection.
Step 3. Create the Skyvia Package to Import CSV File to SQL Server
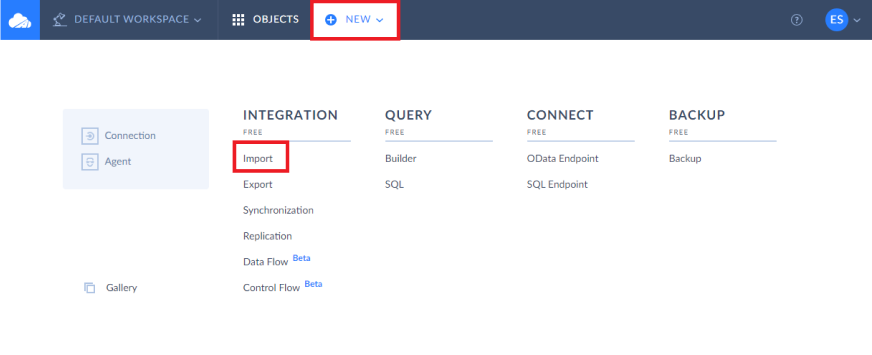
We’re almost done. The final part is to create the Skyvia package. So, start by clicking NEW and then Import. This will create an import package.
In the opened package editor, name your package CSV-SQL-Test and indicate the source and target. Our source is MyGDrive Google Drive connection. And the target is CSV-MSSQL-TEST, the SQL Server connection.
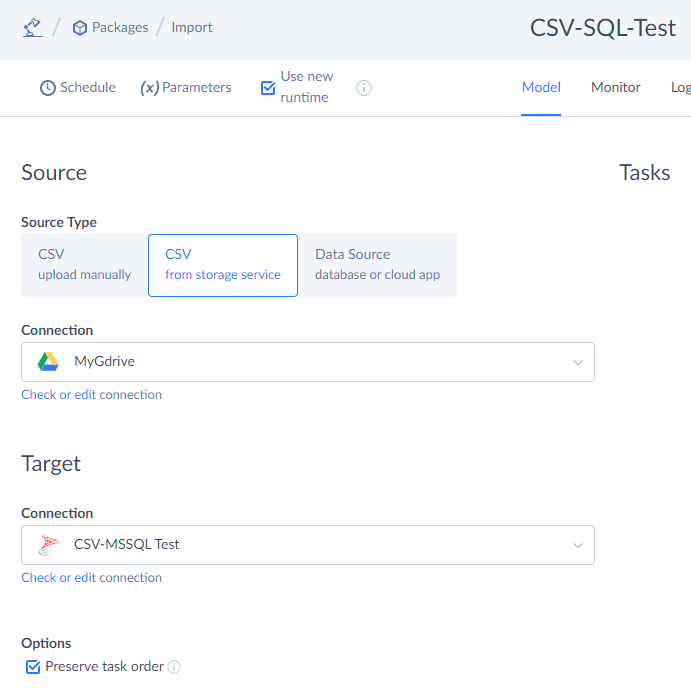
Some other things to pay attention to:
- Select the the Use new runtime checkbox. Otherwise, the SQL Server connection won’t be visible in the drop-down list of targets;
- Choose CSV from storage service. Otherwise, the Google Drive connection won’t be selected;
- Select the Preserve task ordercheckbox. This will make tasks run in succession.
Step 4. Create Tasks in the Import Package
It’s time to create the tasks. First, whatever existing record there is in the Actors table, it should be deleted. Under Tasks, click Add new. A new window will appear. Then, select the actor.csv file in Google Drive. Then, make the Text Qualifier blank and the Code Page Western European Windows (1252). Finally, set the id column to DT_I4 (Integer).
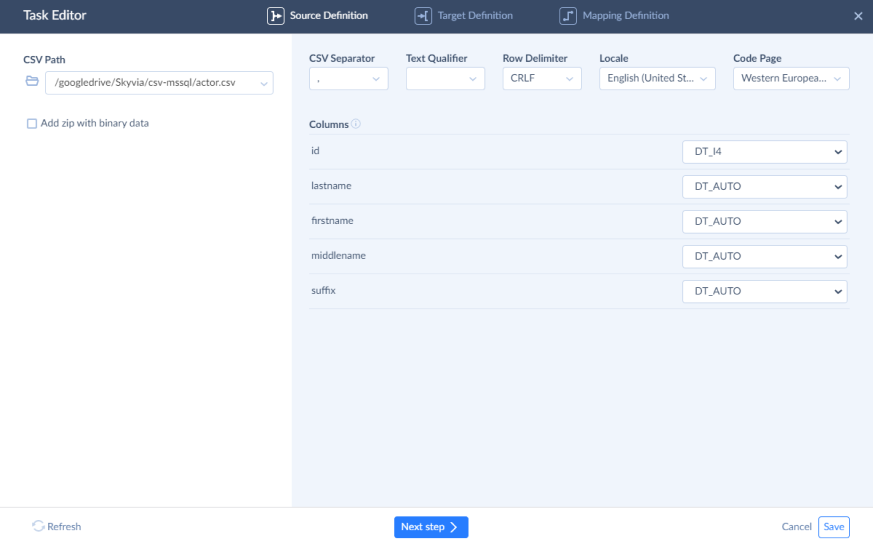
Click Next step to proceed further. On the second page, under Operation, click Delete. This will delete the records in the target. Click Next step again to proceed to mapping settings. You will see a mapping between the id column of the source and target. Click Save.
Finally, the first task is completed.
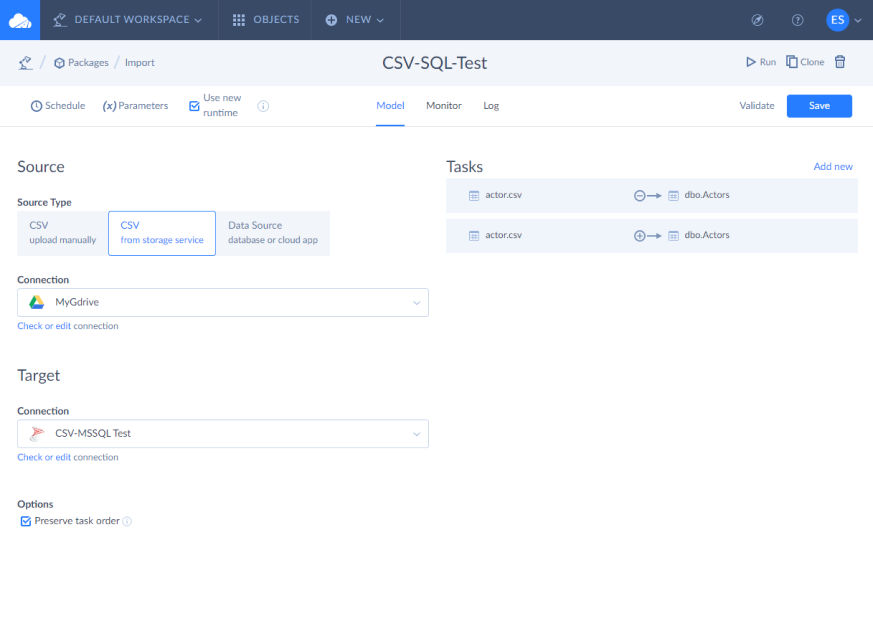
The second and last task is to insert the rows in the CSV file to SQL Server. The steps are almost the same, except you need to define all column types and sizes based on Table 1 earlier. Then, click Next step and select the Insert operation instead of Delete. Finally, Save the task.
You can see below the screenshot of the completed package. Click Save to save the package.
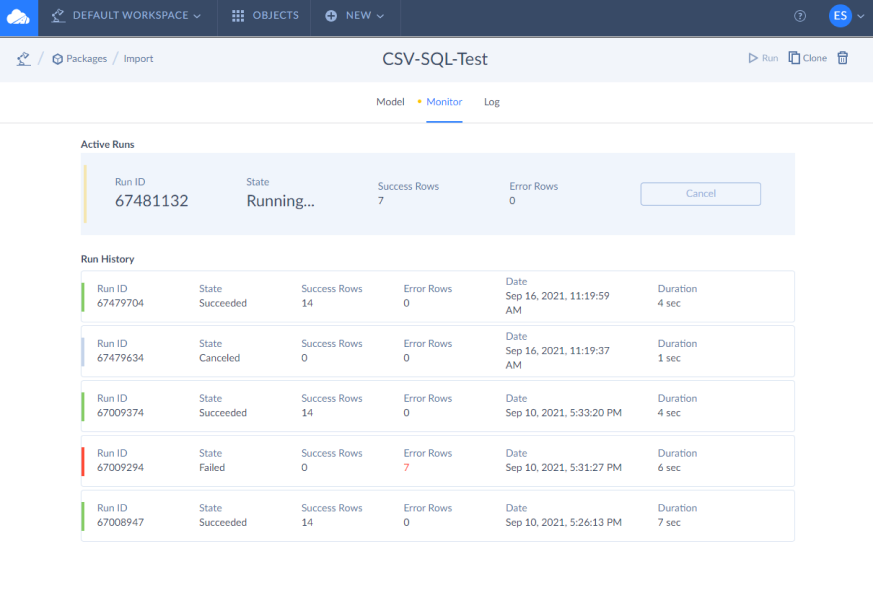
Step 5. Run the Package
To run the package, click the Run button in the upper right corner of the page. Then, click Monitor to see the progress. See a sample screenshot below.
PROS AND CONS OF USING SKYVIA
Pros:
- A lot of data sources and destinations, including cloud storages;
- Experienced ETL professionals will experience an easy learning curve;
- Schedule an unattended execution of packages;
- Flexible pricing based on current needs and usage;
- No need to install development tools (except when Agent is required).
- Rated 4.8 in G2’s Best ETL Tools and 4.9 in Gartner Peer Insights.
Cons:
- Sometimes queueing can take longer than the actual runtime duration. This can be improved.
Conclusion
You can use these 3 ways to import CSV to SQL Server: all are viable tools depending on your needs.
- BULK INSERT – good for on-premise import jobs with a little coding.
- SQL Server Management Studio Import Tools – good for one-time import and export of various on-premise data.
- ETL Tools – the most flexible for on-premise and cloud data of various types. You can use either SSIS or a cloud solution like Skyvia.
Was this post useful? If yes, please share it on your favorite social media platforms.
