Articles • by Oleksandr Khirnyi • September 22, 2026
Business applications are optimized for running day-to-day processes, not for analytical workloads. For simple reporting, a direct BI connection to the source may be enough. As analytical requirements become more complex, a data warehouse provides a dedicated environment for standardizing transformations, reusing data models, combining data, and delivering consistent, analytics-ready datasets to reporting tools.
In this tutorial, we will build that pipeline for Salesforce Opportunity analytics. Skyvia will replicate Salesforce data to BigQuery, dbt will transform the replicated data into analytics-ready models, and Data Studio will use the final data for reporting.
To organize the warehouse, we will use a simple Medallion Architecture, which separates data into layers based on how much processing it has gone through:
| Layer | BigQuery dataset | Purpose |
|---|---|---|
| Bronze | raw |
Raw Salesforce data replicated to BigQuery by Skyvia |
| Silver | staging |
Cleaned and standardized data prepared by dbt |
| Gold | business |
Aggregated, analytics-ready data for reporting |
This separation keeps ingestion, data preparation, and business logic independent from one another. Raw data remains available when transformation logic changes, staging models can be reused by multiple business models, and reporting tools work with data prepared specifically for analytics.
The completed pipeline will look like this:
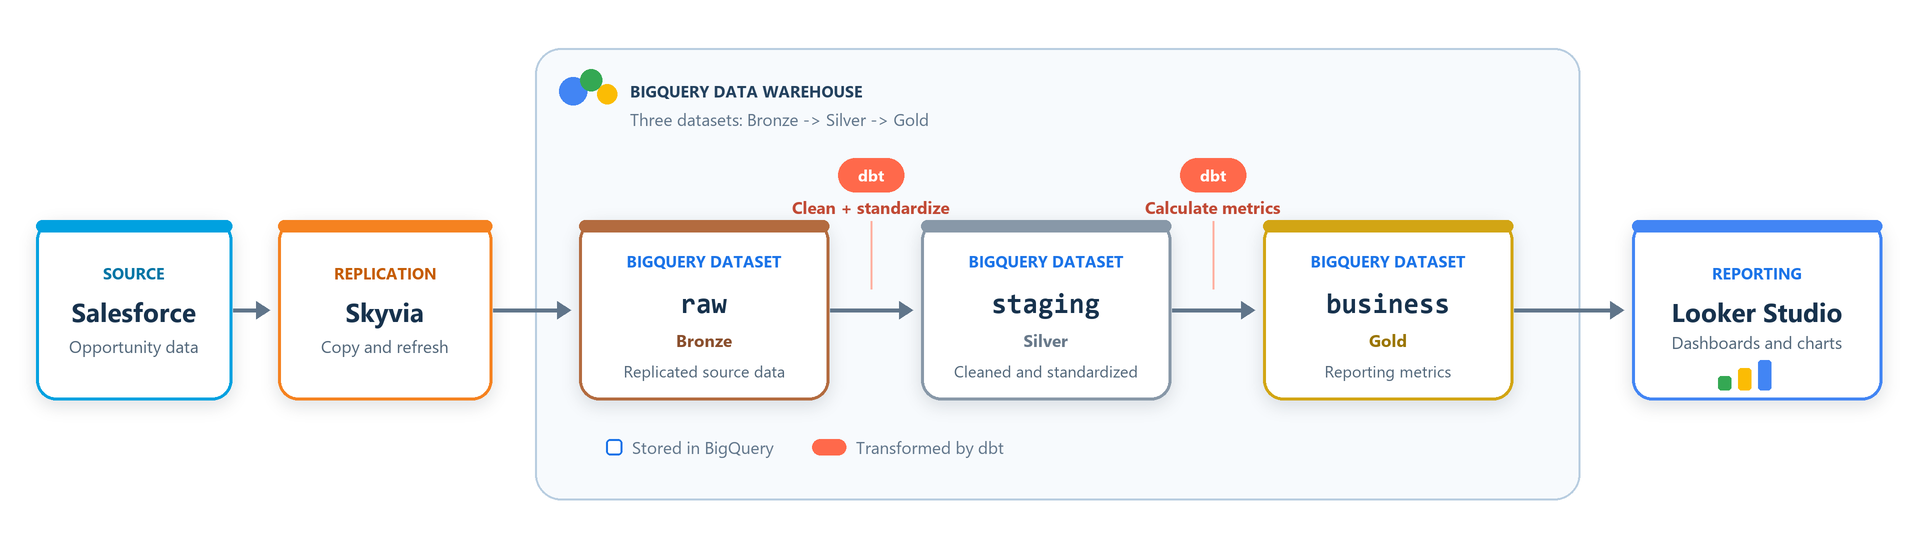
GitHub stores the dbt project under version control, and Skyvia Control Flow runs Replication and the dbt transformations in sequence to keep the reporting data up to date.
By the end of the tutorial, you will have an automated pipeline that loads Salesforce Opportunity data into BigQuery, transforms it with dbt, and makes the resulting business data available in Data Studio.
Before you start
Before starting, make sure you have the accounts, tools, and permissions required to complete the tutorial:
- A Salesforce account with access to the
Opportunityobject - A Google Cloud project with billing enabled
- A Skyvia account
- A GitHub account
- VS Code, Python, Git, and dbt Core installed locally
- Permission to create BigQuery datasets, a service account, a service-account key, and a Cloud Storage bucket
1. Prepare Google Cloud
1.1 Create or select a BigQuery project
In Google Cloud Console, create a BigQuery project or select an existing one. Confirm that billing is enabled.
1.2 Create the BigQuery datasets
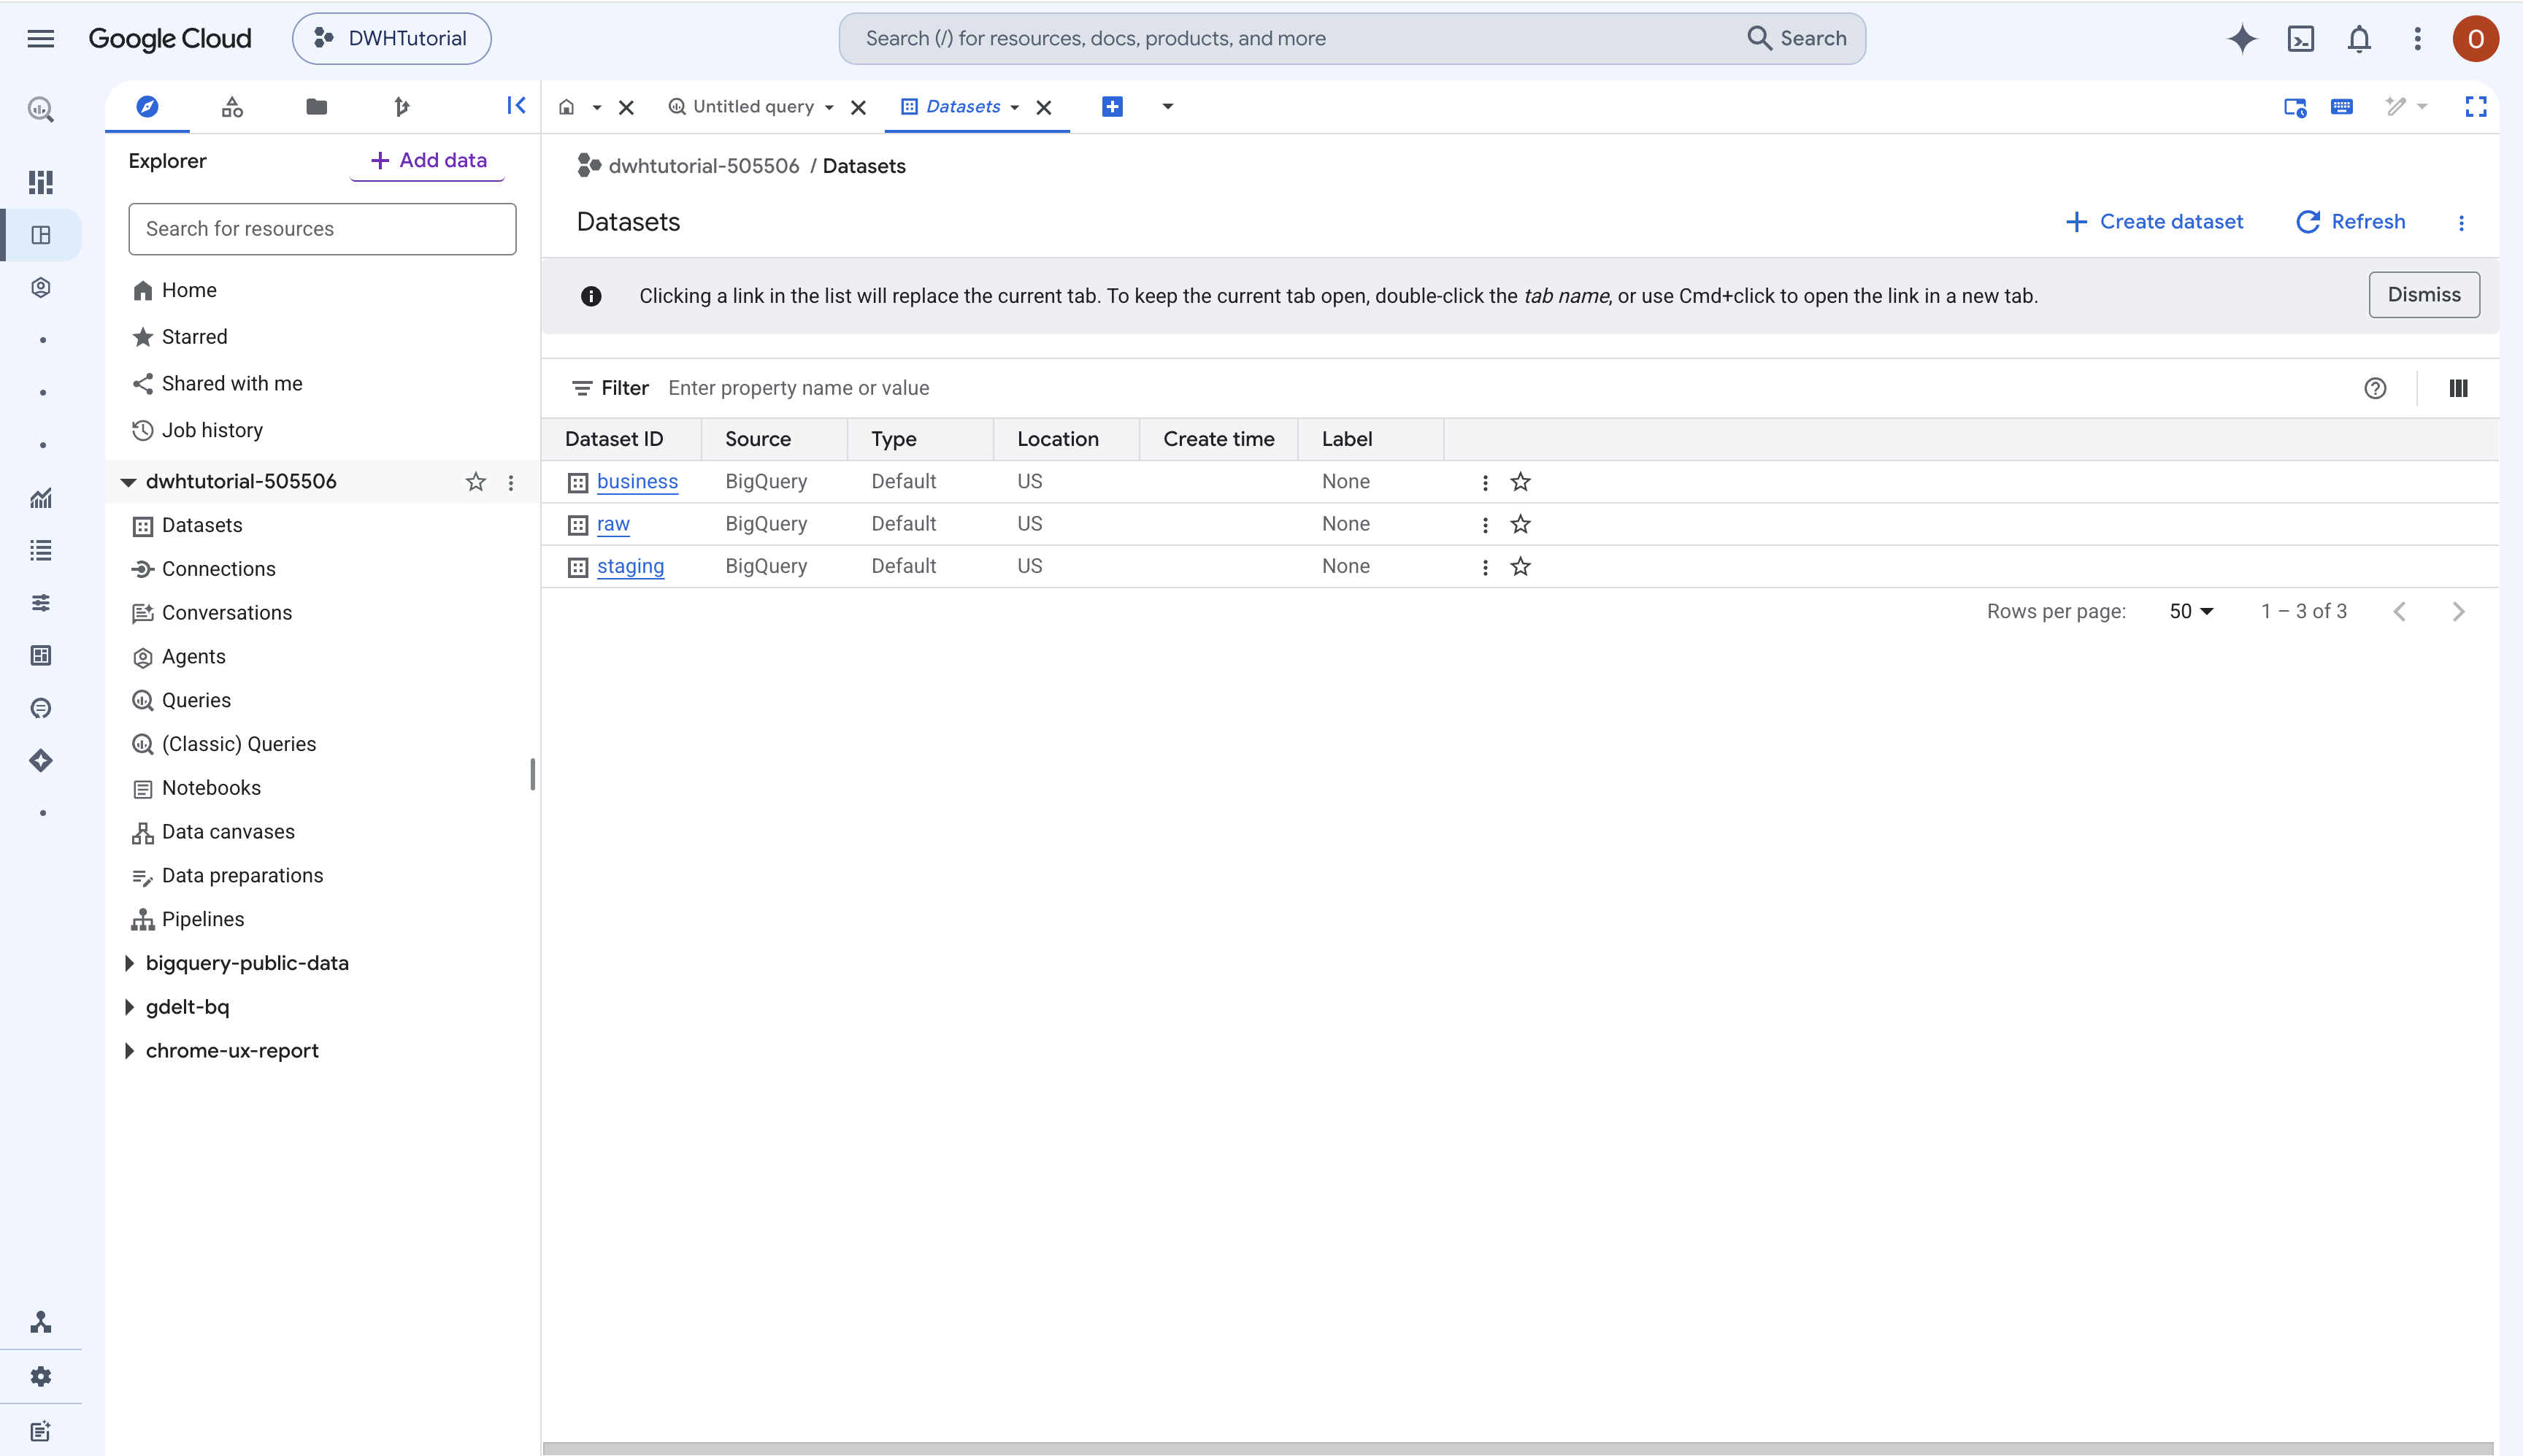
In BigQuery Studio, create these datasets in the same location:
rawstagingbusiness
The
rawdataset must exist before you run Skyvia Replication because it is the target for the replicated Salesforce data. Thestagingandbusinessdatasets can also be created by dbt when the corresponding models are built, depending on the project configuration.
1.3 Create a Cloud Storage bucket
Create a bucket for Skyvia's temporary files. Use the same region or multi-region as the BigQuery datasets. Skyvia deletes the temporary files after the load completes.
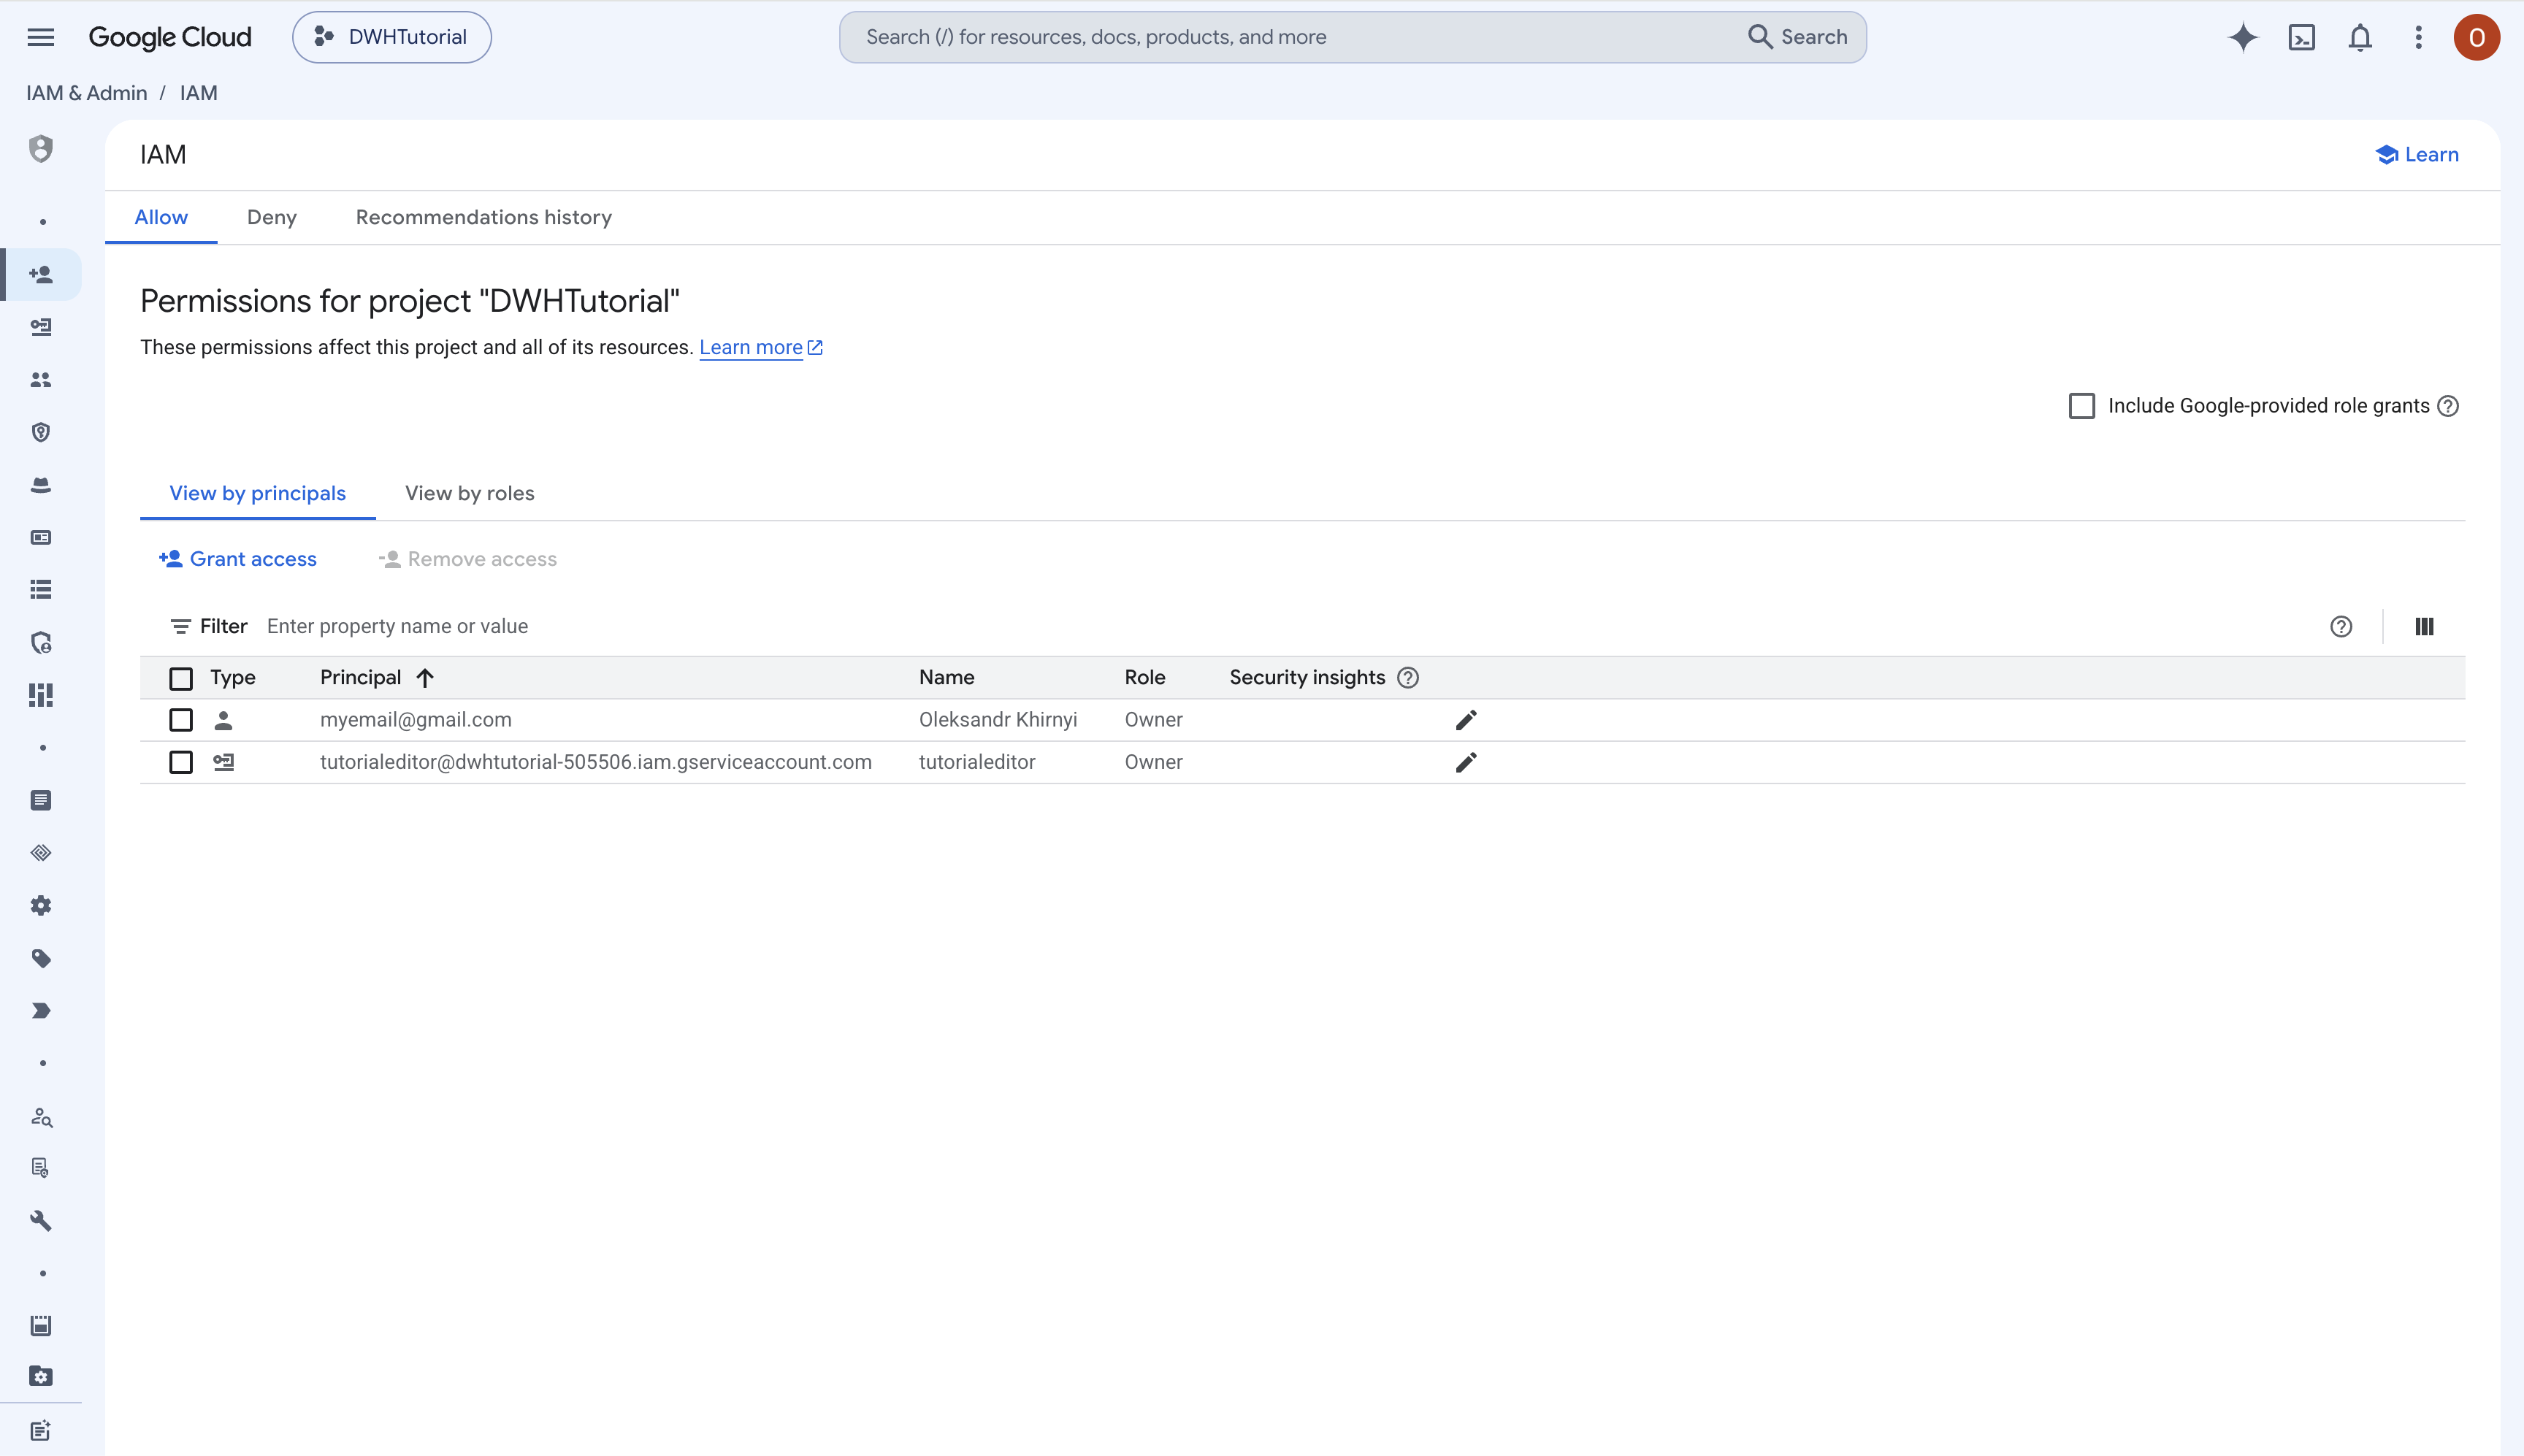
1.4 Create a service account
Create a service account for this pipeline and grant it access to the Google Cloud project.
For this tutorial environment, assign the Owner role. This gives the service account the permissions required to work with BigQuery and other project resources used in the tutorial.
Note: The Owner role provides broad access to the entire project. For production environments, use more restrictive roles that grant only the permissions required by the pipeline.
Create a JSON key and store it outside the dbt project, for example:
/Users/your-user/.gcp/salesforce-opportunity-dwh.jsonOn Windows, use a path such as:
C:\Users\your-user\.gcp\salesforce-opportunity-dwh.jsonKeep the JSON key private. Do not commit it to Git or include its contents in screenshots, because it contains credentials that can be used to authenticate as the service account.
2. Load Salesforce data into BigQuery
With the BigQuery environment prepared, the next step is to populate the raw dataset with Salesforce data. Skyvia Replication will copy the Salesforce Opportunity data to BigQuery. To achieve that, create the connections to Salesforce and BigQuery first.
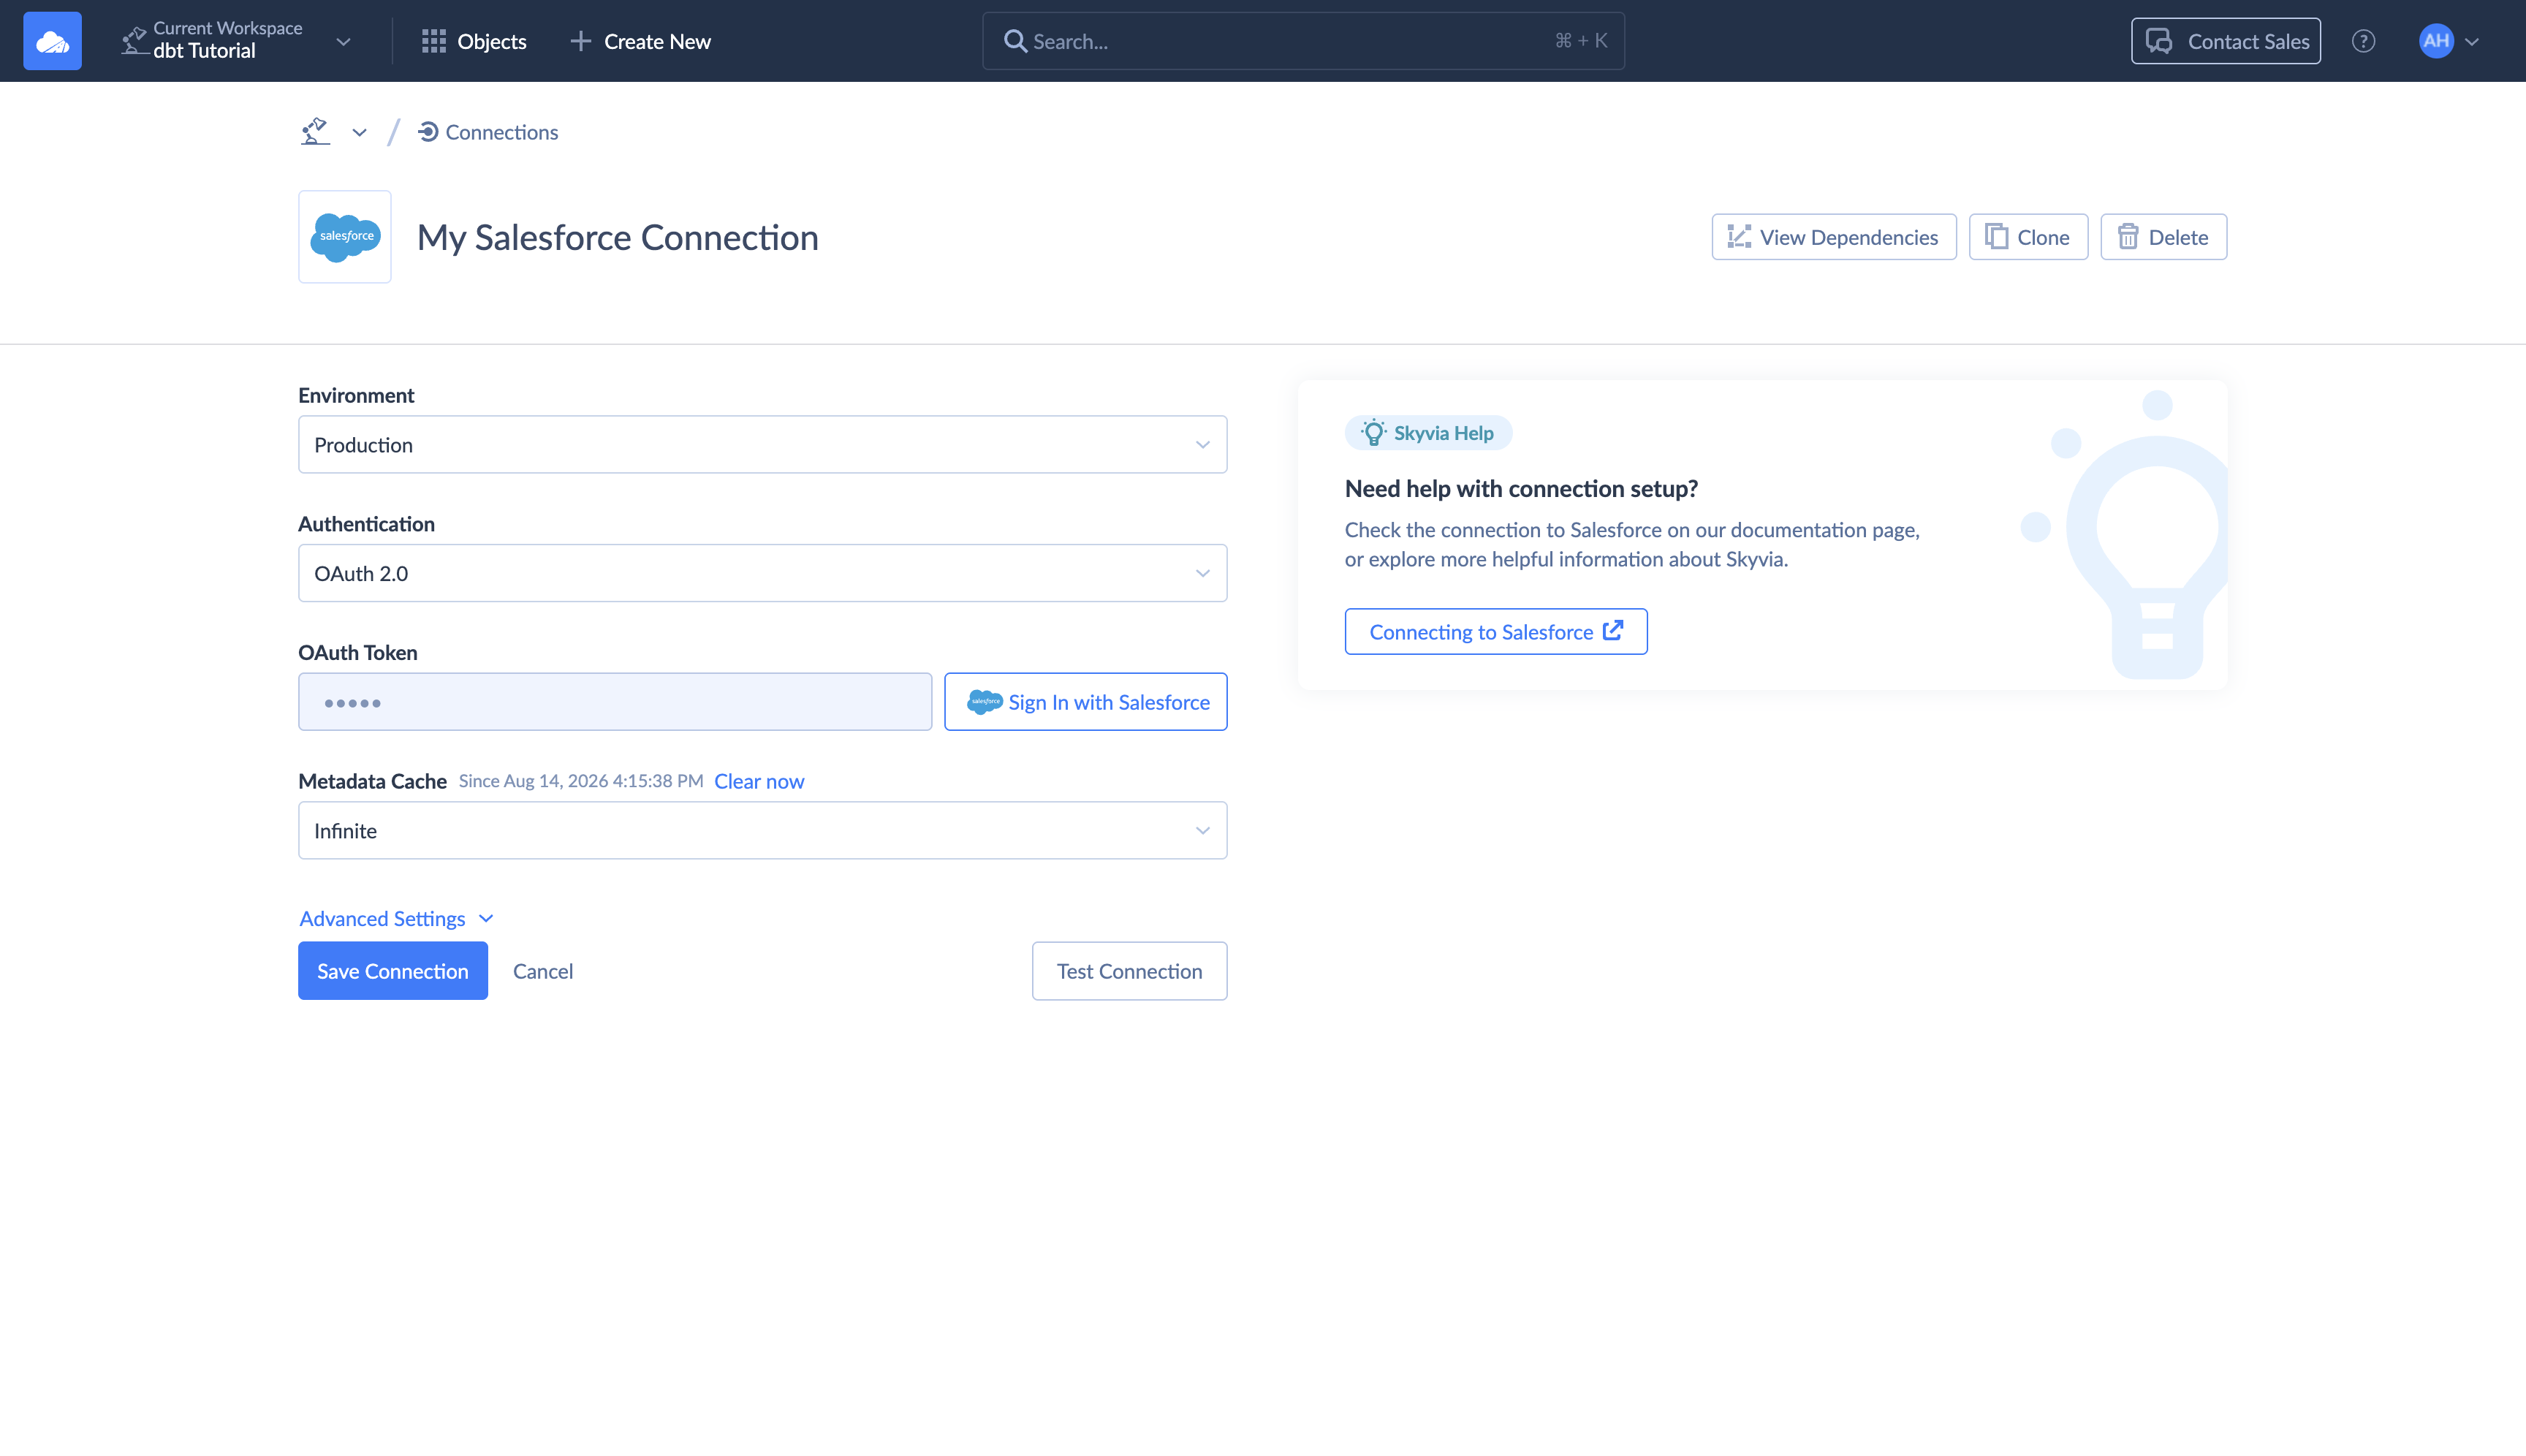
2.1 Create Salesforce connection
In Skyvia:
- Select + Create New > Connection.
- Select Salesforce.
- Choose the correct environment: Production, Sandbox, or Custom.
- Sign in with OAuth unless your organization requires another method.
- Save the connection and run Test Connection.
2.2 Create BigQuery connection
Create a Google BigQuery connection in Skyvia:
- Select + Create New > Connection.
- Select Google BigQuery.
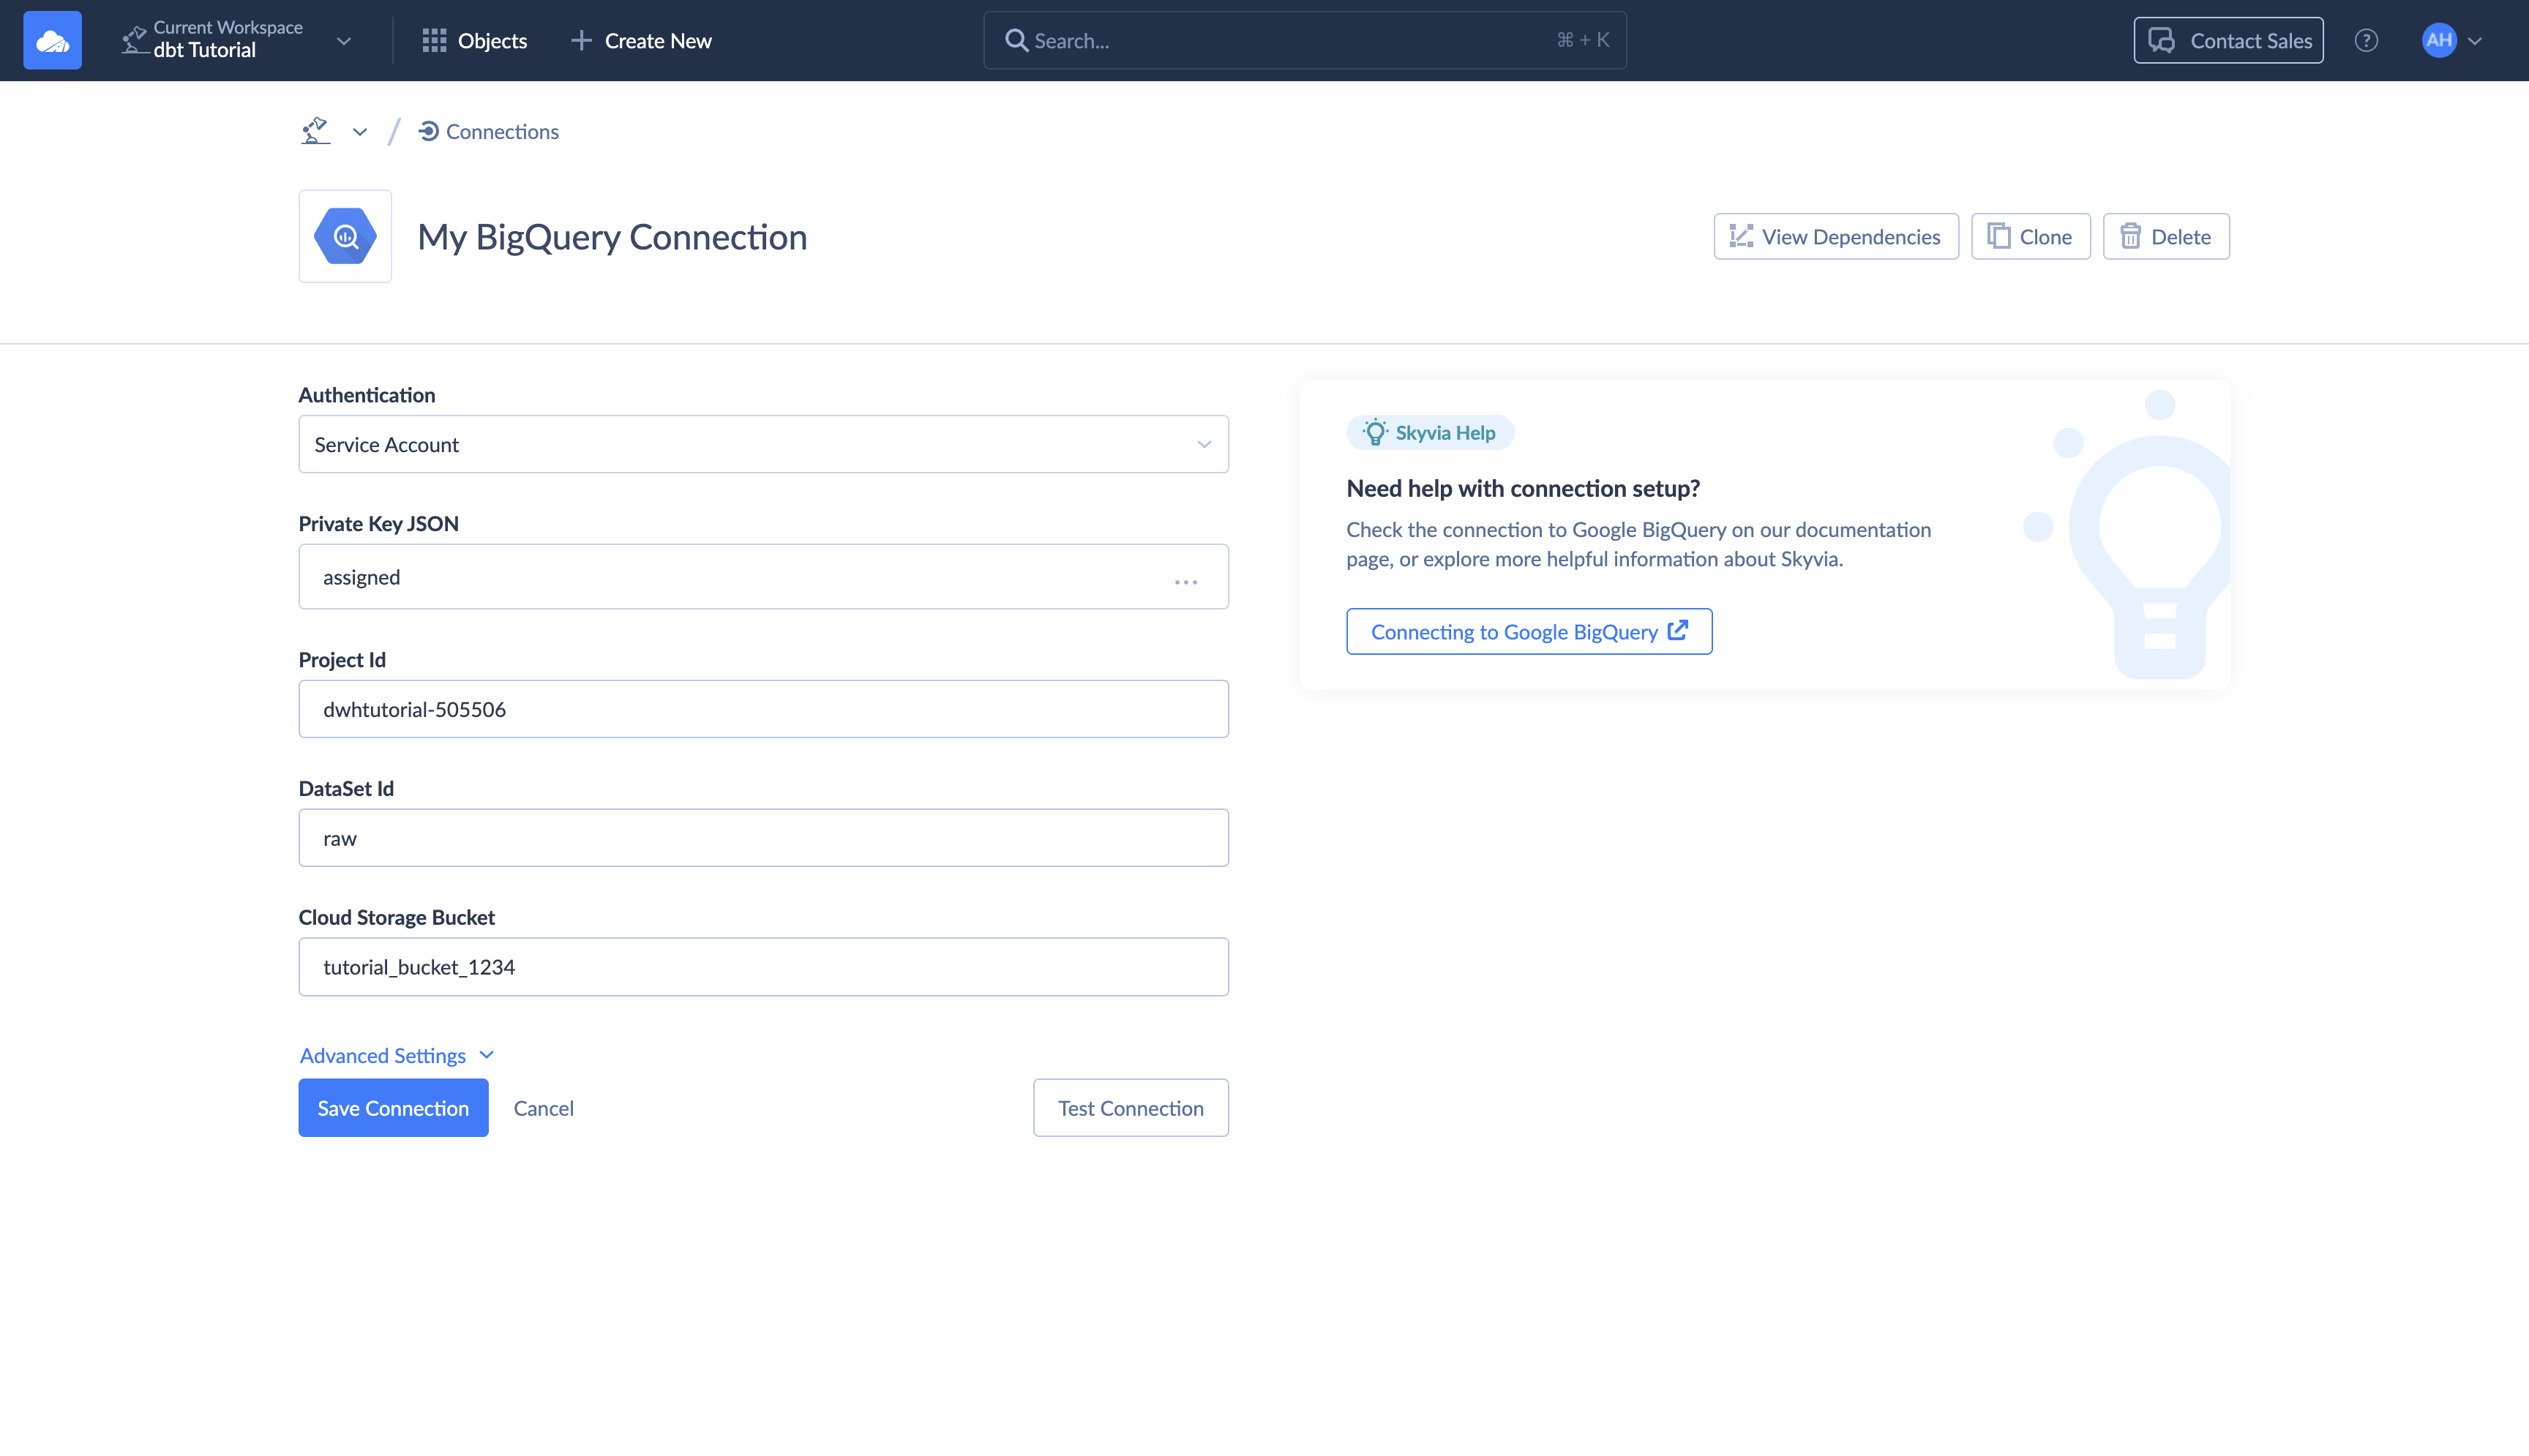
- Choose Service Account authentication.
- Enter the Google Cloud Project ID.
- Enter the Dataset ID (
rawin this tutorial). - Paste the service-account JSON into the protected credentials field.
- Enter the Cloud Storage bucket used by the connection.
- Save the connection and run Test Connection.
3. Replicate Salesforce Opportunities to BigQuery
3.1 Create the Replication integration
In Skyvia:
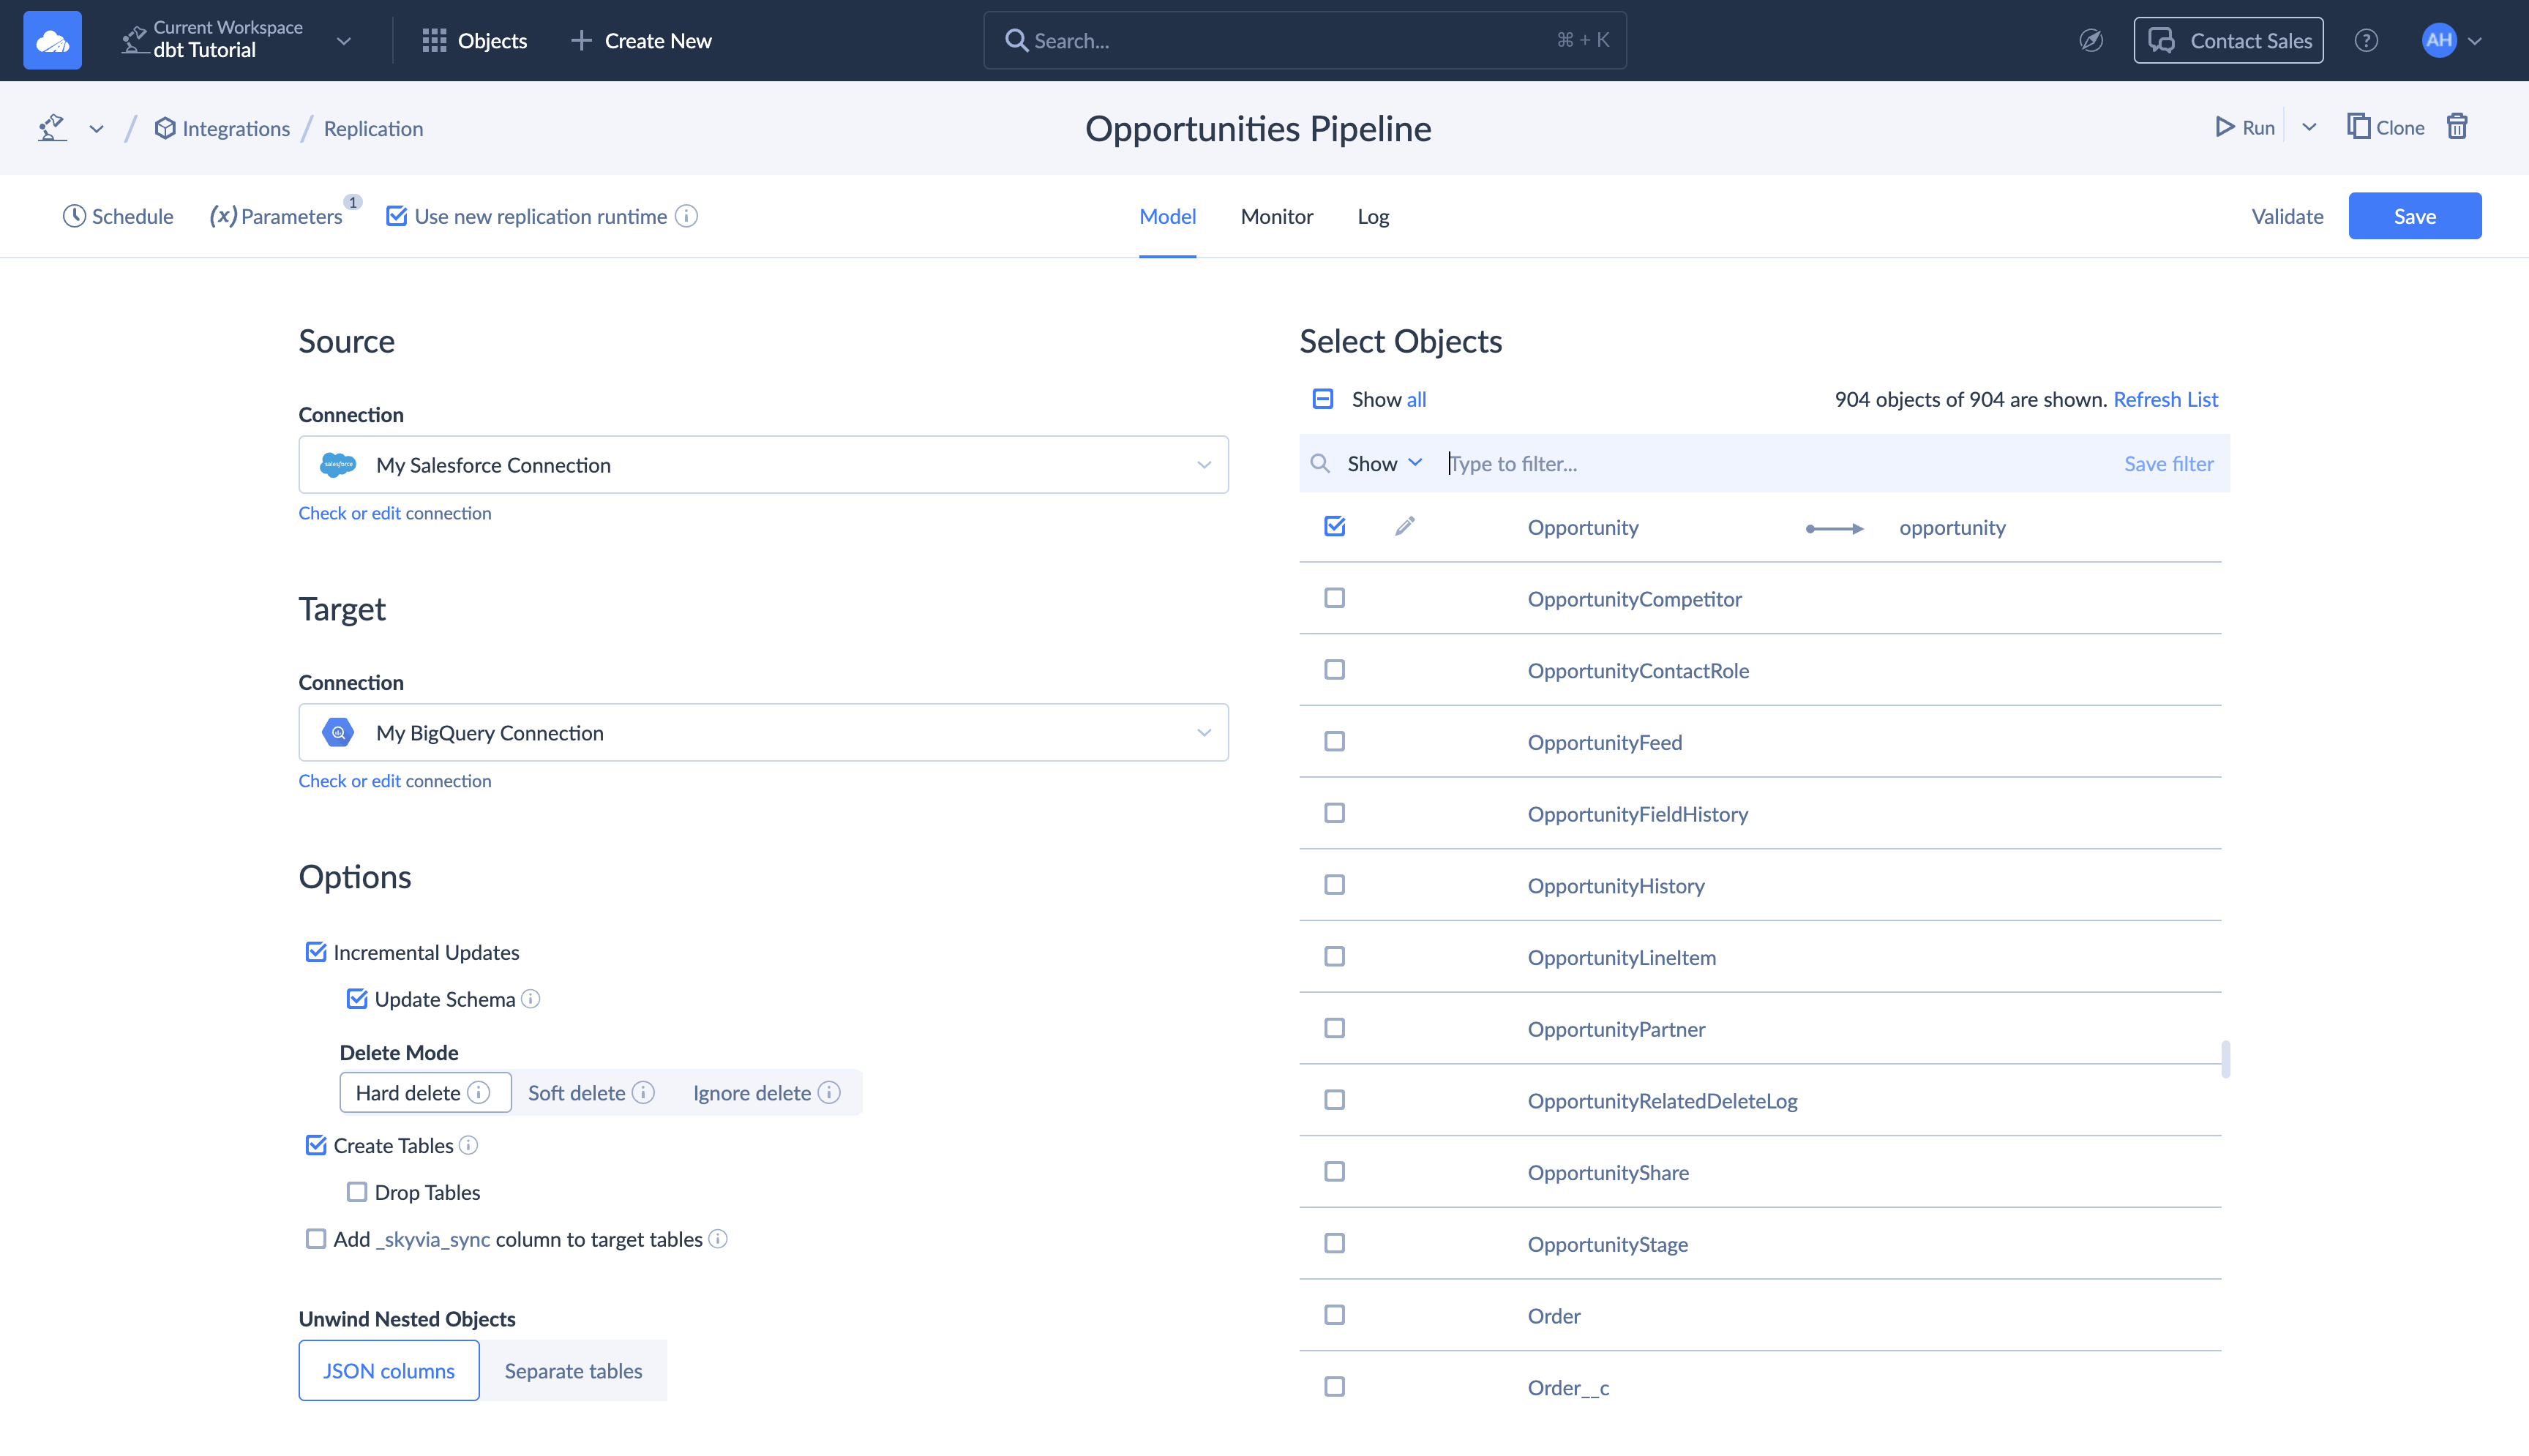
- Select + Create New > Replication.
- Select the Salesforce connection as the source.
- Select the BigQuery connection as the target.
- Enable incremental updates if you want later runs to load only changes.
- Select the
Opportunityobject. - Optionally, open the Opportunity replication settings. If you want to partition the target BigQuery table, configure Partitioning and select a suitable date or time field. For this tutorial, you can partition by CloseDate, which is useful when analytics queries filter Opportunities by reporting period.
Keep all Opportunity fields, or at minimum keep the fields used by this tutorial:
Id
Name
AccountId
OwnerId
StageName
Type
LeadSource
Amount
Probability
CloseDate
IsClosed
IsWon
IsDeleted
CreatedDate
LastModifiedDate
Incremental replication also needs the object key plus creation, modification, and deletion-tracking fields. Do not exclude those fields.
3.2 Run and verify the first load
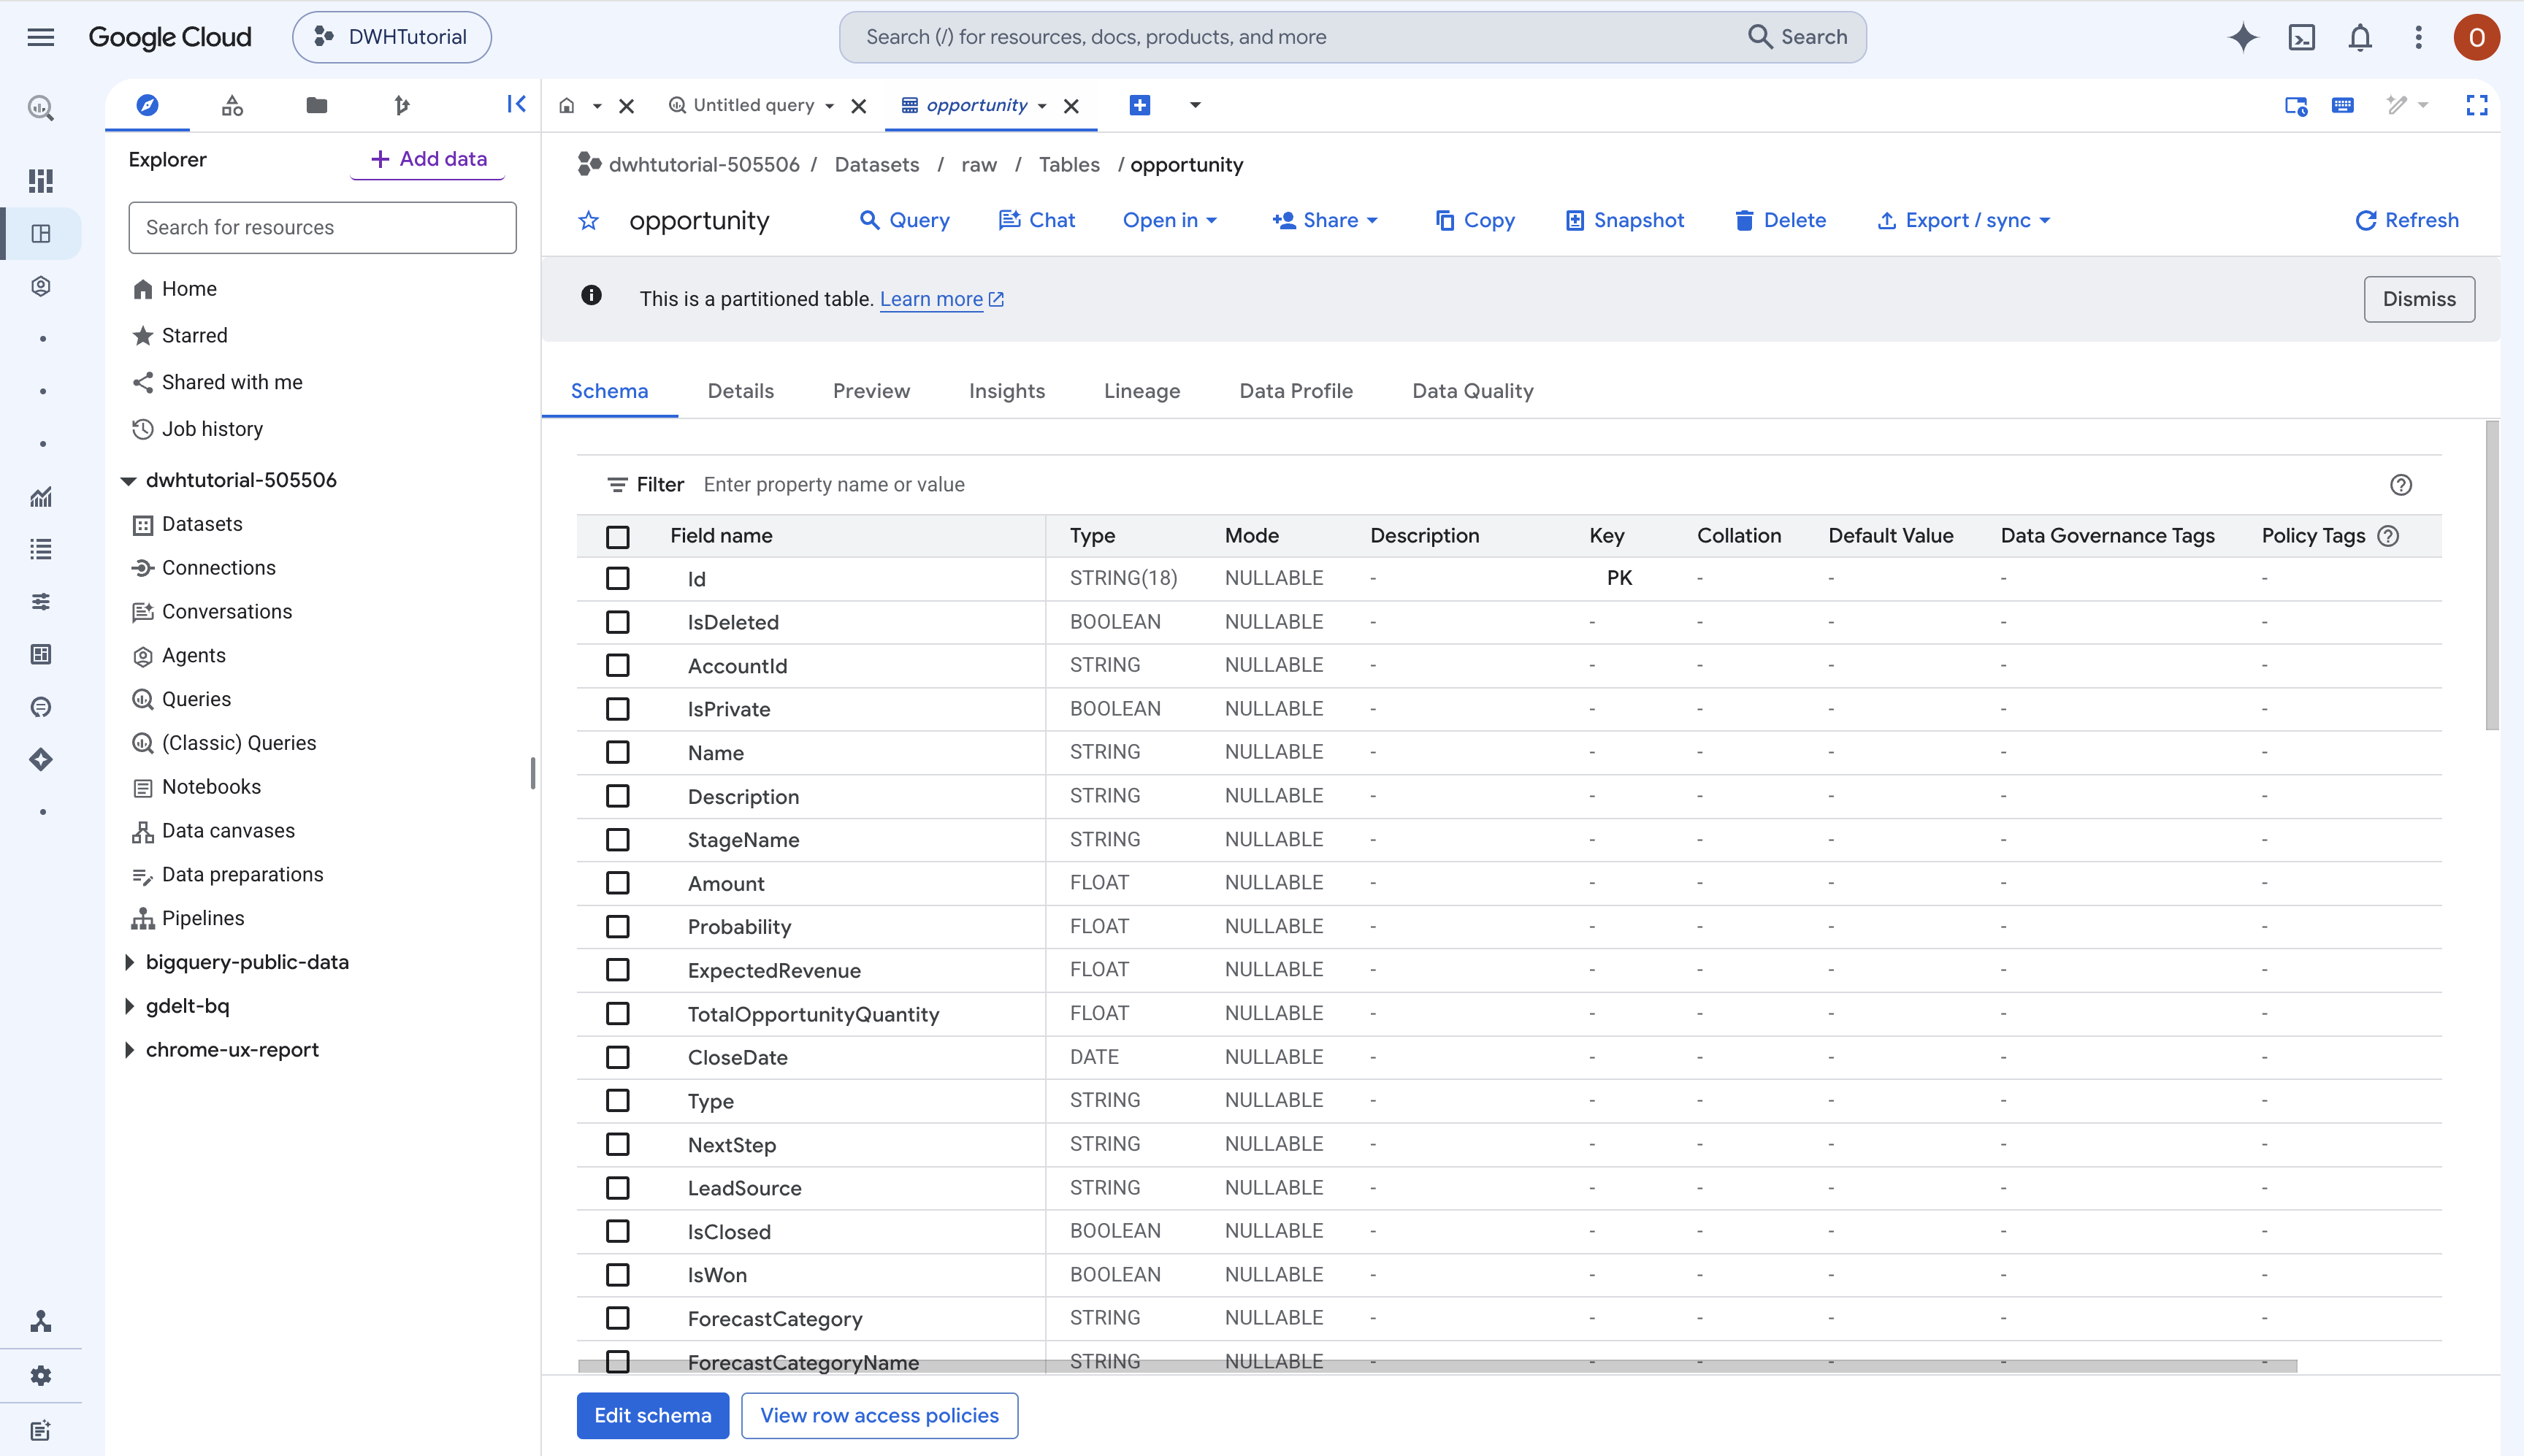
Save and run the Replication integration. When it succeeds, open BigQuery and confirm that this table exists:
raw.OpportunityPreview the table and confirm that the required columns contain data.

4. Create the local dbt project
Build and test the dbt project locally. Later, you will configure Skyvia to run the same project automatically.
4.1 Create a Python virtual environment
Create a folder for the tutorial project, open a terminal in that folder, and create a Python virtual environment:
python -m venv dbt-envA virtual environment keeps dbt and its Python dependencies isolated from other Python projects on your computer.
Activate the dbt-env virtual environment.
On macOS or Linux:
source dbt-env/bin/activateOn Windows PowerShell:
.\dbt-env\Scripts\Activate.ps14.2 Install the BigQuery adapter
Install dbt-bigquery, then check the installed versions:
pip install dbt-bigquery
dbt --version
When you configure the Skyvia dbt Transformation later, select a supported dbt Core version that matches the local project's major and minor version.
4.3 Initialize the project
Run:
dbt init salesforce_opportunity_dwhIf dbt asks you to select a database adapter during initialization, select BigQuery.
Then open the project folder:
cd salesforce_opportunity_dwh
dbt may generate sample models in the models directory, typically in an example folder. Delete these sample models because in this tutorial you work with staging and business models.
5. Connect local dbt to BigQuery
dbt uses a profiles.yml file to connect to BigQuery.
The file is usually stored here:
macOS or Linux:
~/.dbt/profiles.ymlWindows:
C:\Users\your-user\.dbt\profiles.ymlIf dbt init already created the file, open it. Otherwise, create it.
Add the following profile:
salesforce_opportunity_dwh:
  target: dev
  outputs:
    dev:
      type: bigquery
      method: service-account
      project: your-gcp-project-id
      dataset: dbt_dev
      threads: 4
      keyfile: /path/to/your/service-account.json
      location: EU
Replace:
your-gcp-project-idwith your Google Cloud project ID./path/to/your/service-account.jsonwith the full path to the JSON key you created earlier.EUwith the location of your BigQuery datasets, if different.
dbt_dev is the default target dataset for this local dbt profile. In the next section, you will configure the tutorial models to build in the staging and business datasets.
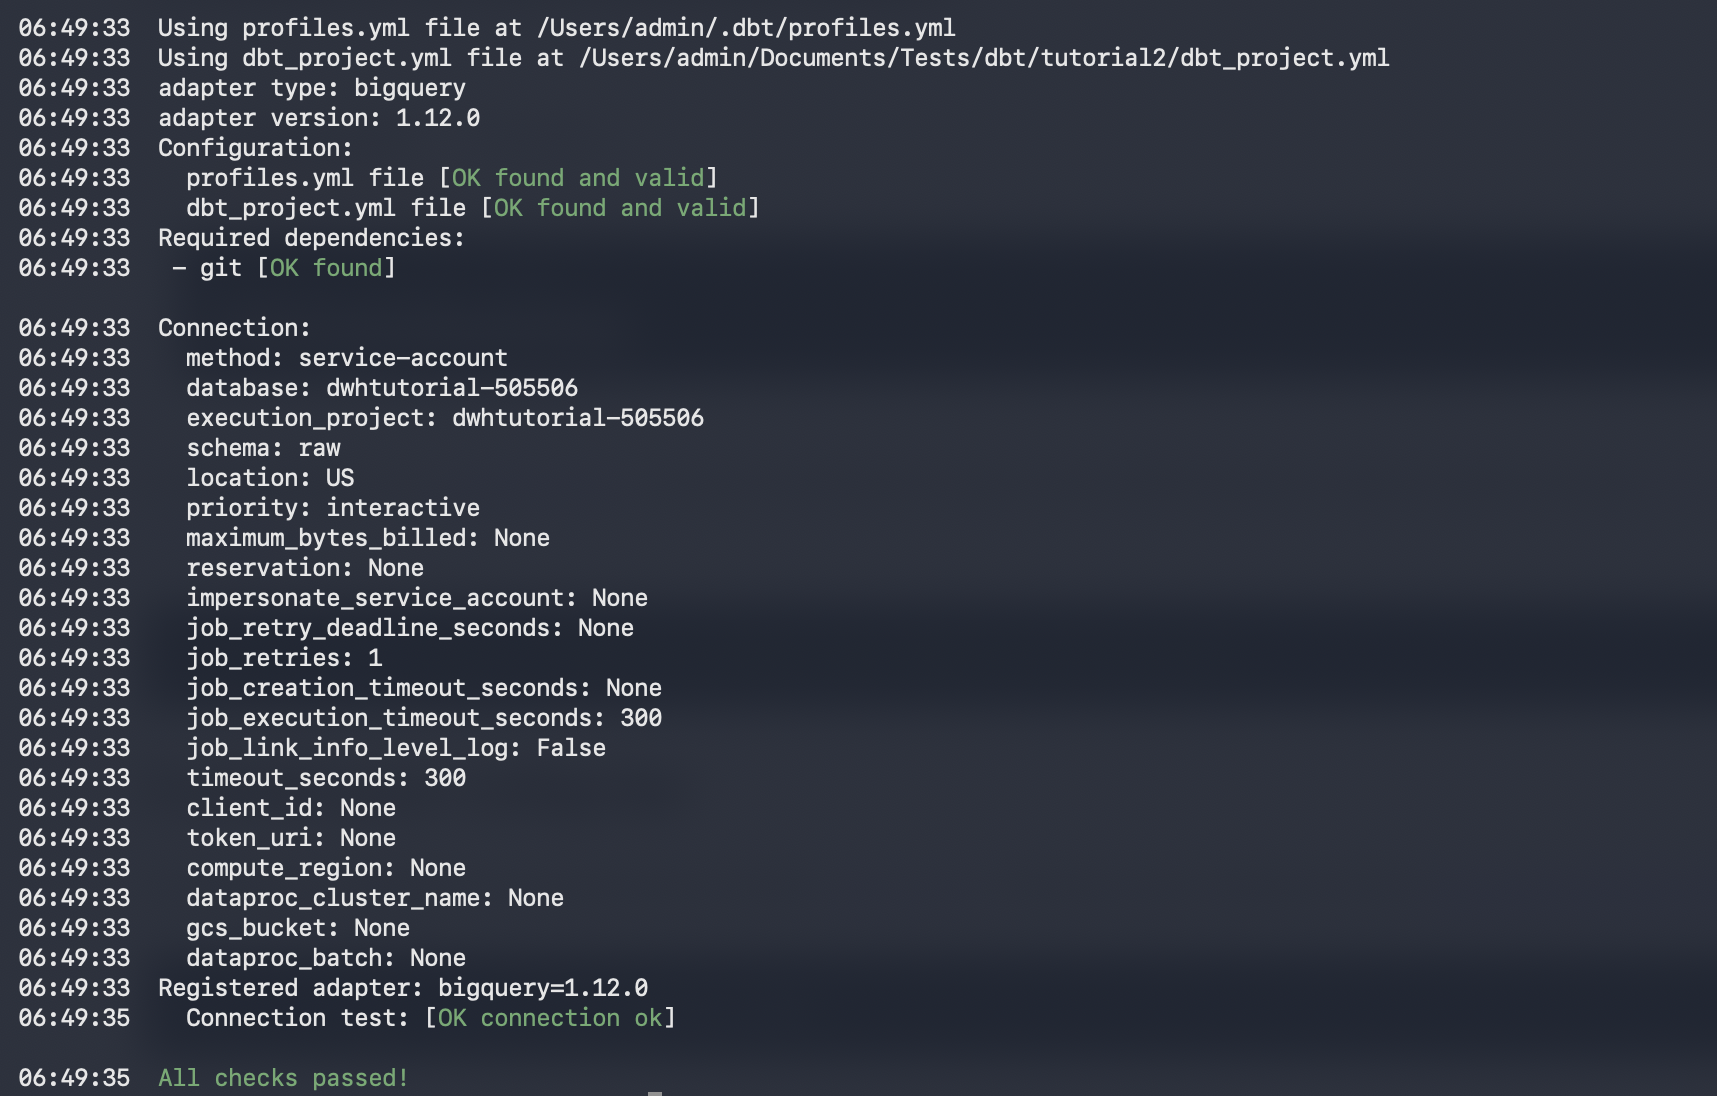
From the dbt project folder, test the connection:
dbt debugA successful connection test confirms that dbt can authenticate and connect to BigQuery.
6. Configure dbt Project Structure
Organize the dbt models into separate folders for the Silver and Gold layers.
In the dbt project, create:
models/
├── staging/
└── business/
The staging folder will contain models that clean and standardize the raw Salesforce data. The business folder will contain analytics-ready models used for reporting.
Open dbt_project.yml and configure the folders:
name: salesforce_opportunity_dwh
version: '1.0.0'
config-version: 2

profile: salesforce_opportunity_dwh

model-paths: ["models"]
macro-paths: ["macros"]

models:
  salesforce_opportunity_dwh:
    staging:
      +schema: staging
      +materialized: view
    business:
      +schema: business
      +materialized: table
With this configuration:
- Models in
models/stagingare created as views. - Models in
models/businessare created as tables.
By default, dbt combines the target dataset from profiles.yml with a custom dataset name. With dbt_dev as the target, this would produce names such as:
dbt_dev_staging
dbt_dev_business
For this tutorial, we want the models in the existing staging and business datasets instead.
Create a macros folder in the project:
macros/Then create:
macros/generate_schema_name.sqlAdd the following macro:
{% macro generate_schema_name(custom_schema_name, node) -%}
  {%- if custom_schema_name is none -%}
    {{ target.schema }}
  {%- else -%}
    {{ custom_schema_name | trim }}
  {%- endif -%}
{%- endmacro %}
This overrides dbt's default dataset-naming behavior for the tutorial. Models configured with +schema: staging or +schema: business will now be created directly in:
staging
business
Note: This simplified naming works for the single-environment setup in this tutorial. In a shared dbt development environment, keeping the target dataset in generated names helps prevent different developers from overwriting each other's models.
Your project structure should now look similar to this:
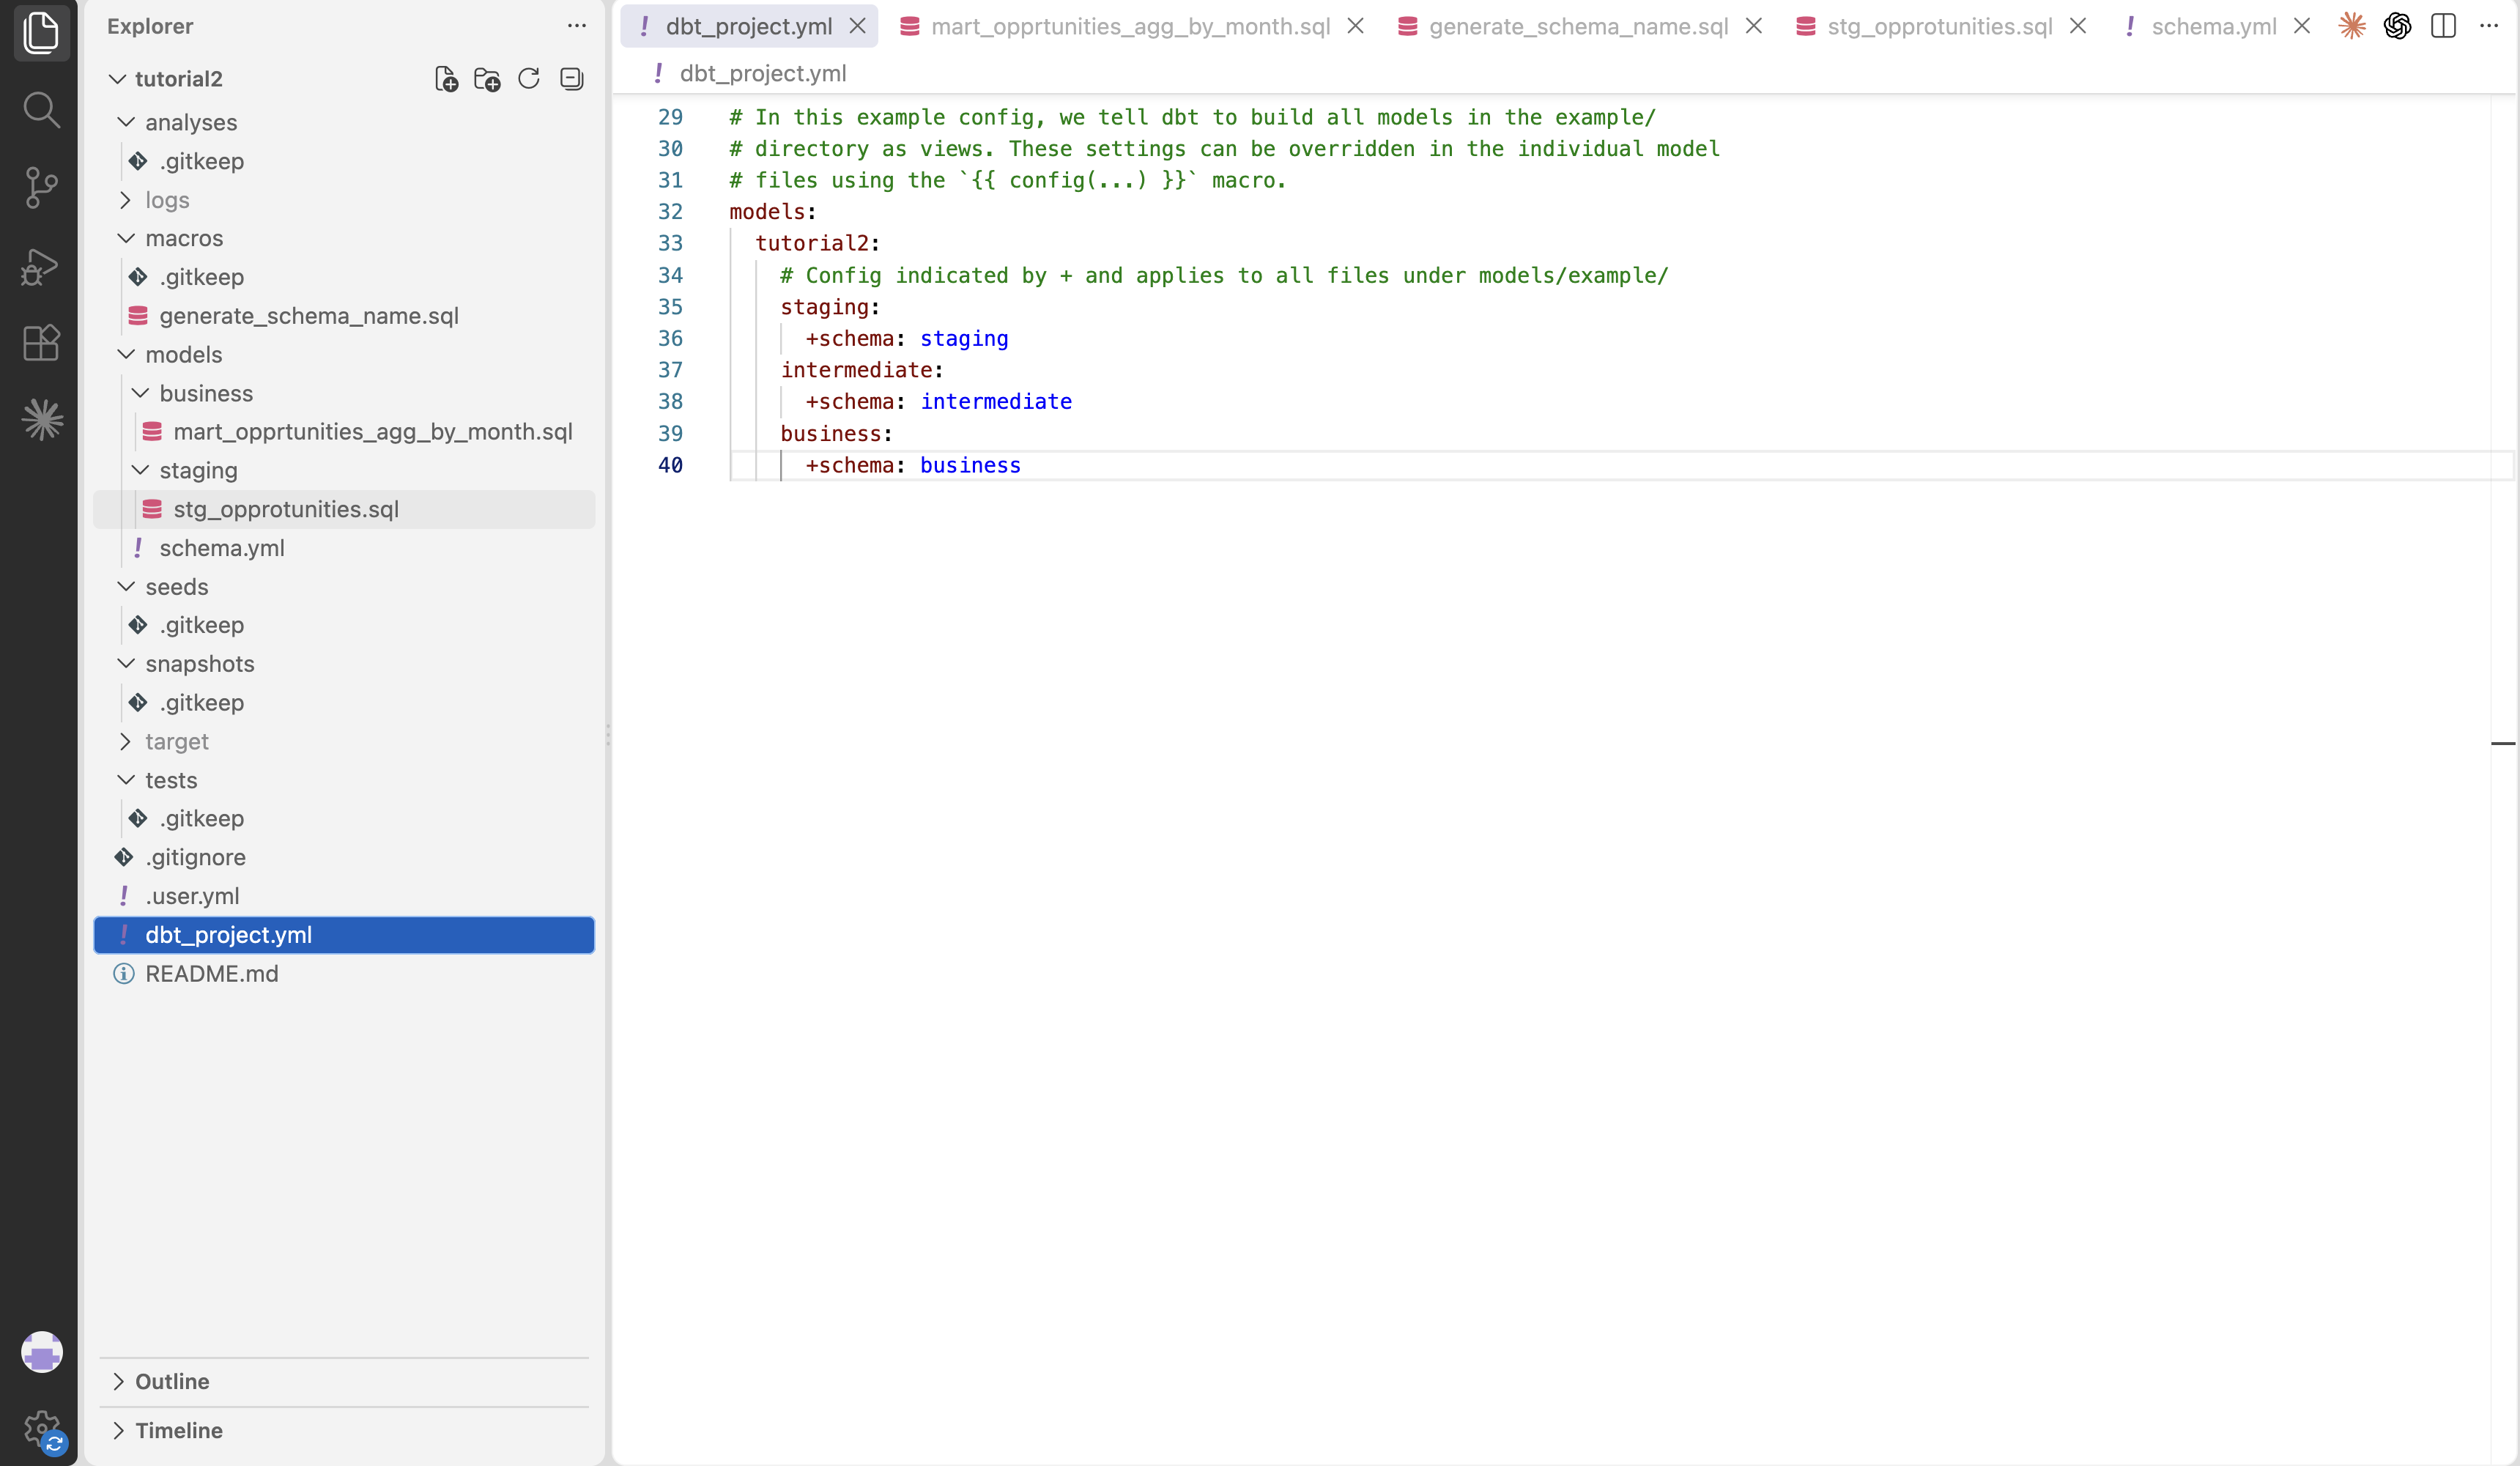
7. Define dbt sources for raw layer
Before creating the staging model, tell dbt where the raw Salesforce data is stored. Create models/staging/sources.yml to define the existing raw.Opportunity table as a dbt source. Once defined, you can reference it in the staging model with the source() function instead of hard-coding the BigQuery table name.
Create models/staging/sources.yml:
version: 2

sources:
  - name: salesforce_raw
    database: your-gcp-project-id
    schema: raw
    tables:
      - name: opportunity
        identifier: Opportunity
        description: Raw Salesforce Opportunity table replicated by Skyvia.
Replace your-gcp-project-id with your Google Cloud project ID.
The identifier maps the dbt source name opportunity to the actual Opportunity table in BigQuery. You can now reference the table in the staging model as:
{{ source('salesforce_raw', 'opportunity') }}8. Build and test the staging model
The staging model transforms the raw Salesforce Opportunity data into a cleaner structure that is easier to use in the business model we create next. It renames Salesforce fields, normalizes data types, and excludes soft-deleted records.
Create models/staging/stg_salesforce__opportunity.sql:
select
    Id as opportunity_id,
    Name as opportunity_name,
    AccountId as account_id,
    OwnerId as owner_id,
    StageName as stage_name,
    Type as opportunity_type,
    LeadSource as lead_source,
    safe_cast(Amount as numeric) as amount,
    safe_cast(Probability as numeric) as probability,
    date(CloseDate) as close_date,
    IsClosed as is_closed,
    IsWon as is_won,
    IsDeleted as is_deleted,
    timestamp(CreatedDate) as created_at,
    timestamp(LastModifiedDate) as updated_at
from {{ source('salesforce_raw', 'opportunity') }}
where IsDeleted = false
The source() function references the raw.Opportunity table defined in sources.yml in the previous section. When dbt runs this model, it creates the cleaned stg_salesforce__opportunity model in the staging dataset.
Next, add basic tests to check that key fields contain valid data.
Create models/staging/stg_salesforce__opportunity.yml:
version: 2

models:
  - name: stg_salesforce__opportunity
    description: Cleaned and standardized Salesforce Opportunity data.
    columns:
      - name: opportunity_id
        description: Unique Salesforce Opportunity ID.
        tests:
          - not_null
          - unique
      - name: opportunity_name
        tests:
          - not_null
      - name: stage_name
        tests:
          - not_null
      - name: close_date
        tests:
          - not_null
These tests verify that every Opportunity has a unique ID and that the fields required by the reporting model are not empty.
9. Build the business model
The business model turns the cleaned Opportunity data from the staging layer into aggregated sales metrics for reporting.
It uses stg_salesforce__opportunity as its input and groups Opportunities by stage. For each stage, it calculates the number of Opportunities, total pipeline amount, won amount, open pipeline amount, and average deal size.
Create models/business/opportunity_pipeline_by_stage.sql:
select
    stage_name,
    count(*) as opportunity_count,
    sum(amount) as total_pipeline_amount,
    sum(
        case
            when is_won then amount
            else 0
        end
    ) as won_amount,
    sum(
        case
            when not is_closed then amount
            else 0
        end
    ) as open_pipeline_amount,
    avg(amount) as average_deal_size
from {{ ref('stg_salesforce__opportunity') }}
group by stage_name
The ref() function tells dbt to use the staging model created in the previous section. dbt also uses this reference to determine the dependency between the two models and run them in the correct order.
When the model runs, dbt creates business.opportunity_pipeline_by_stage with one row per Opportunity stage.
Metric definitions in this example are literal:
total_pipeline_amountincludes open, won, and lost Opportunities.open_pipeline_amountincludes only Opportunities that are not closed.won_amountincludes only won Opportunities.average_deal_sizeis the average Opportunity amount for the stage.
If your business defines these metrics differently, adjust the SQL before using the model for production reporting.
10. Run the project locally
At this point, Skyvia Replication has already loaded the Salesforce Opportunity data into raw.Opportunity. Run the dbt project locally to verify that the staging and business models can be built from this raw data and that their configured tests pass.
From the dbt project folder, run:
dbt builddbt build runs the models and their tests in dependency order. In this project, dbt builds the staging model first and then the business model that depends on it.
Confirm that the command completes successfully.
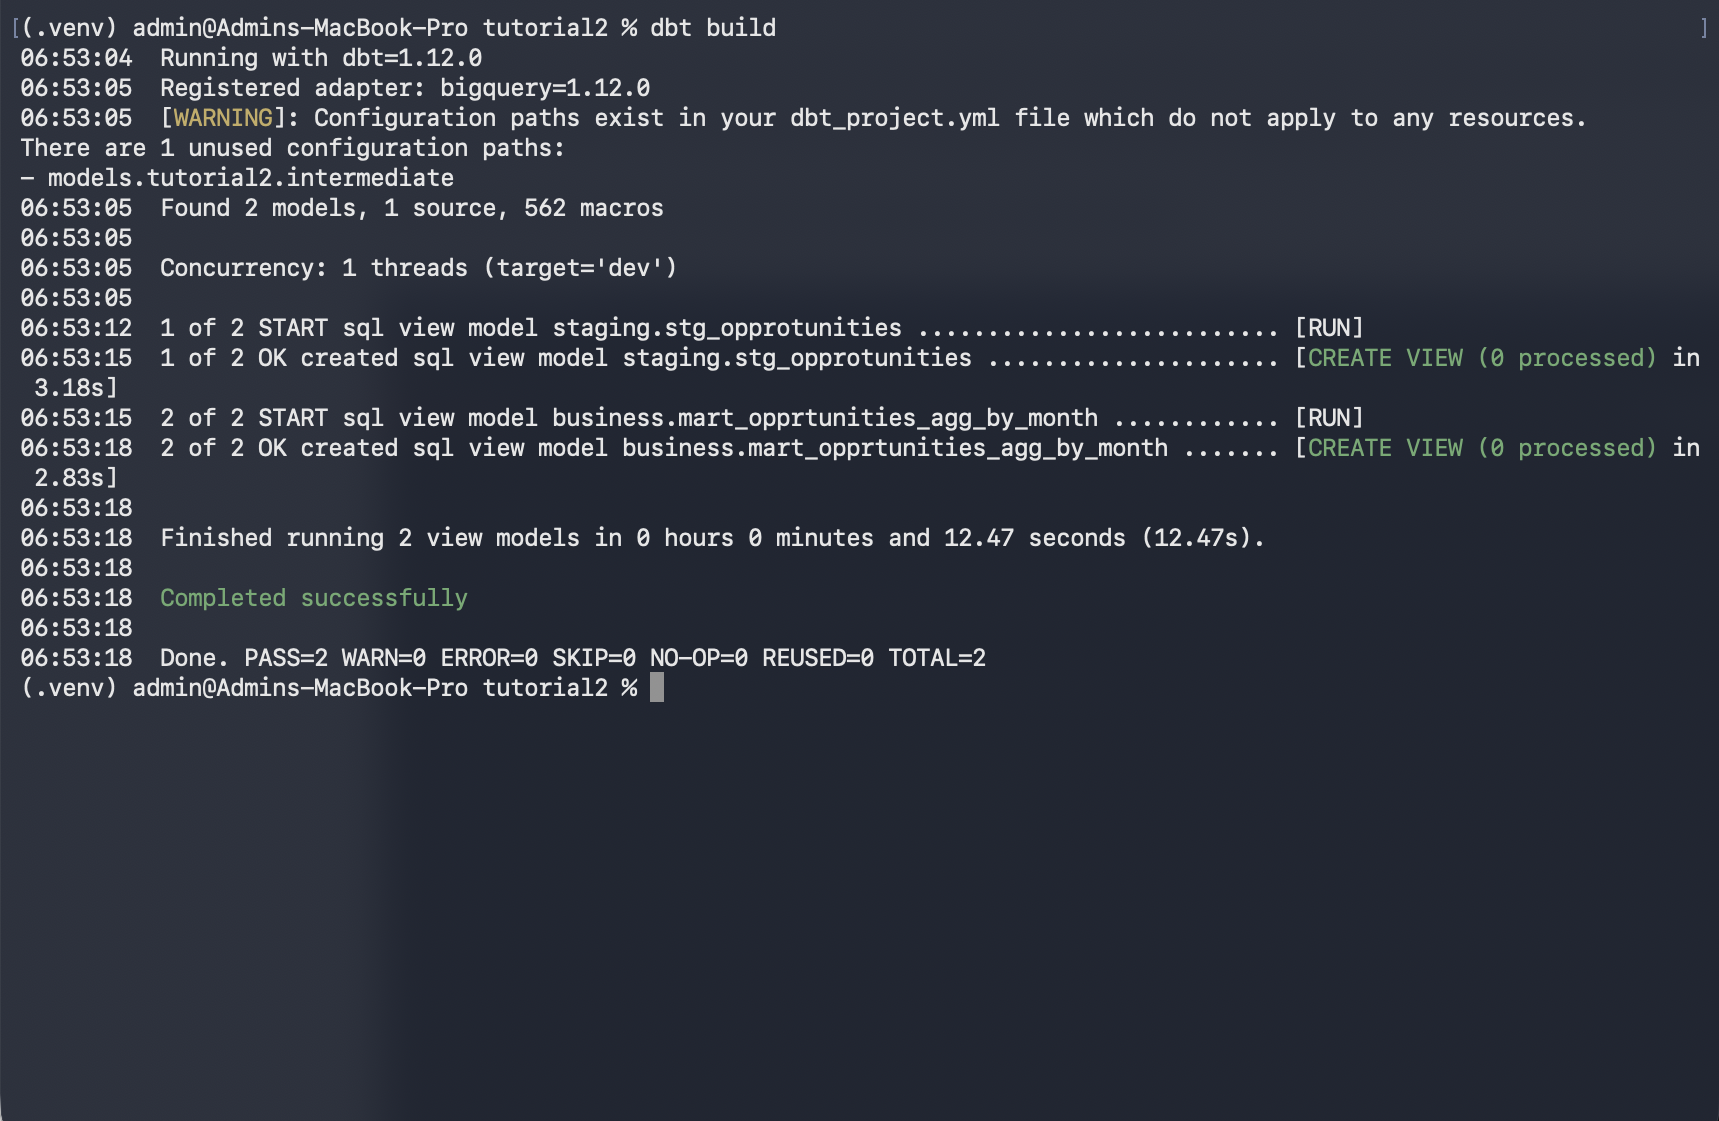
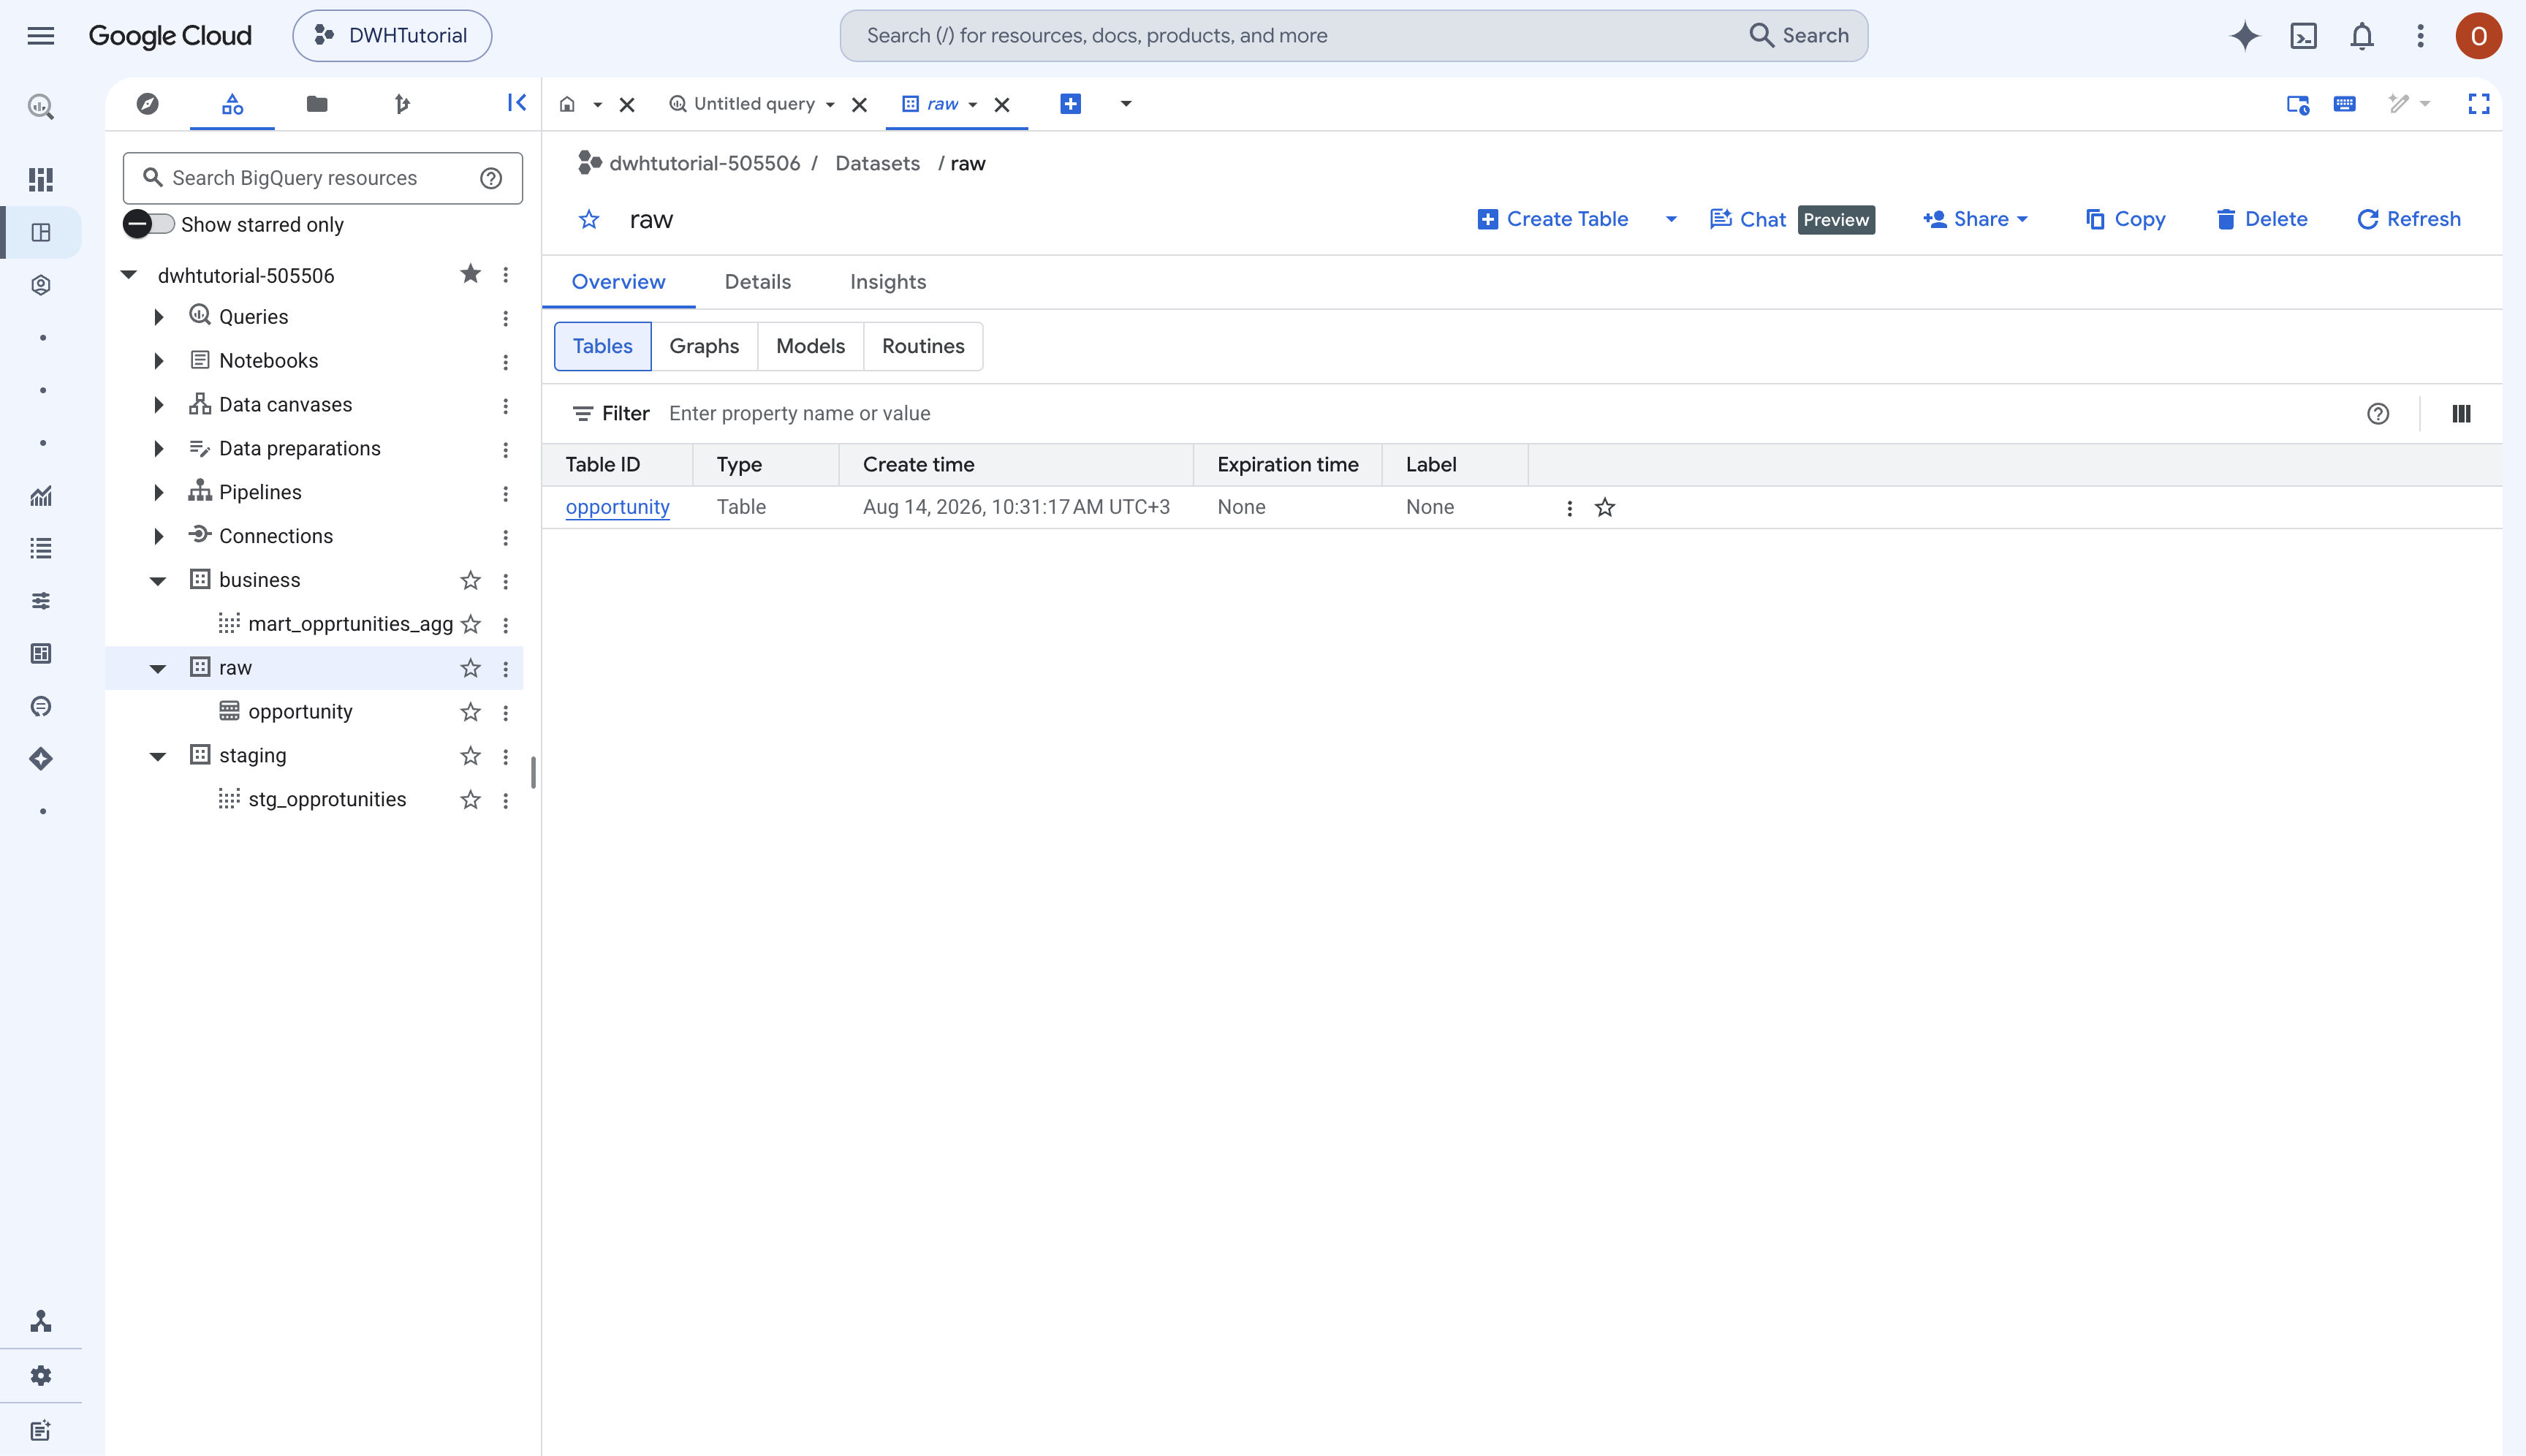
Then, open BigQuery and verify that the following objects are available:
raw.Opportunity
staging.stg_salesforce__opportunity
business.opportunity_pipeline_by_stage
The raw.Opportunity table was created earlier by Skyvia Replication. The staging and business objects are created by dbt.
At this point, all three warehouse layers are in place: raw Salesforce data, cleaned staging data, and aggregated business data for reporting.
11. Push the project to GitHub
Now that the dbt project works locally, push it to GitHub. GitHub provides version control for the project and gives Skyvia a repository from which it can later load and run the dbt project.
Before committing the project, make sure the service-account JSON key is not included. Keep the key outside the dbt project folder, as configured earlier in profiles.yml.
Open the .gitignore file created by dbt init. If the file does not exist, create it in the root of the dbt project.
Make sure it contains:
.env
target/
dbt_packages/
logs/
*.log
*.json
The dbt-related entries exclude files generated locally by dbt. The *.json entry provides an additional safeguard against accidentally committing the service-account JSON key used in this tutorial.
If your dbt project later needs JSON files that should be stored in Git, replace
*.jsonwith the specific service-account key filename instead.
If a service-account key has ever been committed to Git, removing the file from the repository is not enough. Delete the exposed key in Google Cloud and create a new one.
Create an empty GitHub repository, for example:
salesforce-opportunity-dwhThen, from the dbt project folder, run:
git init
git add .
git status
Check the staged files and make sure the service-account JSON key is not listed.
Then commit and push the project:
git commit -m "Initial dbt project for Salesforce Opportunity analytics"
git branch -M main
git remote add origin https://github.com/your-org/salesforce-opportunity-dwh.git
git push -u origin main
Replace the repository URL with the URL of the GitHub repository you created.
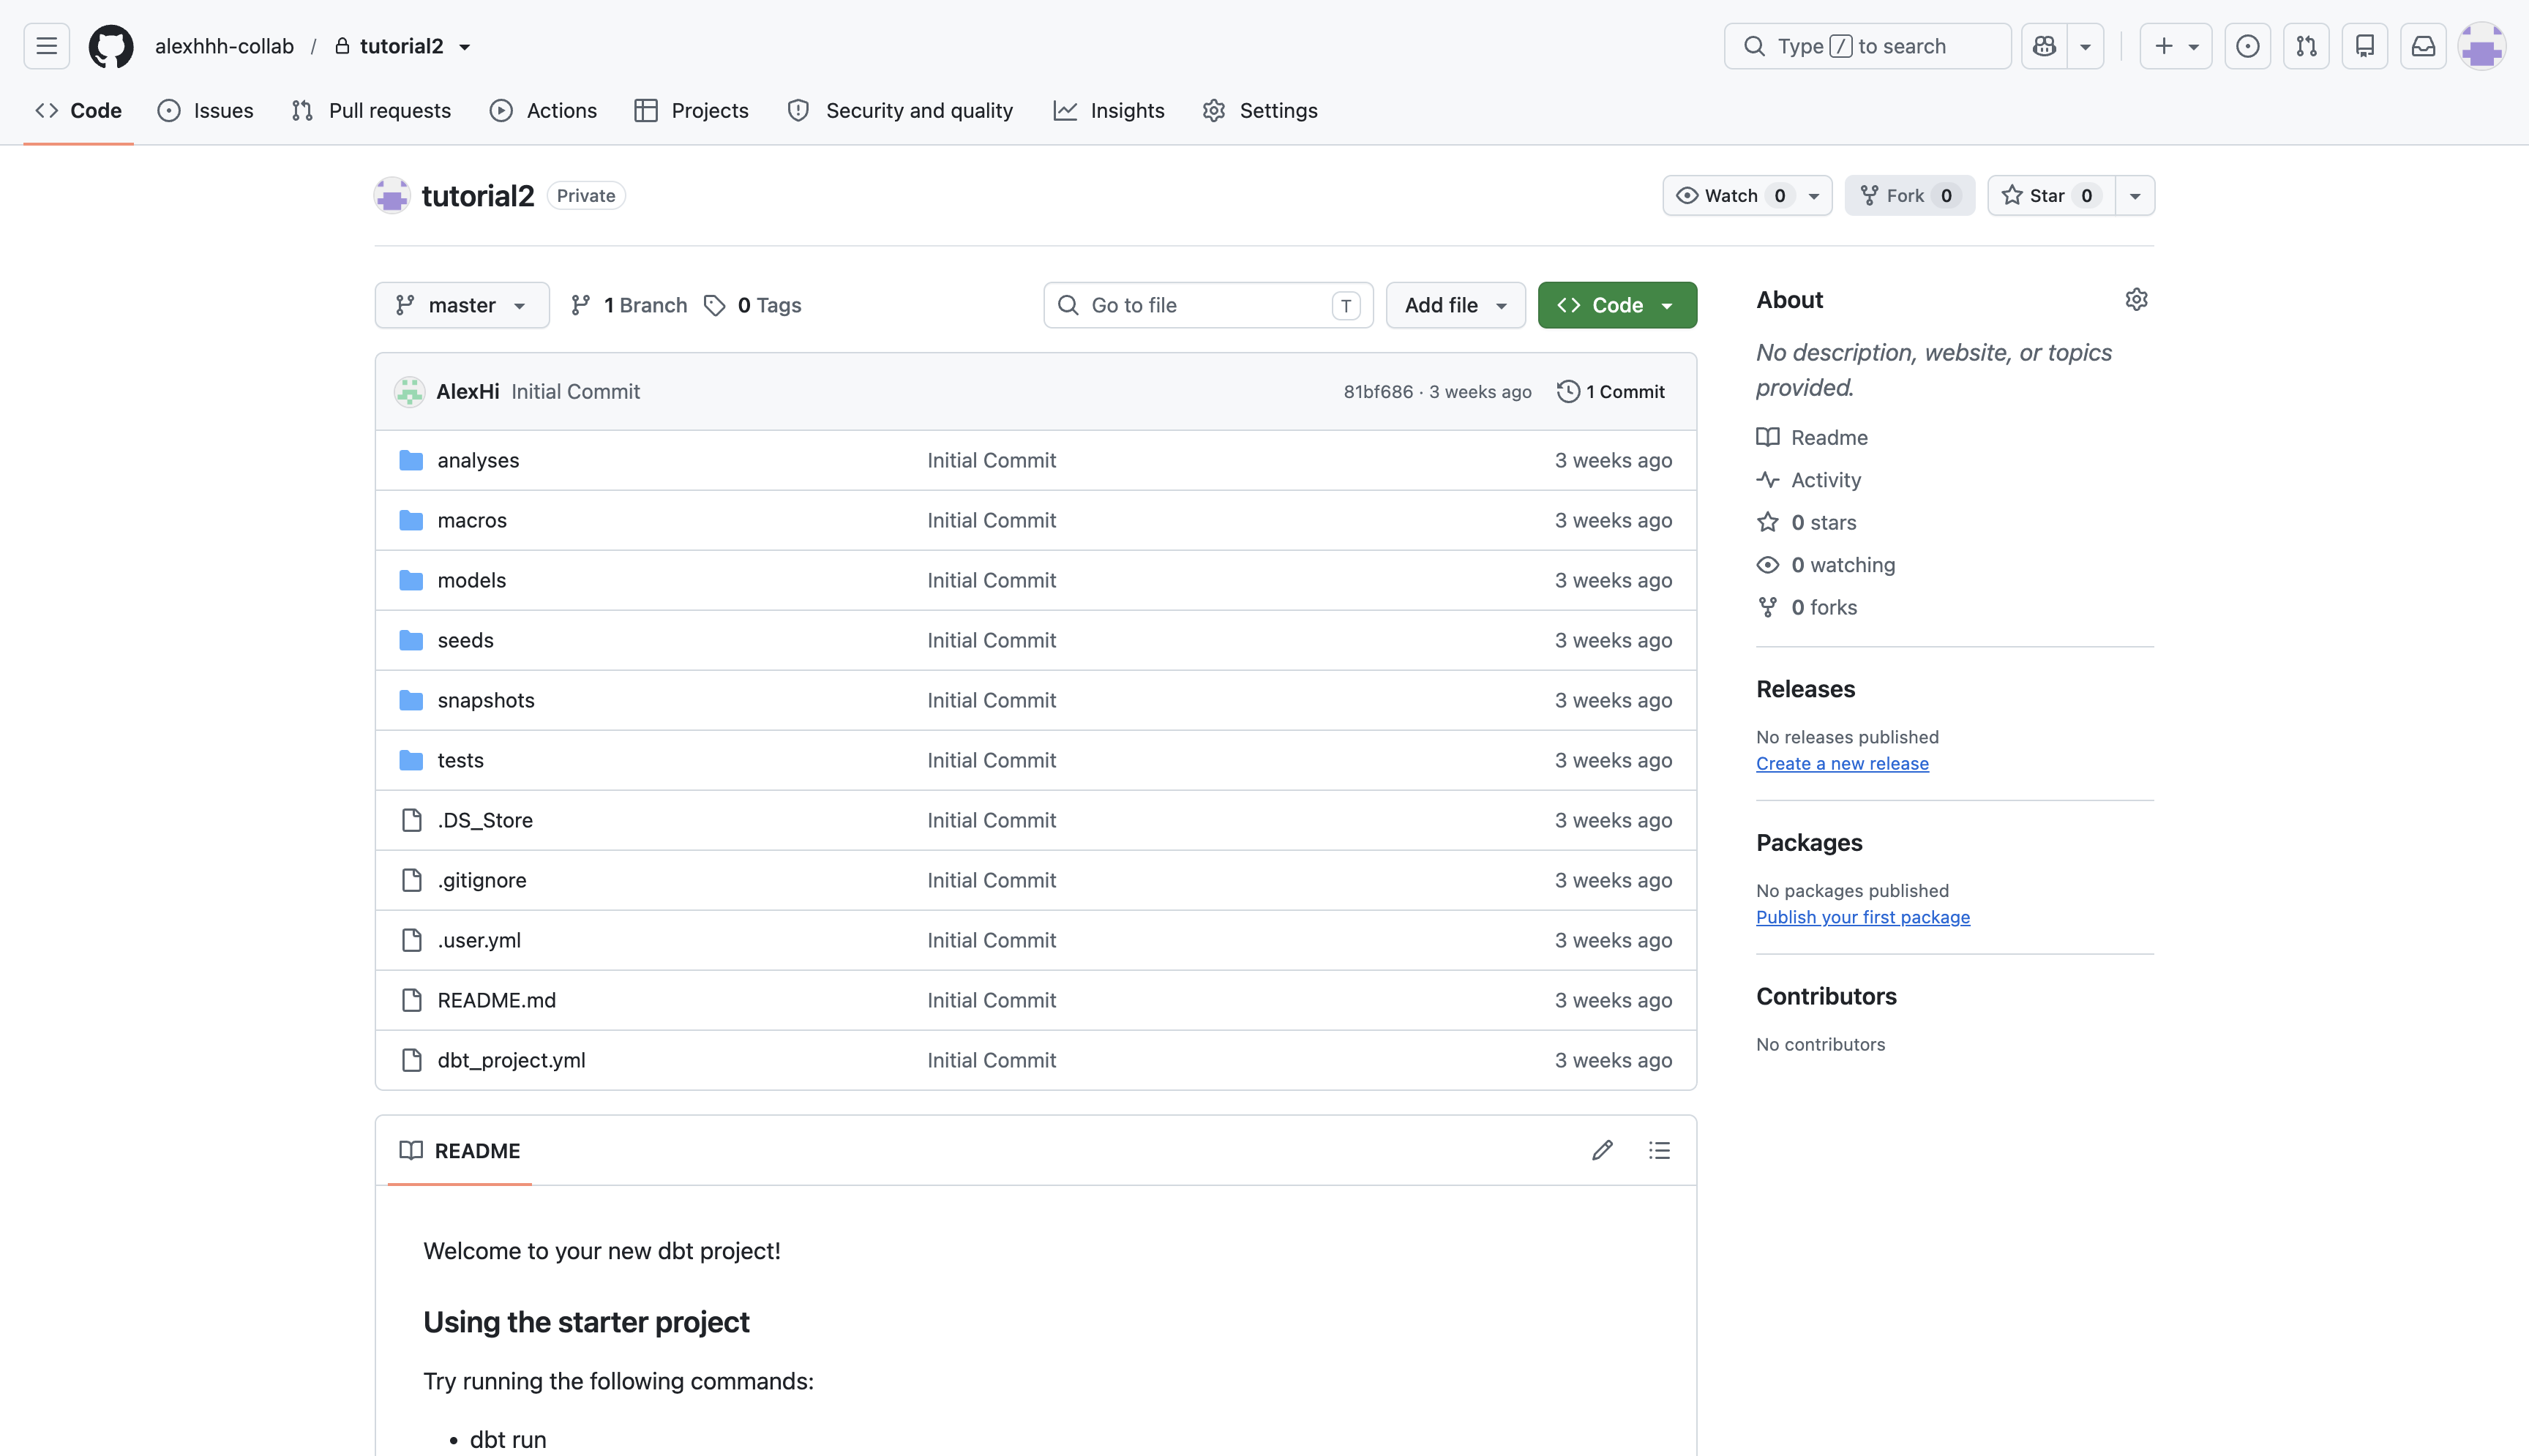
After the push completes, open the repository in GitHub and confirm that the dbt project files are present and no service-account key was committed.

12. Run the dbt project in Skyvia
The dbt project is now stored in GitHub and has already been tested locally. Next, configure a dbt Transformation in Skyvia so that Skyvia can run the same project without relying on your local environment.
A dbt Transformation combines three things:
- The dbt project stored in Git.
- A target connection where dbt creates or updates the models.
- The dbt Core settings used to run the project.
For this tutorial, the project comes from the GitHub repository created in the previous step, and the target is the BigQuery connection created earlier.
When the Transformation runs, Skyvia loads the dbt project from GitHub and runs dbt Core on Skyvia. It uses the selected BigQuery connection to access BigQuery and create or update the dbt models. The local profiles.yml file and its service-account credentials are used only for local dbt runs and are not used by Skyvia.
12.1 Create the dbt Transformation
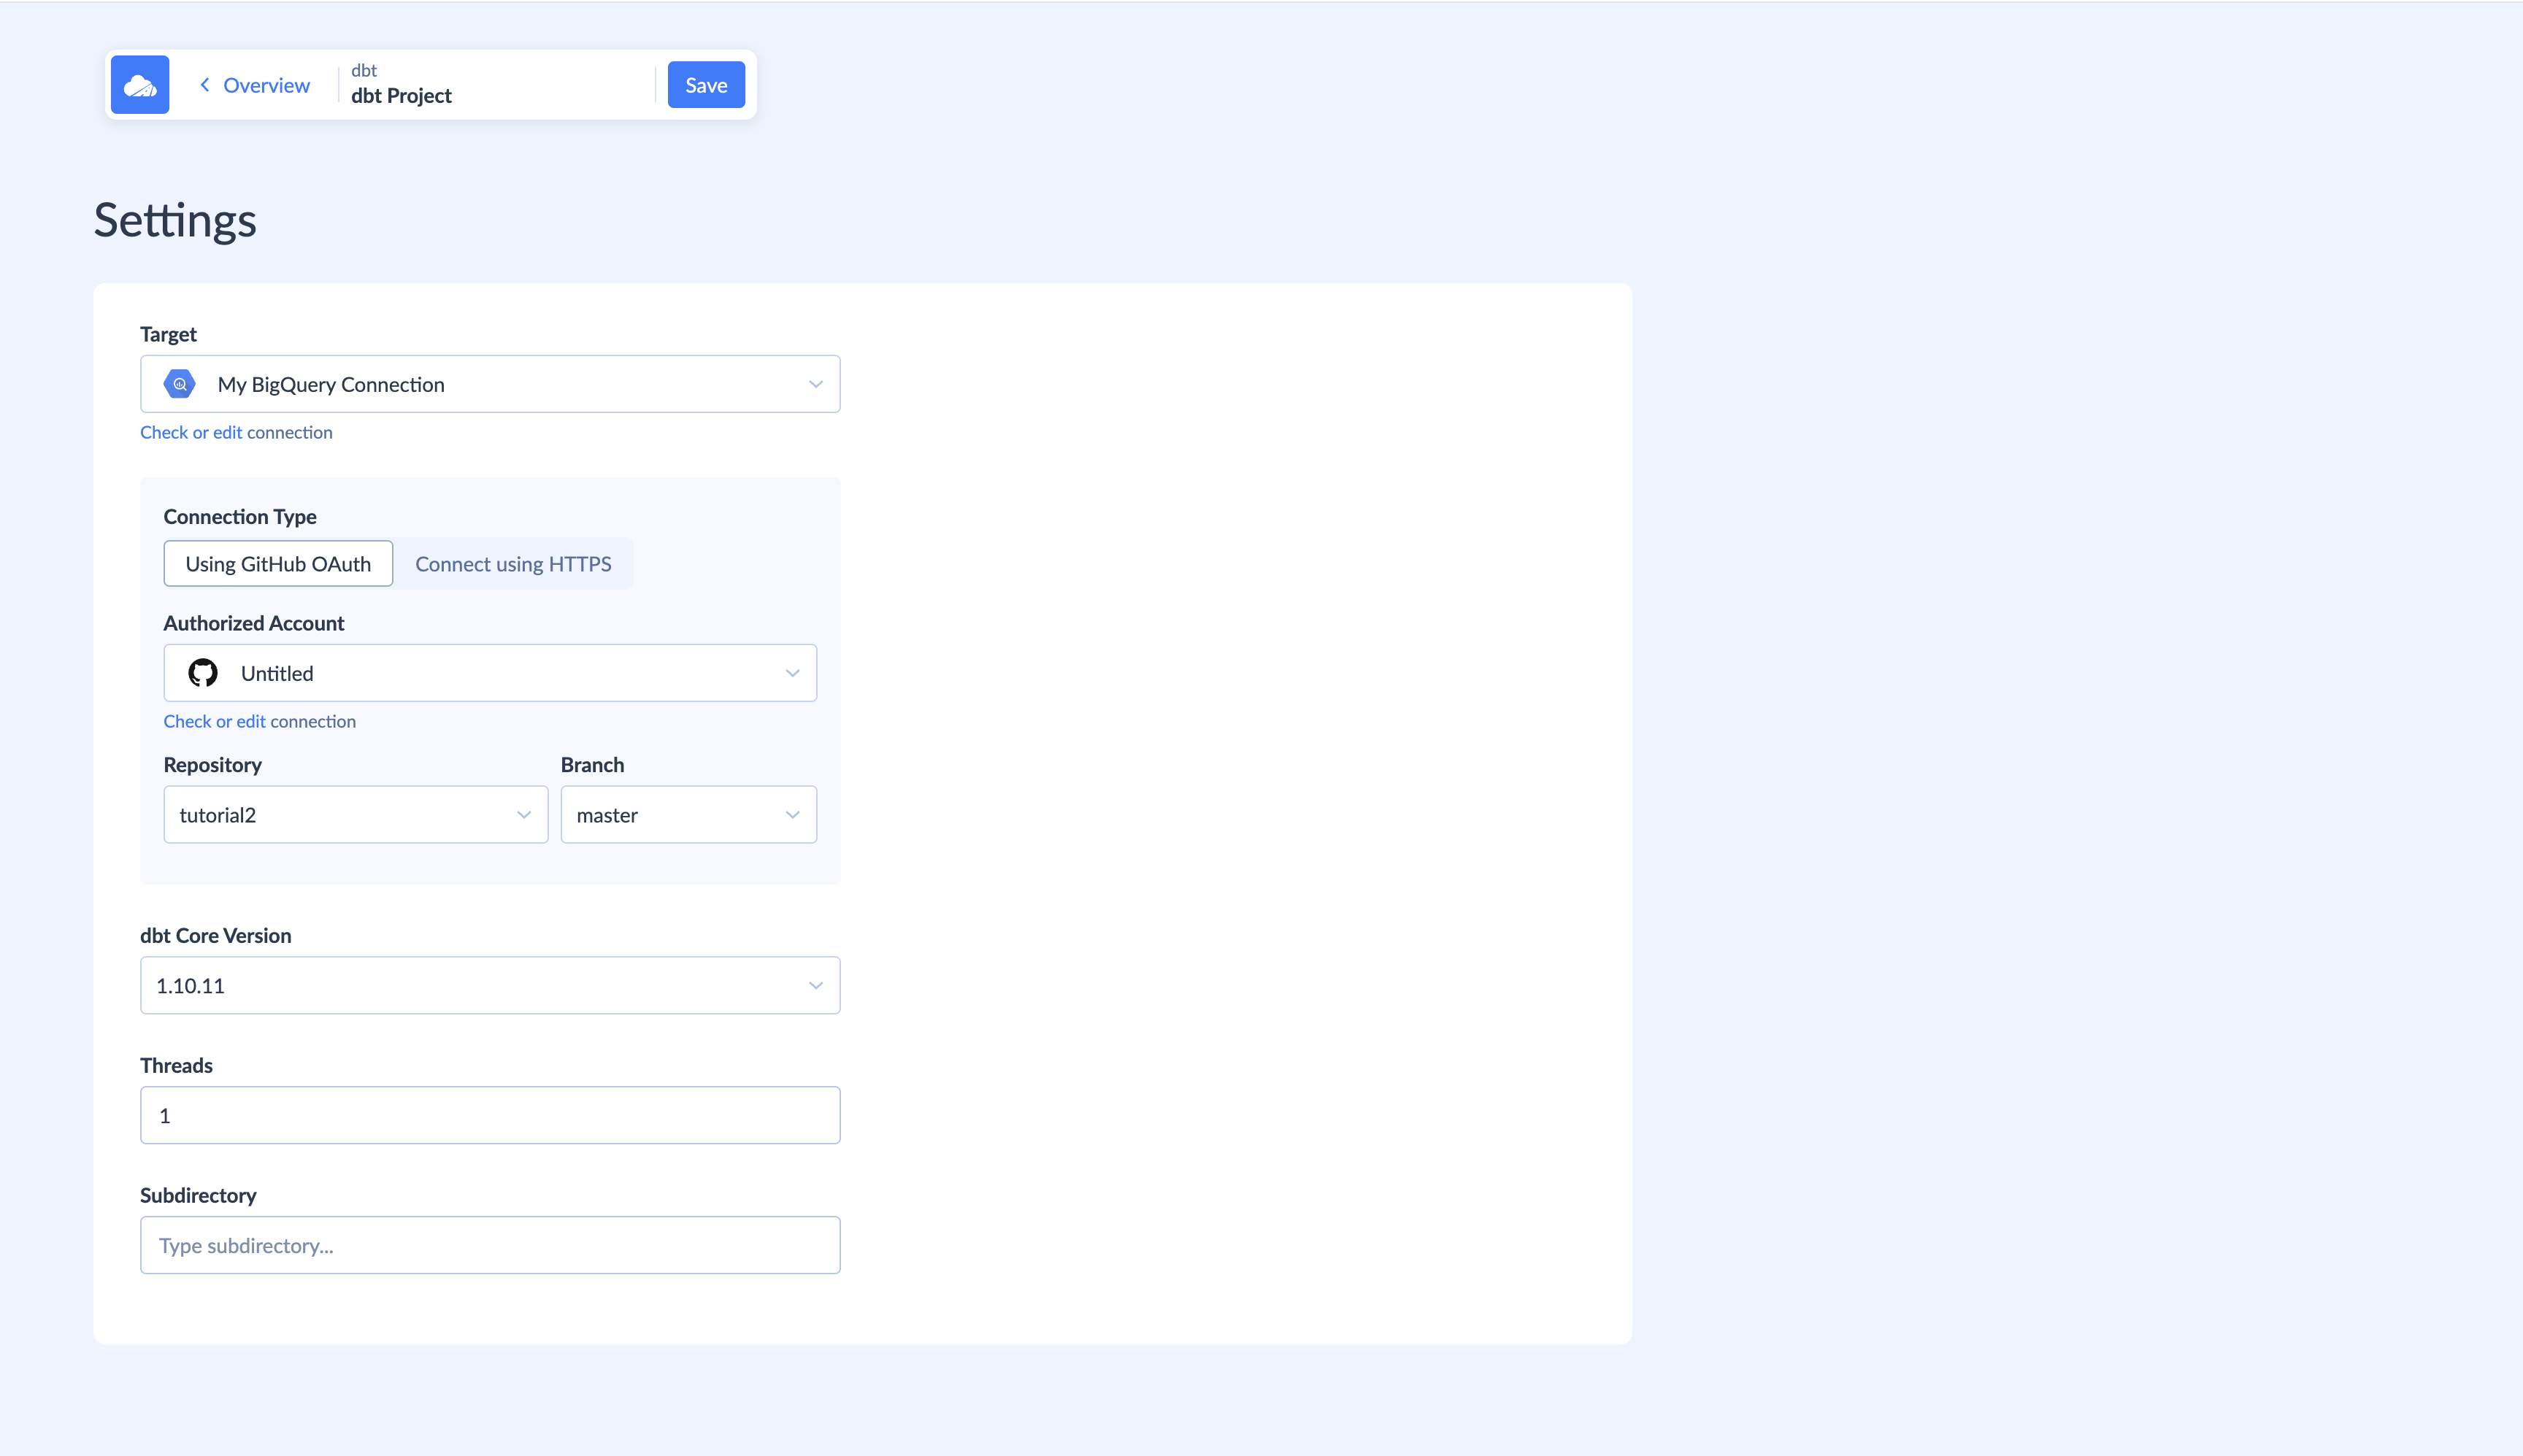
- Select + Create New > dbt.
- In Target, select the BigQuery connection created earlier in the tutorial. Skyvia uses this connection to access BigQuery when it runs the dbt project.
- Under Connection Type, select Using GitHub OAuth.
- In Authorized Account, select an existing GitHub connection or create a new one. If you create a connection, authorize Skyvia to access the GitHub account that contains the dbt repository.
- In Repository, select the repository containing the dbt project.
- Select the correct Branch. Skyvia loads the dbt project from this branch when the transformation runs.
- In dbt Core Version, select a version compatible with the one you used to test the project locally.
- In Threads, specify how many dbt tasks can run in parallel.
- Leave Subdirectory empty because
dbt_project.ymlis stored in the repository root. If the dbt project is stored in a subfolder instead, enter the relative path to that folder. - Save the transformation.
12.2 Run the Transformation
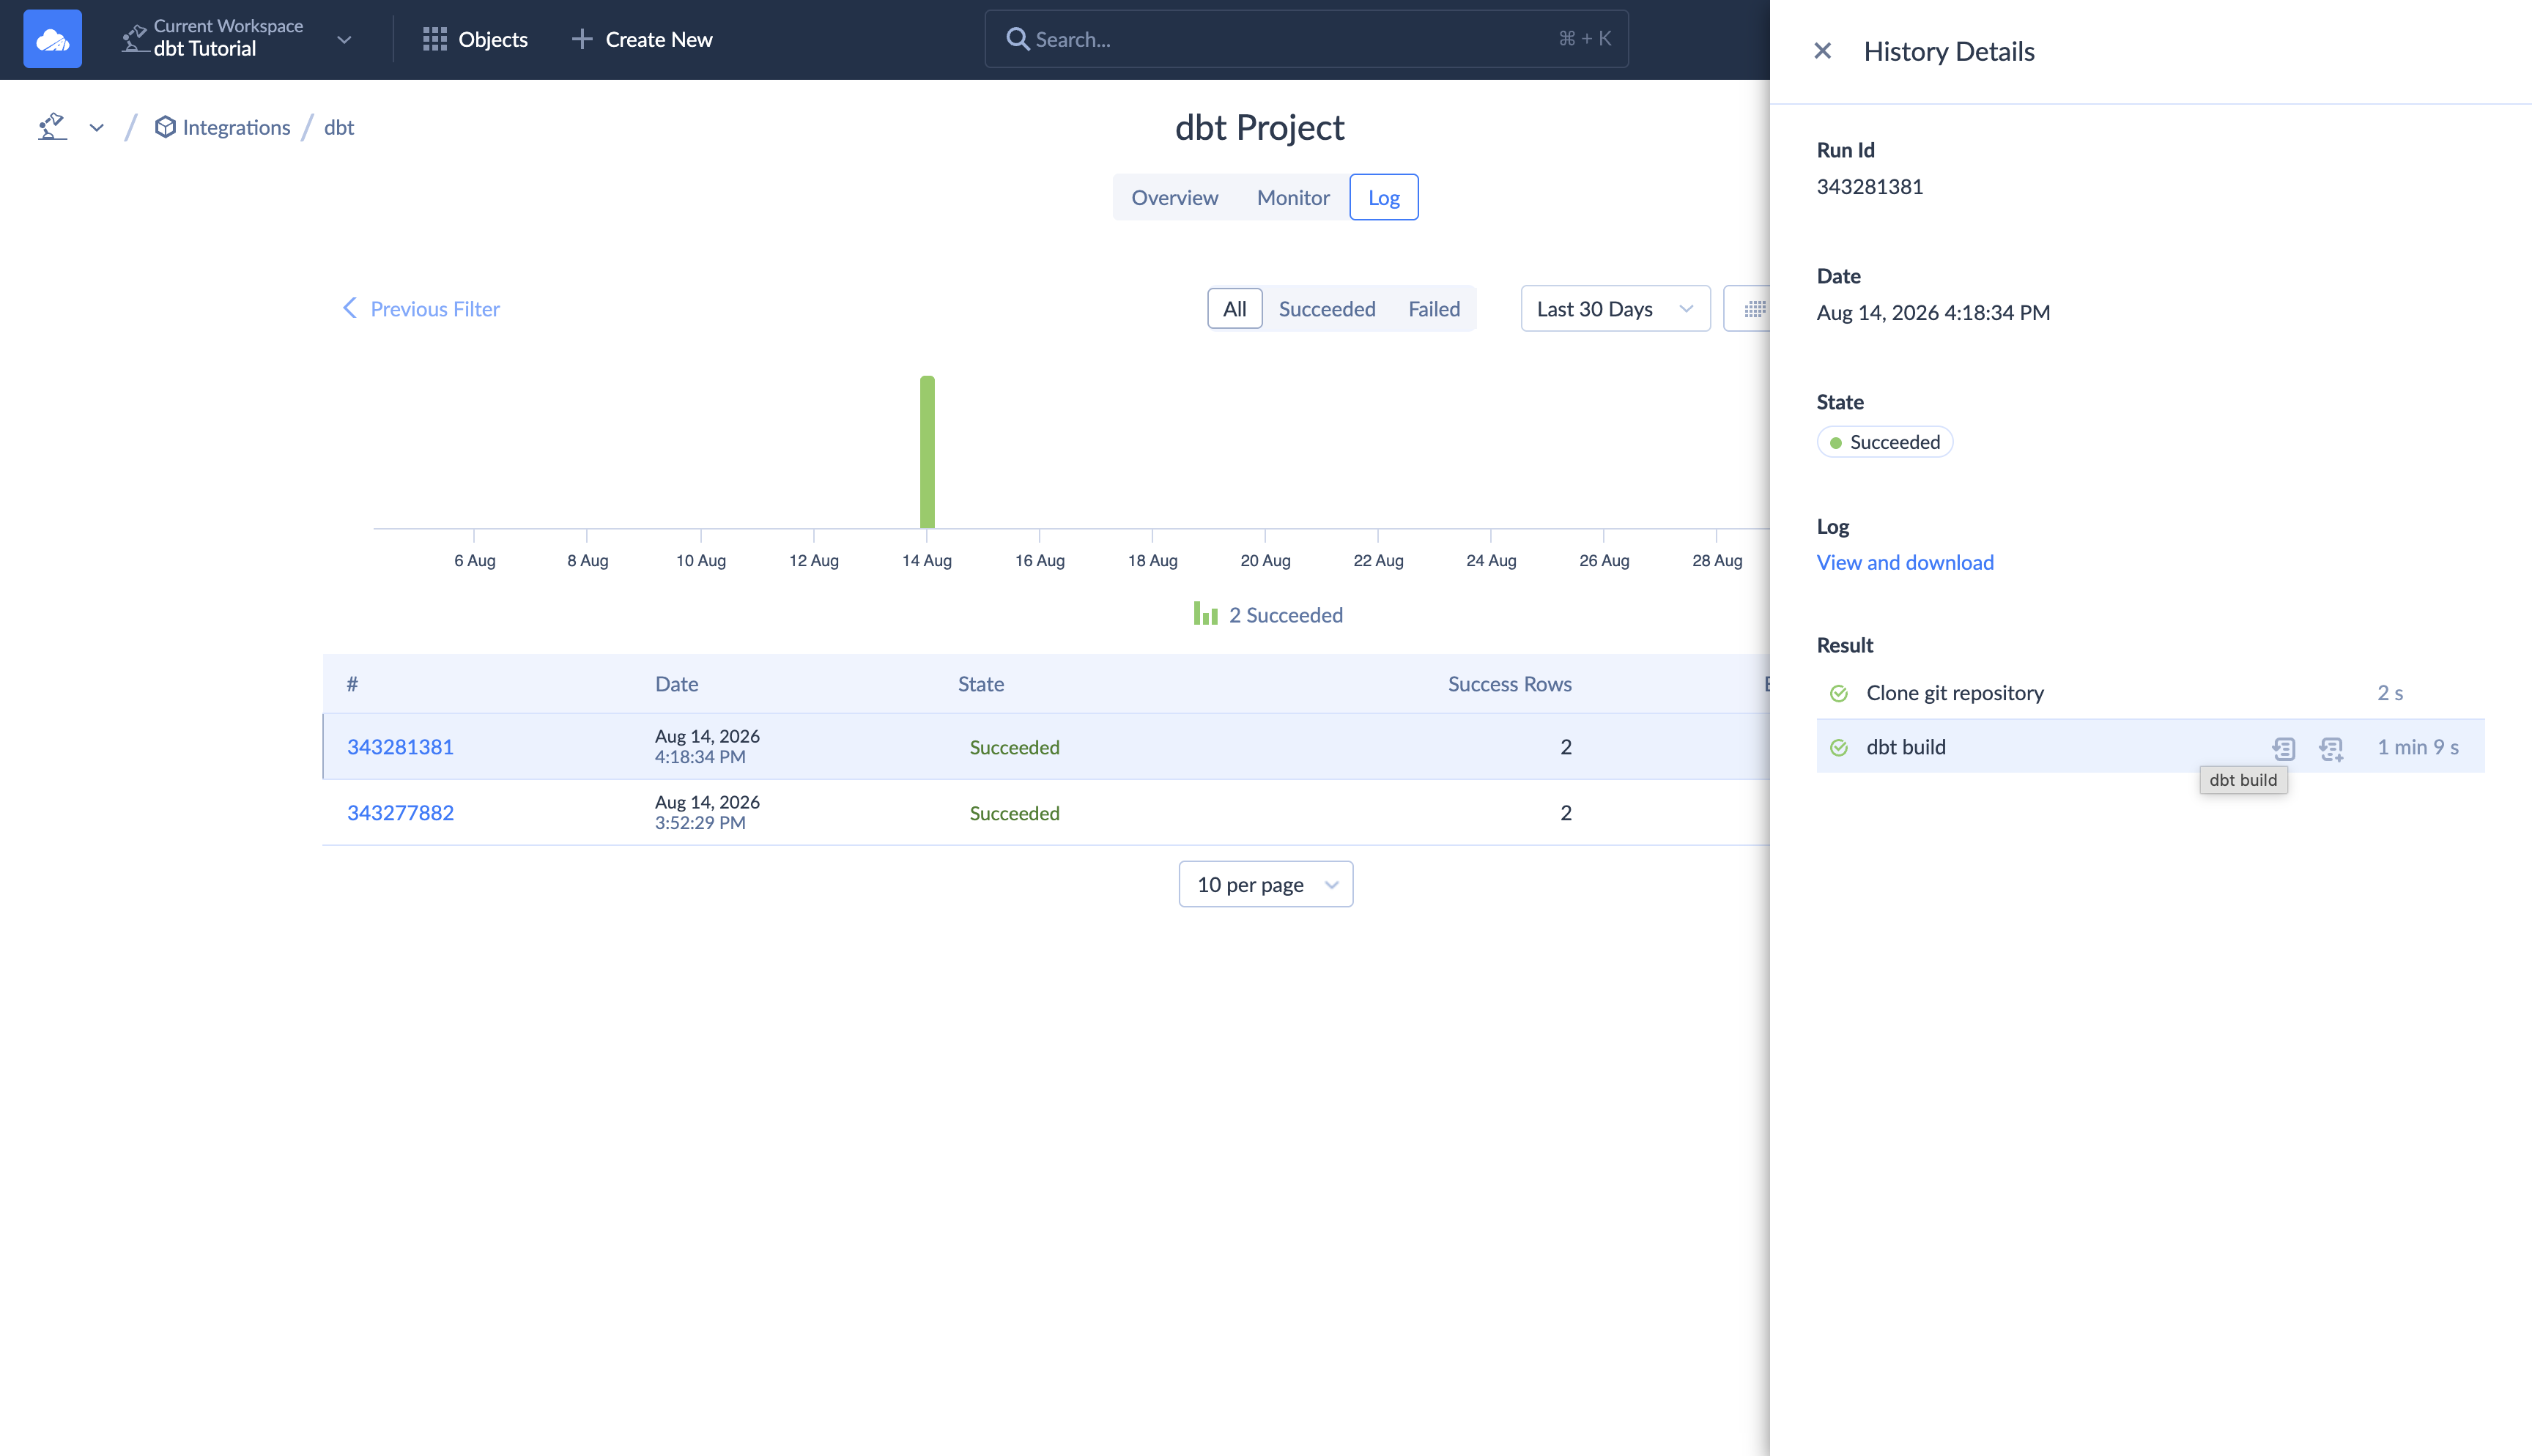
Run the dbt Transformation manually to verify that Skyvia can load the project from GitHub and execute it against BigQuery.
When the Transformation runs, Skyvia executes:
dbt buildThis builds the staging and business models in dependency order and runs the tests configured earlier in the tutorial.
Wait for the run to complete and confirm that the Transformation finishes successfully.
Then open BigQuery and verify that these objects have been updated:
staging.stg_salesforce__opportunity
business.opportunity_pipeline_by_stage
You have now run the same dbt project that you tested locally, but through Skyvia using the project stored in GitHub and the BigQuery connection configured in the Transformation.
13. Orchestrate the pipeline
The Replication and dbt Transformation now work independently. Combine them in a Skyvia Control Flow so that Skyvia first refreshes the raw Salesforce data and then runs dbt against the refreshed data.
13.1 Create the Control Flow
- Select + Create New > Control Flow. The Control Flow editor opens with Start and Stop components connected by a branch.
- From the component list, drag Execute Integration onto the branch between Start and Stop.
- Select the new component. In its settings, select the Salesforce Opportunity Replication created earlier in the tutorial.
- Give the component a descriptive name, for example:
Replicate Salesforce Opportunities - Drag another Execute Integration component onto the branch below the Replication component.
- In its settings, select the dbt Transformation created in the previous section.
- Give it a descriptive name, for example:
Run dbt Transformation
The Control Flow should now run in this order:
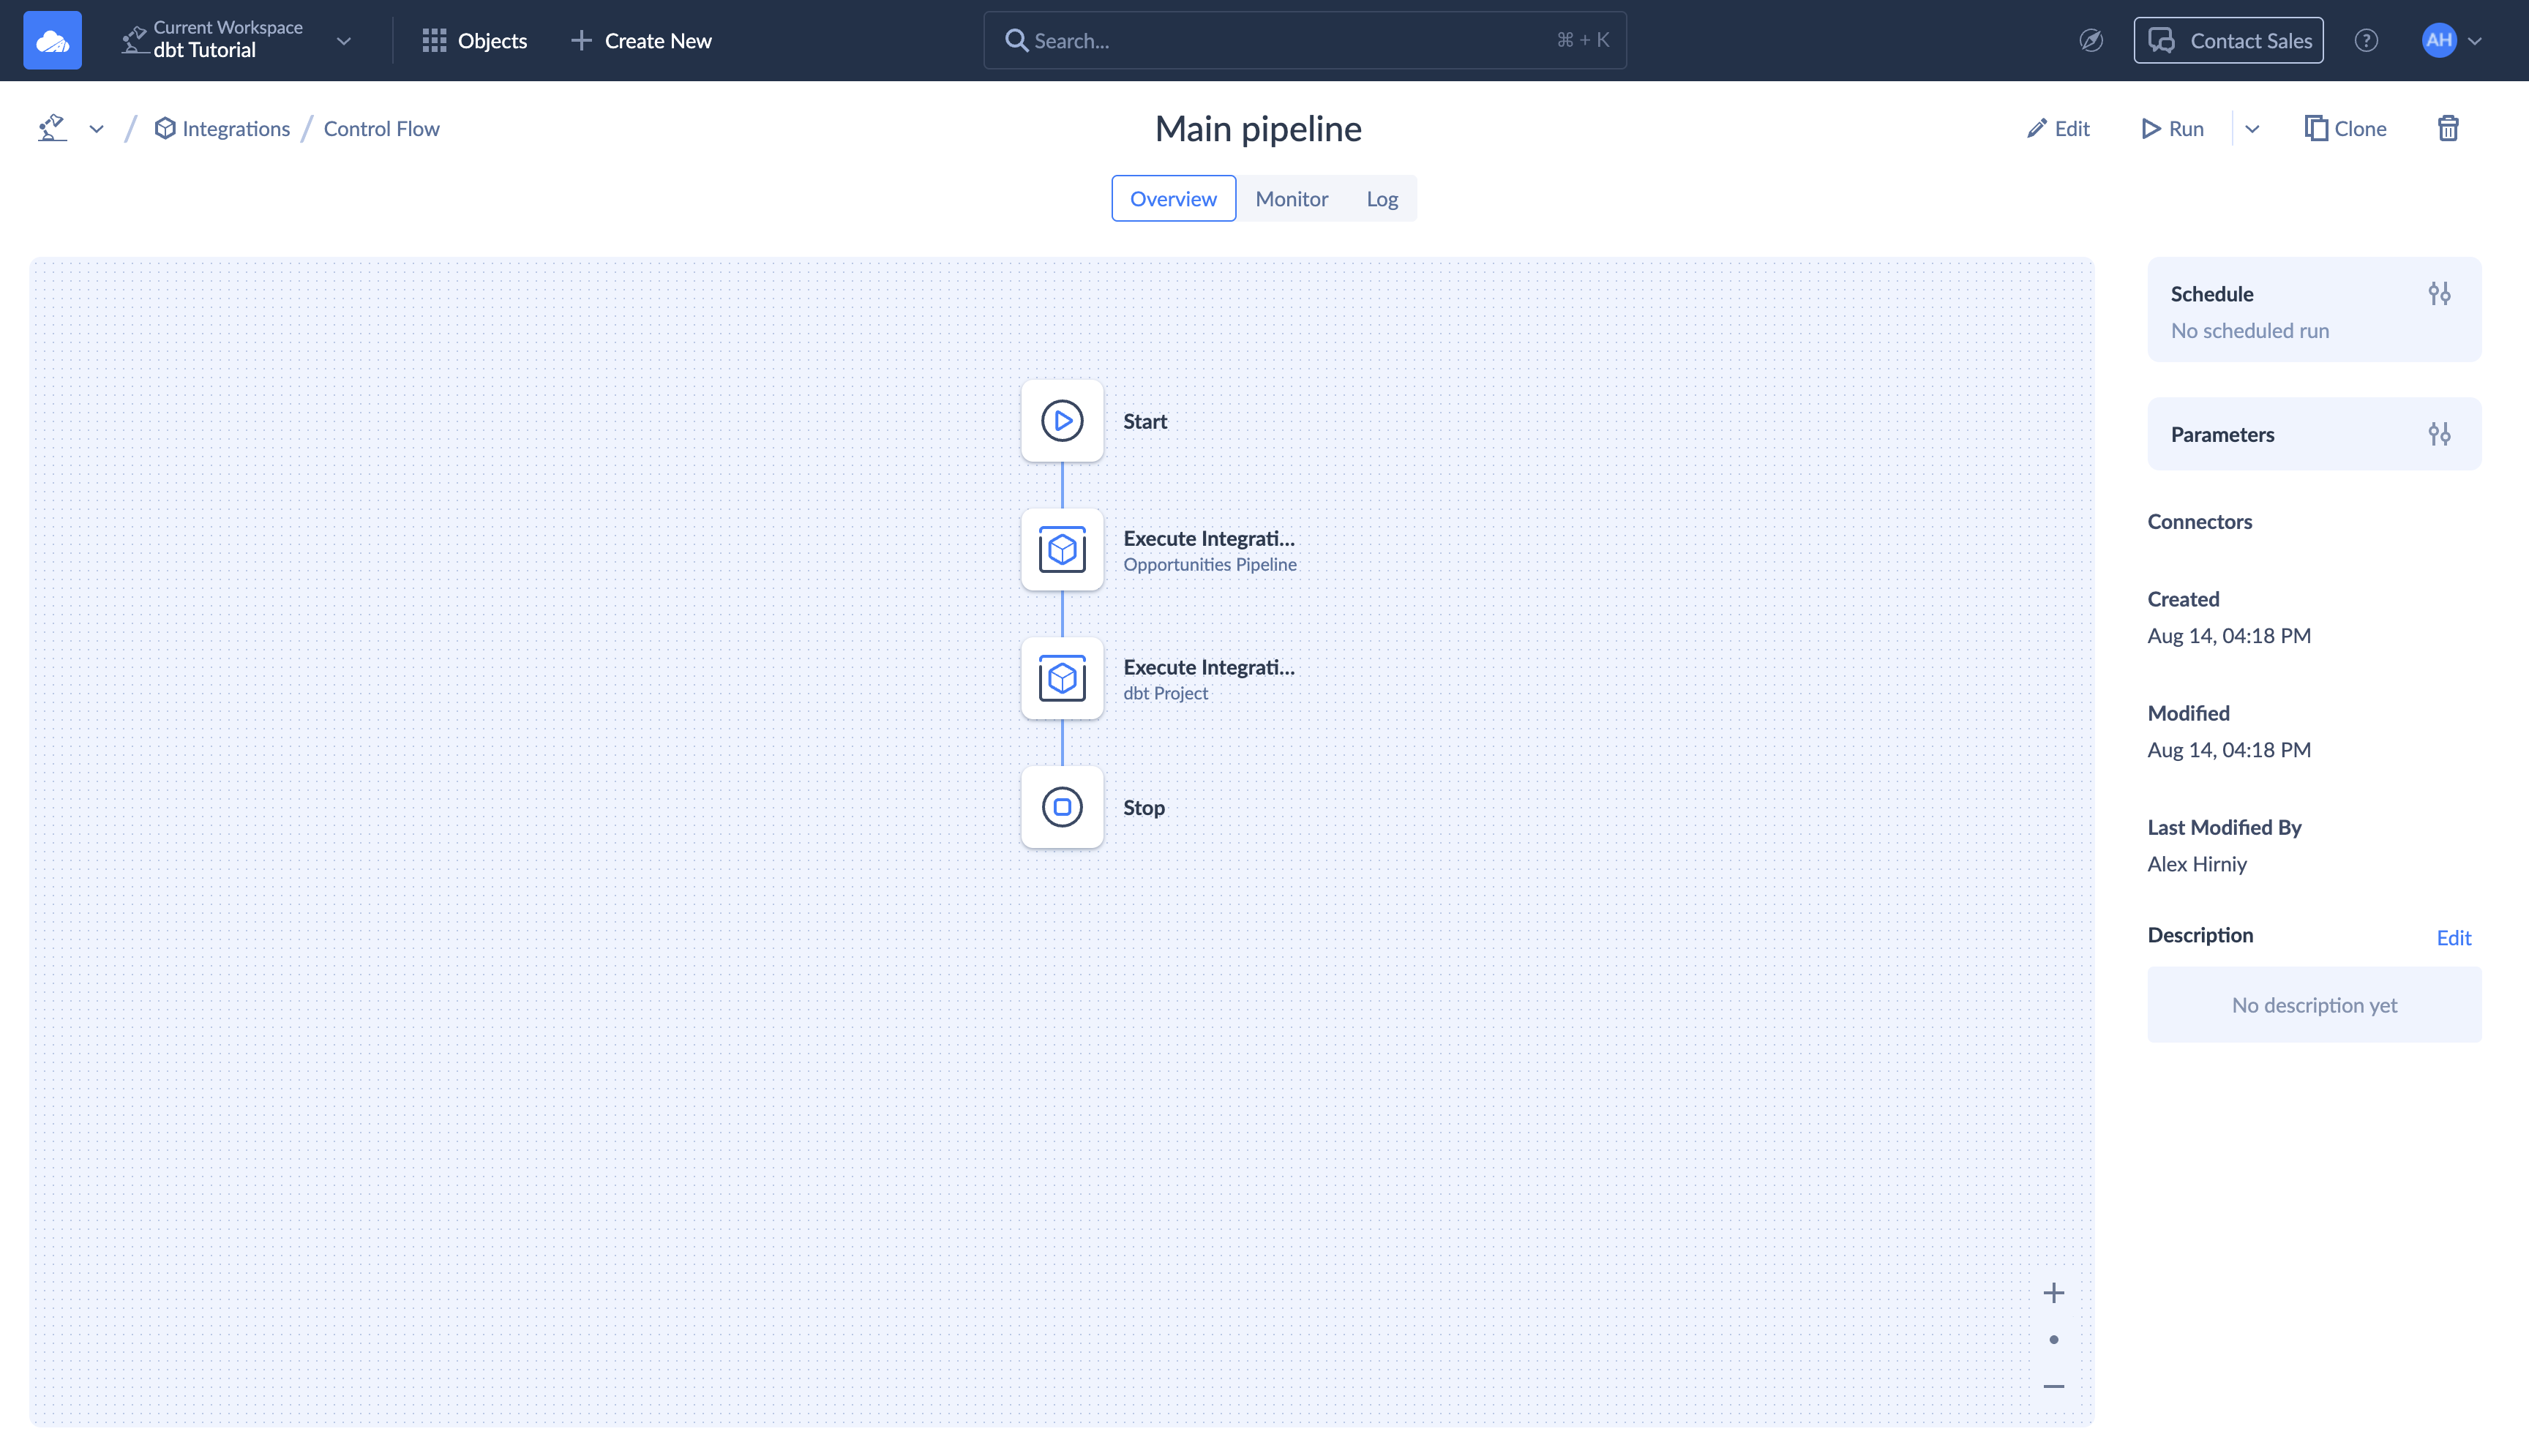
You do not need to add an If component or a separate success branch for this scenario. Components on the same branch run sequentially, so the dbt Transformation starts only after the Replication component finishes. If an Execute Integration component fails with an integration-level error, the Control Flow stops with an error instead of continuing to the next component.
This order ensures that dbt works with the latest data loaded into raw.Opportunity.
- Click Save.
- Enter a name for the Control Flow, for example: Salesforce Opportunity Analytics Pipeline
13.2 Test the Control Flow
Before scheduling, run it manually once.
Open the Control Flow Overview and click Run.
Wait for the execution to finish and verify that:
- the Salesforce Replication runs first;
- the dbt Transformation starts after the Replication finishes;
- the Control Flow completes successfully.
After the run, you can also open BigQuery and confirm that the raw, staging, and business layers contain the expected updated objects.
13.3 Schedule the Control Flow
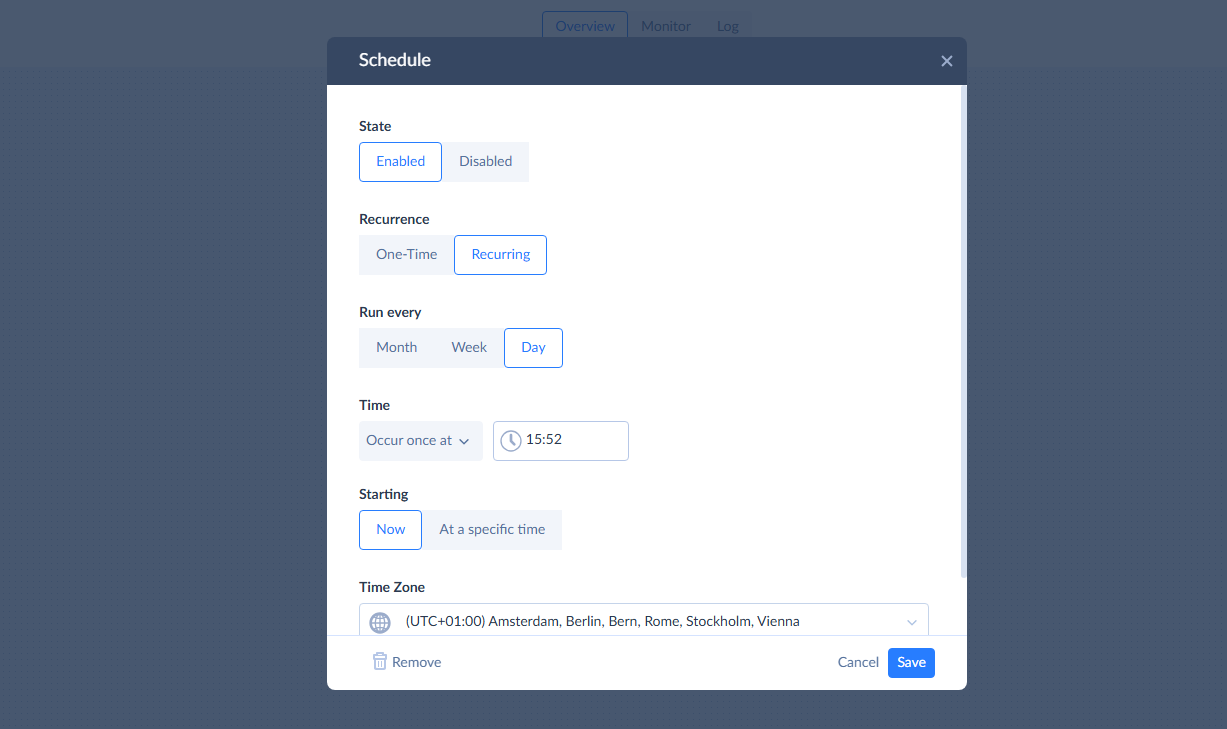
Once the complete pipeline works, schedule the Control Flow instead of scheduling the Replication and dbt Transformation separately.
On the Control Flow Overview, open Schedule and configure how often the reporting data should be refreshed.
Scheduling the complete Control Flow keeps the execution order in one place: each scheduled run refreshes the Salesforce data first and then runs the dbt Transformation.
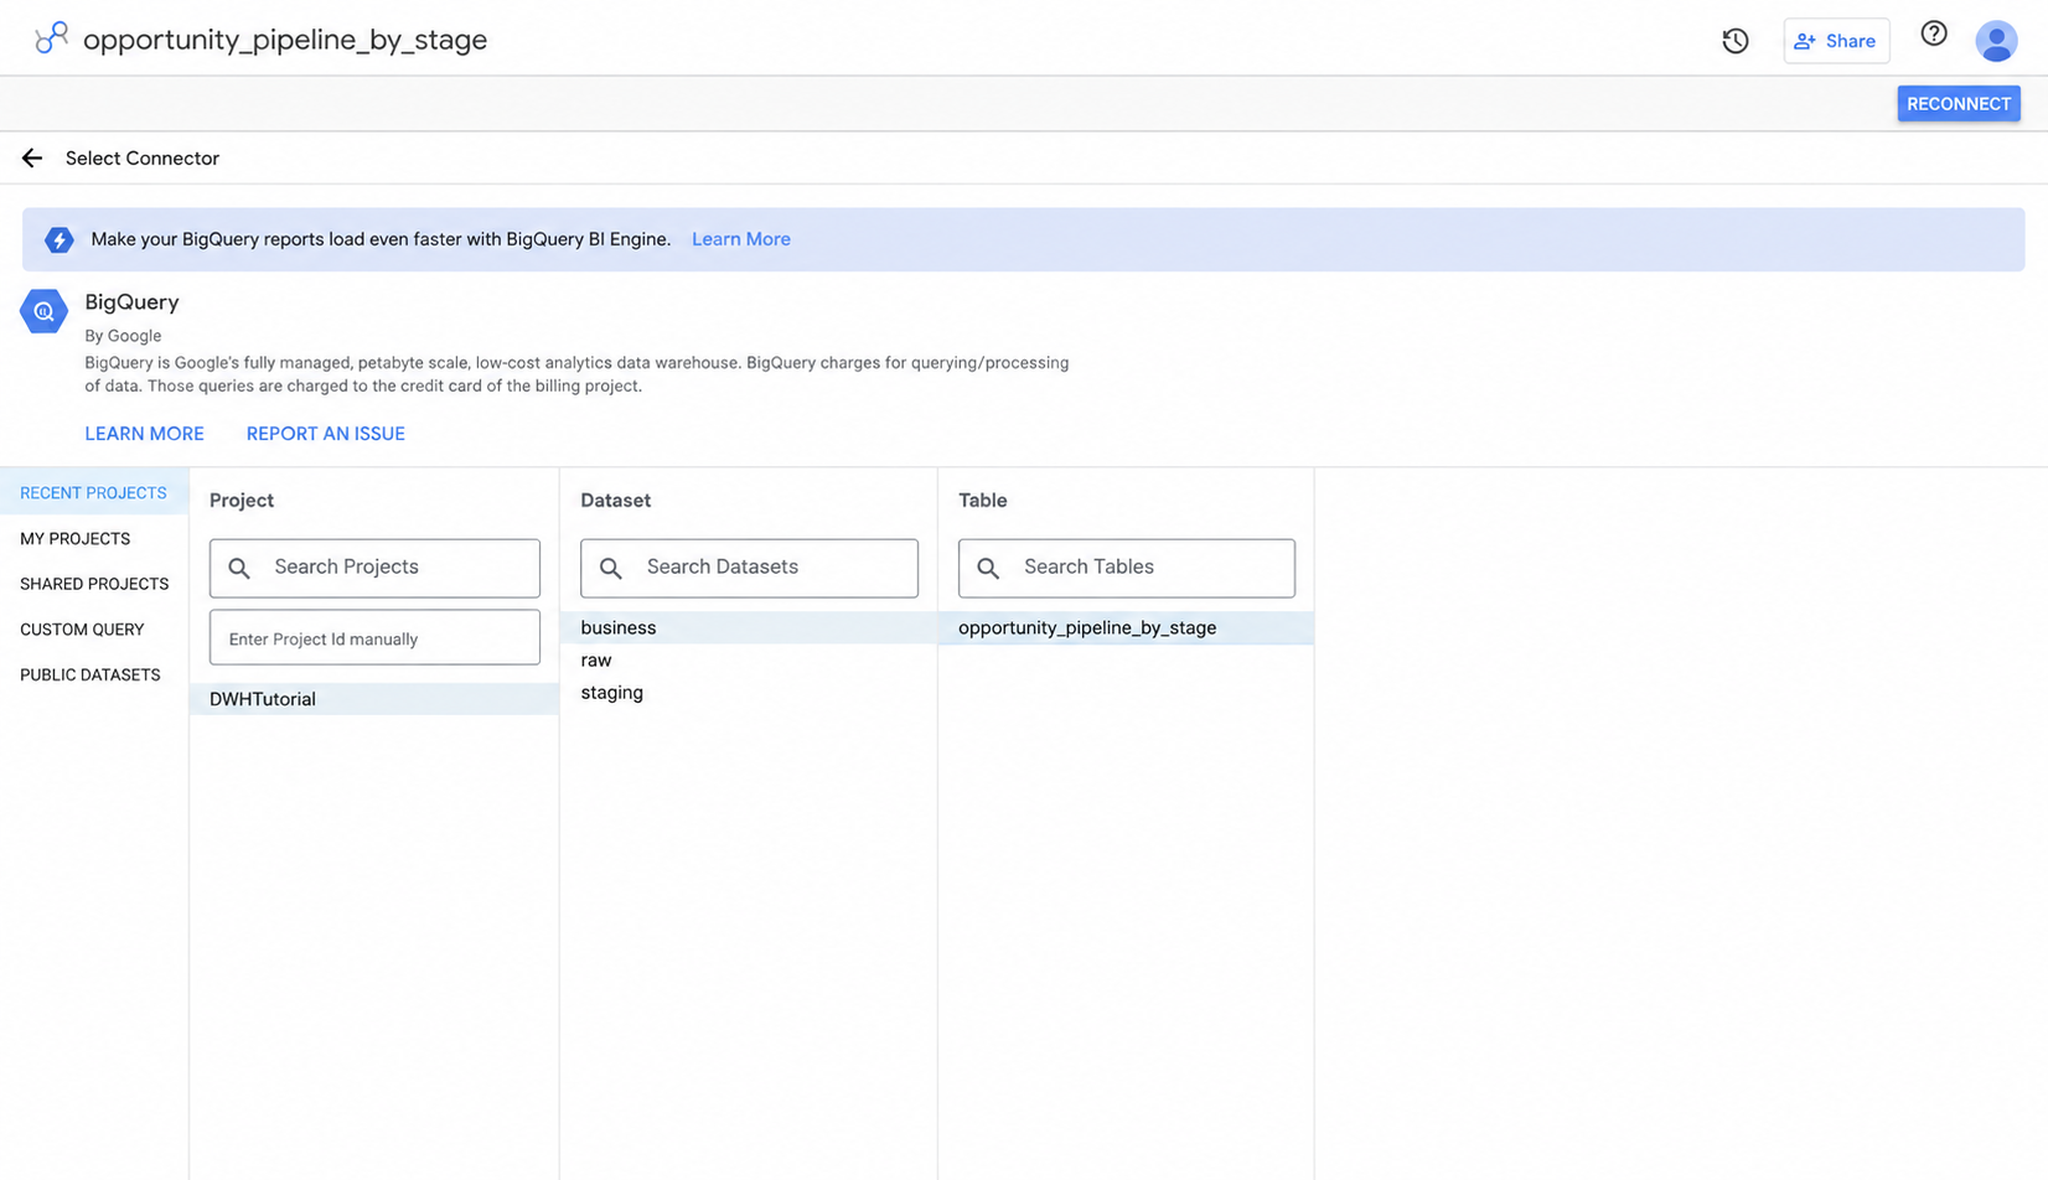
14. Build the Data Studio report
In Data Studio:
- Create a report.
- Add a BigQuery data source.
- Select your Google Cloud project.
- Select the
businessdataset. - Select
opportunity_pipeline_by_stage. - Add the data source to the report.
Build the Data Studio dashboard
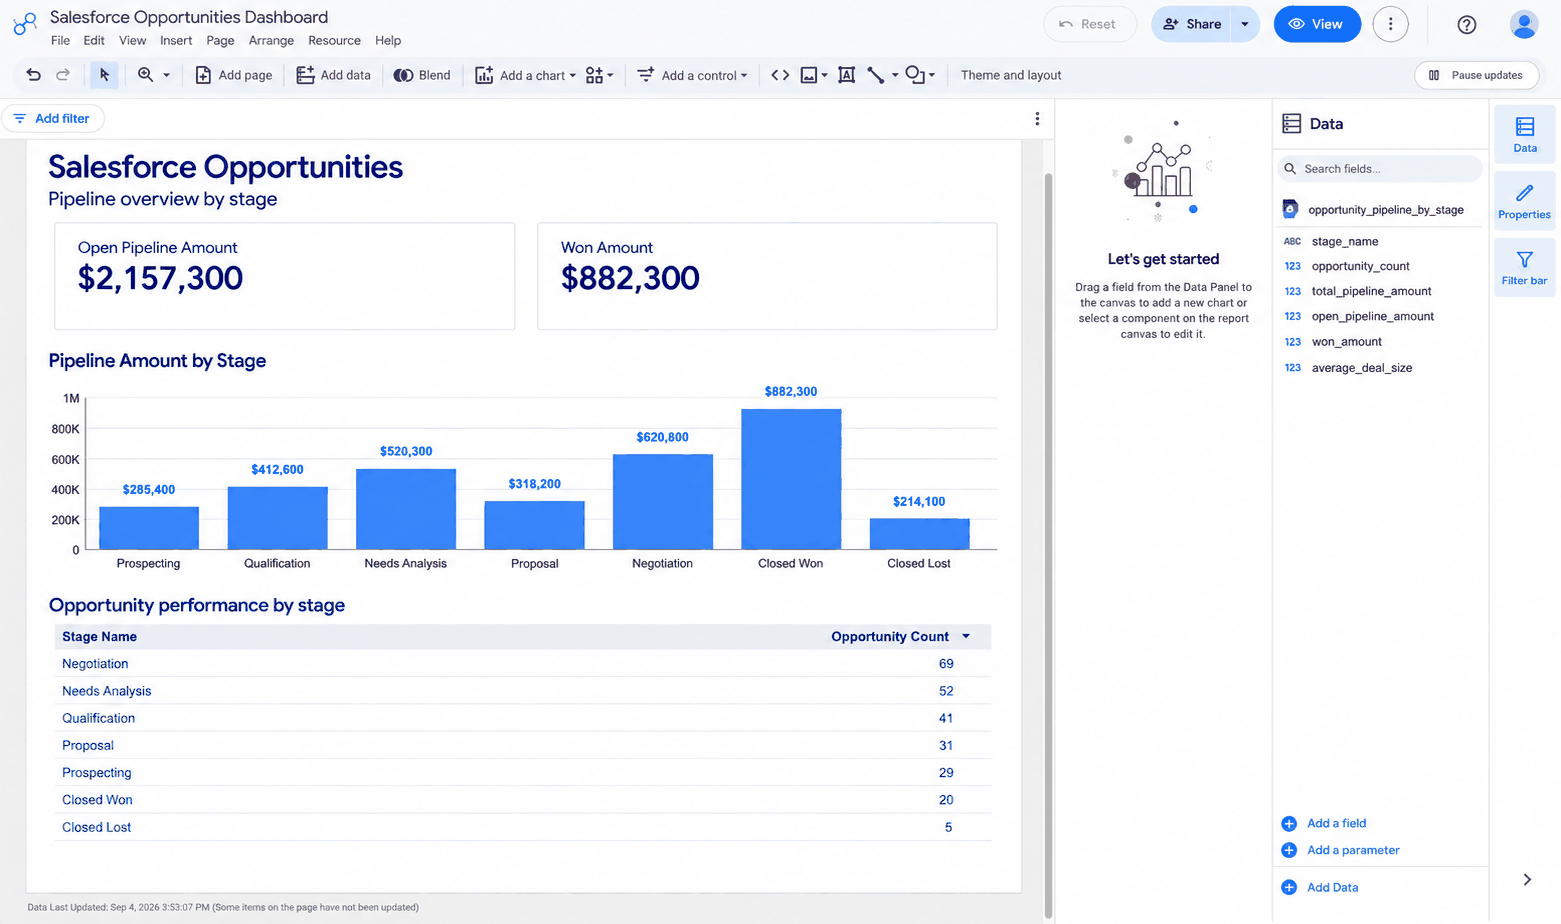
Create the following visuals from business.opportunity_pipeline_by_stage:
| Visual | Configuration | What it shows |
|---|---|---|
| Bar chart | Dimension: stage_nameMetric: total_pipeline_amount |
Total pipeline amount for each Opportunity stage |
| Scorecard — Open pipeline | Metric: open_pipeline_amount |
Total value of Opportunities that are still open |
| Scorecard — Won amount | Metric: won_amount |
Total value of won Opportunities |
| Table — Opportunity performance | Dimension: stage_nameMetric: opportunity_count |
Number of Opportunities in each stage |
To format the values consistently, open the BigQuery data source in Data Studio and change total_pipeline_amount, open_pipeline_amount, and won_amount to the appropriate Currency type.
These settings control how the values are displayed in the dashboard; they do not change the underlying data.
Completion checklist
raw.Opportunityis refreshed by Skyvia Replication.dbt buildpasses locally.staging.stg_salesforce__opportunityexists as a view.business.opportunity_pipeline_by_stageexists as a table.- The dbt project is in GitHub with no credentials committed.
- The Skyvia dbt Transformation completes successfully.
- Control Flow stops if replication fails and runs dbt after replication succeeds.
- Data Studio reads from the
businessdataset.
Common failures
| Symptom | Check |
|---|---|
| Skyvia cannot write to BigQuery | Project ID, raw Dataset ID, service-account roles, and bucket access |
| Replication succeeds but a dbt column is missing | Confirm the required Opportunity fields are selected; refresh Skyvia metadata if the Salesforce schema changed |
dbt debug fails |
Key path, project ID, BigQuery location, and service-account permissions |
Models appear in dbt_dev_staging |
Confirm that generate_schema_name.sql is in the macros folder and the macro folder is configured |
| Skyvia cannot find the project | Repository access, branch, and dbt project subdirectory |
| Skyvia build behaves differently from local | Use compatible dbt Core versions and run dbt build locally before pushing |
| Data Studio cannot find the table | Confirm the latest dbt build succeeded and the Google account has access to the business dataset |