

Summary
- Skyvia: A no-code, cloud-native platform featuring visual mapping, predictable tiered pricing, and built-in tools for end-to-end ELT, dbt integration, and Reverse ETL.
- Fivetran: Fully managed enterprise ingest platform utilizing log-based CDC and automated schema drift handling, backed by a usage-based MAR pricing model.
- Airbyte: Highly customizable, open-source integration framework that gives developer-led teams absolute control over deployment, connectors, and infrastructure.
- Matillion: A specialized enterprise tool built for data engineers to execute heavy, push-down SQL and Python transformations directly inside cloud data warehouses.
- Estuary Flow: A high-throughput streaming platform providing sub-second, low-latency Change Data Capture (CDC) for real-time operational analytics.
Has your pipeline said “Success,” and when you check your reports, the numbers aren’t right? How about quiet pipeline failures? Or maybe
pricing models that jump 40–70% after adding a few core SaaS connectors? If it’s a ‘Yes’ in any or all of them, it’s time to look for the top ETL tools in 2026.
But let me be honest. We are the team behind Skyvia. We built a no-code cloud data integration platform, so we naturally believe in our product. However, Skyvia is not a magic wand for every data stack. Requirements, use cases, and even budgets may differ with every company. There’s no one tool for everything. That’s why we will test Skyvia alongside market leaders using real test data.
But before we dive into the tests, let me show how we did it.
How Did We Test and Evaluate These Data Integration Tools?
We did our test using real test data in HubSpot and PostgreSQL hosted in Neon. Meanwhile, Snowflake and BigQuery were selected as representative cloud data warehouse targets.
The ETL tools we picked are the following:
- Skyvia
- Fivetran
- Airbyte
- Matillion, and
- Estuary
Of the 5 ETL tools, Fivetran, Estuary, and Airbyte’s PostgreSQL connector require the following:
- The database wal_level set to logical.
- A Publication
- A Replication Slot
- and the tables included for replication
Neon accepts these configurations, and so it was chosen as the PostgreSQL host.
We’re going to have the same data and test cases to use. This way you will see how different ETL tools handle connections, organize pipeline creation, and structure data in the chosen targets. You will also know how easy (or difficult) pipeline creation is in each respective ETL tool.
Test Lab Overview
Let me show you our test data first.
For HubSpot
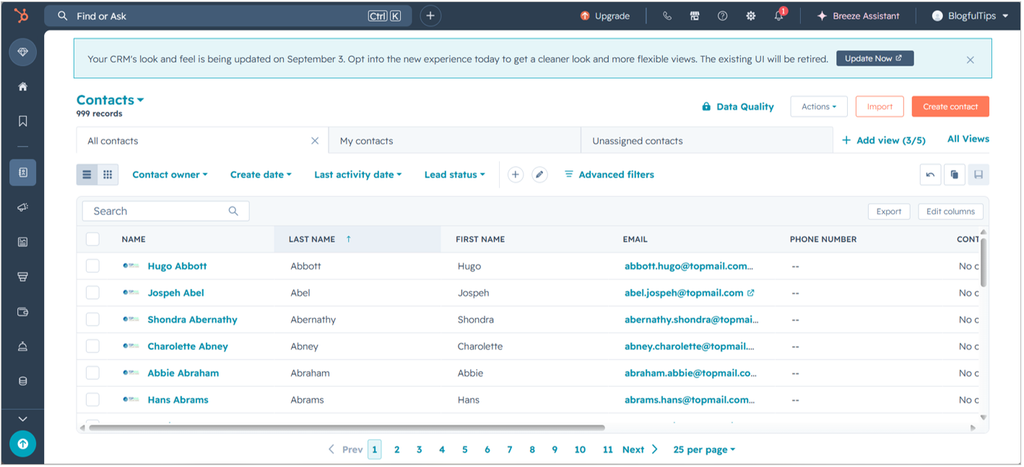
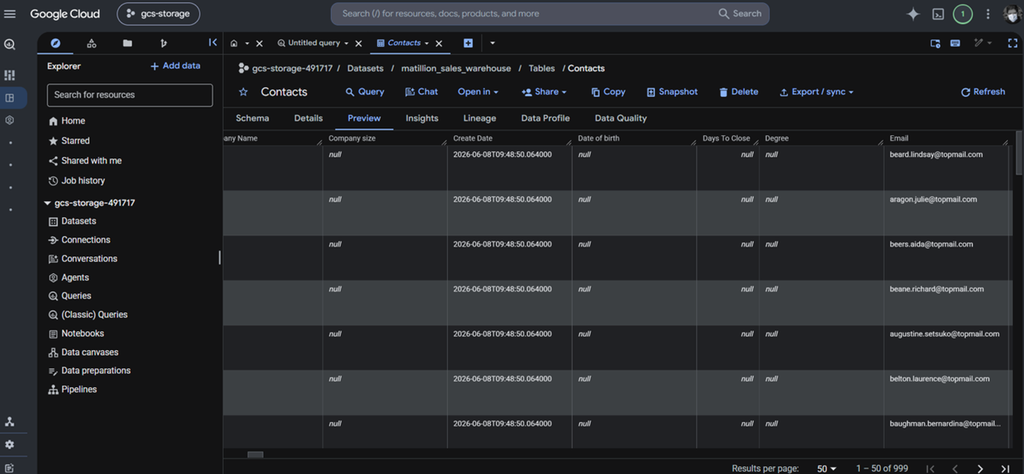
I used a free HubSpot account with 999 Contacts. The limit is actually 1000 contacts, but HubSpot didn’t allow me last time to add the 1000th row. Note that the names and email addresses are fictitious and generated for testing only.
For PostgreSQL
Below are the tables we will replicate:
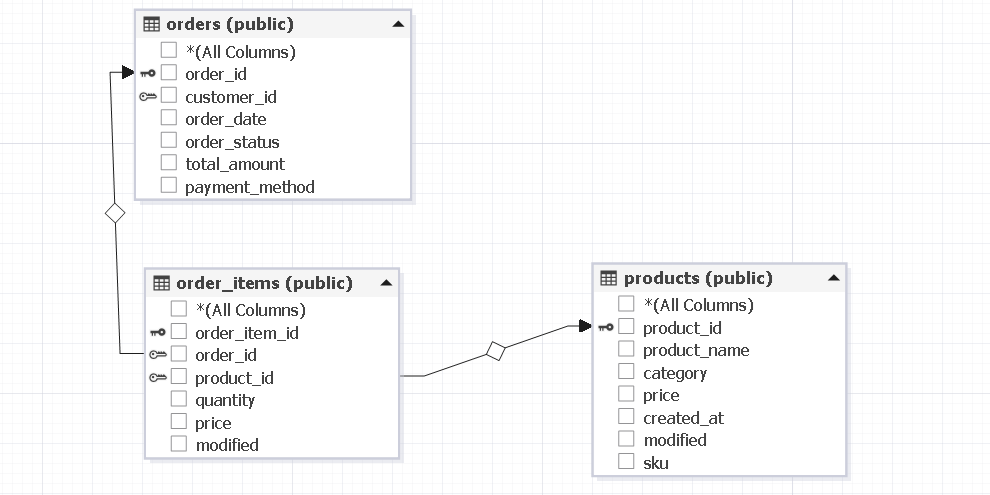
The customer is in HubSpot, and the transactions are in PostgreSQL.
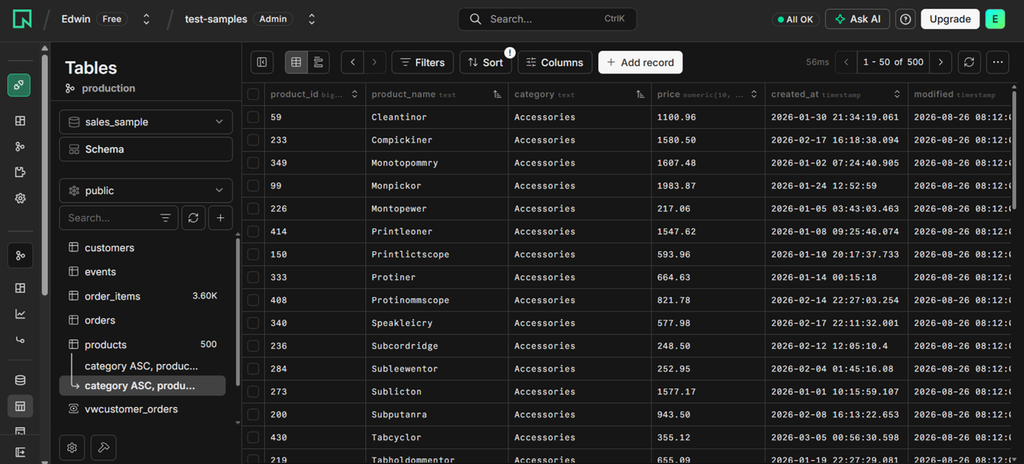
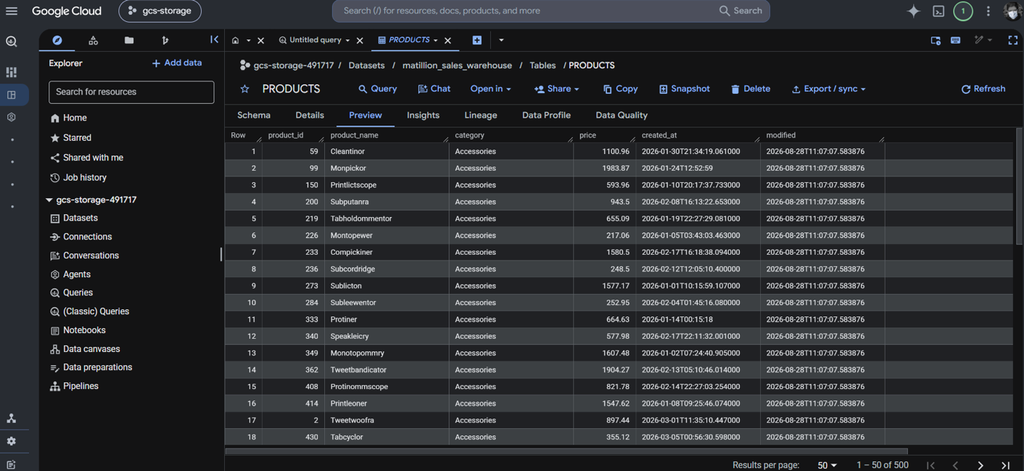
We have 500 products, as seen in the page counter:
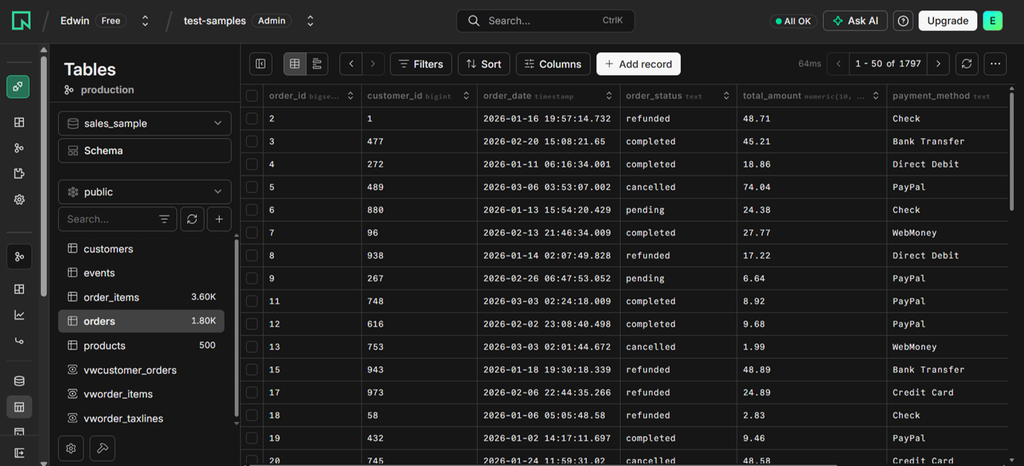
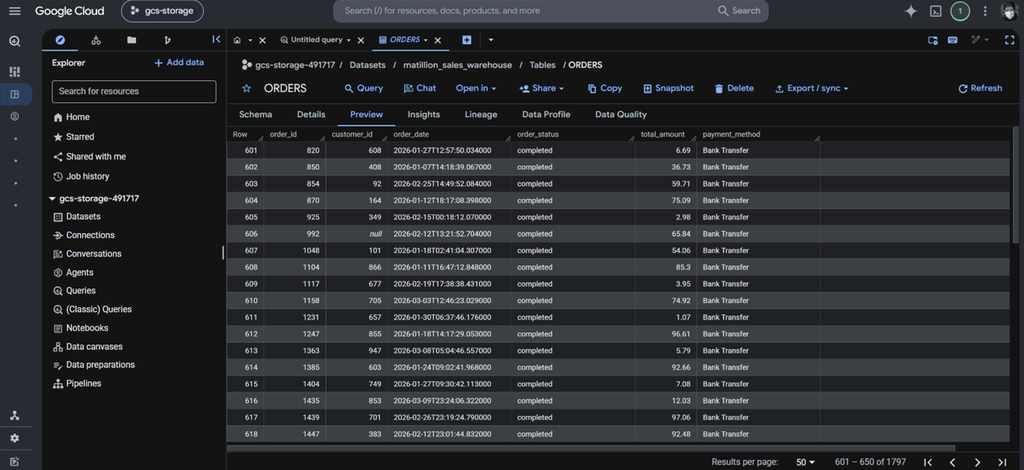
Then, 1797 orders:
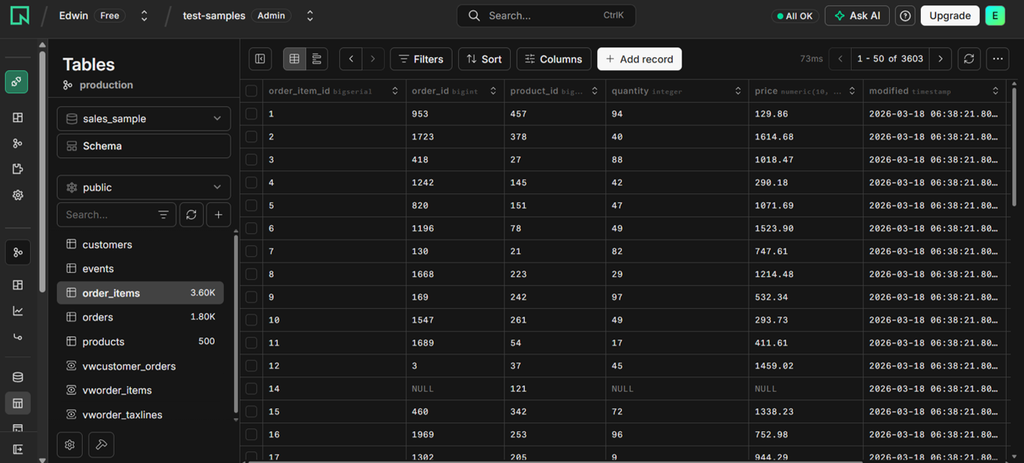
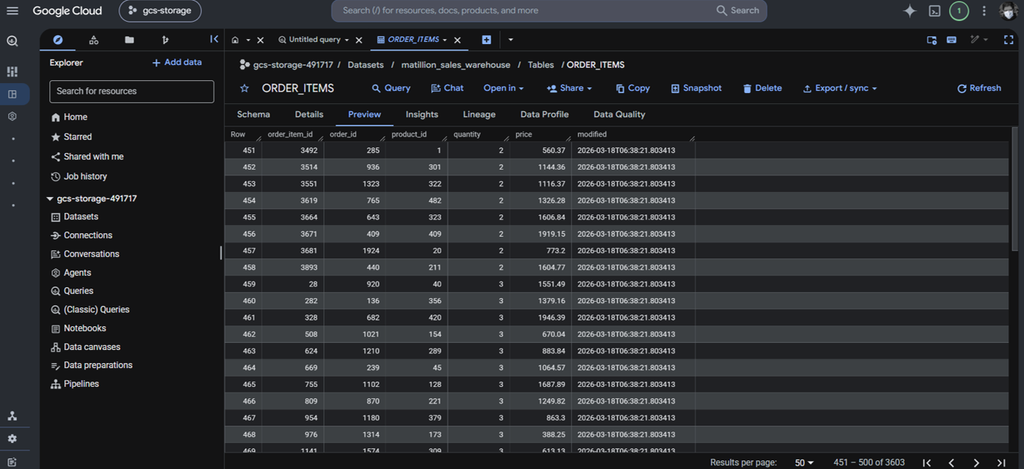
And 3603 order items:
I have to set the 3 tables for replication by doing this:
ALTER TABLE products REPLICA IDENTITY DEFAULT;
ALTER TABLE orders REPLICA IDENTITY DEFAULT;
ALTER TABLE order_items REPLICA IDENTITY DEFAULT;
When you do the same to your tables, make sure you’re pointing to the intended database. Or the ETL tools will either not find it or will give you an error.
The test aims to replicate the rows into a Snowflake database with different schemas. Each tool will have its own schema instead of overwriting each other’s copy of the tables. That way, we will see what the result will look like for each of the ETL tools.
Intended Warehouse Output
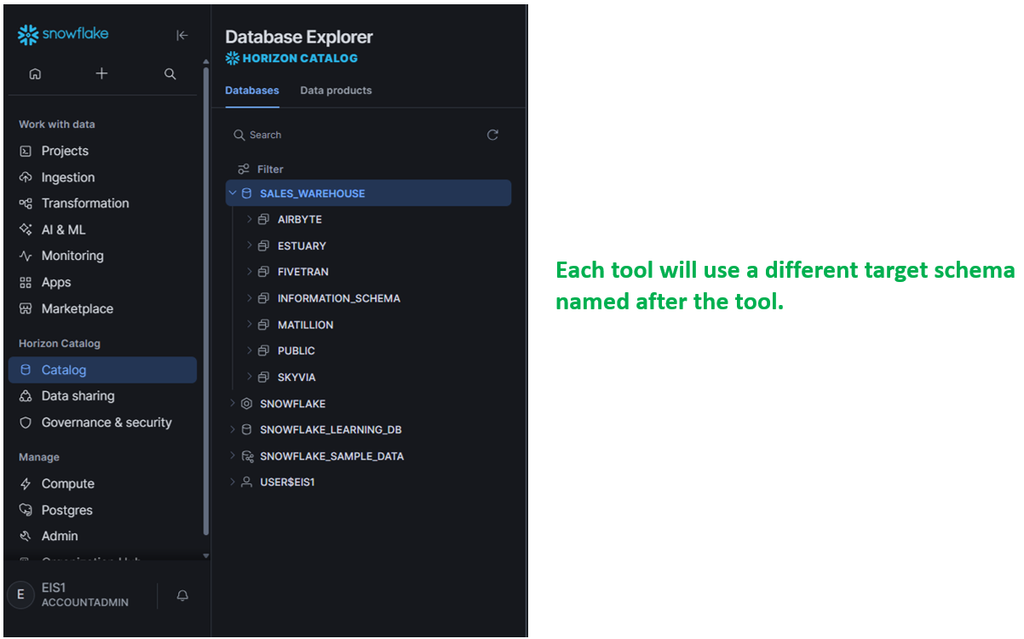
Now, this won’t mean that the ETL tools can write to them right away. You need to set permissions. Here’s what I did for the Snowflake warehouse, database, and schemas:
GRANT USAGE ON WAREHOUSE COMPUTE_WH TO ROLE PUBLIC;
GRANT USAGE ON DATABASE SALES_WAREHOUSE TO ROLE PUBLIC;
GRANT USAGE ON SCHEMA SALES_WAREHOUSE.SKYVIA TO ROLE PUBLIC;
GRANT USAGE ON SCHEMA SALES_WAREHOUSE.AIRBYTE TO ROLE PUBLIC;
GRANT USAGE ON SCHEMA SALES_WAREHOUSE.FIVETRAN TO ROLE PUBLIC;
GRANT USAGE ON SCHEMA SALES_WAREHOUSE.MATILLION TO ROLE PUBLIC;
GRANT USAGE ON SCHEMA SALES_WAREHOUSE.ESTUARY TO ROLE PUBLIC;

GRANT CREATE TABLE ON SCHEMA SALES_WAREHOUSE.SKYVIA TO ROLE PUBLIC;
GRANT CREATE TABLE ON SCHEMA SALES_WAREHOUSE.AIRBYTE TO ROLE PUBLIC;
GRANT CREATE TABLE ON SCHEMA SALES_WAREHOUSE.FIVETRAN TO ROLE PUBLIC;
GRANT CREATE TABLE ON SCHEMA SALES_WAREHOUSE.MATILLION TO ROLE PUBLIC;
GRANT CREATE TABLE ON SCHEMA SALES_WAREHOUSE.ESTUARY TO ROLE PUBLIC;

GRANT SELECT ON FUTURE TABLES IN DATABASE SALES_WAREHOUSE TO ROLE PUBLIC;
GRANT INSERT ON FUTURE TABLES IN DATABASE SALES_WAREHOUSE TO ROLE PUBLIC;
GRANT UPDATE ON FUTURE TABLES IN DATABASE SALES_WAREHOUSE TO ROLE PUBLIC;
GRANT DELETE ON FUTURE TABLES IN DATABASE SALES_WAREHOUSE TO ROLE PUBLIC;

GRANT CREATE SCHEMA ON DATABASE SALES_WAREHOUSE TO ROLE PUBLIC;
I just used the PUBLIC role for simplicity and testing purposes. But you need to set aside a separate role in your Snowflake production database. We are setting these up too because Snowflake won’t allow a user with administrative privileges when connecting from the ETL tools. For this case, I used a TESTUSER account with the PUBLIC role, which aligns with the permissions above.
You also need to configure a private key for the Snowflake account you will use. For my TESTUSER, I followed the instructions here for key-pair authentication. This is very important because Snowflake will no longer accept a userid/password authentication. This applies to all the ETL tools connecting to Snowflake.
The same principle applies in BigQuery. Each tool will target a different dataset.
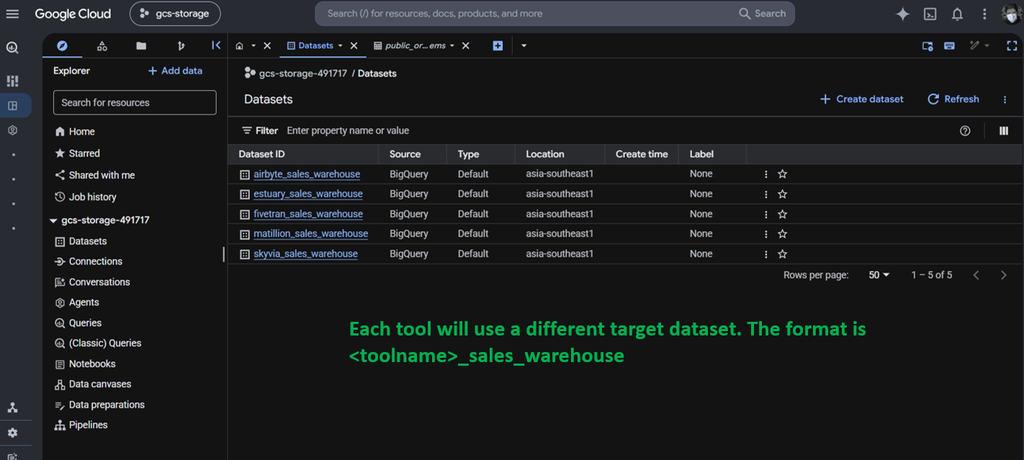
We will find out if the tool will write to the intended schema or dataset, or if it will decide on its own.
That said, we committed 40 hours to test the ETL tools.
Why Two Targets?
The two targets are used as evaluation targets, not because a production system necessarily needs both. We are also not recommending which data warehouse is best for your needs.
Many organizations will use one data warehousing platform. It will be very rare to use two. So, treat these tests not as an architectural recommendation, but for testing and evaluation.
The Four Technical Benchmarks
Though you will see how the setup for each tool is done, we would like to know the following:
- Time-to-First-Sync: How long did it take the tool to replicate the HubSpot contacts and Postgres tables to Snowflake and BigQuery? We’re hoping each tool will have some form of reports on how long the replication took place.
- Schema Evolution Resilience: When the source schema adds or removes a column, do you need to change the pipeline, or is it automatic? In our test, we will add a column in the products table in PostgreSQL.
- Pipeline Visibility & Failure Recovery: We are going to examine logs, error handling, notifications, and stuff that will let you know if the pipeline run is a success or not.
- Pricing Predictability: How will the ETL tools let you know how much you will pay? Is the pricing plan straightforward? Would you know how much you will pay given a workload like next month or by the end of the year?
These same criteria will be used across all candidate ETL tools.
Testing Limitations
You might have noticed that we will use relatively small datasets. Let me tell you that the sources, destinations, and the pipelines were created using free tiers and trial accounts, which impose limitations on data volume and usage. For example, the HubSpot test environment limits the sample to 1,000 contacts.
With these limitations, we can’t test using large datasets. We also would like to make the tests uniform across the different ETL tools.
The purpose of these tests is therefore to evaluate the practical experience of configuring and running each ETL tool rather than to benchmark enterprise-scale performance or a feature claimed by the makers of the tool. Claims about pushdown transformation, large-volume processing, scalability, and production performance are based on the capabilities and architecture offered by each platform and should not be interpreted as results from the test.
What Key Criteria Should You Use to Evaluate ETL & ELT Platforms?
We already stated earlier what we will watch for in the test. But what are the things you’re going to live with after purchasing the tool?
The right one is more than just counting connectors. Let’s discuss 4 of these criteria.
Ingestion & Pipeline Architecture
Start by knowing how data will move from source to destination and where data transformation will happen. You have 3 scenarios:
- ELT (Extract, Load, Transform): Modern data stacks favor this one, where you load data to the data warehouse and do the transformation from there using its compute engine.
- ETL (Extract, Transform, Load): Where you want it cleaned first through transformation before loading to the data warehouse.
- Reverse ETL: It’s reverse because the data warehouse becomes the source and the target is the operational systems. For example, a company might calculate customer scores or lifetime value in its warehouse and then write those metrics back to Salesforce, HubSpot, or Zendesk for sales and customer-service teams to use.
Do you need all 3? If it’s a ‘Yes’, is having separate tools for each a better solution or a tool that does it all?
The key question is not whether a platform calls itself ETL or ELT. It’s where the transformation happens and whether that architecture fits your workload.
Sync Frequency & Latency Mechanics
How quickly does your data need to move from the source to the destination? Your daily report has very different requirements from an application that needs data within seconds. There are a few common approaches:
- Scheduled polling: The platform queries the source at set intervals like every minute, every hour, or once a day. It works when near real-time data is not needed.
- Log-based Change Data Capture (CDC): The tool reads database transaction logs to identify inserts, updates, and deletes. This captures changes with less overhead, and it’s very useful for high-volume databases.
- Continuous streaming: Changes are processed continuously, often with very low latency. This is useful for operational analytics, real-time dashboards, and other workloads where a scheduled sync is not acceptable.
Don’t just check the tool’s shortest advertised sync interval. Check the tool’s latency and how the source system can handle the resulting workload.
Schema Drift Automation
Databases and APIs change as business requirements evolve. Because of that, tables change or new ones are added. New, changed, or deleted columns can be a pipeline headache. That’s schema drift, and a perfectly working pipeline yesterday may break tomorrow because of these changes.
Unless the ETL tool handles it automatically for you. Otherwise, you have to manually change the pipeline too, test it, and deploy it.
Good schema-drift handling can save significant maintenance effort, particularly when integrating SaaS applications whose APIs can change independently of your data team.
Is Automatic Schema Drift Handling Always Ideal?
- What if the change contains sensitive information? Highly controlled environments may prefer approval first before it goes to the warehouse.
- What if a change in column type (like DECIMAL to VARCHAR) is a bug in the source system? That shouldn’t go to the warehouse. It’s potentially dangerous.
- What if an additional column is not needed in the warehouse? It will just be an additional overhead. This applies when the table initially contains 5 columns, but now it’s 10. Should all 10 go to the warehouse?
- If the source contains JSON columns and you choose to retain them in the warehouse, the physical structure remains, but the logical structure is changed. That will quietly go to the warehouse. If your business requirements need approval, the ETL tool’s physical schema-drift handling will no longer be responsible. You need transformations to exclude the additional JSON property if the logical change is rejected to go to the warehouse.
This only means that good schema-drift handling should give you control over how changes are applied.
Pricing Predictability & Licensing
Know what will actually cause your bill to balloon as your data grows. It’s not commonly advertised on the pricing page.
Here are some common pricing models:
- Volume-based pricing: This is more predictable. You only pay for the rows processed regardless of the number of connectors used.
- MAR (Monthly Active Rows) or similar usage metrics: Charges are based on rows affected during a billing period. Historical reloads or re-syncs and frequent updates may significantly add costs.
- Per connector pricing: Cost will increase as you add more sources and destinations.
- License plus compute: The ETL platform charges for its service, while transformations pushed down to a cloud warehouse also consume warehouse compute. The ETL subscription is therefore only part of the total cost.
- Annual contracts: This has a fixed annual cost where you commit to use the tool. Depending on the tool, you may have discounts.
How Do the Top ETL Tools Compare Side-by-Side?
See the best ETL tools for 2026 at a glance below:
| Feature / Metric | Skyvia | Fivetran | Airbyte | Matillion | Estuary Flow |
|---|---|---|---|---|---|
| Primary Workflow Fit | No-Code Cloud Data Integration & End-to-End DWH | Enterprise Managed Ingestion & Automated ELT | Open-Source / Developer Infra Control | Engineering Push-Down Transformation | Real-Time Streaming & Log CDC |
| Pricing Model | Volume-based (Records moved); Unlimited users | Usage-based (MAR) + Per-connector pricing | PyAirbyte/Airbyte OSS: Free open-source engine + Infra/DevOps costs Airbyte Cloud: Pay As You Go | Usage-based Matillion Credits | Usage-based (GB moved + tasks) |
| Minimum Sync Interval | 1 Minute | 5 Minutes (1 min on high-tier) | 1 Hour (Cloud free) / Custom (Self-hosted) | 1 Minute | Sub-second / Continuous streaming |
| Setup Complexity | Visual / No-Code (Minutes) | Low / Configuration-only | Depending on the offering, it can be Low or High (Requires Docker/Python coding) | Medium-High (Requires SQL/Python skills) | Medium (CLI + UI) |
| dbt Transformation Support | Yes (Hosted dbt Core inside Skyvia) | Yes (dbt Core / dbt Cloud) | Yes (External orchestrator required) | Native visual dbt & SQL modeling | External orchestrator required |
| Reverse ETL Included? | Yes (Built-in to operational SaaS apps) | Yes (Fivetran Activations) | Yes, for supported connectors | Add-on required | Stream-based activation endpoints |
| Live Data Access (No Copy) | Yes (Skyvia Connect OData/SQL) | No | No | No | No |
Which ETL Tool Fits Your Specific Use Case?
This is probably the section you wish to dive into to see which one will fit your use case. The tests won’t reveal a winner. This is not a contest. Just the output of the tests and which areas and use cases the tool will shine.
Let’s begin.
Why Is Skyvia Best for Lean Data Teams, Solo Analysts & No-Code Simplicity?
Skyvia is a no-code data integration platform, and ease of use is at the core of the design. The user interface is clean, and forms are straightforward. You will find connector configurations reusable, so the same configurations need not be typed more than once. Most pipelines can be designed using wizards and simple forms, but features like the Data Flow and Control Flow use drag-and-drop.
I’ve used it many times. I already lost count. I’ve used the easiest feature to move data from HubSpot and PostgreSQL to Snowflake and BigQuery: Skyvia Replication. Before we dive into the tests, let me tell you more about Skyvia and who this is for.
Best for
It’s for everyone who needs systems talking to each other without code. Ideal for solo data analysts, BI leads, IT managers, and RevOps who need reliable pipelines without waiting for IT staff.
Engineers can have their to-do lists crossed out quickly and focus more on other stuff that matters. That means more rollouts and less debugging.
Rating
How do users see Skyvia? Check out reviews from:
- G2 – 4.8/5 based on 322 reviews
From G2: “Users consistently praise the ease of use and reliable automation of Skyvia…” - Capterra – 4.8/5 based on 116 reviews.
Pricing Deep Dive
Skyvia is volume-based. That means no surprises on your budget. Skyvia pricing includes Free, Basic, Standard, Professional, and Enterprise, and includes free trials for the paid tiers. Pricing starts at $79/month for Basic.
I used a trial account (which can be your choice too when you start). Below is my usage for this test:
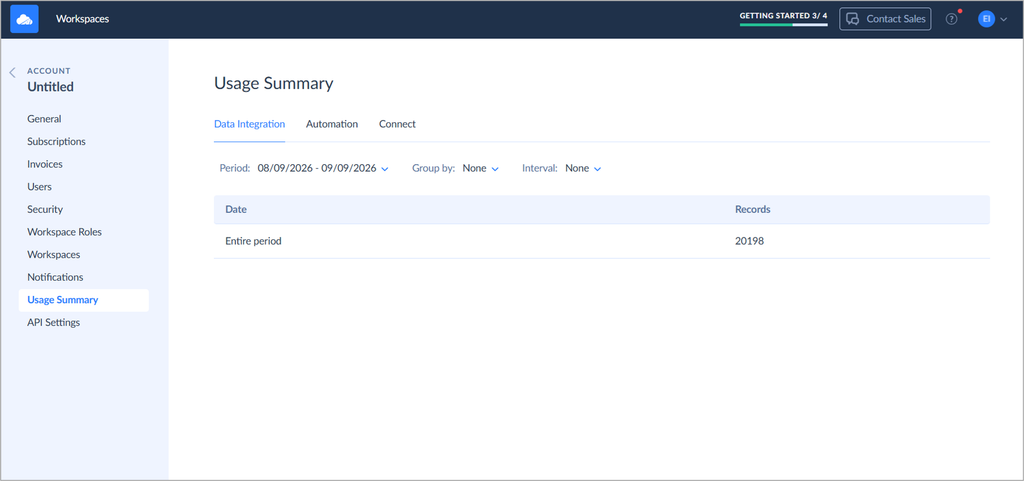
If those numbers are consistent monthly, I won’t be eligible for the Free tier. The Basic tier will be more applicable. That’s how predictable it is. At $79/month, my annual cost will be $948.
I also have a free tier account, but I can’t use it here because of the higher number of rows. I’ve reached my limit too, and I’m waiting for it to reset the following month.
For more pricing info, visit the Skyvia pricing page.
What Does Building a Data Pipeline Look Like in Skyvia?
The Skyvia replication requires a source and a destination, and we have 2 sources and 2 destinations. You will follow a wizard to create a Skyvia replication. You also need to configure the targets before creating their connections. This means:
- The Snowflake database and schema should already exist.
- The BigQuery project, dataset, and cloud storage bucket are configured with the correct permissions.
Pipeline Setup Difficulty: 1/5 (No-Code Visual Wizard)
Time to Launch: 5–10 minutes.
Workflow Steps
- Create a Skyvia Connection for the 4 sources (HubSpot, PostgreSQL, Snowflake, and BigQuery)
- Add a new Skyvia Replication following a wizard.
- Create a replication for HubSpot to Snowflake.
- Do the same to replicate PostgreSQL to Snowflake.
- Reuse the HubSpot connection and create a replication going to BigQuery.
- Reuse the PostgreSQL connection and create a replication going to BigQuery.
- Run the 4 pipelines to test.
- Create a schedule to run the 4 pipelines on demand.
Below is the Skyvia Replication wizard that I used when creating the replication:
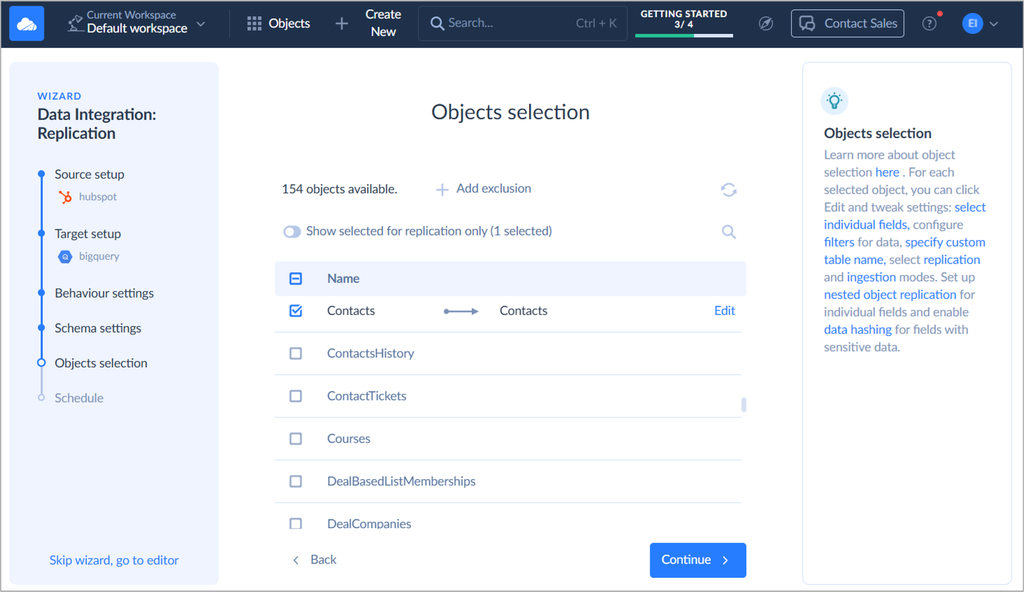
At this point, the HubSpot and BigQuery connections are chosen as source and target. The wizard is now asking what HubSpot objects to replicate.
The other 3 replications use the same wizard.
Connector Configurations
Check out how Skyvia connector configuration looks like for HubSpot, PostgreSQL, Snowflake, and BigQuery.
HubSpot
See what it looks like to configure a HubSpot connection in Skyvia.
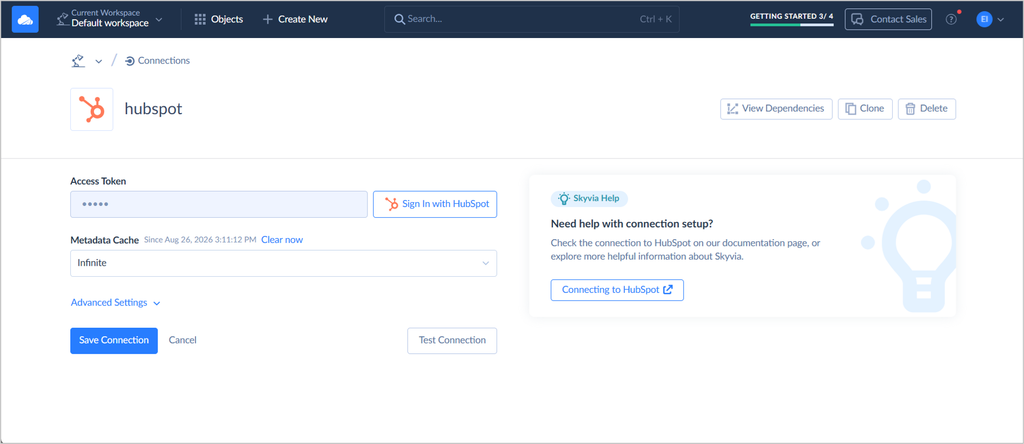
We don’t need to give Skyvia our HubSpot account and password. What I did was sign in to HubSpot, and HubSpot provided the access token to Skyvia.
PostgreSQL
Then, we have the PostgreSQL connection below:
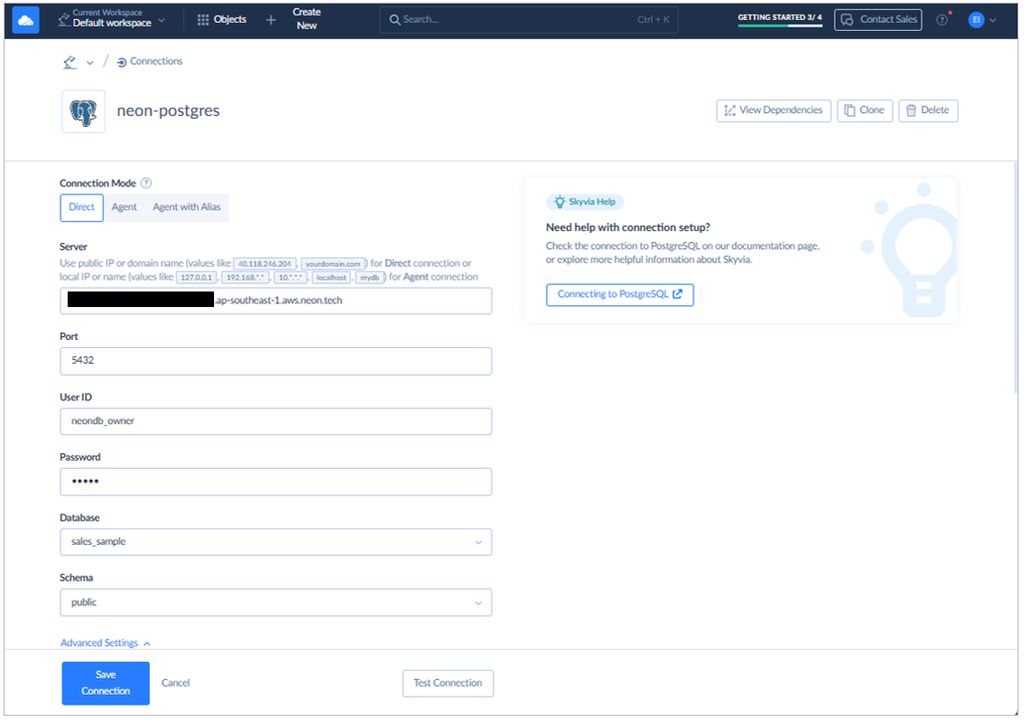
Ask your database administrator to provide those credentials for your own connection. Connecting to Neon needs SSL=require, so I set that too. Note that I got a successful connection after I changed the SSL TLS Protocol from 1.1 to 1.2.
Snowflake
Below is my Snowflake connection:
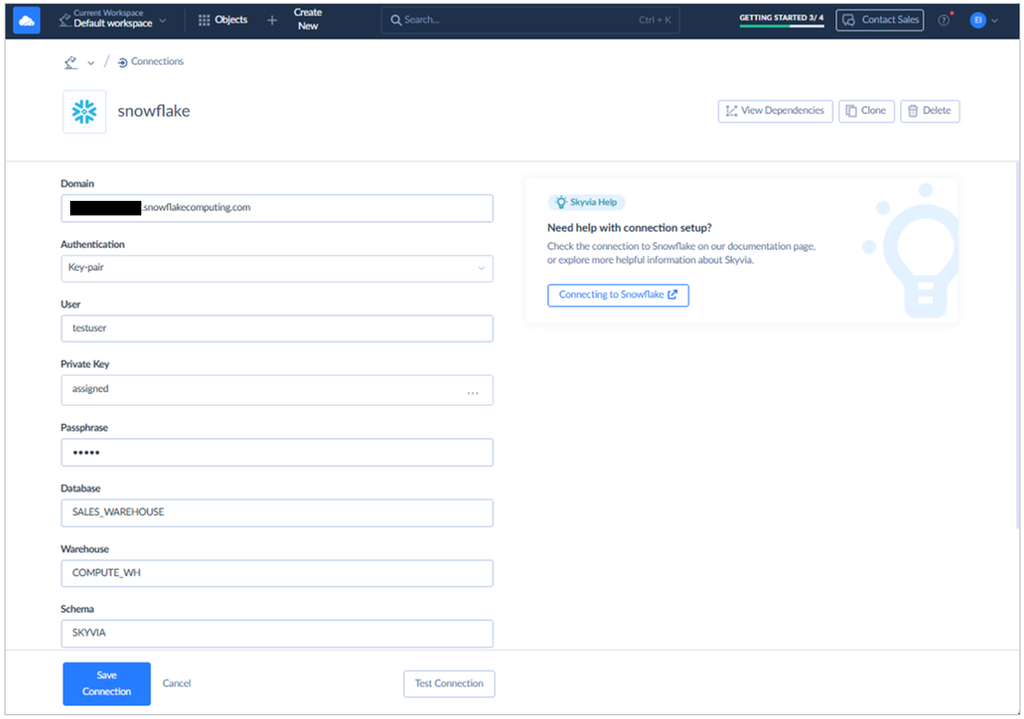
I chose Key-Pair authentication because Snowflake won’t accept username/password authentication.
BigQuery
Finally, the following is the BigQuery connection:
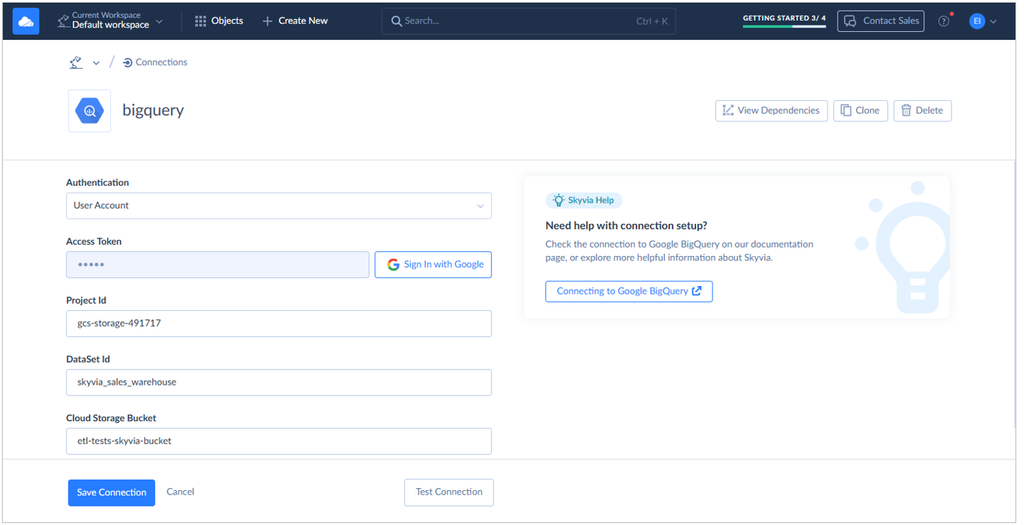
I signed in to Google for the access token. Then, I provided the BigQuery project ID, dataset, and Cloud Storage Bucket. This needs to be setup in advance before creating the BigQuery connection in Skyvia.
Replication Setup
For the HubSpot to Snowflake replication, below is the final setup after following the wizard.
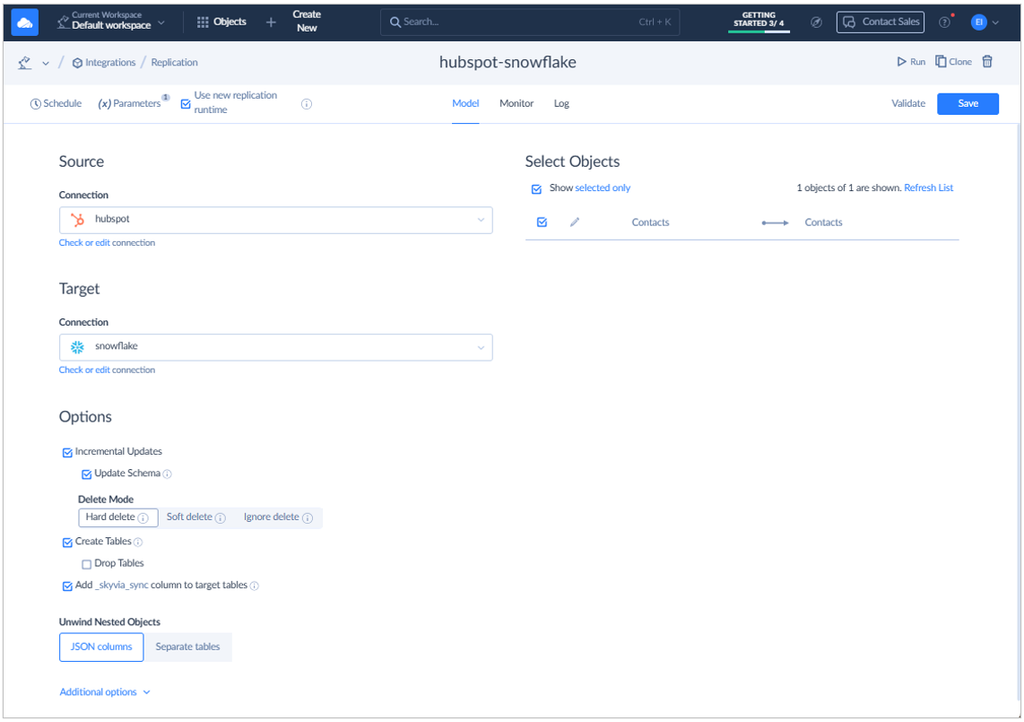
And below is the setup for PostgreSQL to Snowflake replication. The 3 candidate tables (products, orders, and order_items) are indicated.
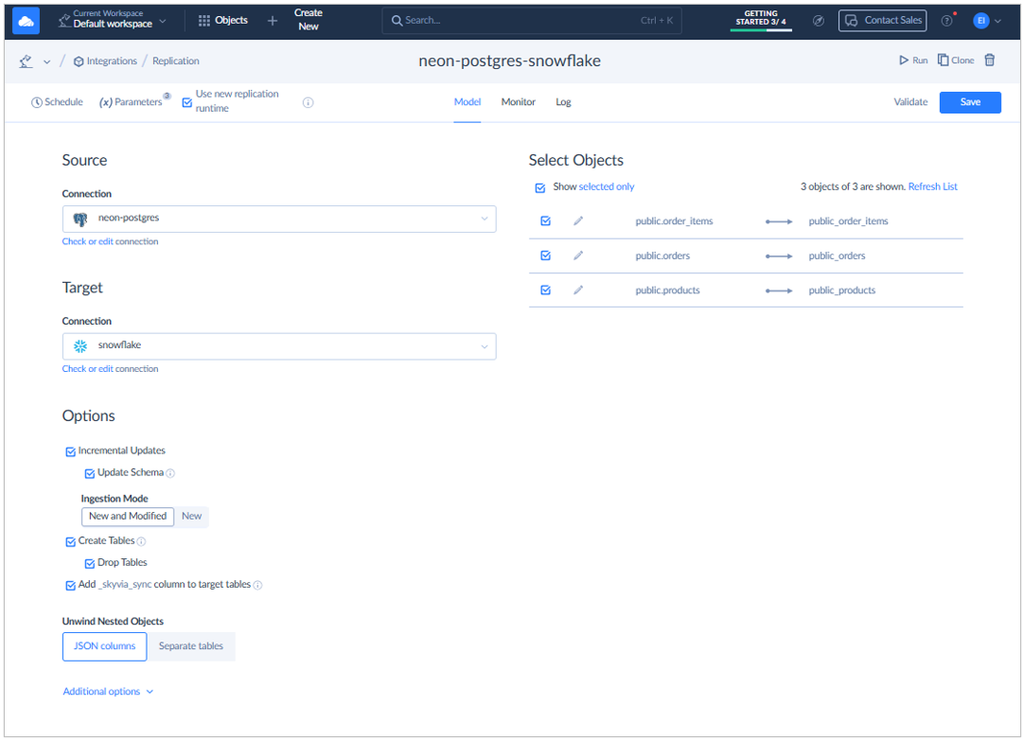
I also set the table to be automatically created in Snowflake.
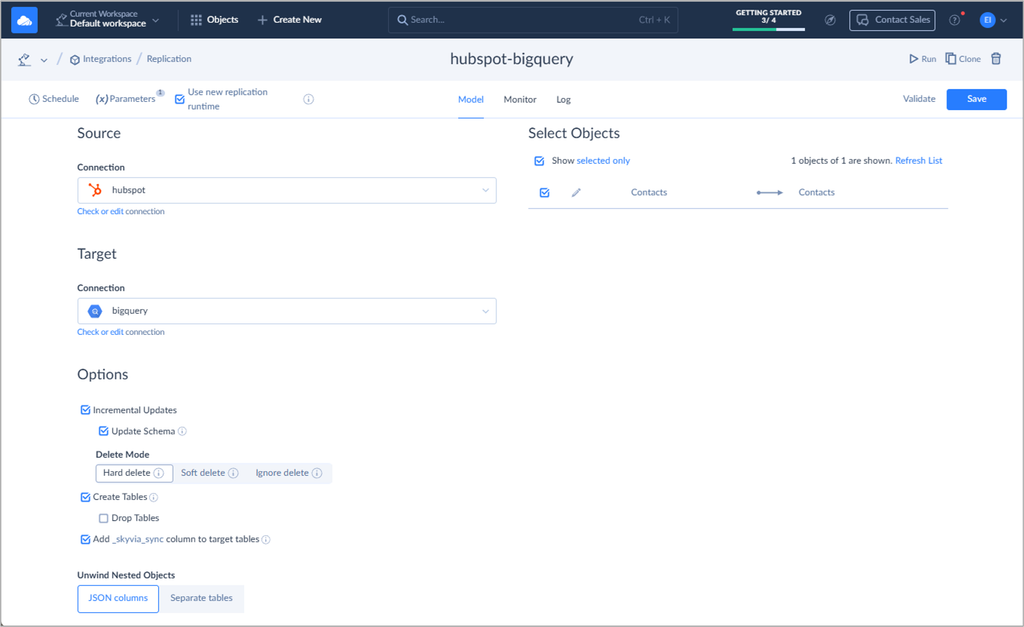
Below is the HubSpot to BigQuery replication. The only thing that changed is the target.
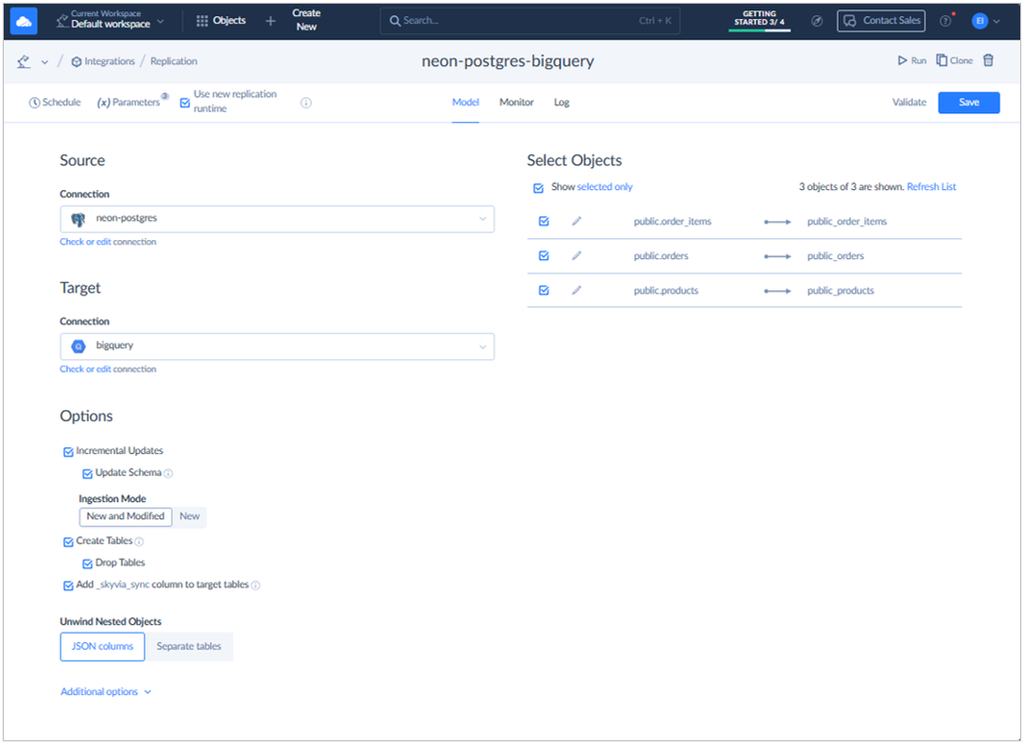
Finally, the PostgreSQL to BigQuery replication:
Since I did this kind of replication setup many times, 2 sources for 2 targets took 10 minutes.
Runtime Results
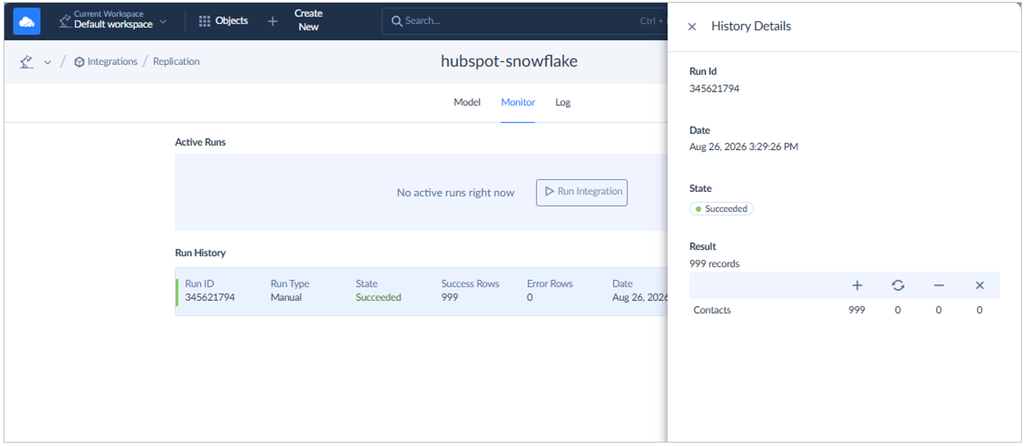
The initial sync for HubSpot Contacts to Snowflake took 22 seconds, and the 999 contacts are the same as the number from HubSpot earlier.
Meanwhile, the 3 tables from PostgreSQL took 32 seconds, and the row counts below are consistent with the source earlier.
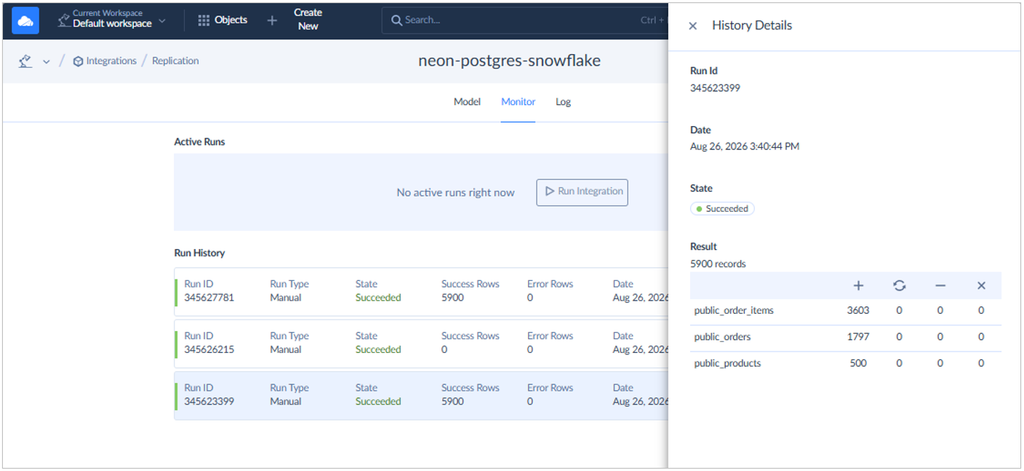
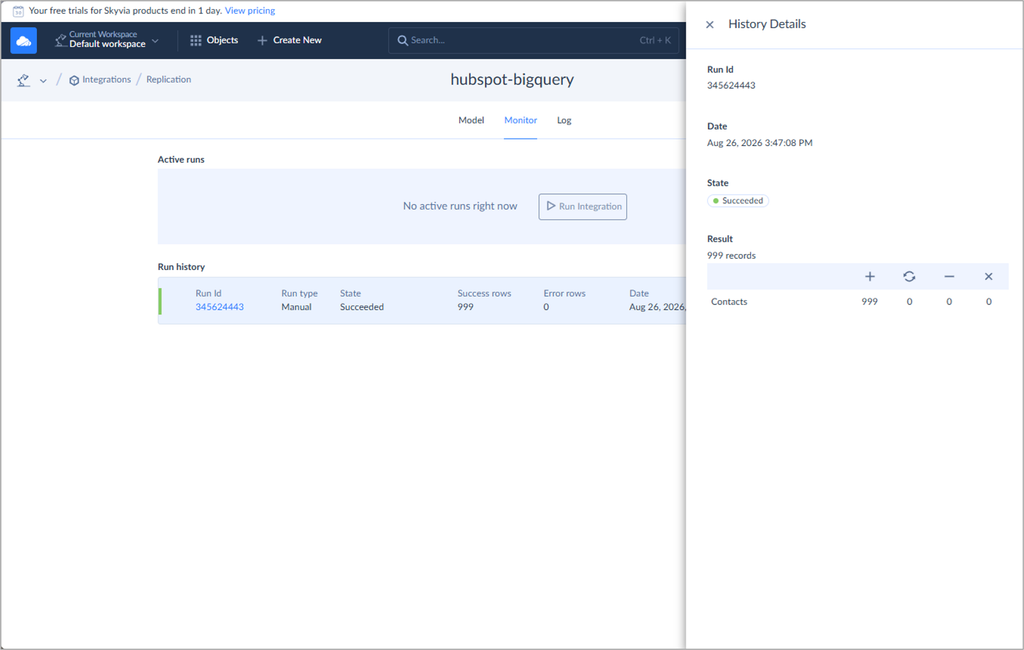
Let’s check the pipelines going to BigQuery. HubSpot contacts took 22 seconds too, and it successfully replicated 999 rows.
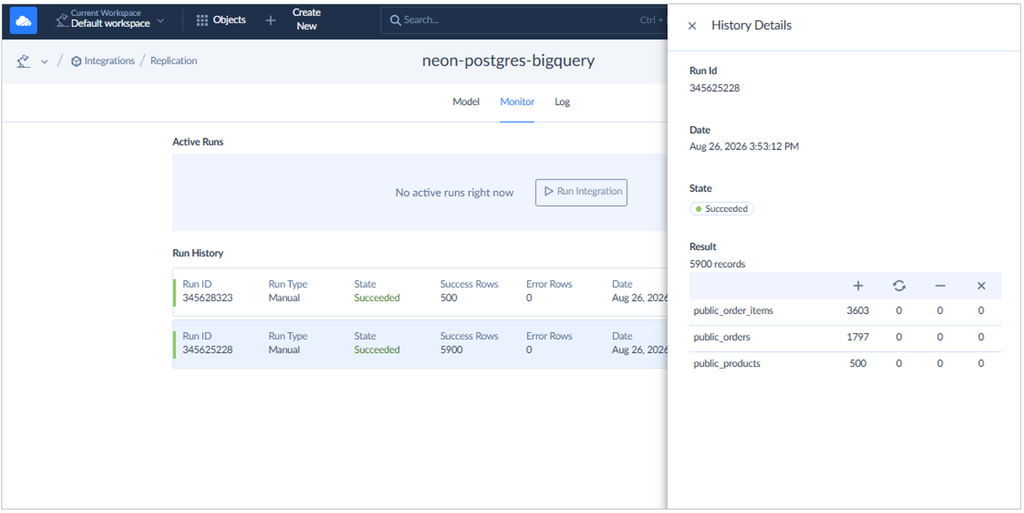
For PostgreSQL to BigQuery, it took 1 minute and 8 seconds for the initial sync. Below shows the same row counts as earlier.
Then, I need to check for schema drift resilience. So, using dbForge Studio for PostgreSQL, I added the sku column to the product table. And then, I did this:
UPDATE products
SET sku = CONCAT(cast(category AS VARCHAR(20)),cast(product_id AS VARCHAR(20))),
         modified=now();
That’s our schema drift. So, how will Skyvia deal with it? I re-ran the PostgreSQL-to-Snowflake pipeline, but I got zero successful rows. It means nothing was replicated to Snowflake. I checked the pipeline. It can detect the new sku column, but it’s excluded in the process.
See below:
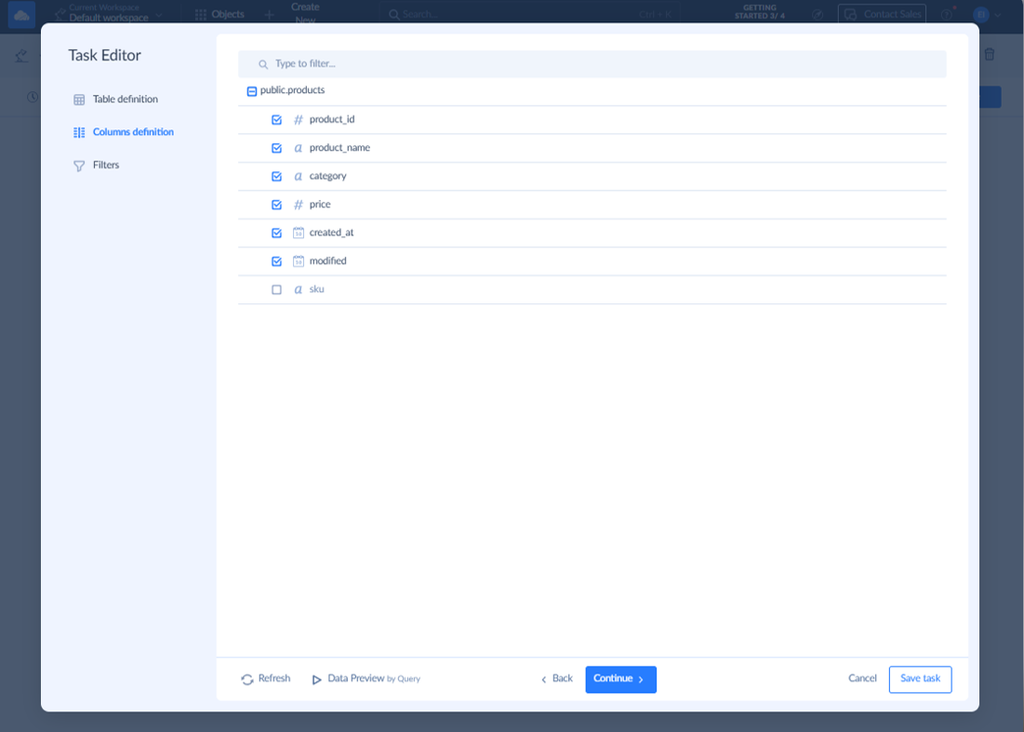
I have to mark it as checked and save the pipeline changes. When I save, I get a prompt:
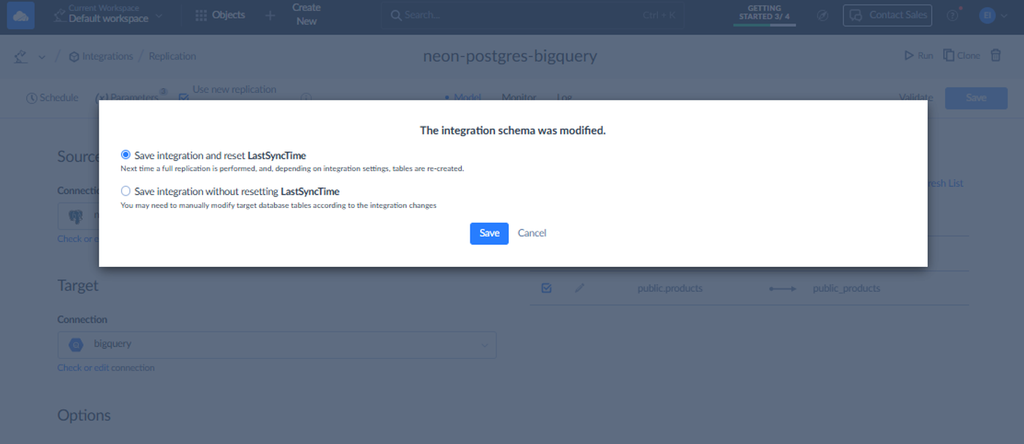
It means that I have to choose whether I want a full refresh or not on the next run. I chose to do the full replication again and reset the LastSyncTime. When I re-ran the pipeline, the new column is there in Snowflake.
Skyvia uses a metadata cache to optimize performance. That means the initial columns are stored in a cache so they won’t be read again from the source. That cache needs to reset, or the new column won’t replicate. And it has to be preconfigured that way from the beginning.
Results in Snowflake
Did the data really replicate? One way to find out is to check it in the target.
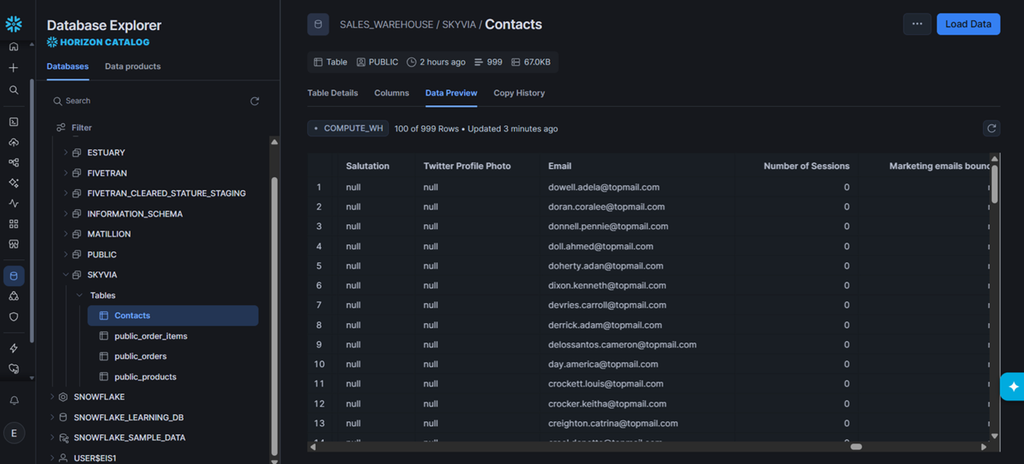
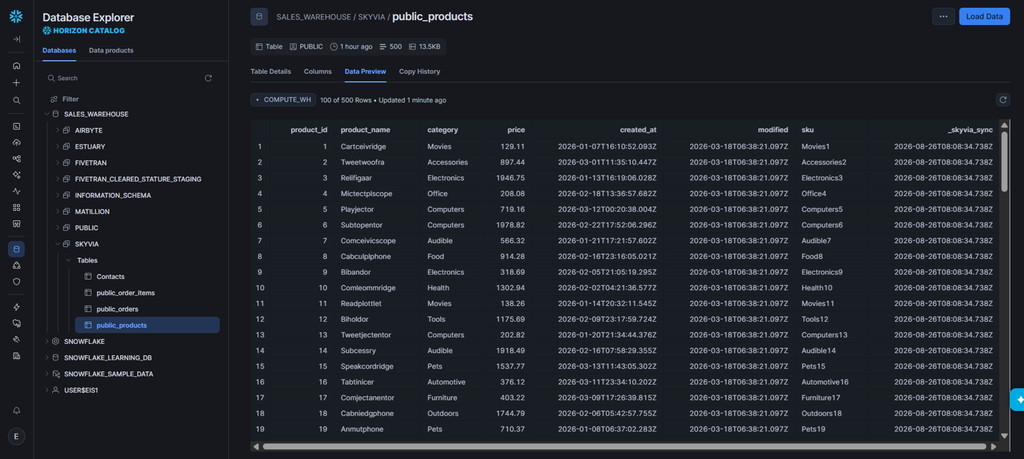
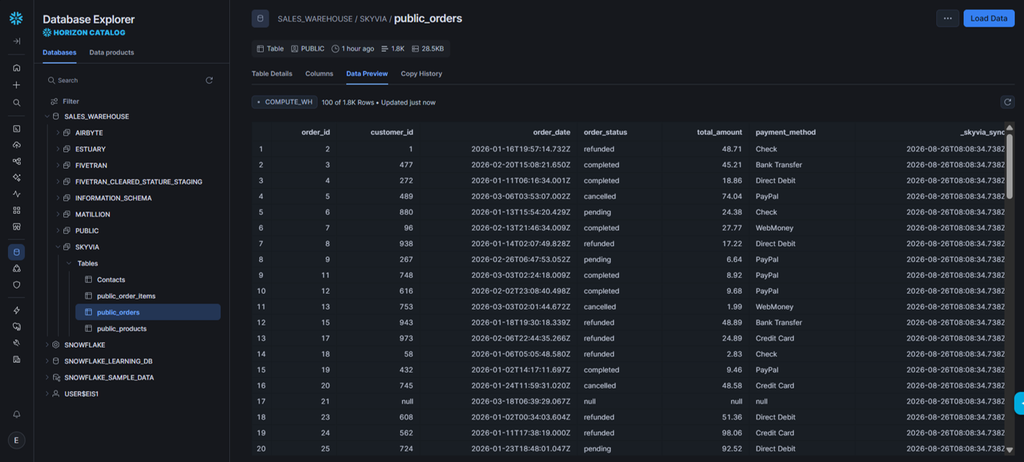
Skyvia followed the schema target we set in the pipeline. That is, it writes tables under the SKYVIA schema. Columns are flattened as in the source. This means Skyvia prioritized query convenience for us. No need to use functions to flatten the columns in Snowflake. However, Skyvia prefixed the source schema into the table name, so public.products in PostgreSQL becomes public_products in Snowflake.
Here’s the data preview of the HubSpot contacts. Row counts are reported as 999 from the top of the page.
Same thing with 500 products from PostgreSQL. Here’s a preview including the additional column added.
The orders table shows a rounded-off row count: 1.8K. But that’s close to our 1797 orders.
The same with the order_items table. A rounded-off figure is 3.6K, which is close to our 3603 order items. Since we set up the replication to add the _skyvia_sync timestamp column, it appears below and in the other tables.
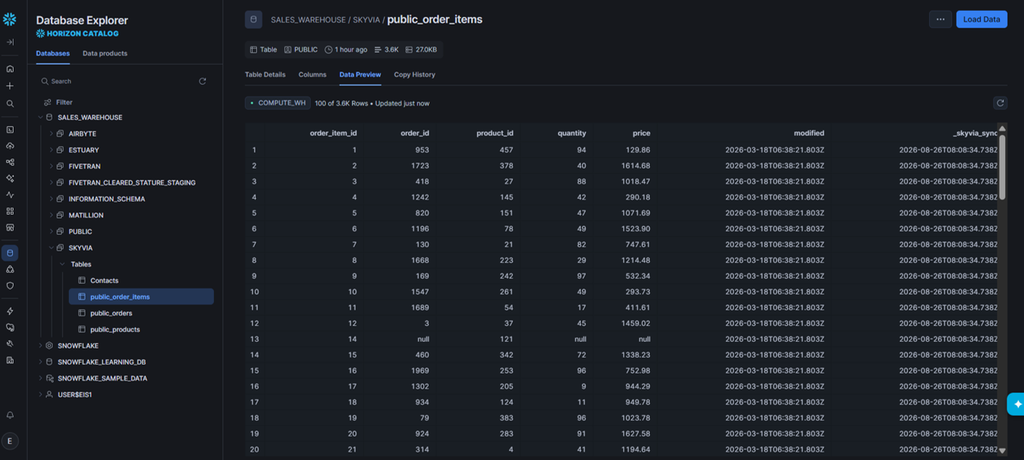
Results in BigQuery
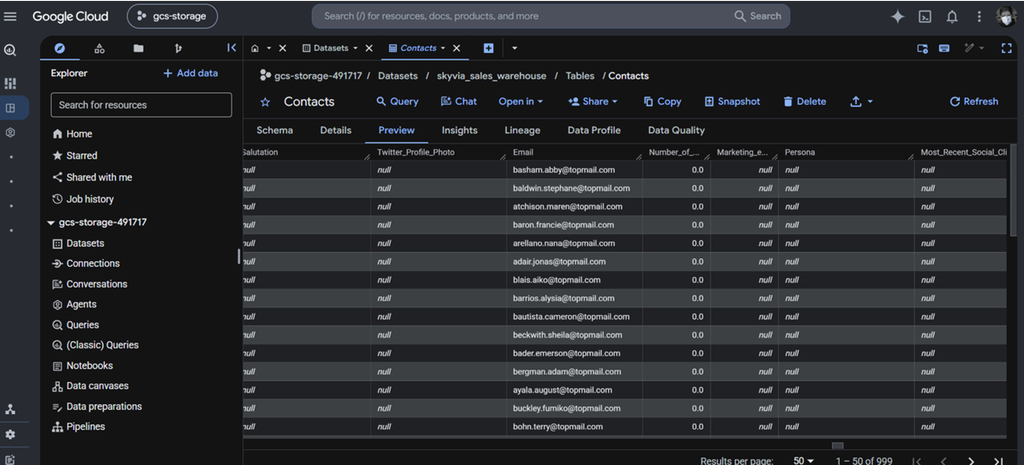
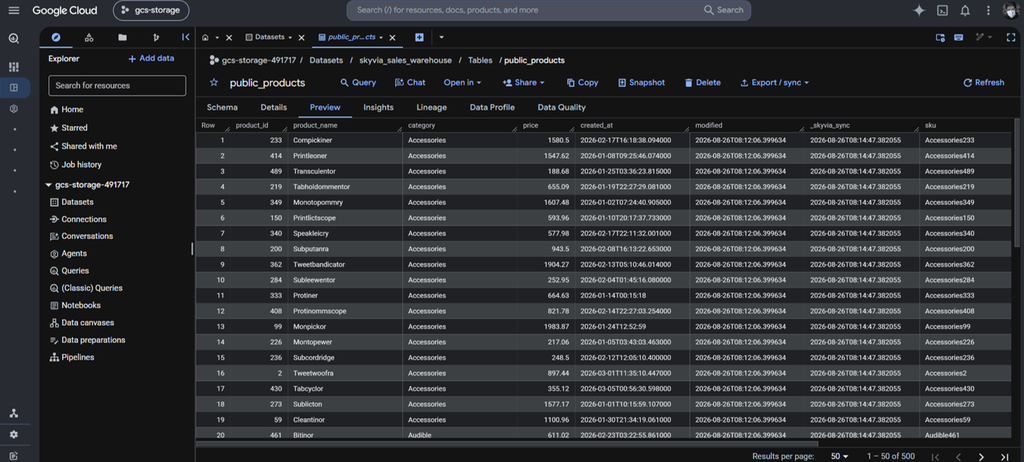
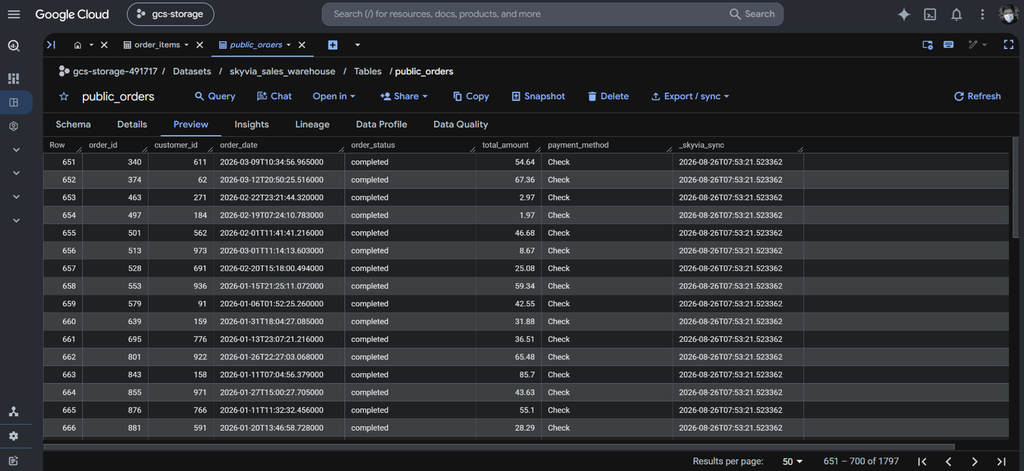
The results in BigQuery are generally the same as in Snowflake. The table columns are flattened for query convenience. The tables were loaded into our intended dataset too.
Below are the 999 HubSpot contacts in the skyvia_sales_warehouse dataset:
Same thing with the products table.
And the orders table:
Finally, the order_items table:
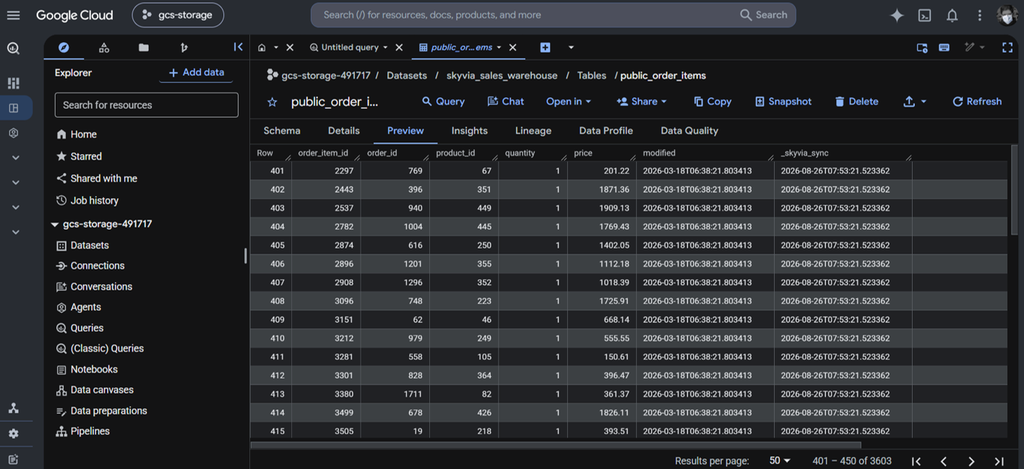
That concludes our tests for Skyvia. You now have an idea of the replication setup, initial sync, and target outputs.
The Pros and Cons below are based on the product features, not from the tests.
Pros
- End-to-End Pipeline in One Tool: Move data in ETL or ELT, model warehouse-side (hosted dbt Core or native SQL), move back to CRMs or OLTP systems (Reverse ETL), and orchestrate execution order with Control Flow.
- Predictable Volume Pricing: A preset number of rows monthly means you stay on budget every month. Just ensure you have enough rows available per month for uninterrupted pipelines. Includes unlimited users on every plan and a genuine freemium tier (no credit card required).
- Broader Data Integration Scope: Beyond data warehousing, Skyvia provides 1-way and 2-way data sync, data loading, and live real-time data access via Skyvia Connect (OData/SQL endpoints).
Cons
- Minimum Sync Interval: Lowest sync interval is 1 minute (polling-based); not designed for sub-second streaming workloads.
- CDC Scope: Log-based CDC is available for MS SQL Server; other database sources use scheduled incremental polling.
- Legacy ERP Modules: Skyvia supports Oracle, Dynamics, and NetSuite, but lacks out-of-the-box deep schema adapters for legacy customized SAP environments.
- Push-Down Engineering: Does not run customized Python/Spark push-down code directly inside Snowflake; heavy developer-only push-down workflows fit platforms like Matillion better.

Why Choose Fivetran for Enterprise-Scale Managed Ingestion?
In our Fivetran test, automatic schema drift handling was flawless. There’s no need for manual intervention. Fivetran is also known for efficient big data processing.
I already tried Fivetran a few times in a similar test. Note that we can’t test the big data processing part, but we can test the schema drift handling.
Best for
Big data companies that prioritize fast scaling, broad connectivity options, and hassle-free schema management will find Fivetran attractive. It’s mostly at home with mid-market and enterprise environments.
If you also don’t mind spikes in monthly payments because of a sudden increase in data volume, this is for you.
Rating
So, how does Fivetran fare? What do users say?
- G2 – 4.3/5 based on 828 reviews
From G2: “Users consistently praise the product for its ease of use and reliable data syncing..However, many users express concerns about the high pricing as data volume increases.” - Capterra – 4.4/5 based on 25 reviews.
Pricing Deep Dive
Fivetran is pay-as-you-go, but there’s a Free tier. Paid tiers include Standard, Enterprise, and Business Critical. There’s a pricing calculator where you can compute your possible Monthly Active Rows (MAR). According to Fivetran, MAR is “the number of distinct primary keys synced from the source system to your destination in a given calendar month.”
Fivetran also offers annual Contract pricing and starts at $12,000, as seen below:
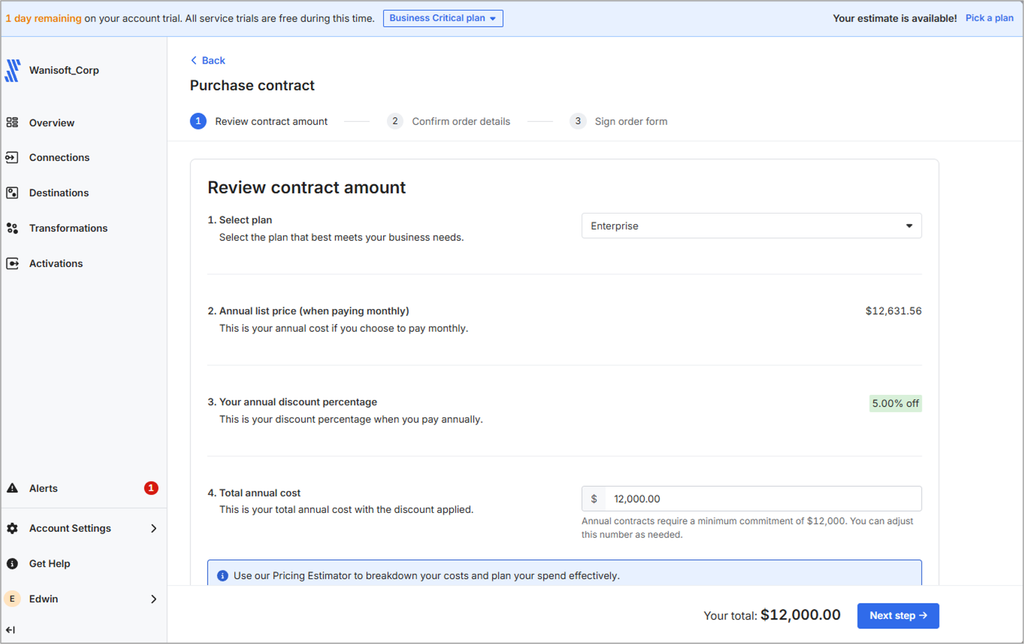
Since I used a trial account, no billing is computed. But Fivetran recommended the Enterprise plan for me based on the tests I did. See below:
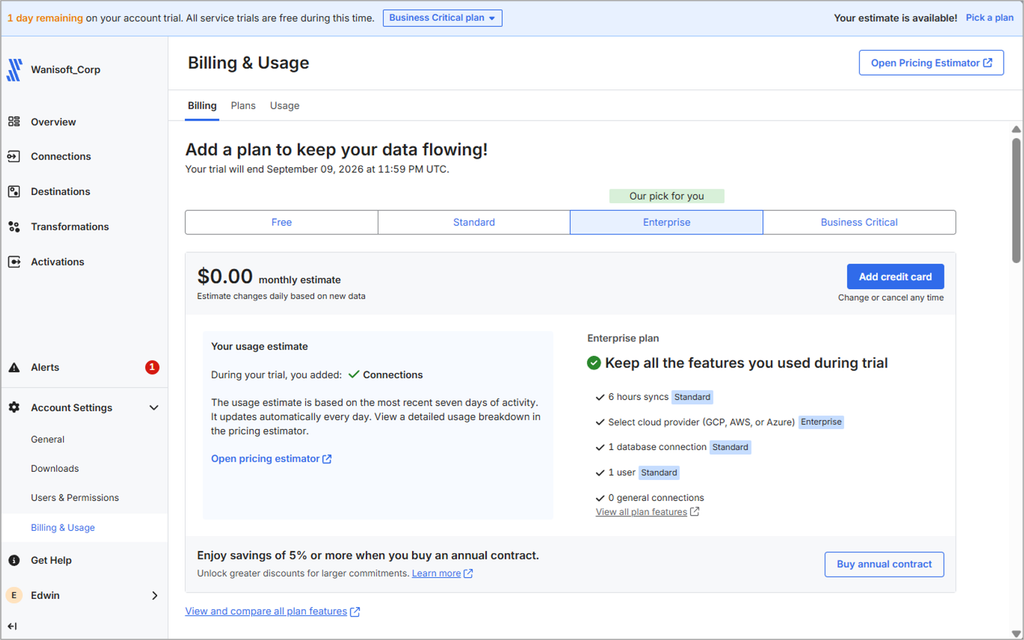
Enterprise was chosen because of the cloud provider used in the trial. But actually, the test will fit the Free plan with GCP as the cloud provider.
Fivetran has no posted price for their plans. For more information, visit the Fivetran pricing page.
What Does Building a Data Pipeline Look Like in Fivetran?
In Fivetran, you need to set up connections and destinations. Connections in Fivetran mean the setup of the source data with its intended destination.
Pipeline Setup Difficulty: 2/5 (Configuration-driven).
Time to Launch: 15–30 minutes.
Workflow Steps
Here’s what I did:
- Create destinations
- For Snowflake
- For BigQuery
- Create connections
- Create a connection for HubSpot with Snowflake as the target.
- Make a connection for PostgreSQL with Snowflake as the target.
- Add another connection for HubSpot with BigQuery as the target. I needed to sign in to HubSpot again.
- Finally, add the last connection for PostgreSQL with BigQuery as the target. I retyped the PostgreSQL config for this connection.
- Run the pipelines to test.
Though there is also a wizard, the way the pipeline is organized will let you repeat configuring the sources. This is expected since you don’t normally have 2 data warehouses in a company.
Connector Configurations
I’ll show you Fivetran connector configurations individually.
HubSpot
Similar to Skyvia, I just signed in to HubSpot for authorization. Note the Destination schema. You can’t edit it once you’ve saved it. When I got it wrong, I had to delete the connection and start again. It happened in this test because that same destination schema will be used as the schema in Snowflake.
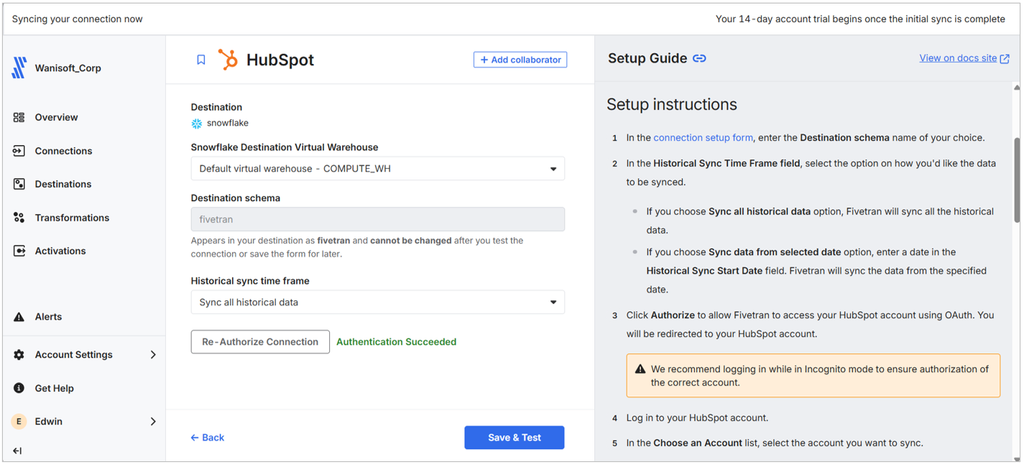
PostgreSQL
Below is the PostgreSQL config. It’s a wizard with green check marks when you’re done. And there’s the destination schema again. But Fivetran doesn’t allow the same destination schema name. So, I used ‘fivetran2’. Sadly, I have no choice, and Fivetran will create a new schema in Snowflake.
The next part of the wizard is for the database host and port.
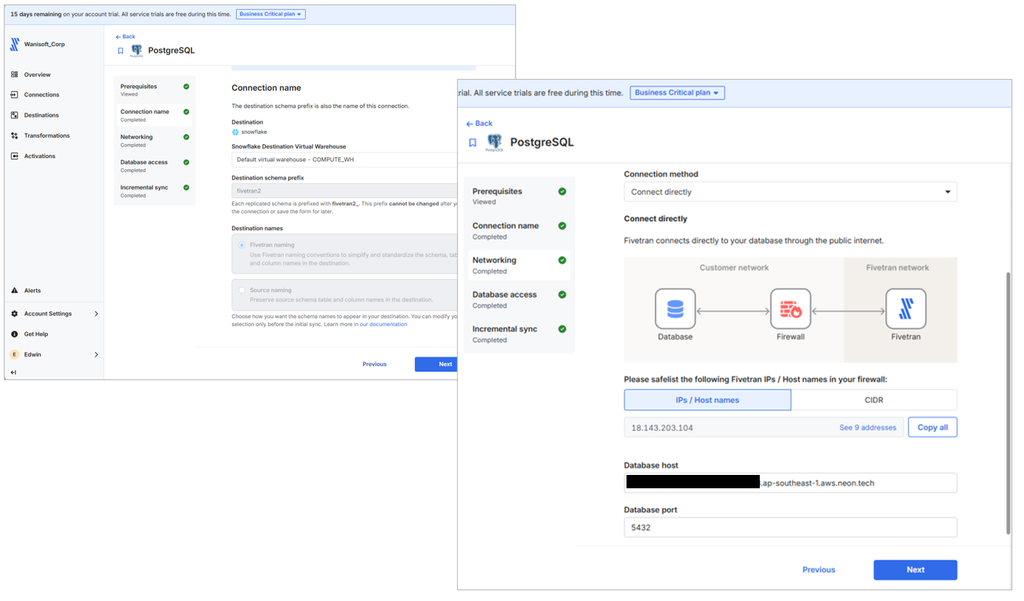
Then, the next page of the wizard has the usual credentials: database, username, password. The next part is very important. It assumes we already set wal_level = logical, the replication slot, and the publication name. Fivetran and Neon have good documentation for that.
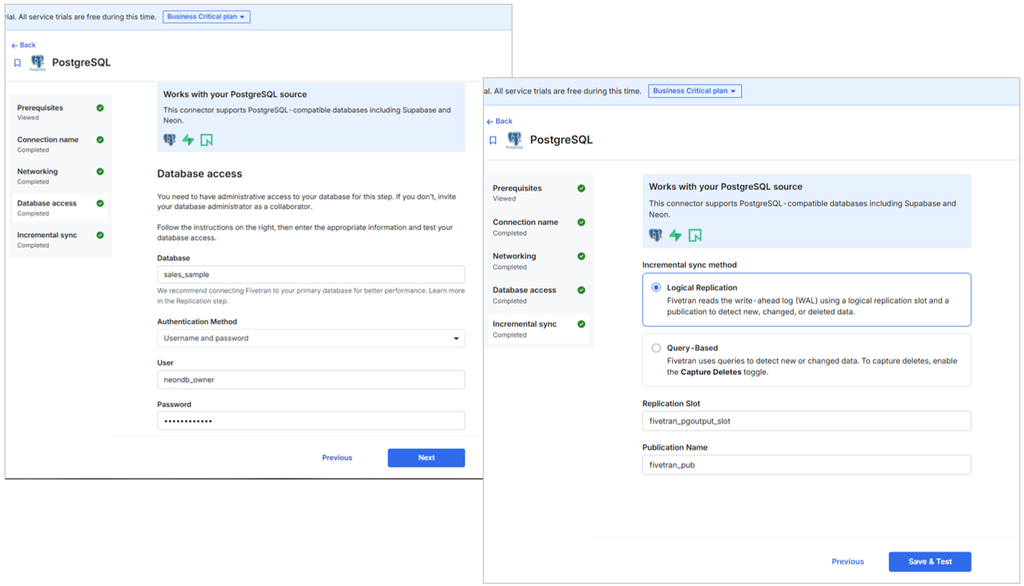
Snowflake
Next is the Snowflake destination. I have the private key file prepared for the Private Key box since I used the same one in Skyvia. The other stuff is the usual parameters we need to provide.
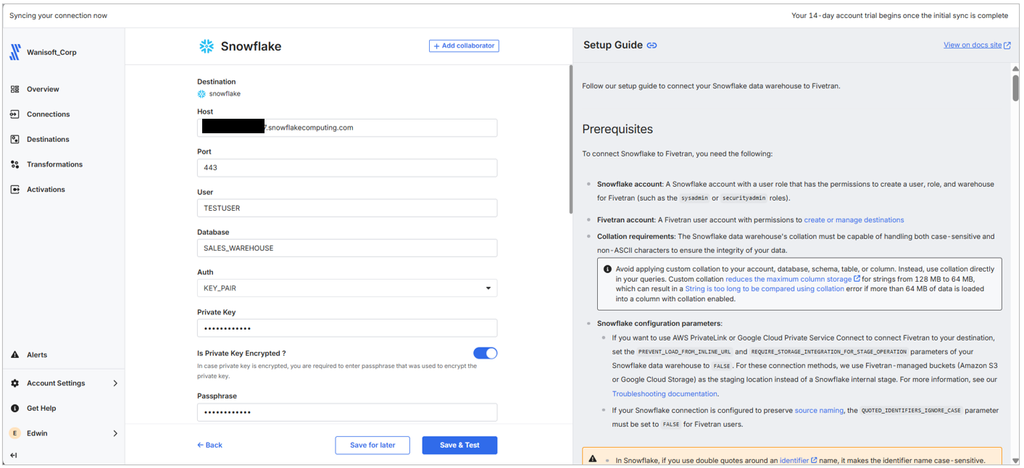
BigQuery
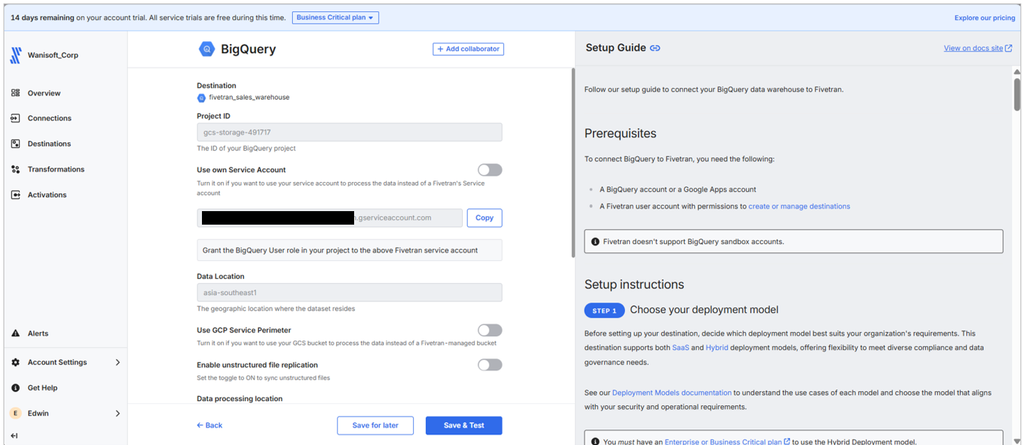
Finally, we’ll see the BigQuery destination config. It uses a defined Service Account prepared by Fivetran. What I did was give this Service Account permission to my BigQuery project so it can write to datasets.
I didn’t have to show the same HubSpot and PostgreSQL config with BigQuery targets because the target is the only difference. However, the same thing happens. I have to set 2 new schema targets that point to 2 BigQuery datasets. Again, not our original intention.
Including Tables in the Pipeline in Fivetran
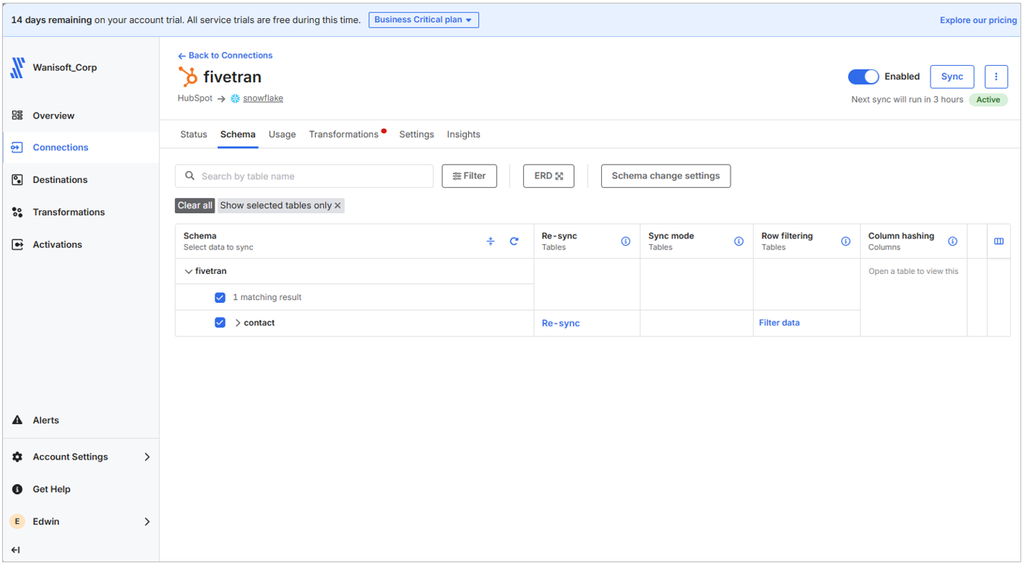
For the fivetran connection, I marked the HubSpot contacts to include them in the replication. The default is all HubSpot objects.
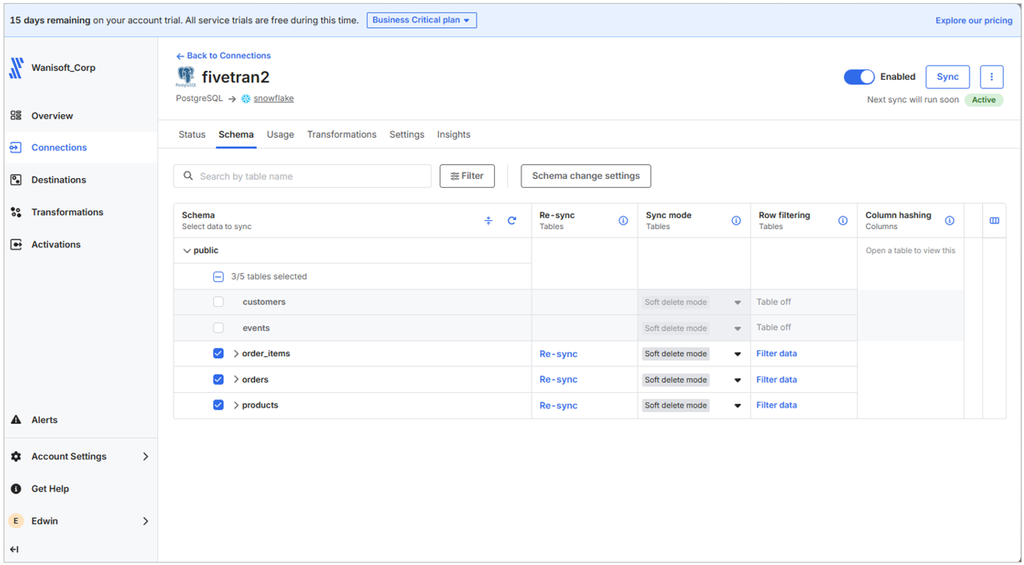
For the PostgreSQL to Snowflake replication (fivetran2), I also set the tables to replicate. Note that only the tables you include for publication in the PostgreSQL database will be replicated. You can see below that Fivetran marks the other tables as Table off because they’re not included in the publication. If your table is marked that way but you want it replicated, you need to go back to PostgreSQL to include it in the publication.
Also, there’s a Schema change settings, as you can see below. The default is Allow all new data, which means all new and changed tables and columns will be replicated. If your company requires approval prior to schema change, set this to Block all new data.
Similarly, I also did the same for HubSpot source and BigQuery destination:
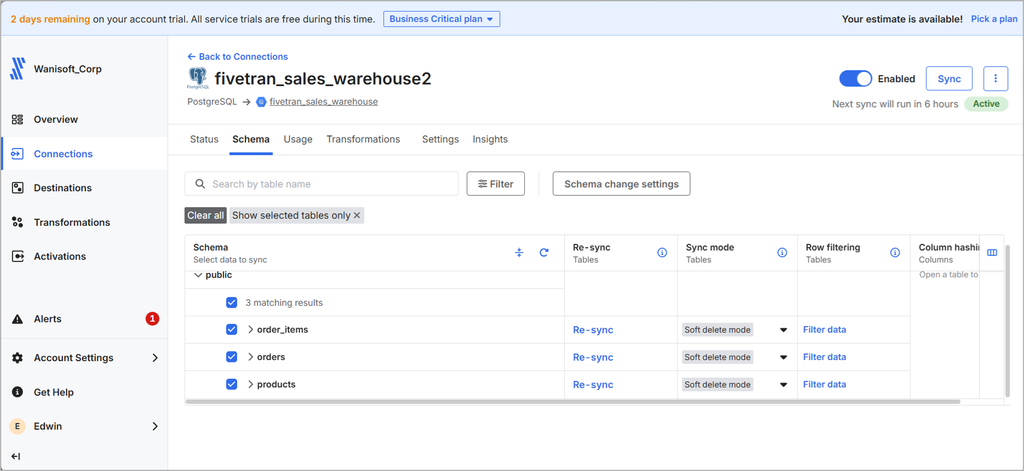
And finally, in PostgreSQL to BigQuery:
Runtime Results
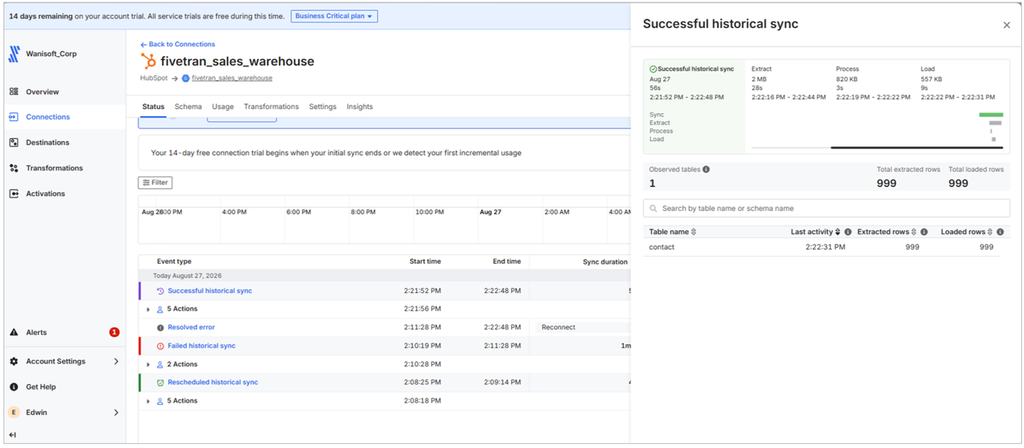
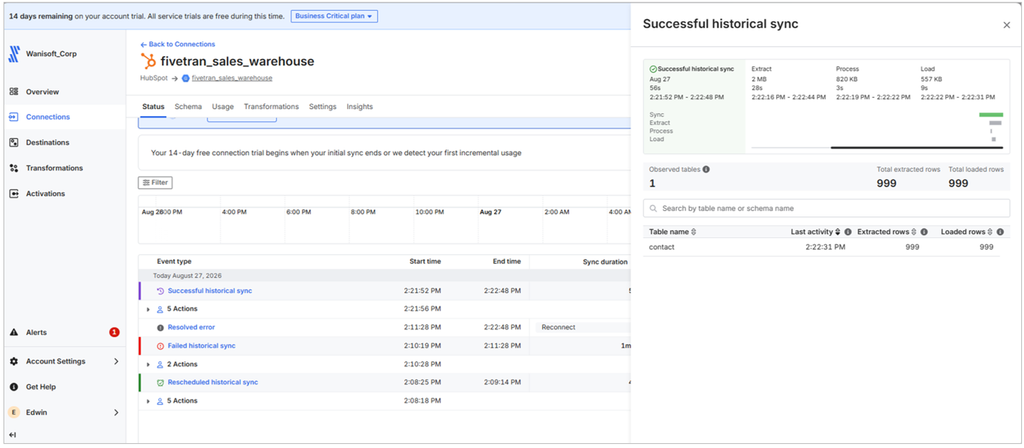
Fivetran separates the runtime duration into Extract, Process, and Load. Each has its own timestamps and duration. Overall, the initial sync of HubSpot Contacts to Snowflake took 49 seconds. It’s the same row count as in the HubSpot source earlier.
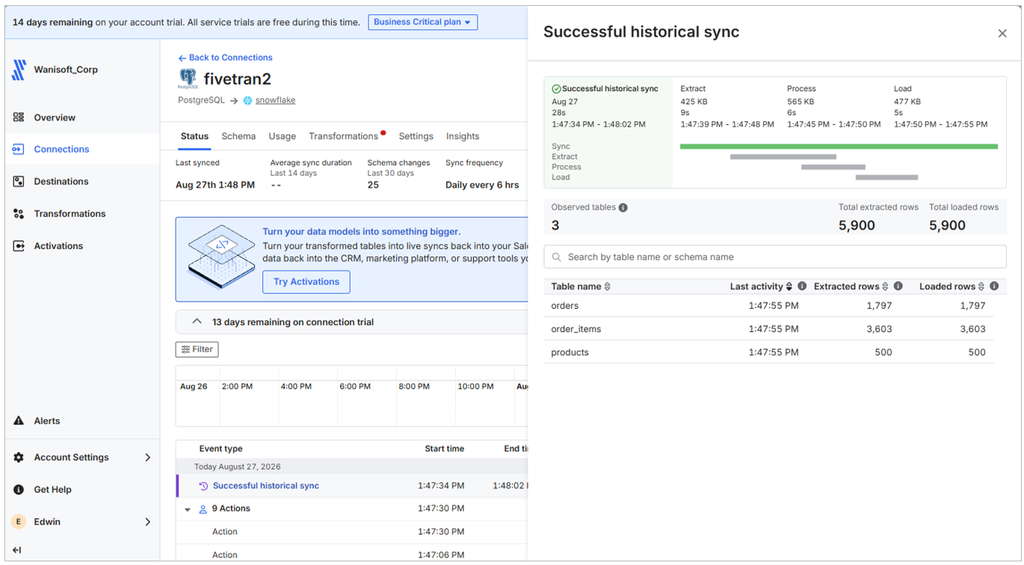
Below is the PostgreSQL-to-Snowflake initial sync that took 20 seconds. Row counts are consistent with the source.
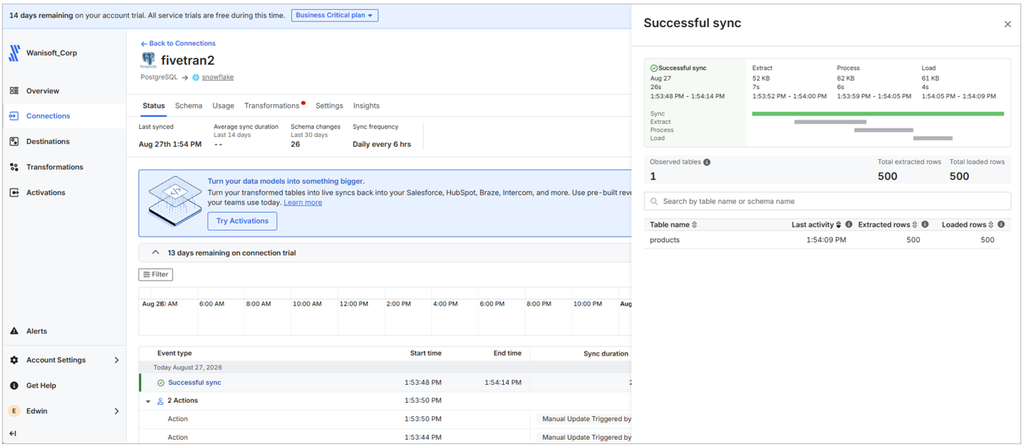
Now, we test for schema drift handling. I added the sku column in the products table in PostgreSQL and put some values into it. I didn’t change the pipeline. Then, I re-ran the pipeline. From the screen capture below, only the products table was replicated, which is correct, because that’s the only table that changed. Will the new column be reflected in Snowflake? We’ll find out in a while.
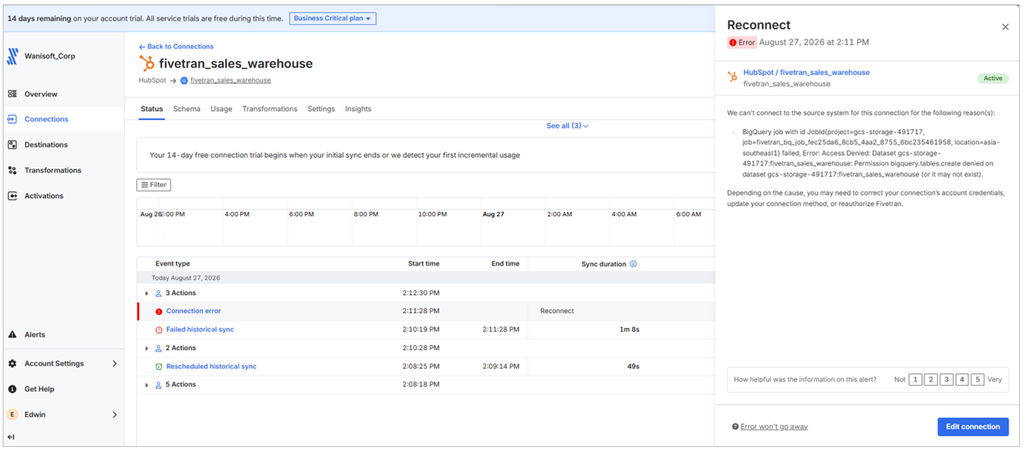
Next, I moved on to HubSpot to BigQuery replication, and I have a runtime error:
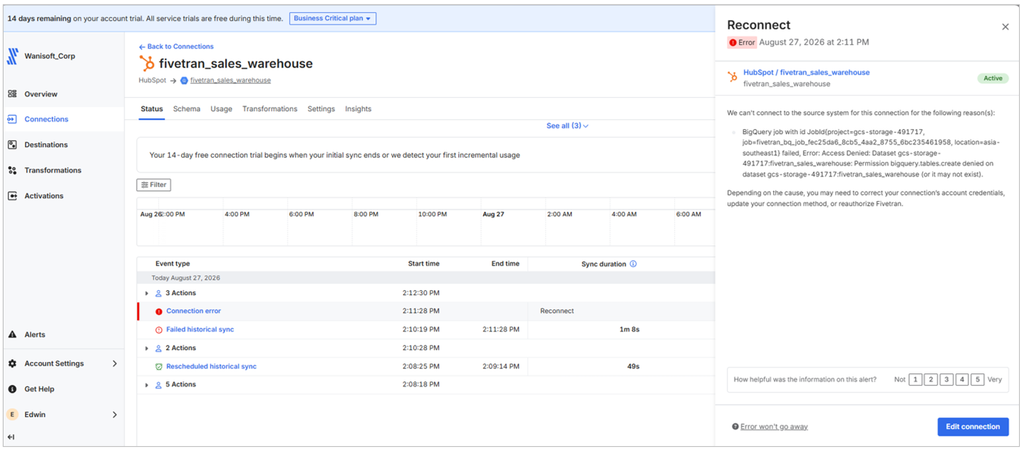
From the looks of it, I can tell that it’s a permission problem. I went back to the Google Cloud console. Then, I accessed IAM & Admin -> Service Accounts -> Permissions to give a BigQuery Data Owner permission to create tables.
After that, it’s good. See below:
PostgreSQL to BigQuery did well too. See the following stats below:
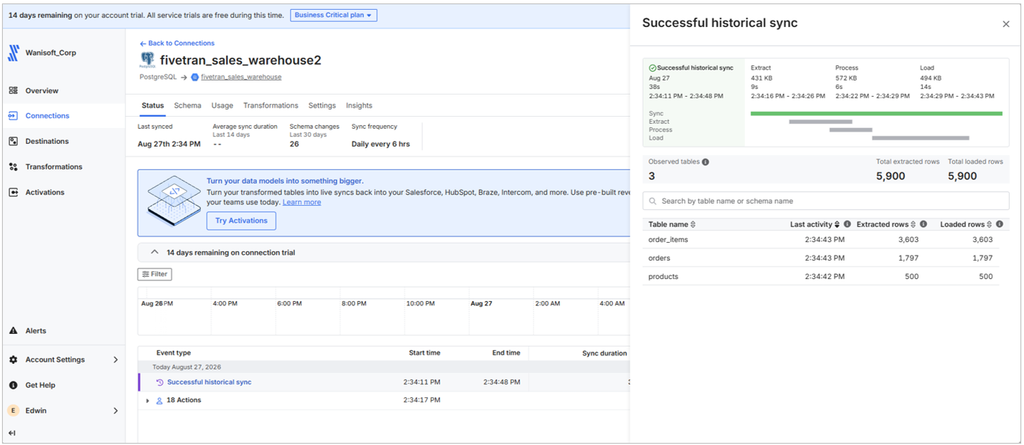
Results in Snowflake
Are there really rows in Snowflake that Fivetran processed?
Below is the replicated HubSpot contacts. Fivetran also flattened the JSON columns in HubSpot for query convenience.
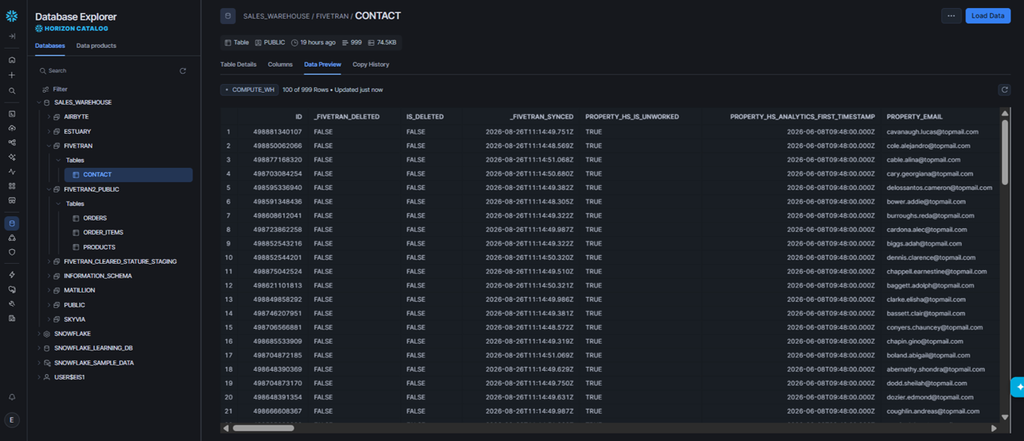
Fivetran loaded HubSpot contacts in our intended schema (FIVETRAN). But the PostgreSQL tables were not there. Instead, it created a FIVETRAN2_PUBLIC schema, which is based on the destination schema name fivetran2.
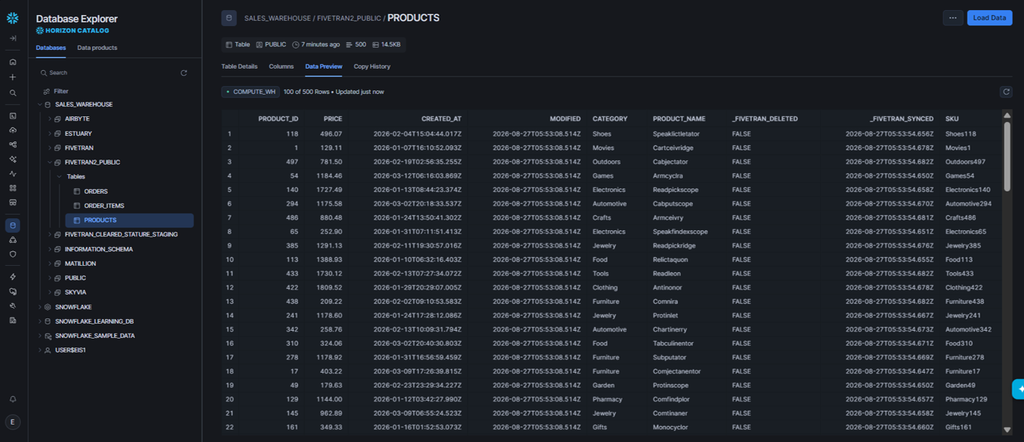
Now, take a look at the products table. It’s in FIVETRAN2_PUBLIC schema. Before the schema changes in PostgreSQL, these were replicated: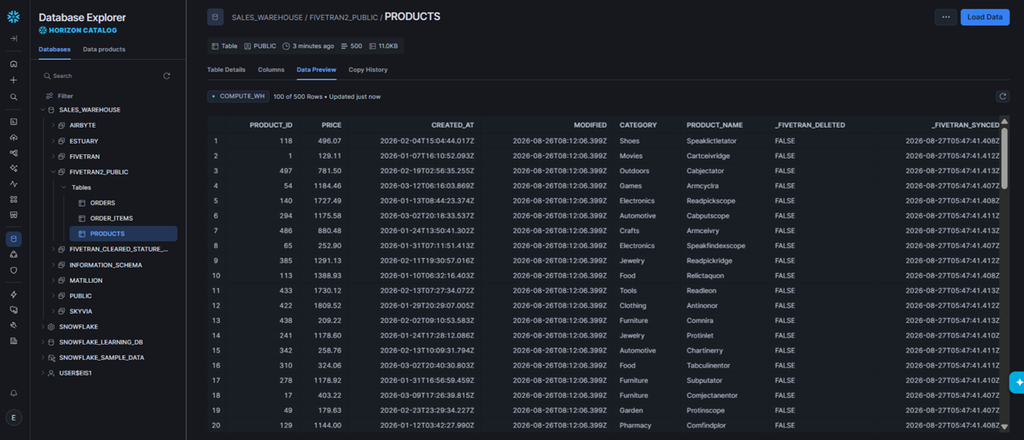
No sku column is present.
After the schema changes, it’s there in the rightmost column. No manual intervention happened in the pipeline.
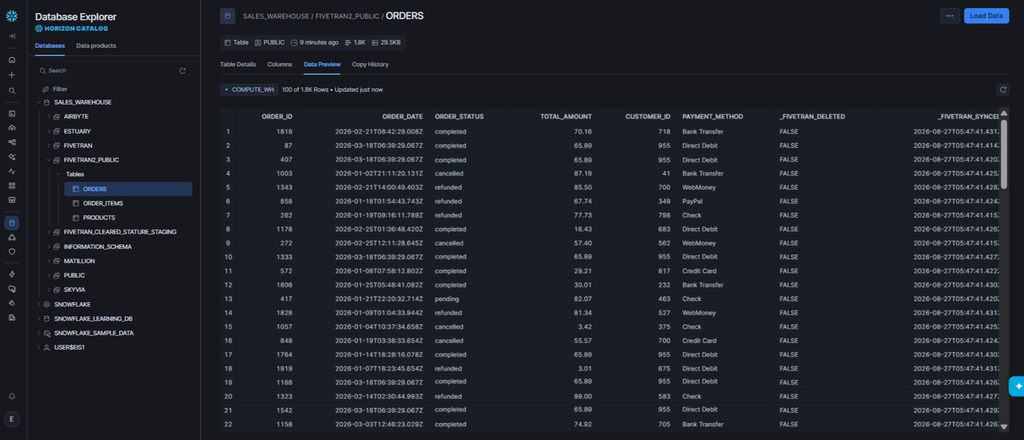
Below is a data preview for the replicated orders table:
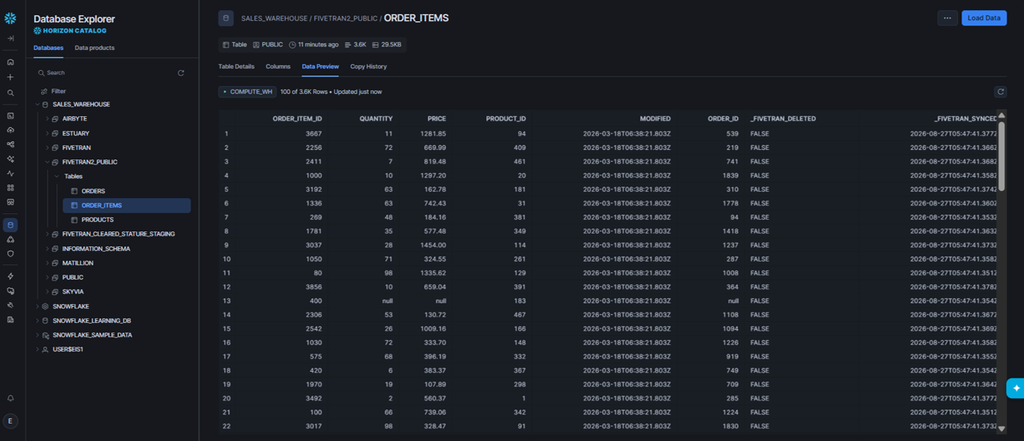
And finally, for the order_items table:
Results in BigQuery
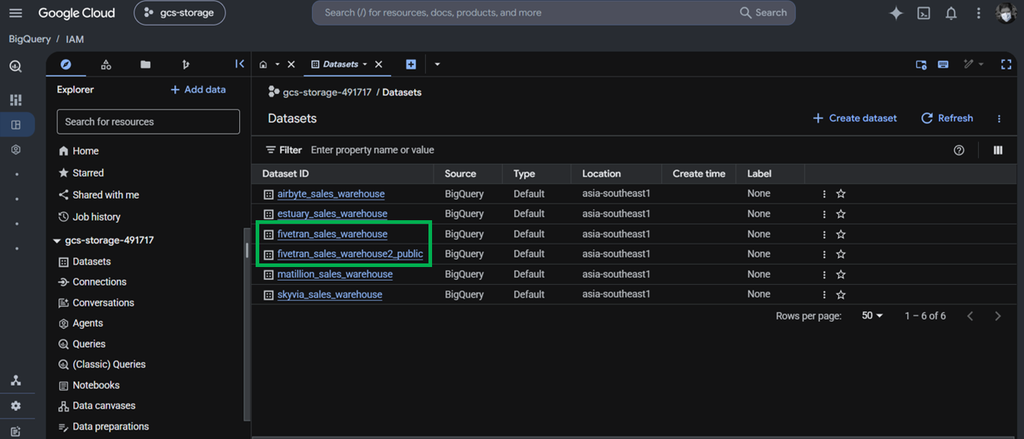
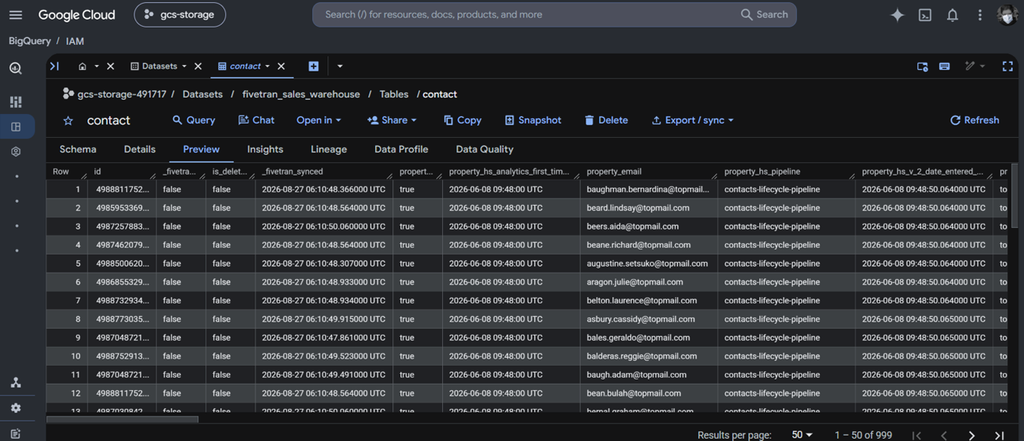
Below is what happened after Fivetran replicated the data from HubSpot and Snowflake. There are 2 datasets, one storing HubSpot data and the other for PostgreSQL.
First, let’s have the replicated HubSpot contacts. All 999 contacts accounted for:
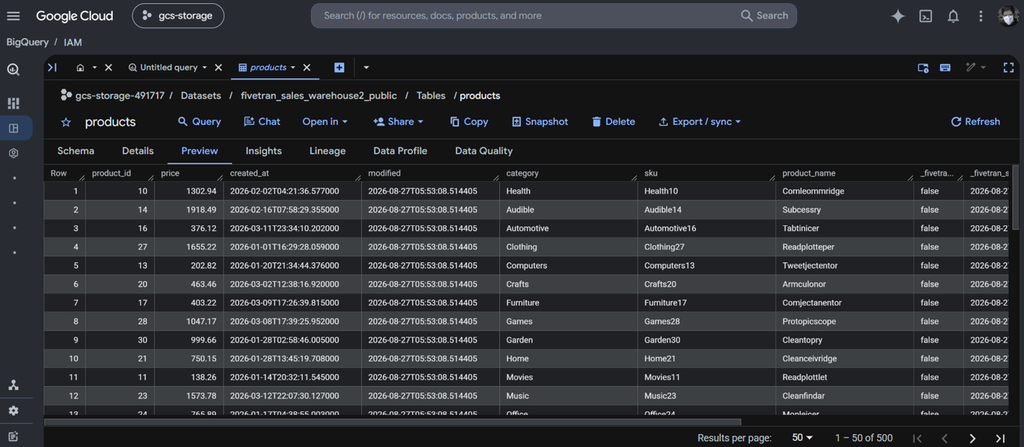
The 500 products are also there:
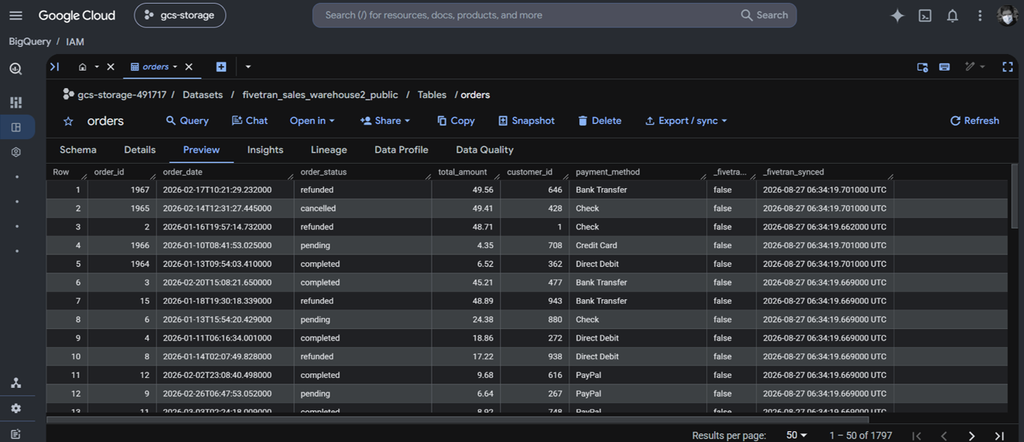
And the 1797 orders:
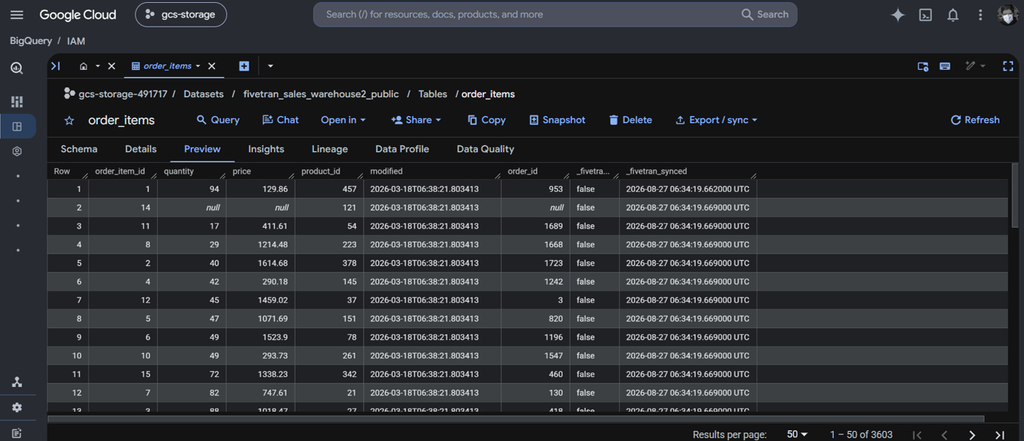
Finally, the 3603 order_items:
That ends the Fivetran tests. The Pros and Cons below do not relate to the test, but to the product features.
Pros
- 900+ pre-built connectors.
- Automatic schema-change handling.
- High-throughput database extraction powered by HVR CDC.
- End-to-end integration with Census (Fivetran Activations) and dbt Labs.
Cons
- March 2025 shift to per-connector MAR billing significantly raised costs for multi-source setups.
- $12,000/year minimum contract commitment locks out smaller budgets.
- Configured connectors are not reusable across different pipelines.
- The user interface may be okay for developers, but quite intimidating for non-technical users.
Why Choose Airbyte for Open-Source Infrastructure Control?
If you need to run pipelines within your own infrastructure because of compliance, you may want an ETL tool you can run within that environment. And if you want more control through coding and scripting, an open-source ETL tool supported by a large community can be a good choice.
I’ve tried Airbyte before. I tried it with Airbyte Cloud, Airbyte OSS/Core, and PyAirbyte. Airbyte Cloud requires registration. Airbyte OSS needs installation, and this makes my Linux Mint and Ubuntu VMs hang. The most attractive one as a developer is PyAirbyte. I think you will agree with me too.
PyAirbyte doesn’t need Airbyte Cloud account and an installed Airbyte OSS. Just Python, Docker, and Visual Studio. So, after you meet the requirements and created an environment for your project:
> pip install airbyte
> pip install dotenv
That’s it. Then, I started coding.
Best for
Companies with technical and developer teams who want full control of their pipelines with a range of options. They can go for a no-code solution with Airbyte Cloud, or install their own Airbyte instance in their preferred infrastructure with Airbyte Open Source. Or even have more control with coding in Python using PyAirbyte or the Airbyte API.
Companies that fully support open source solutions will find Airbyte attractive.
Rating
There are a few developer and user reviews compared to other ETL tools.
- G2: 78 reviewers rated 4.4/5
From G2, referring to Airbyte Cloud: “Users consistently praise the product for its ease of use and flexibility in integrating data from various sources….However, some users note that certain connectors can be buggy, which may require additional troubleshooting.” - Capterra: no reviews yet.
Pricing Deep Dive
Pricing in Airbyte depends on the Airbyte option you choose.
- Free: for PyAirbyte and Airbyte Core/OSS. Only the software is free. Infrastructure and developer costs are not included.
- Paid: for Airbyte Cloud. Pricing plans include Standard, Plus, and Pro, using capacity-based pricing. You need to contact sales for a tailored quote. For more details, visit the Airbyte pricing page.
For this test, I just downloaded the Python libraries, used free Docker, and free Visual Studio Code. Development price is another story because this test took the longest of all the ETL tools here.
What Does Building a Data Pipeline Look Like in Airbyte?
For this testing, I used Visual Studio Code. Docker needs to be installed and running because the connectors will run in default Docker images managed by Airbyte.
Pipeline Setup Difficulty: 5/5 (Coding in Visual Studio Code using Python and PyAirbyte)
Time to Launch: 3 working days or 24 hours, where 16 hours is for debugging and fixing.
Building the Pipeline in PyAirbyte
I created a folder on my laptop for this new Python project in Visual Studio Code, and I created a new environment. After installing the Airbyte and dotenv packages, I made the .env file for the configurations. They include all parameter settings to successfully connect to HubSpot, Neon Postgres, Snowflake, and BigQuery.
Below is a sample without the actual values:
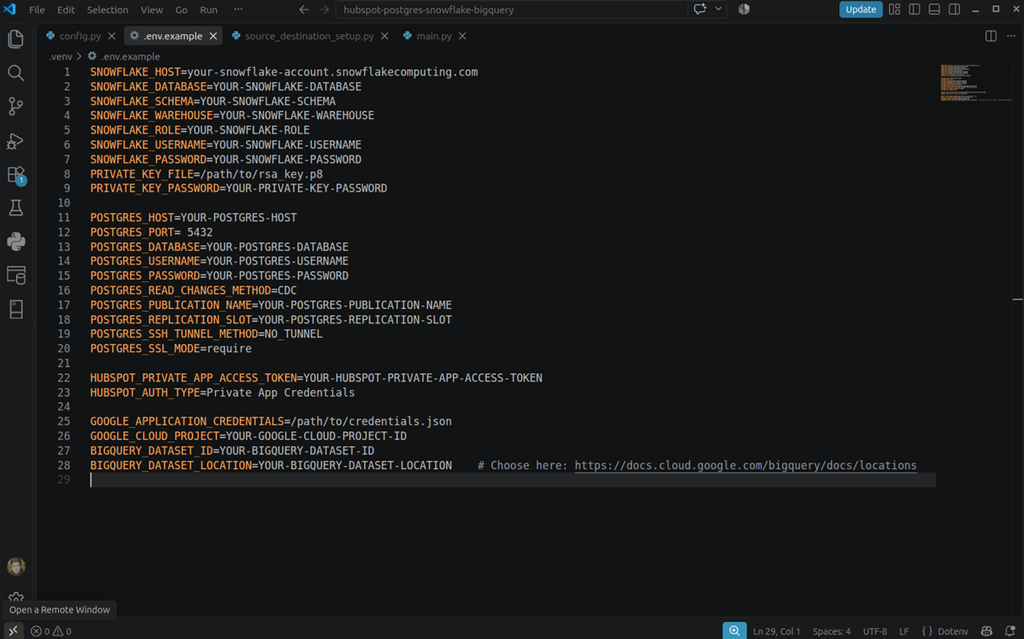
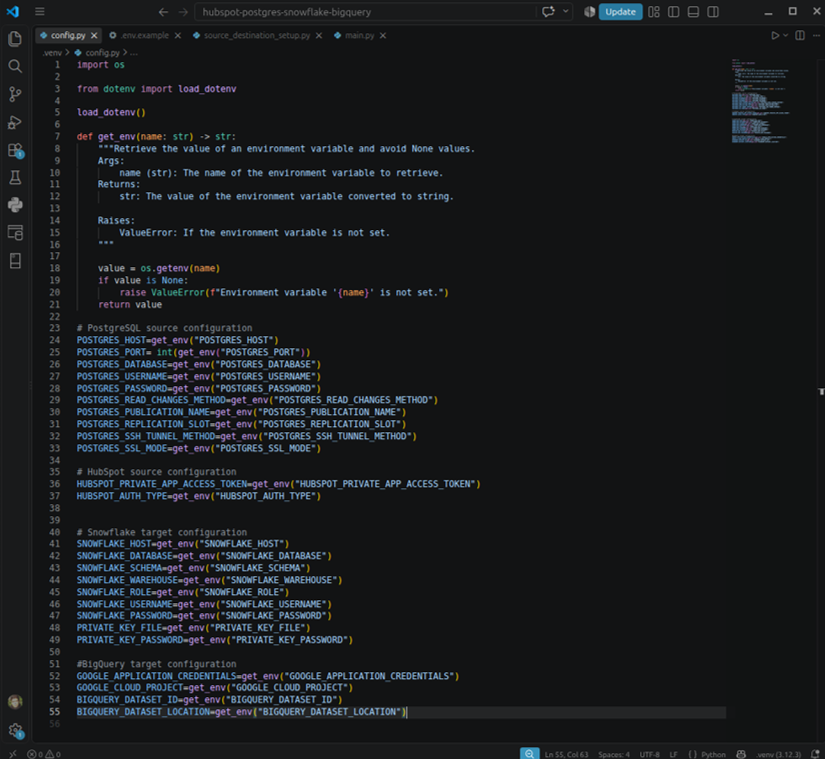
Then, I have to load those environment values using dotenv and assign each value to a Python variable.
Then, I prepared the source connectors with config.py imported
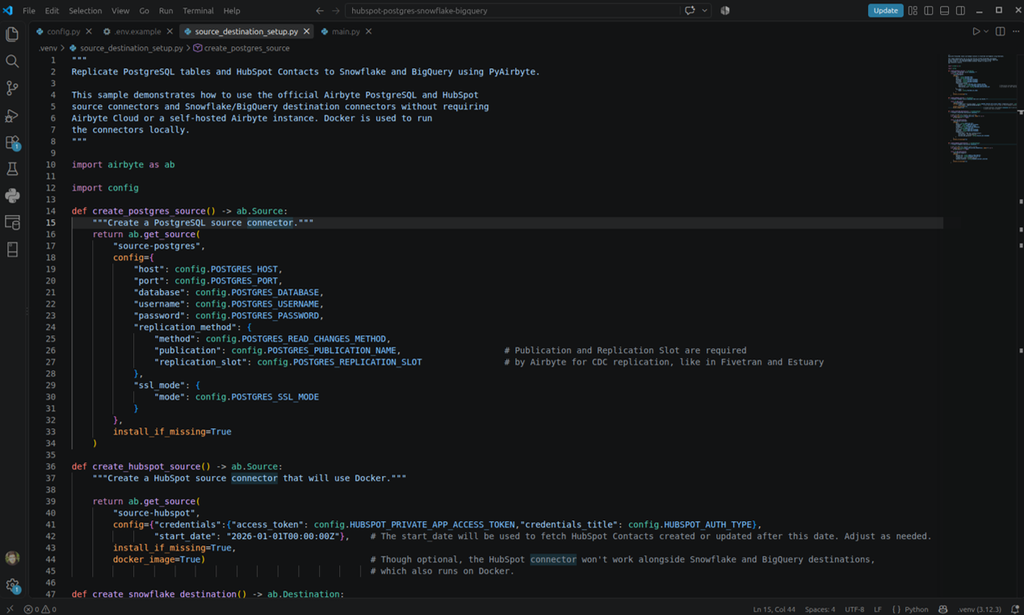
As you can see, those are the same parameters the other ETL tools needed. The only unique to PyAirbyte is the:
install_if_missing = TrueThis will install the connectors, if it’s not already present.
There’s also a special setting for HubSpot:
docker_image = TrueBy default, Snowflake, PostgreSQL, and BigQuery run on default Docker containers. HubSpot is not, so this has to be set, or an error will occur. This took me 2 working days to figure out because the error says nothing about Docker. You will see it in a screenshot later.
Meanwhile, below is the code for setting the destinations:
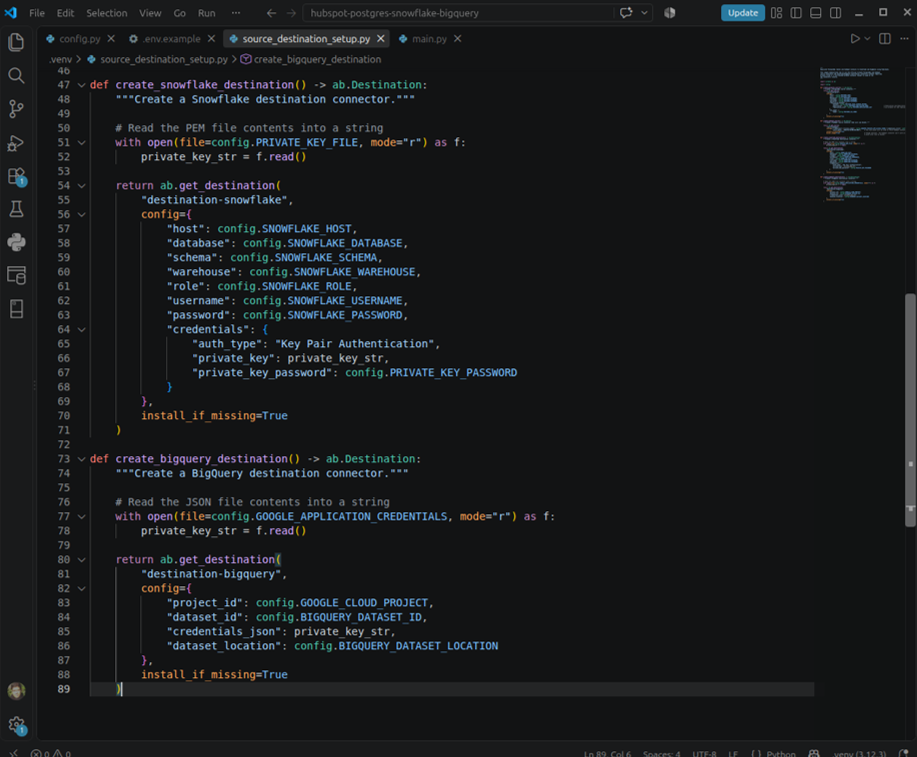
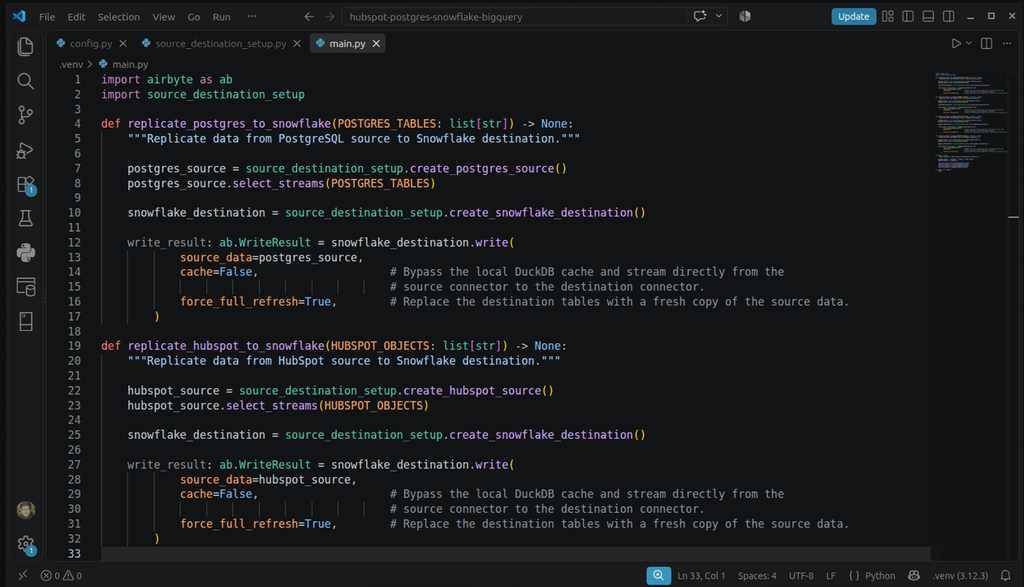
Then, the following will be the actual replication code from HubSpot and PostgreSQL to Snowflake:
And then going to BigQuery:
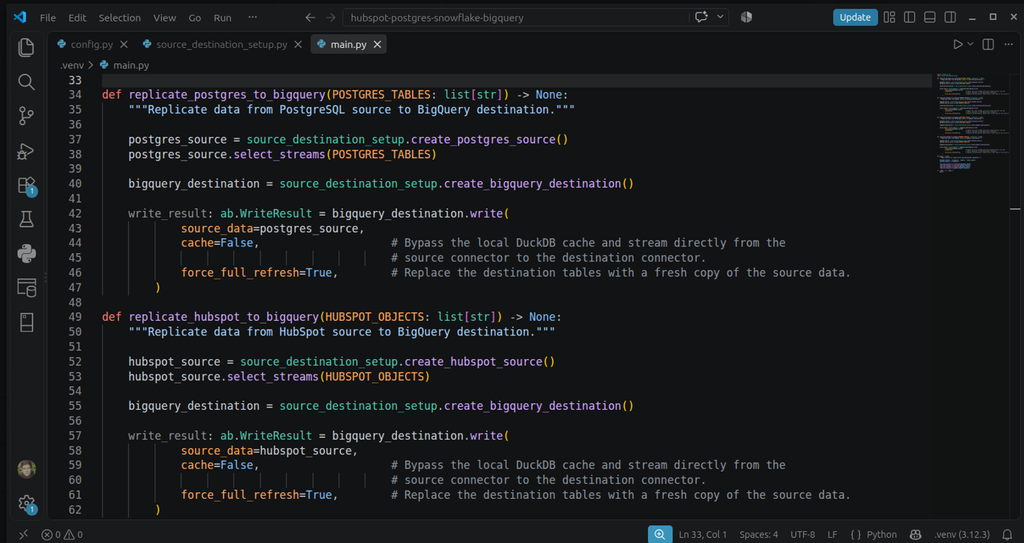
All destination setups avoid DuckDB caching (cache=False) and force full refreshes (force_full_refresh=True).
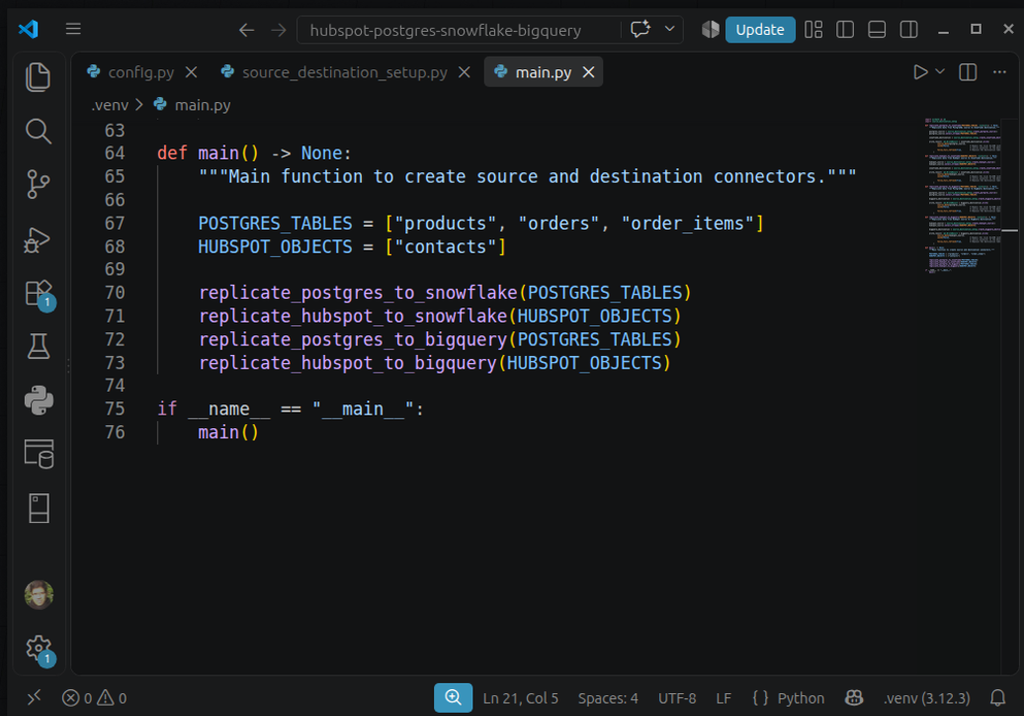
Below is the main function that acts as the orchestrator:
Runtime Results
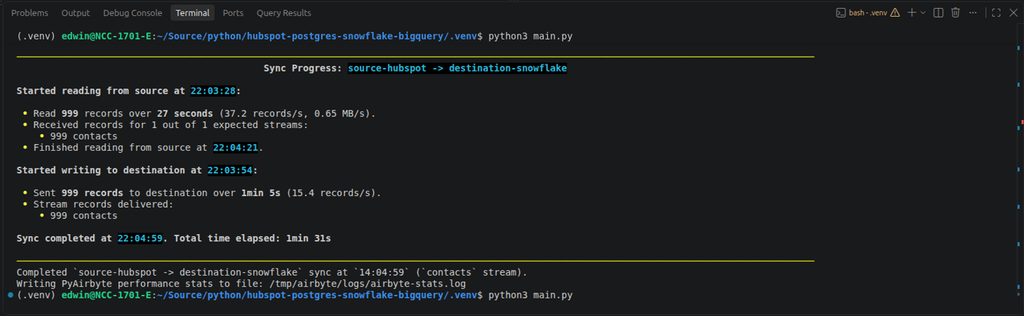
I will show you the output from my Visual Studio Code Terminal. Note that the processing progress is within the PyAirbyte library. There’s no need for Python prints.
Below is the HubSpot to Snowflake. It took the initial sync 1 minute and 31 seconds:
Then, PostgreSQL to Snowflake. Initial sync took 1 minute and 2 seconds.
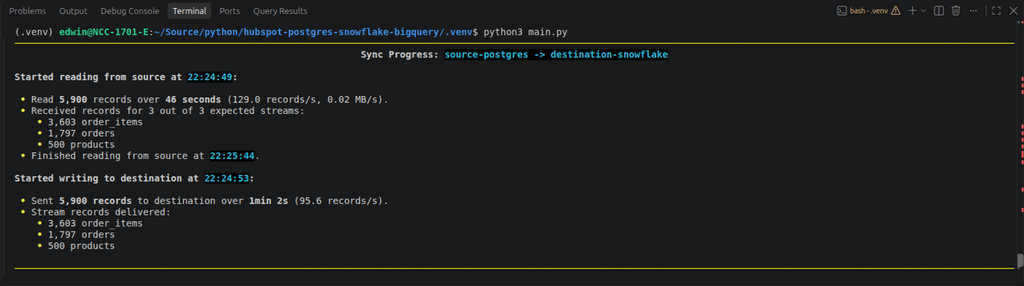
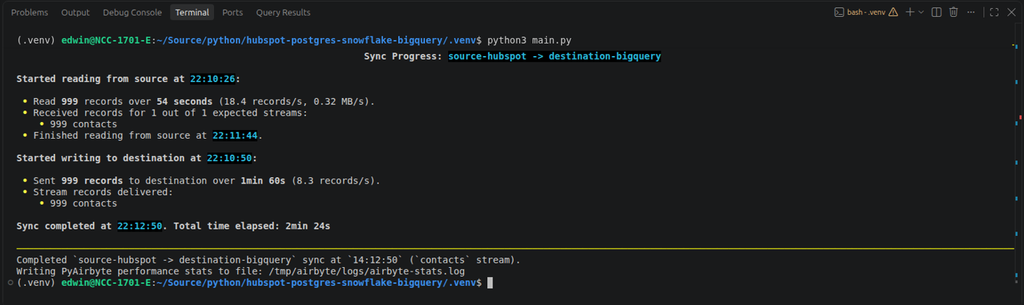
Also, HubSpot to BigQuery. This one took 2 minutes and 24 seconds:
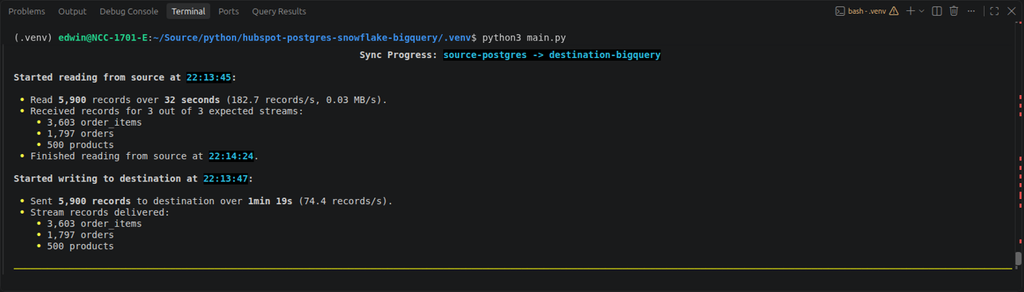
And finally, PostgreSQL to BigQuery (1 minute and 19 seconds):
Note that it ran in a Linux Mint VM with 6 CPU cores and 16GB of RAM.
The runtime error when docker_image=True is not explicitly set: Config validation error: ‘credentials’ is a required property.
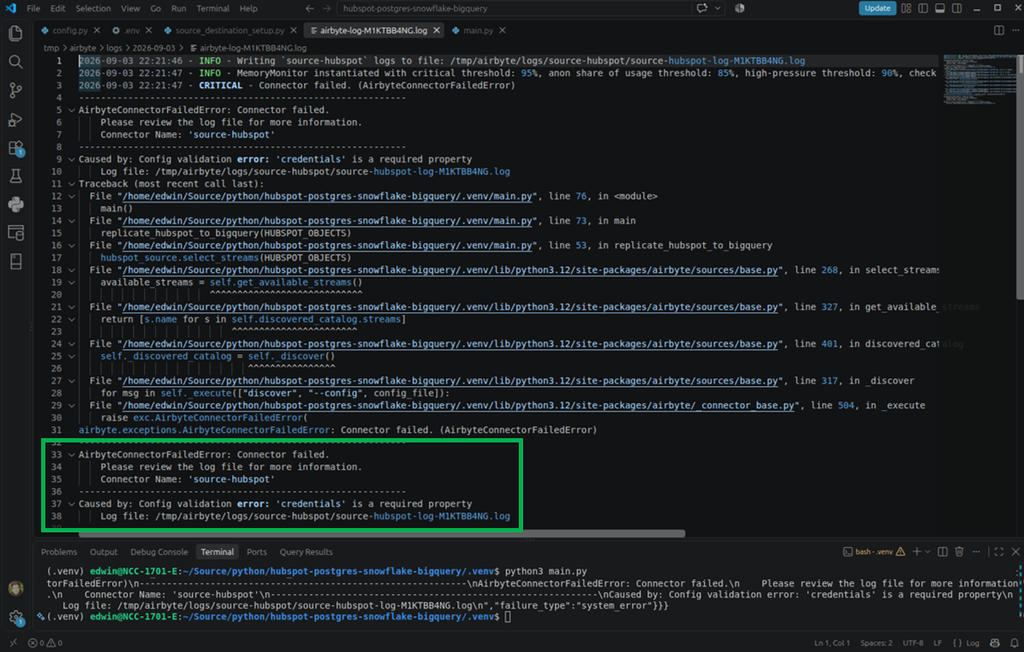
This made me think that my credentials format is malformed, but it’s not after checking the documentation several times. After much thought, I concluded that I’m missing a configuration. It proved to be true.
Do you want to try this yourself? You can clone my GitHub repo here -> https://github.com/eisanchez1/hubspot-postgres-to-snowflake-bigquery-pyairbyte-sample.
Results in Snowflake
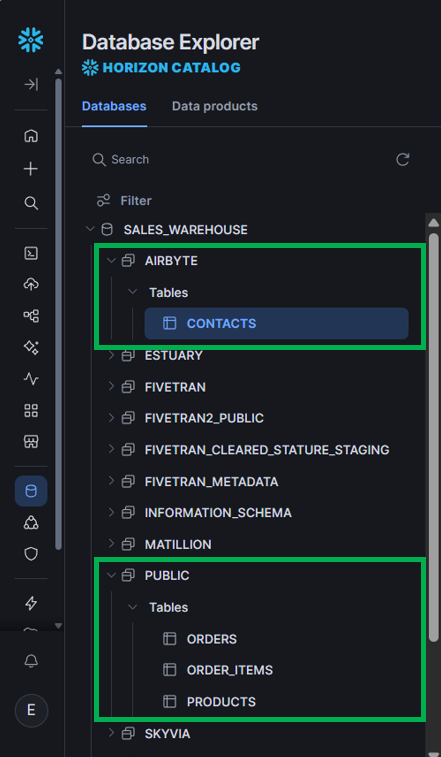
First, Airbyte didn’t write all the tables in the AIRBYTE schema. Only HubSpot contacts are there. Instead, it followed the schema name from source, which is public in PostgreSQL. See the resulting structure below:
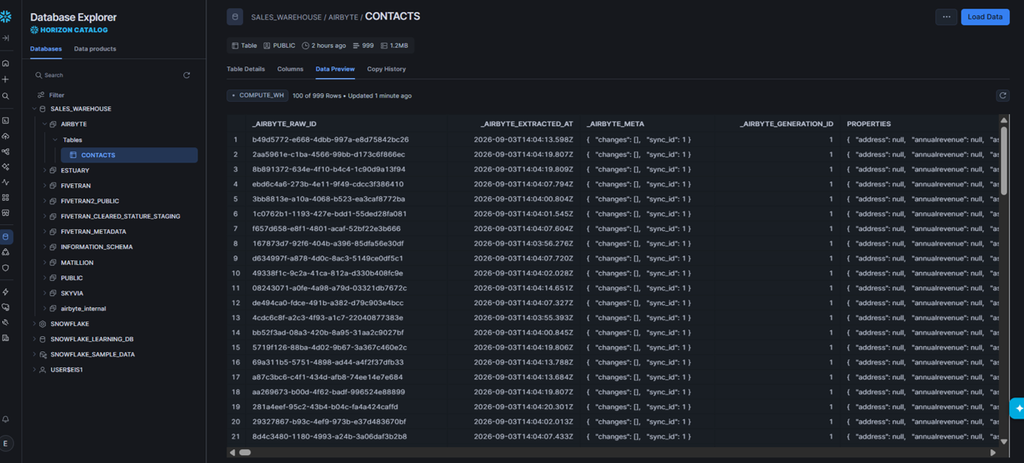
Notice the output in replicated HubSpot contacts below. The Properties column contains the raw, unflattened JSON values from HubSpot.
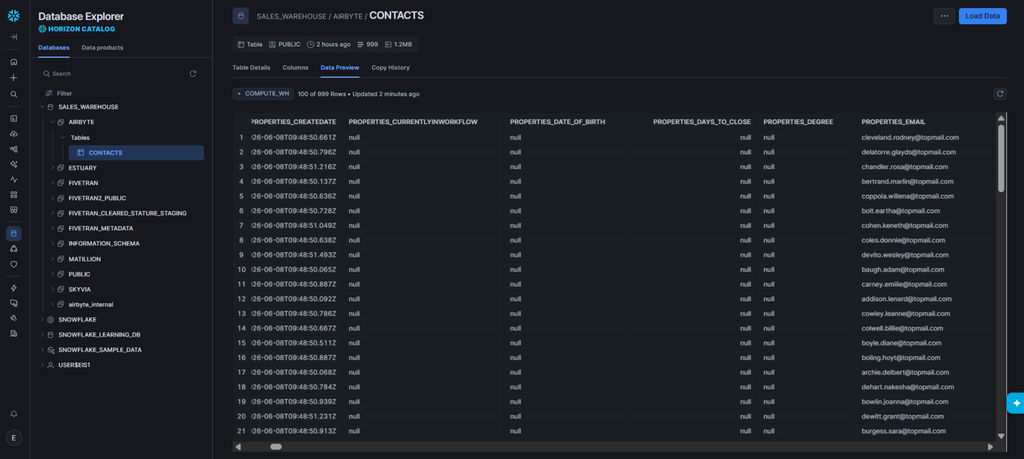
Scrolling to the right, it also has a flattened version of the essential columns. So, this means that Airbyte chose a balance between querying convenience and flexibility in logical schema changes. Email, for example, is one of the columns you don’t need to flatten and it’s an important one for contacts. However, if there are changes in the logical structure of the JSON properties column, Airbyte will capture them.
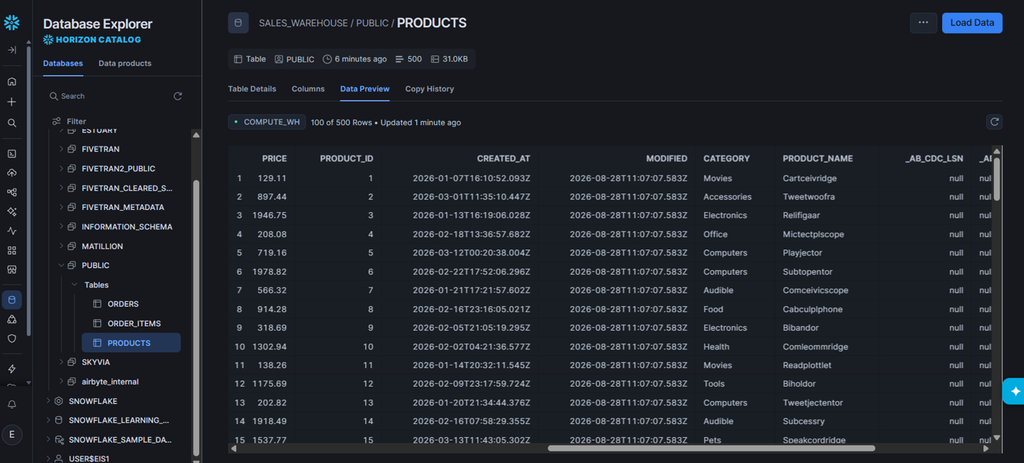
Meanwhile, below is data preview prior to the schema change in the products table:
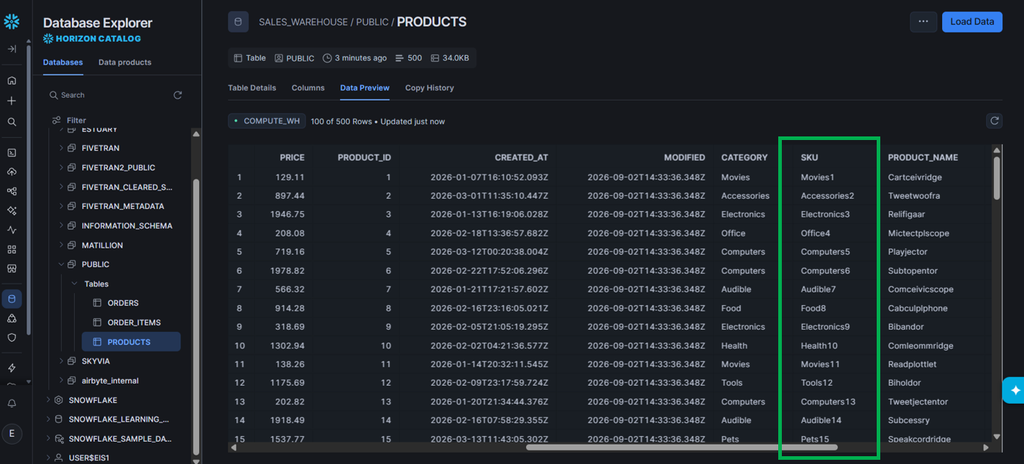
Airbyte handled the schema change without changing the pipeline code. See the sku column below:
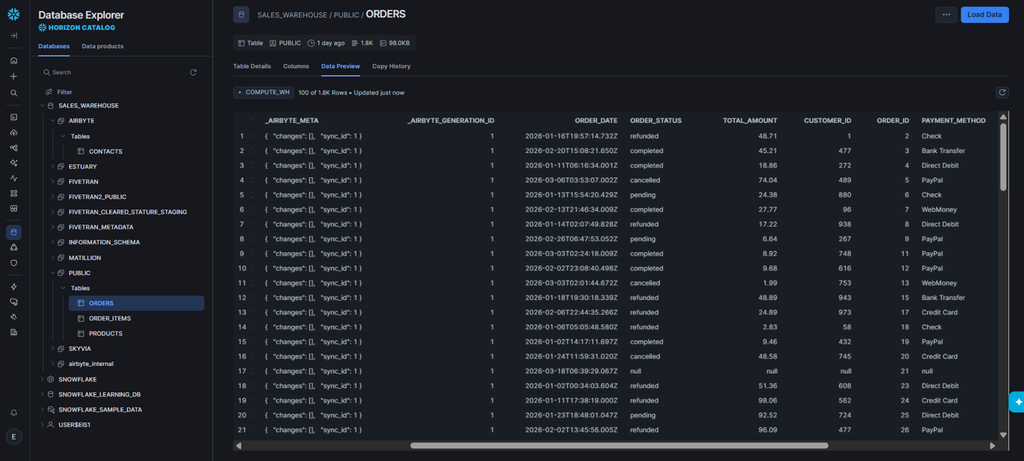
In addition, here’s a preview of the replicated orders table:
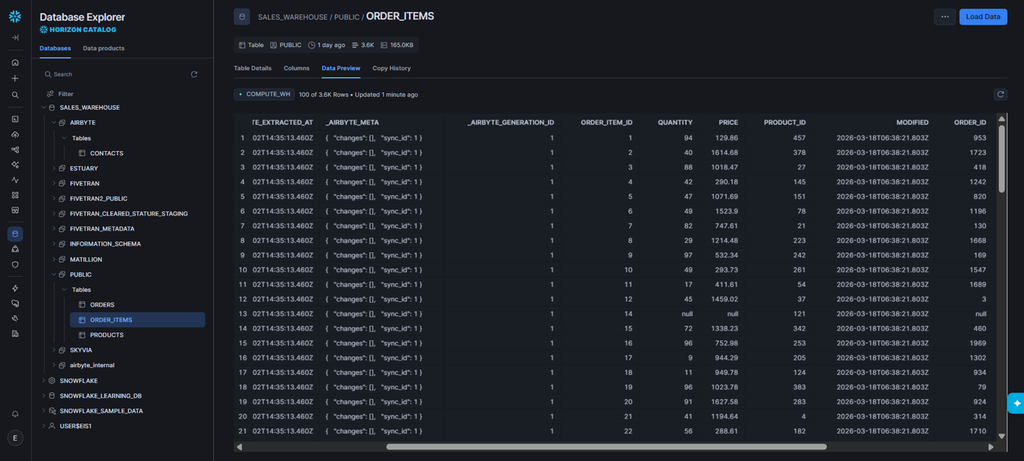
And the order_items table:
Results in BigQuery
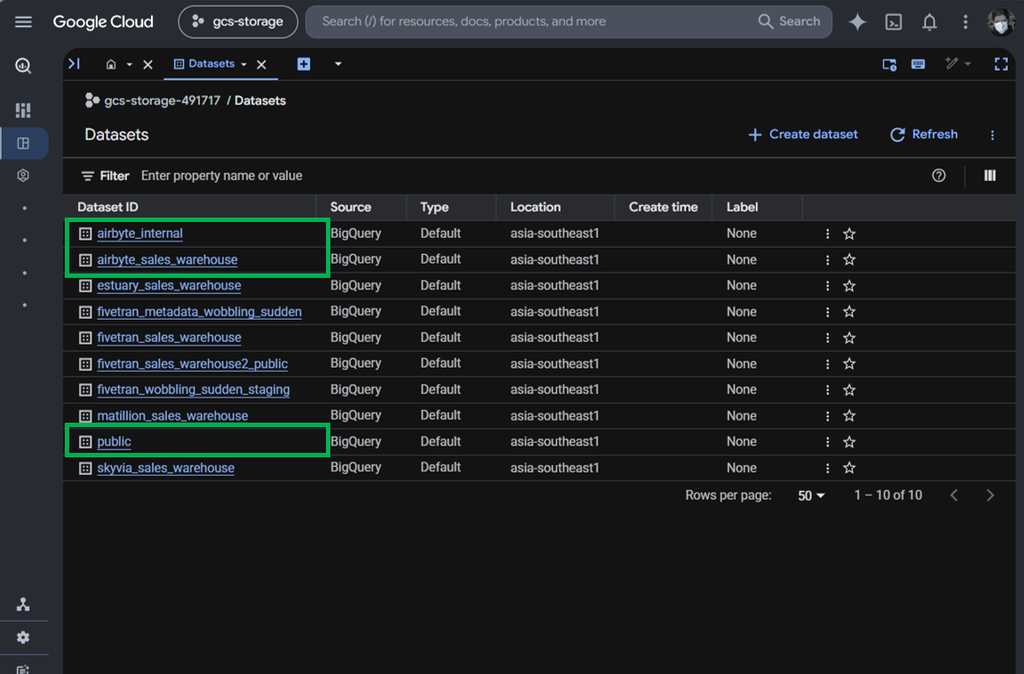
Since Airbyte follow the source schema name, there is now a public dataset in BigQuery. There’s also the airbyte_internal which is a staging area.
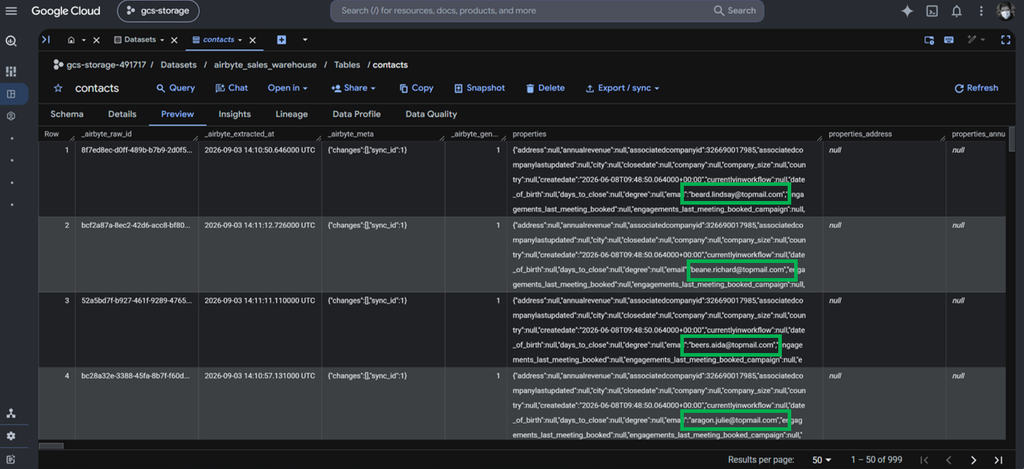
BigQuery has a better preview of JSON columns. Below is a preview of the replicated HubSpot contacts. The email addresses are visible there:
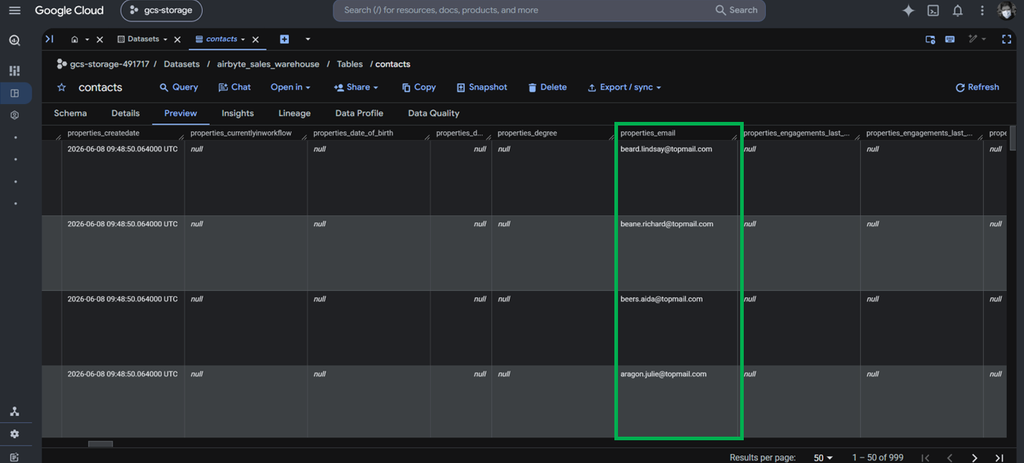
The flattened versions are similar to Snowflake, as you can see below:
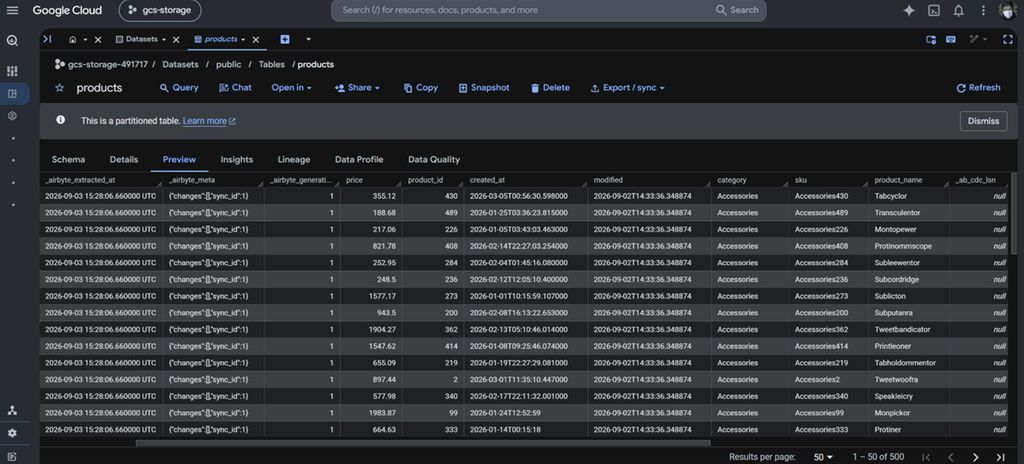
Then, here’s a preview of the products table:
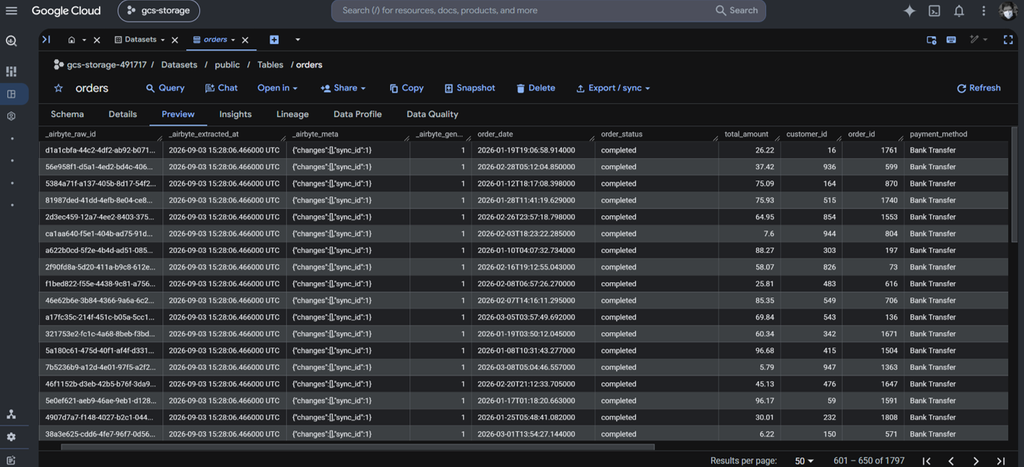
And the orders table:
And finally, the order_items table:
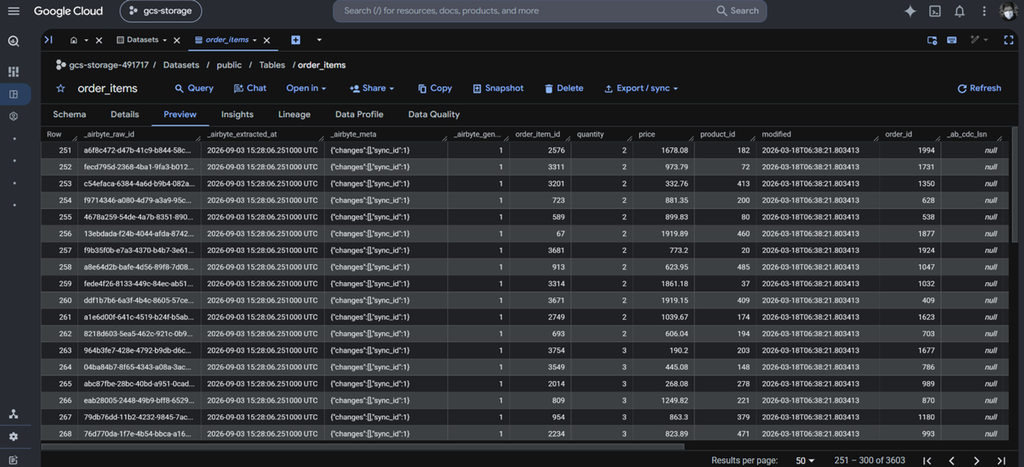
All row counts in Snowflake and BigQuery are the same compared to the source.
That ends the testing for Airbyte using PyAirbyte. Below are general Pros and Cons related to Airbyte Cloud, Airbyte OSS, and PyAirbyte.
Pros
- Complete open-source code control and air-gapped deployment option, good for HIPAA/GDPR control.
- Vast library of community-maintained connectors.
- Easy connector development framework for custom internal APIs.
- No Airbyte account needed using PyAirbyte pipeline development.
Cons
- “Free” self-hosting hides real infrastructure and DevOps costs ($500–$3,000+/month).
- Community-maintained connector quality varies.
- Cloud standard tier limits sync frequency to 1 hour unless upgraded.
- Coding and scripting may require a lot of time.
Why Choose Matillion for Complex Push-Down Transformations?
Matillion can run an SQL script after your source data is loaded in your data warehouse. This is great for transformations running within the compute resources of your data warehouse. However, this will need engineering effort.
Matillion has Maia, it’s agentic AI. It’s upfront when you start your first pipeline project and will assist you until you finish it. I haven’t tried Matillion much, so there’s a little learning curve needed.
Though Matillion excels in pushdown transformation, we won’t test them here to be consistent with the other ETL tools tests.
Best for
Teams who want AI-assisted data pipeline development, along with a drag-and-drop canvas to further configure each pipeline component. Data transformations running on data warehouse compute shines with Matillion.
Rating
What do users say about Matillion?
Pricing Deep Dive
Pricing tiers in Matillion include Developer, Teams, and Scale. There are free trials for each, but there’s no posted price. Though in Capterra, there’s a basic $2 price. Consumption uses Matillion credits, “the smallest unit of charge, consumed when a customer uses a Matillion resource”, based on Matillion’s FAQ.
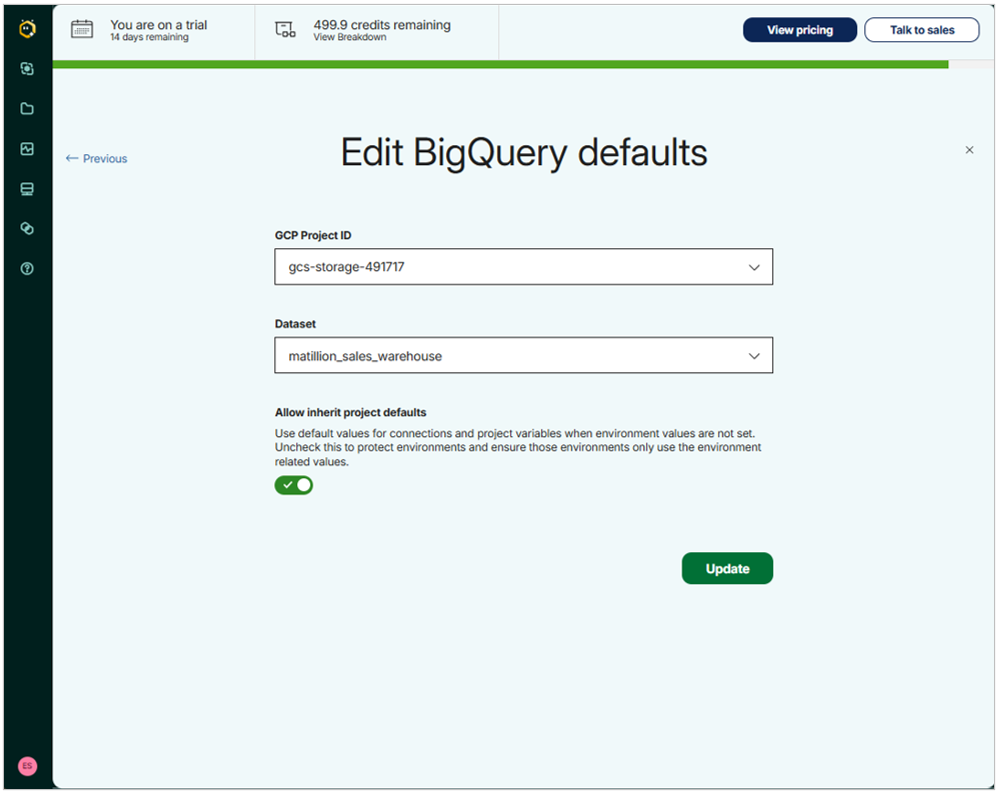
For the tests I made with Matillion, the trial gave me 500 Matillion credits. After the test, the remaining credits is 499.9 as shown below:
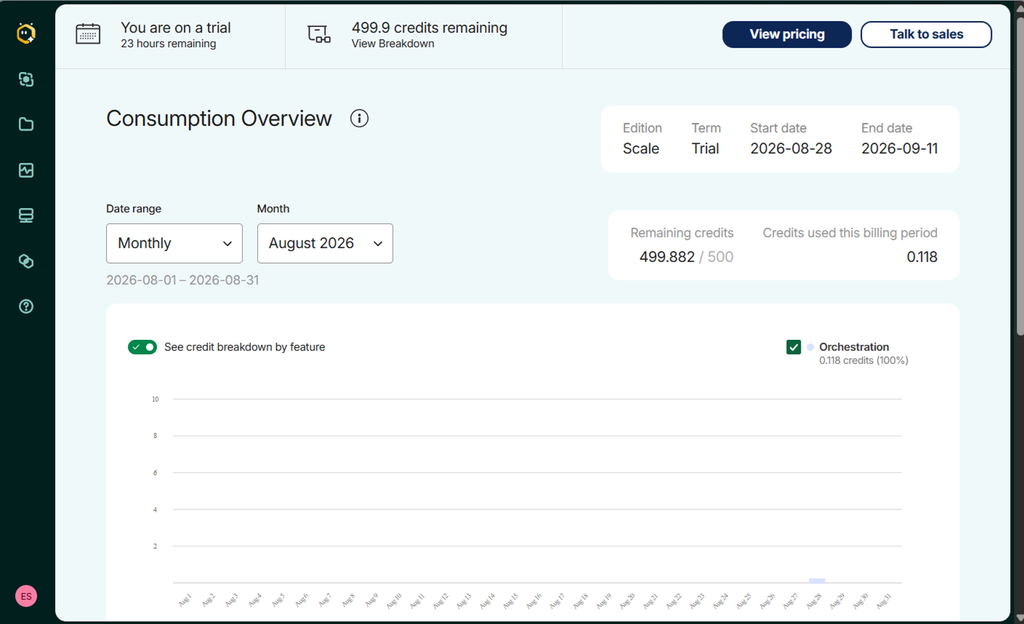
Matillion doesn’t have a free tier.
For more information, visit the Matillion pricing page.
What Does Building a Data Pipeline Look Like in Matillion?
In Matillion ETL, there are projects, and projects have environments. These environments are your data’s destination. Each environment will store secrets like passwords and such, and will have pipelines with configured sources..
Pipeline Setup Difficulty: 3/5
Time to Launch: 60–120 minutes
Workflow Steps
Creating pipelines in Matillion is very different compared to the rest of the ETL tools. You have 2 options: You tell Matillion to create/design a new pipeline, and Maia will guide you, or do it yourself.
I started with Maia, but I find it slow and intrusive, so I told Maia to just show me the form, and I’ll do it myself. That’s my opinion. Others find it helpful and make them productive.
When I finally figured it out, the following are the steps (the “do-it-yourself option”):
- I created a project and create two environments:
- One environment for Snowflake
- Another environment for BigQuery
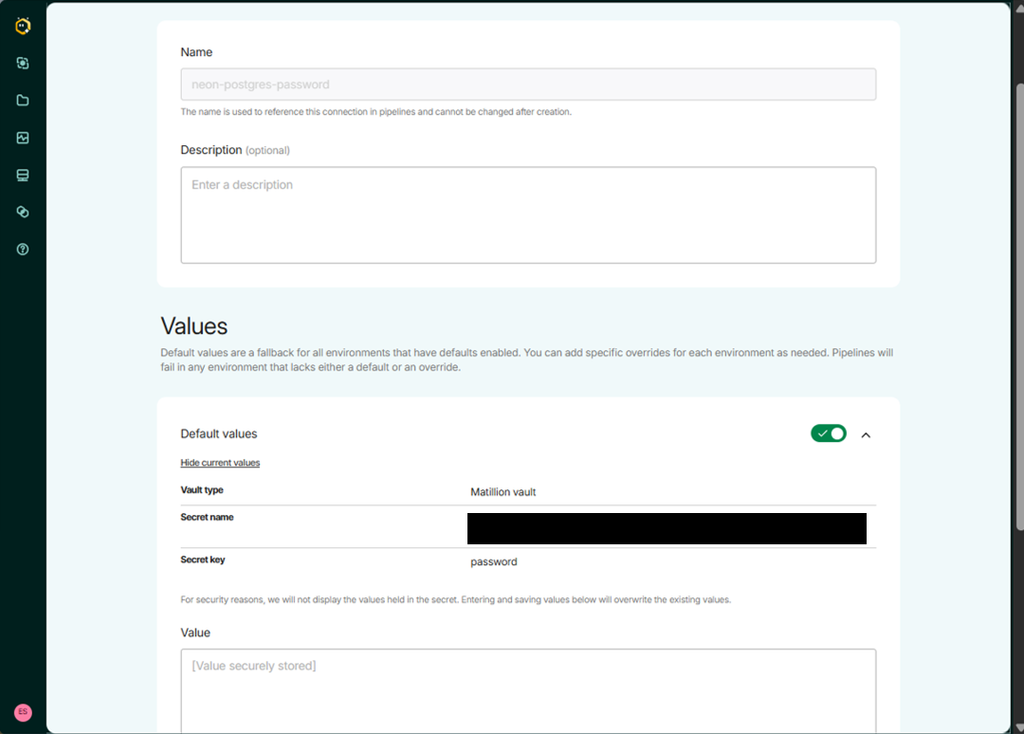
- I created a secret for Neon PostgreSQL password.
- Build the pipelines.
- One pipeline for HubSpot and PostgreSQL to Snowflake.
- Another pipeline for HubSpot and PostgreSQL to BigQuery.
- Run each pipeline to test.
- I run the pipelines manually and I didn’t create schedules. But real batch processing pipelines need one in production.
Connector Configurations
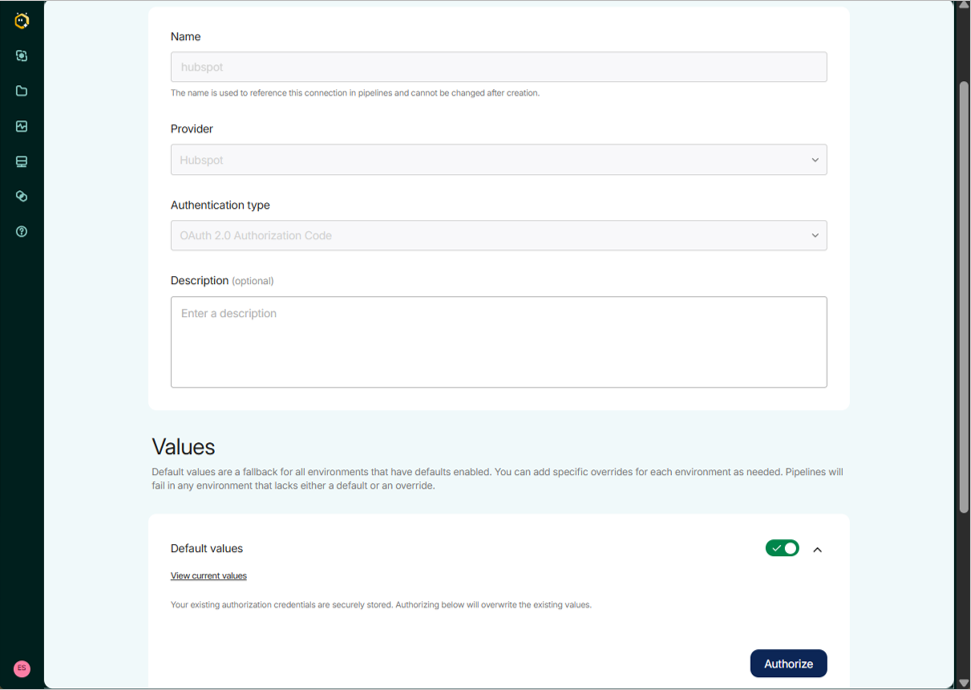
Creating a HubSpot connection is the same as Skyvia. Sign in to HubSpot to get authorization. See it below:
Below is for storing a secret – the Neon PostgreSQL password in the Matillion vault. Note that when you type it, it’s readable. That’s why I covered it. See below:
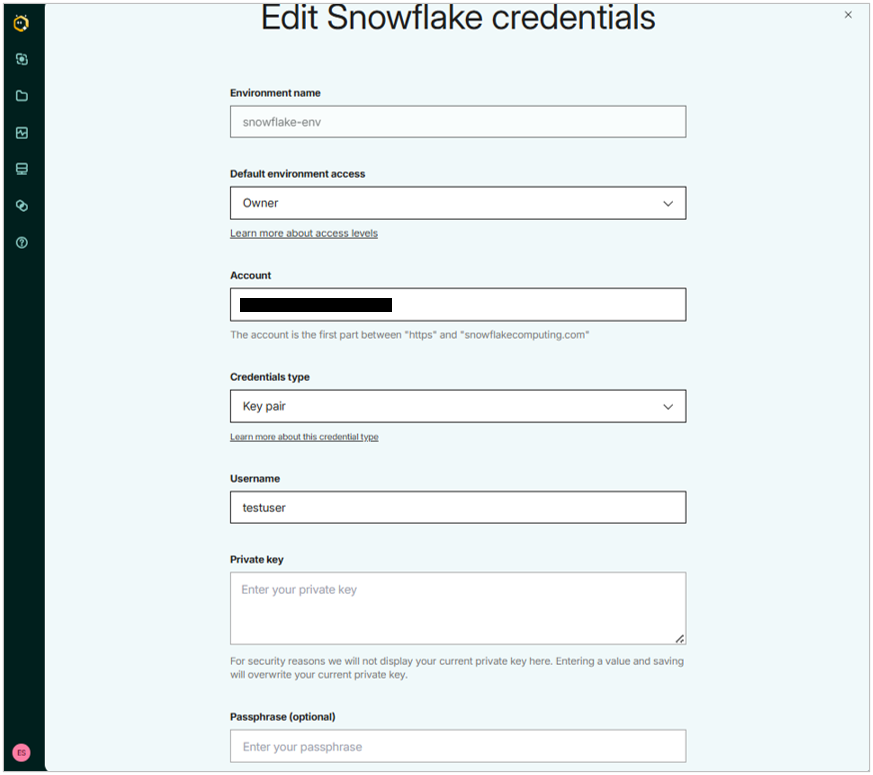
Below is the Snowflake environment. Again, it will use Key-pair authentication, and the private key file is crucial to this.
Meanwhile, below is the BigQuery environment. It starts by asking for the project and the target dataset.
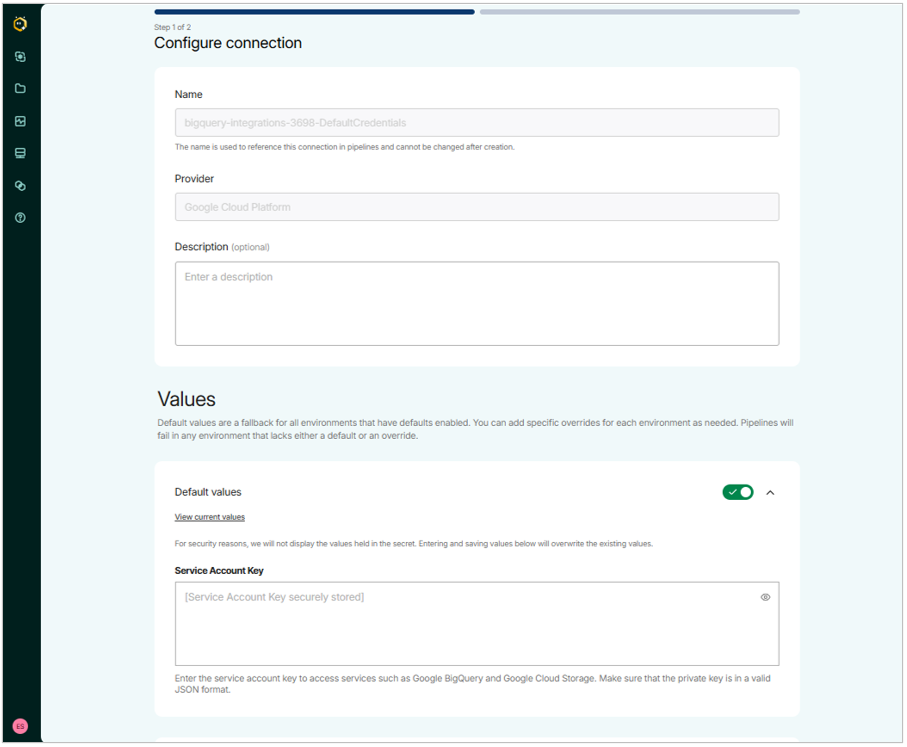
Then, you need the service account key for authentication. It won’t be visible like a password.
Validating the connection caused a permission error at first. It took me a while, but I followed the instructions here, and all went well.
Pipeline Setup
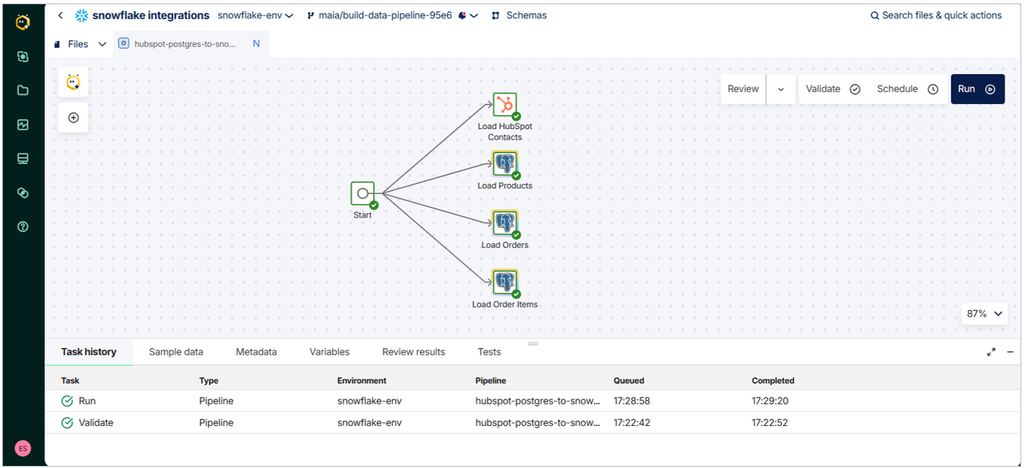
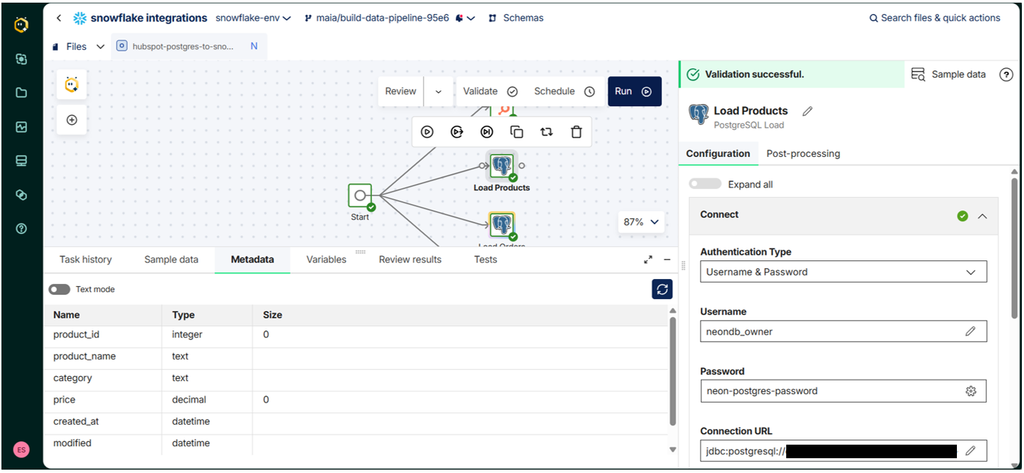
Matillion uses drag-and-drop components. The relevant components here are the Load HubSpot and Load Postgres components. For PostgreSQL, each component defines a source table in PostgreSQL and a target table in Snowflake.
See the canvas below:
Each Load component needs a connection configuration. It uses JDBC to connect to PostgreSQL. See below:
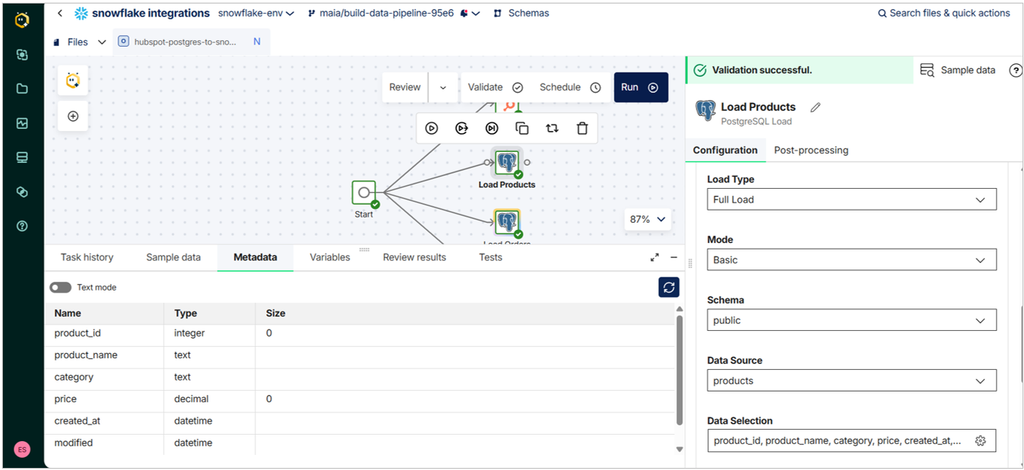
Then, you need to define the source table so the component can find the source data. This includes the table and columns.
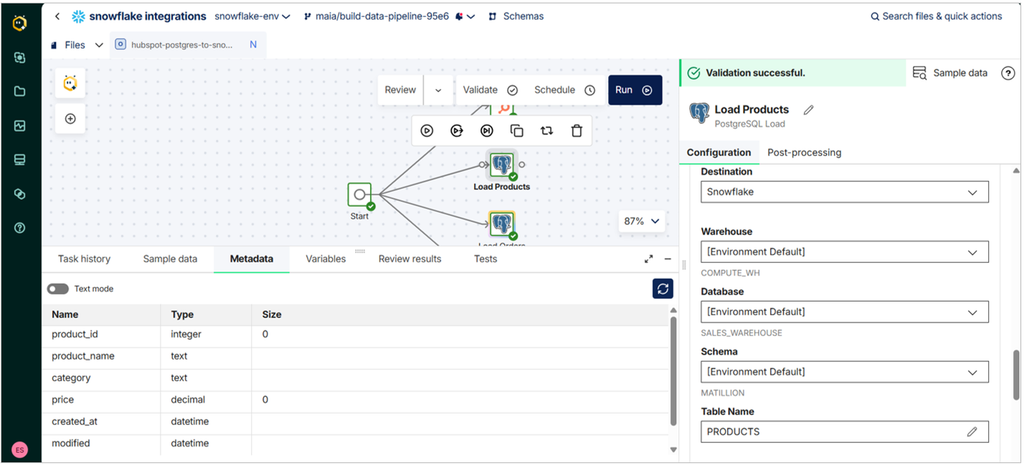
The final part is defining the target table name. The other values will come from the environment settings earlier.
You have to repeat the same for the other 2 PostgreSQL tables:
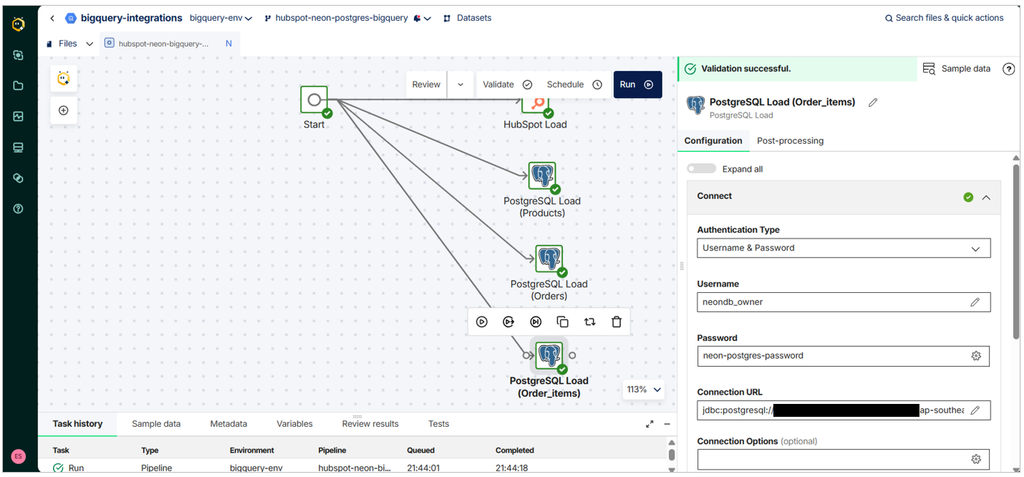
When I realized this, I regretted dismissing Maia’s help because it’s repetitive. The good thing here is I only have 1 pipeline for both HubSpot and PostgreSQL going to Snowflake. The other is for BigQuery. This approach is similar to Skyvia’s Data Flow and Control Flow, but without the repetitive configurations.
Since I’m still new to Matillion, I finished the setup in 2 hours, including finding my way in Matillion and correcting the BigQuery permission error.
Runtime Results
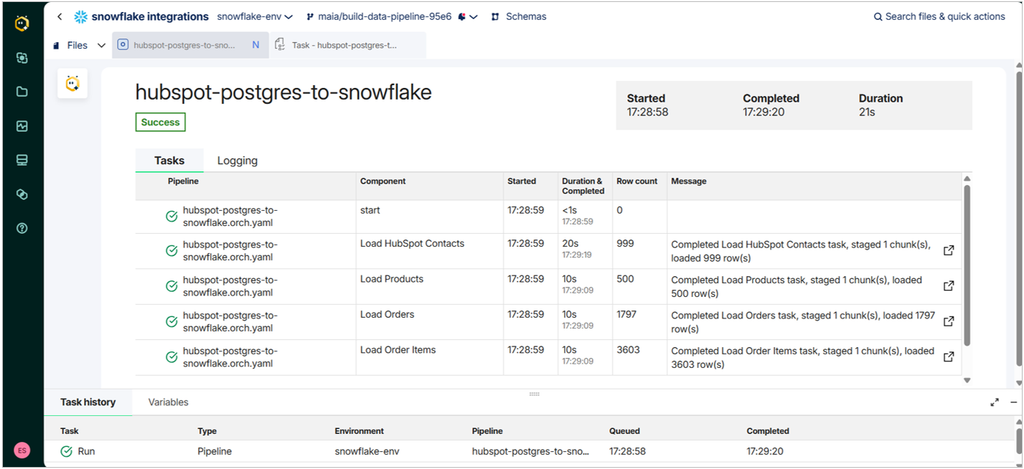
The HubSpot and Postgres sources under the Snowflake environment took 21 seconds for the initial sync. See below:
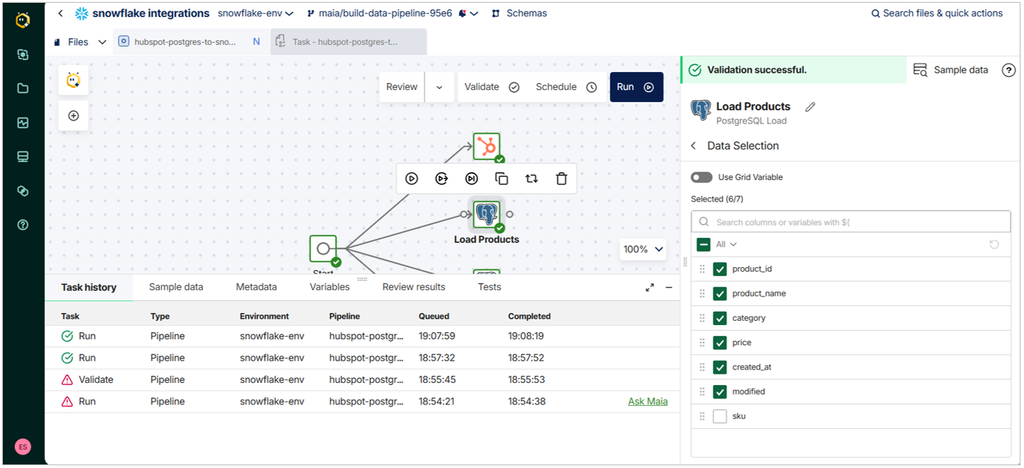
Then, I added the sku column in the PostgreSQL products table and put values in it. Then, I re-ran the pipeline. However, the schema drift was not handled automatically. However, Matillion could detect the new column when I checked it. In other words, the pipeline needs editing. So, I did that, ran the pipeline again, and the new column was reflected in Snowflake.
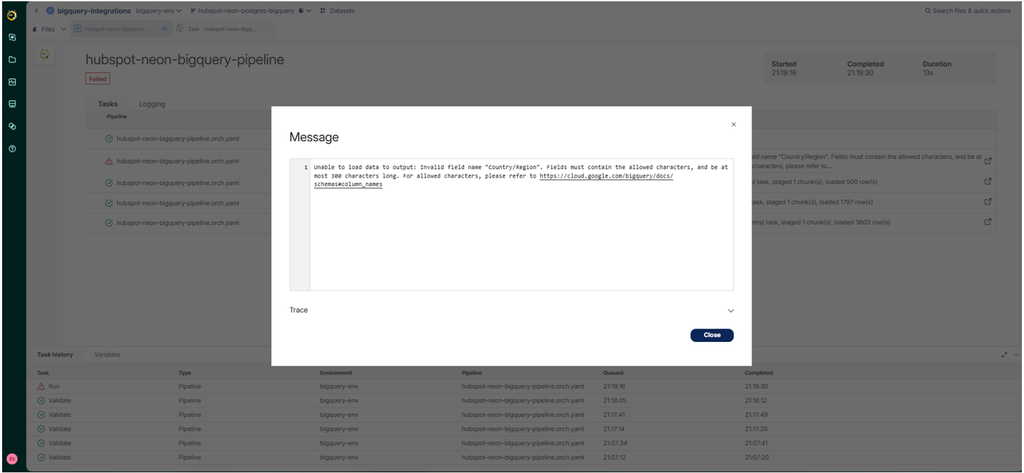
There’s a different story with BigQuery. There’s a runtime error. Sadly, Matillion didn’t handle the HubSpot column names with characters like “/” and “&” by default, and BigQuery rejects them. I think it can be resolved using an SQL query and creating an alias for those columns. But my time is short now, so what I did was just remove those columns from the replication.
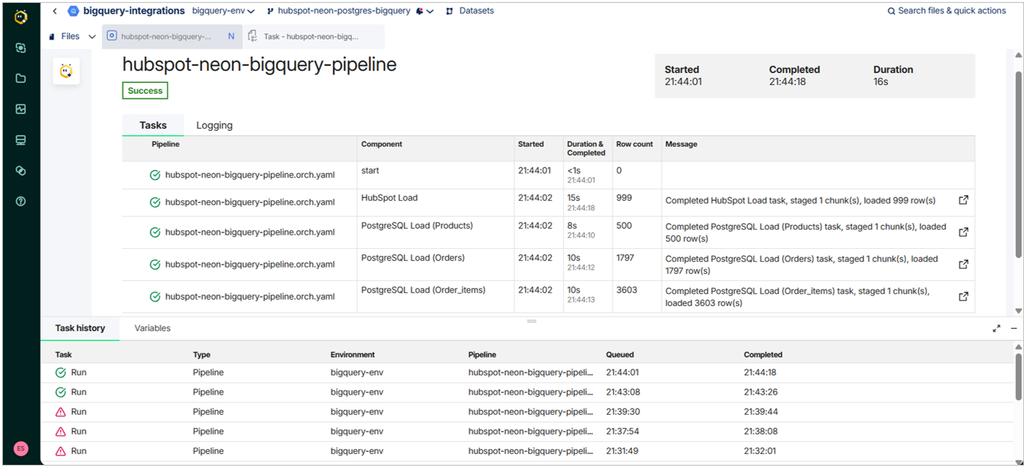
And finally, it ran for 16 seconds.
Results in Snowflake
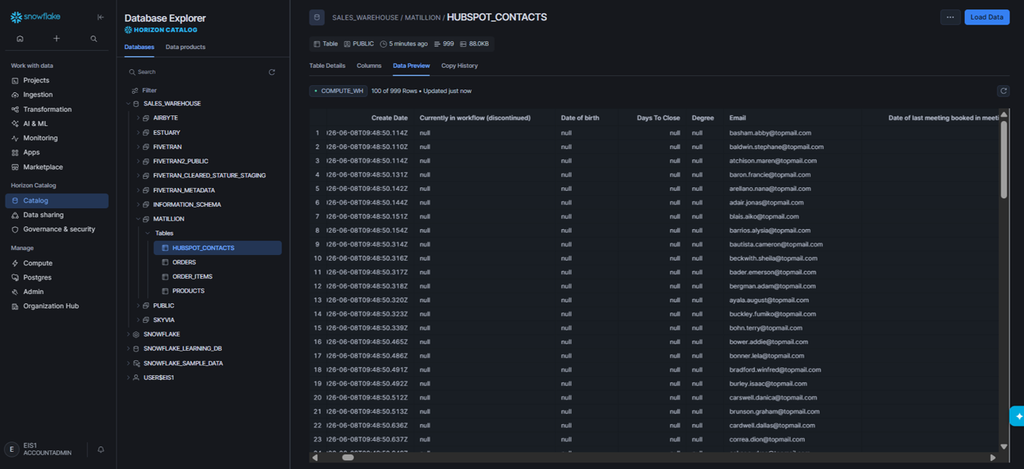
HubSpot contacts in Snowflake have flattened the JSON columns as a result of the Matillion process. See below:
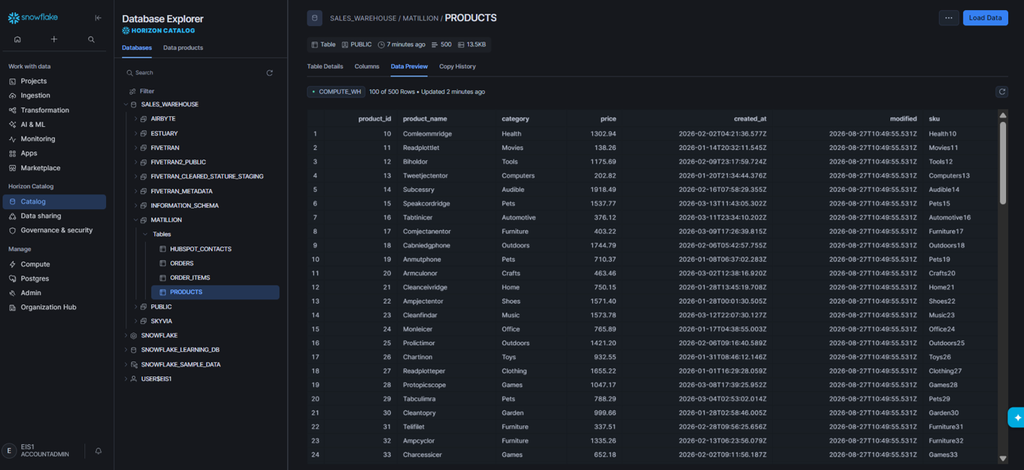
And here is the preview of the products table after the schema change and the manual pipeline editing:
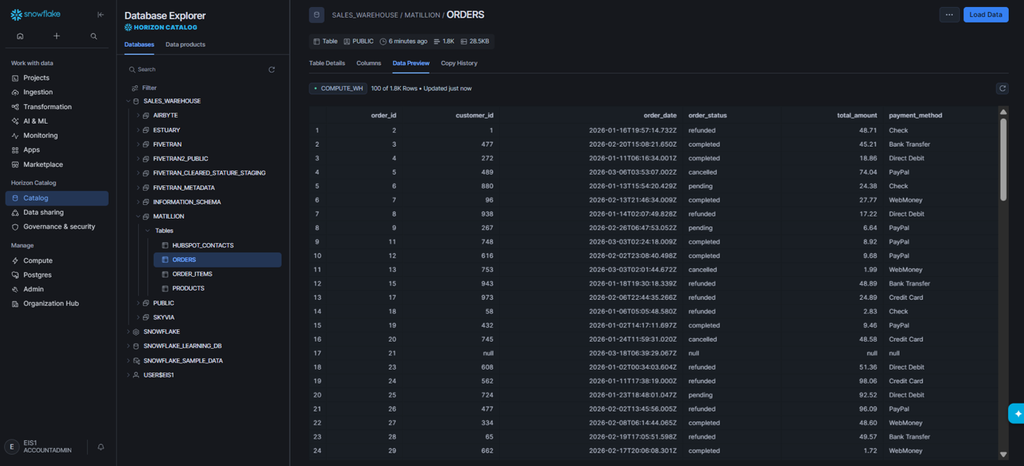
Then, below is for the orders table:
And for order_items table:
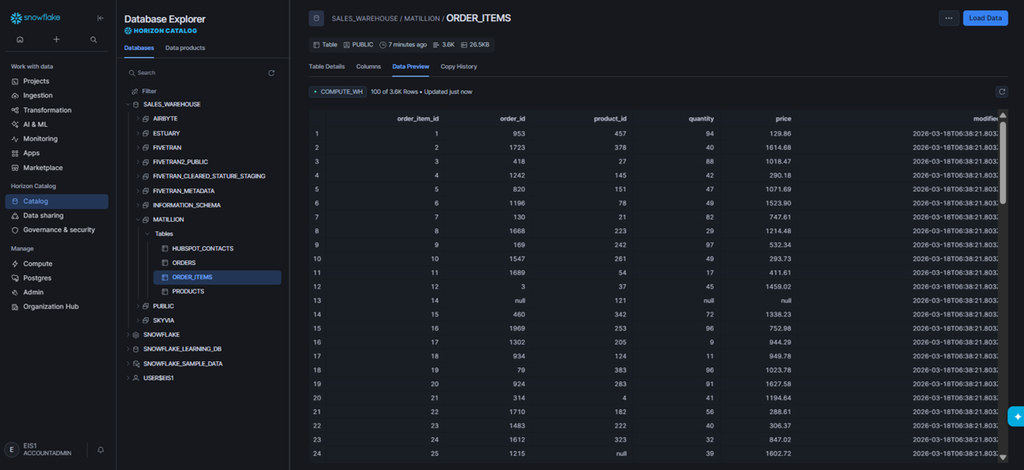
All row counts are the same as the source, and all the tables were loaded into the schema we intend it to (the MATILLION schema).
Results in BigQuery
The same flattened columns exist for the HubSpot contacts in BigQuery:
Same with products table:
And with the orders table:
Finally, the order_items table:
Row counts are also the same as the source for all tables.
This ends the Matillion tests. Find below the Pros and Cons based on product features.
Pros
- Deep push-down transformation leverage directly on Snowflake, Databricks, and Redshift compute.
- Built specifically for data engineers comfortable with SQL, Python, and dbt.
- AI-assisted pipeline development with Maia.
Cons
- Steep learning curve for non-engineers.
- Dual-billing structure (paying Matillion credit fees on top of warehouse compute costs).
Why Choose Estuary Flow for Sub-Second Streaming & Log-Based CDC?
Estuary Flow is our streaming ETL tool candidate in this test. If you need sub-second streaming because your reports and dashboards need instant updates, this is the tool for you. Log-based CDC also ensures only the updated rows are processed.
I had a few tests done in Estuary, so I know my way around here a little.
Best for
Companies that rely on real-time dashboards and reports with automatic schema-change handling.
Rating
How do Estuary users feel about the product?
- G2: 4.7/5 with 35 reviews
From G2: “Users consistently praise the product for its ease of use and responsive support…” - Capterra: No reviews found
Pricing Deep Dive
Estuary has a Free Developer tier with 10GB per month and 2 concurrent connector instances. But the moment this is exceeded, a 30-day free trial starts.
Paid tiers include Cloud and Enterprise. Pricing starts at $0.50 per GB + $100 per connector.
When I started, it was free, but I hit the free ceiling, and I entered the free trial. See what happened in the August and September 2026 period below:
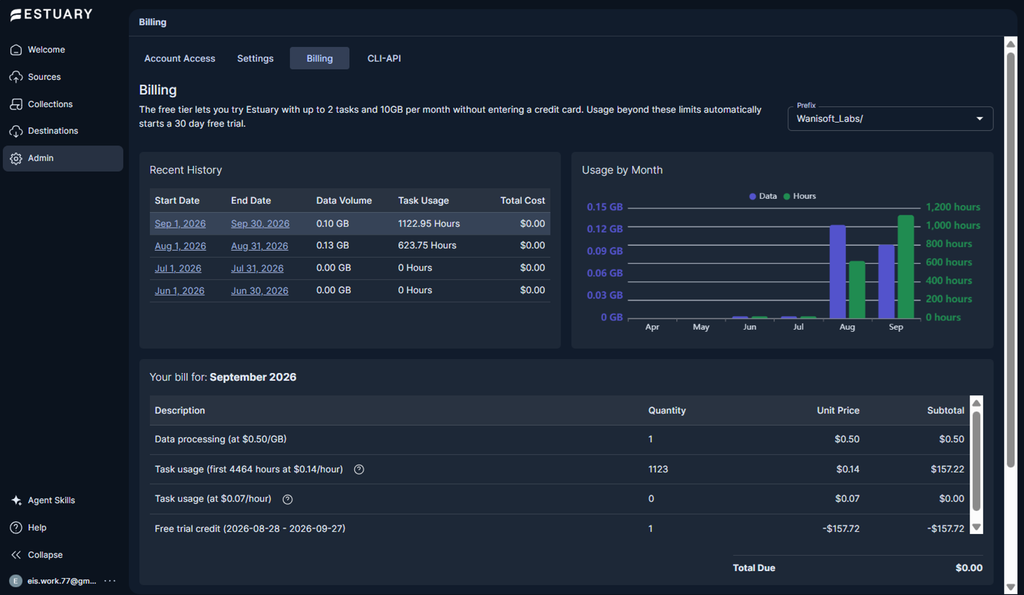
I won’t be eating for a month if I’m asked to pay that price. Good thing it’s a trial. I forgot that this is streaming and the pipelines continue running until I disabled it.
For more information, visit the Estuary pricing page.
What Does Building a Data Pipeline Look Like in Estuary Flow?
Estuary needs sources (or captures) and destinations (or materializations) similar to other ETL tools. But I have to shift my mind from batch to streaming. Of all the candidate ETL tools here, this is the only platform capable of streaming.
Pipeline Setup Difficulty: 3/5
Time to Launch: 20–30 minutes.
Workflow Steps
- Create 2 Captures (Sources)
- One for HubSpot
- Another for PostgreSQL
- Create 2 Materializations (Destinations)
- One for Snowflake
- Another for BigQuery
- Set the Sync Frequency. It defaults to 30 minutes, but it can be set to zero seconds.
- Publish the materializations and let it start running.
Connector and Pipeline Configurations
Let’s start with HubSpot. Same with the others; authorization requires a HubSpot sign-in. See below:
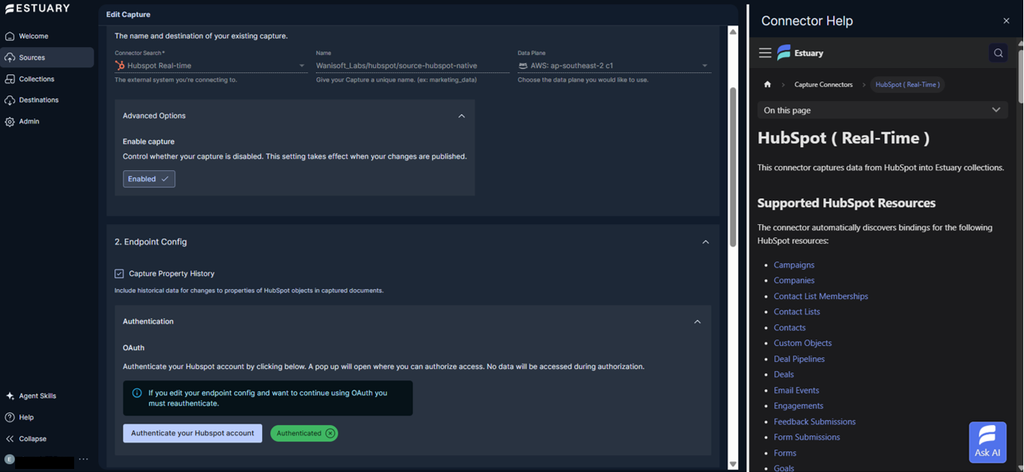
The next step is indicating the HubSpot object to replicate. So, we marked contacts.
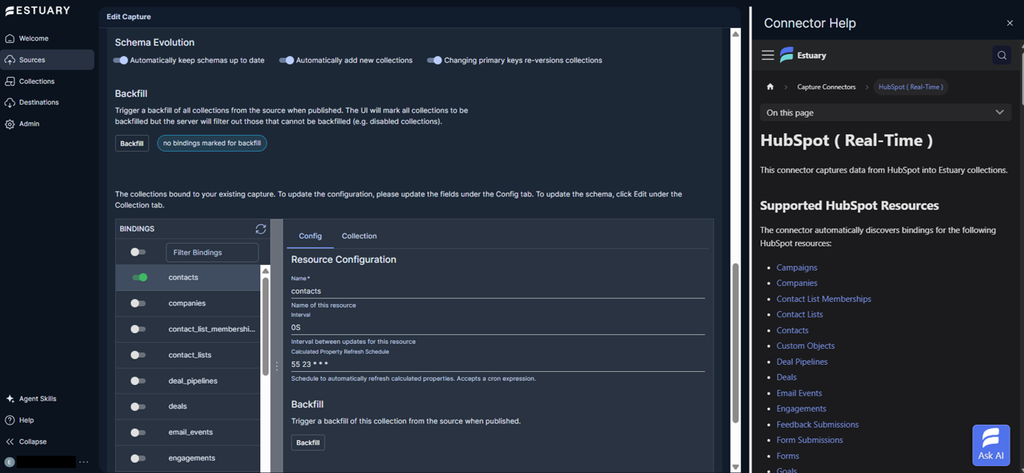
Next is PostgreSQL. I used the same credentials and other parameters.
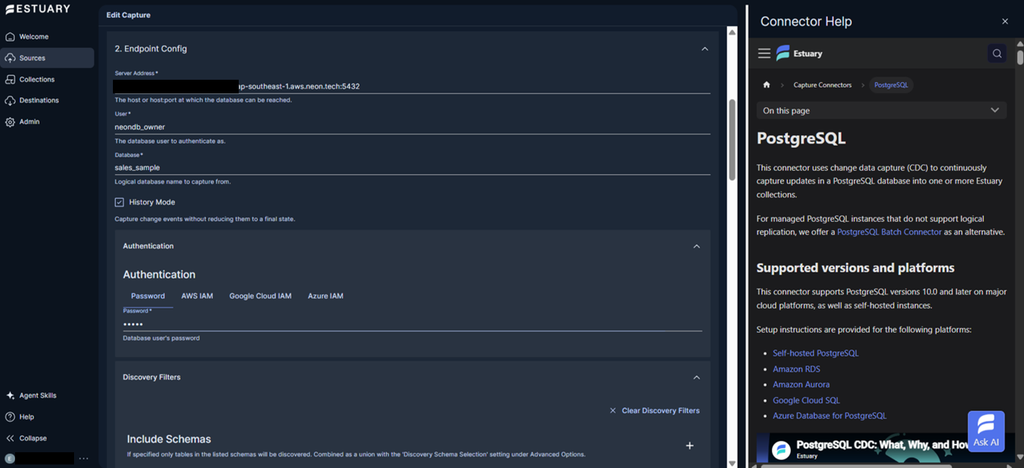
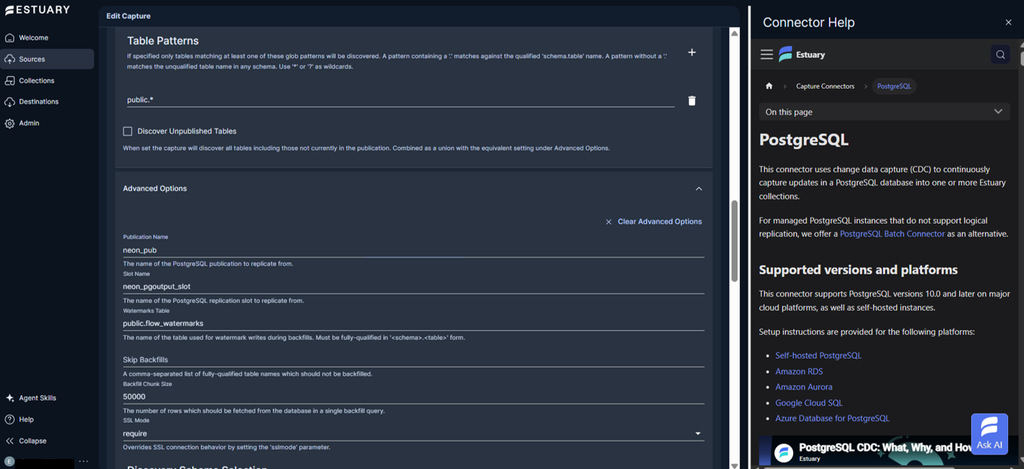
Choosing the tables is quite technical. So, I input public.*, meaning all tables set for replication. Like Fivetran and Airbyte, Estuary wants a publication name and replication slot. See them below:
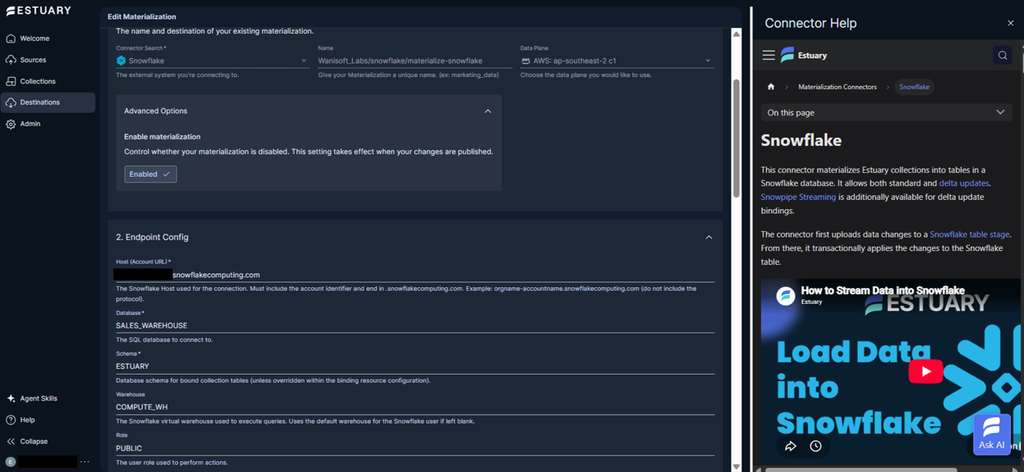
Then, we have Snowflake for the first destination. The only difference here is the target schema (ESTUARY).
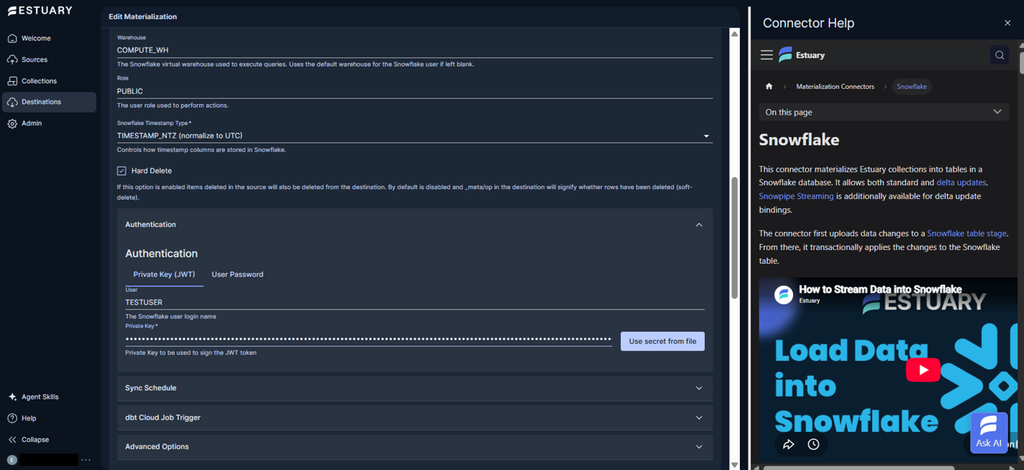
Then, we add authorization using the Private key file for TESTUSER.
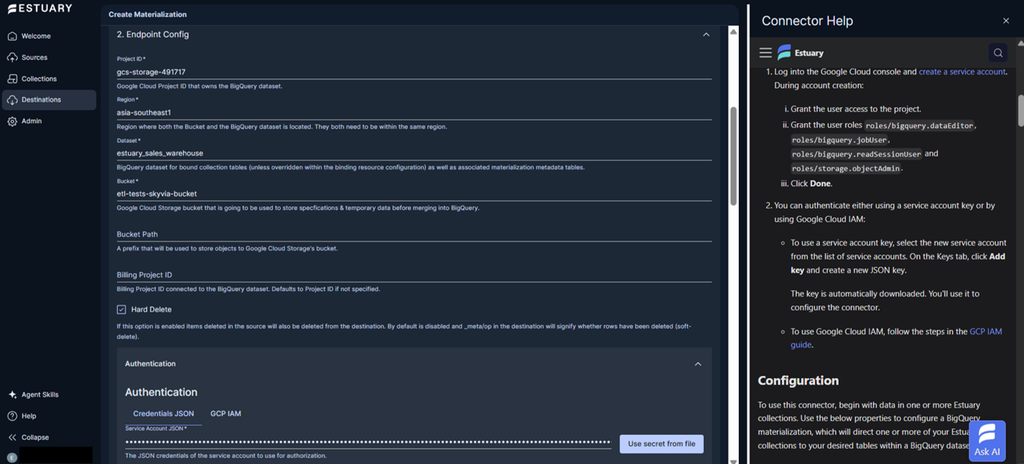
Finally, we have the config for BigQuery below. The JSON credentials used in Matillion are the same here. But the target dataset is estuary_sales_warehouse.
I have a BigQuery permission error below. It pertains to creating BigQuery jobs. The BigQuery Job User permission is only for running jobs. So, to make this quick, I used the BigQuery Data Owner permission.
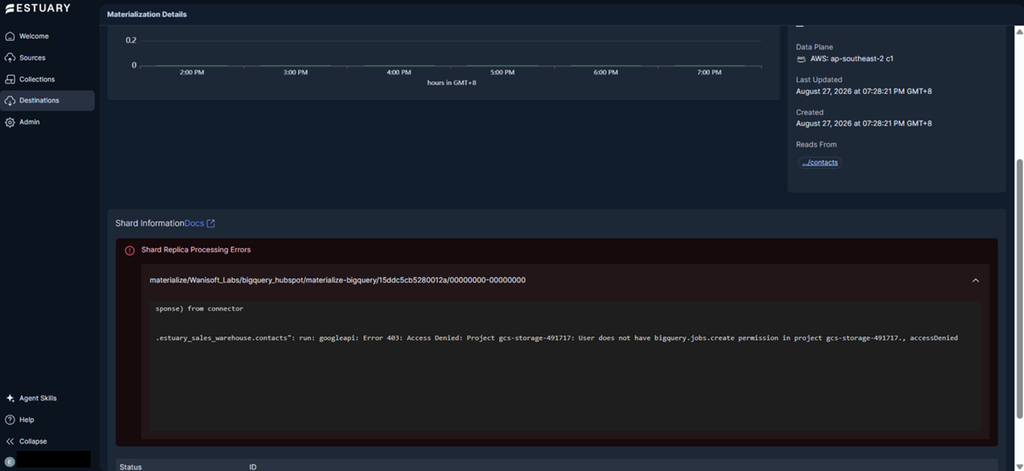
But then again, there’s another error. This time, for Snowflake:
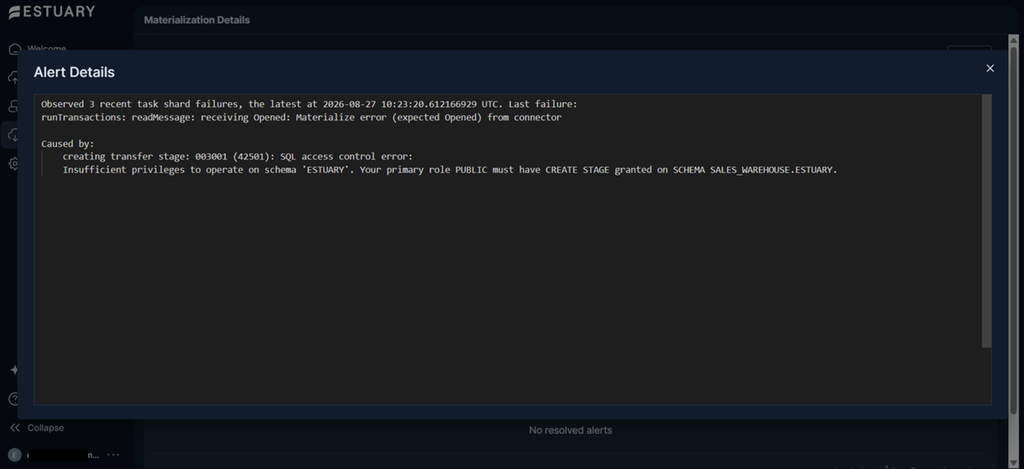
It seems that Estuary uses Snowflake Stages. So, I added:
GRANT CREATE STAGE ON SCHEMA SALES_WAREHOUSE.ESTUARY TO ROLE PUBLIC;
Then, it went well with Snowflake.
Runtime Results
The tables replicated have the same row counts as the source.
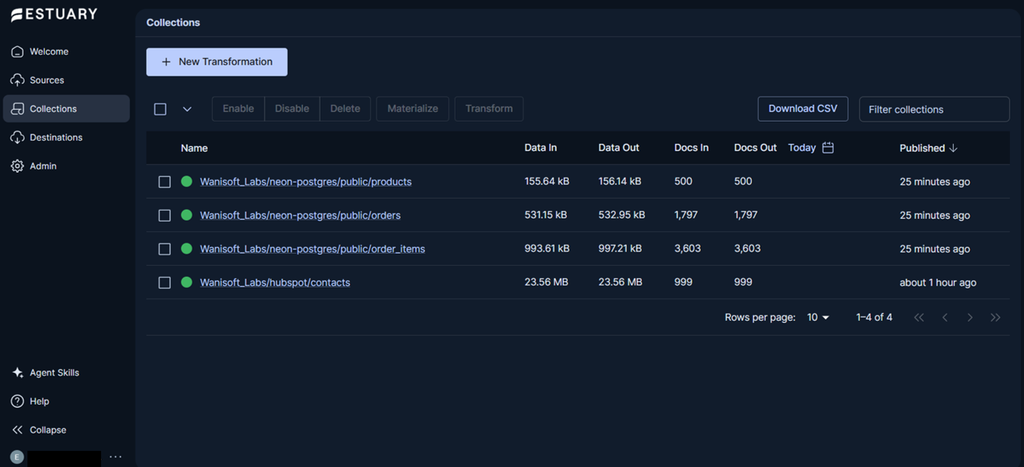
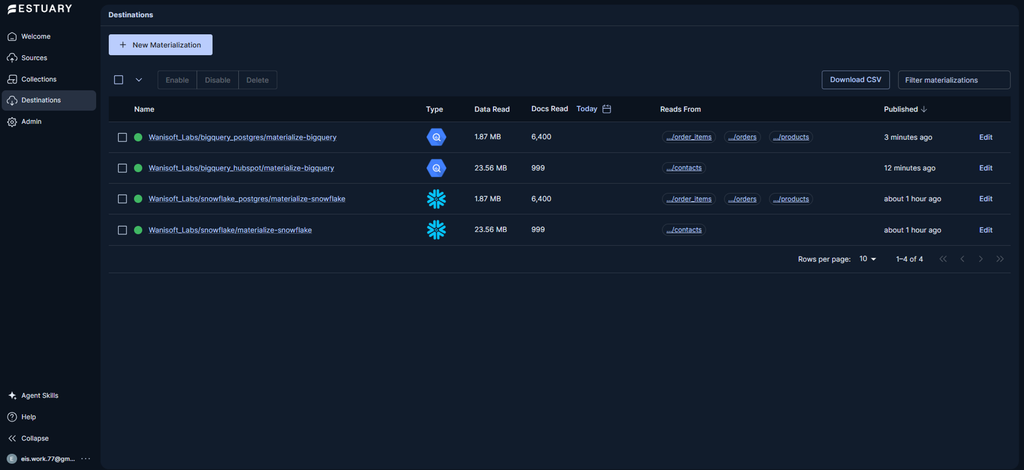
All pipelines are green, meaning it’s working. The good part is, I just noticed it’s done, true to its sub-second promise. Sadly, the duration is not indicated on the page below. I have to dig into the JSON logs, and it’s deep and too technical.
Results in Snowflake
Estuary didn’t flatten the JSON columns from HubSpot. It’s raw, as seen below:
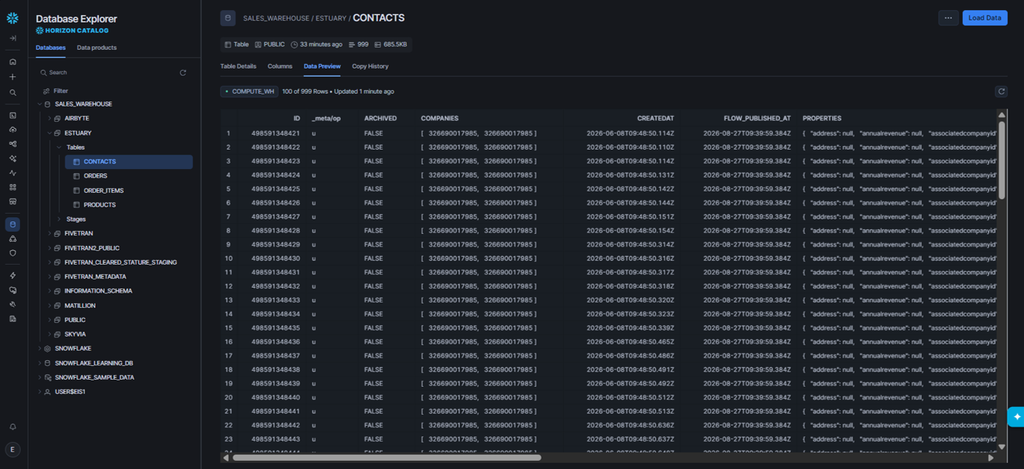
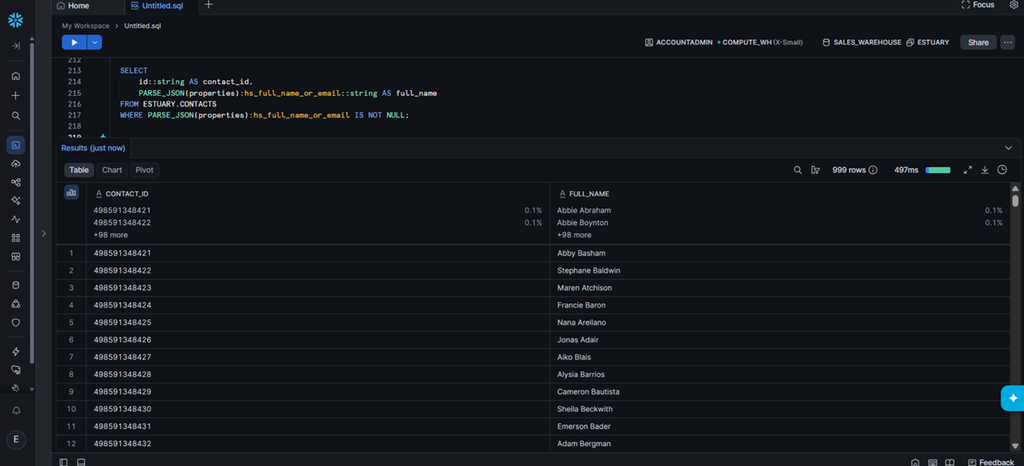
To unflatten this, you can run a SELECT statement with PARSE_JSON. Here’s a sample:
SELECT
    id::string AS contact_id,
    PARSE_JSON(properties):hs_full_name_or_email::string AS full_name
FROM ESTUARY.CONTACTS
WHERE PARSE_JSON(properties):hs_full_name_or_email IS NOT NULL;
It will extract the CONTACT_id and the FULL_NAME. See the output below:
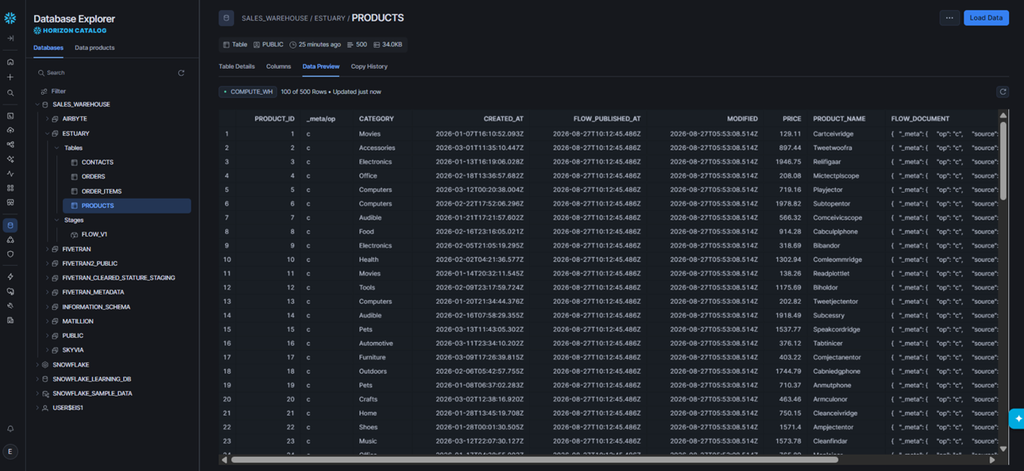
Below is a preview of the products table prior to schema change:
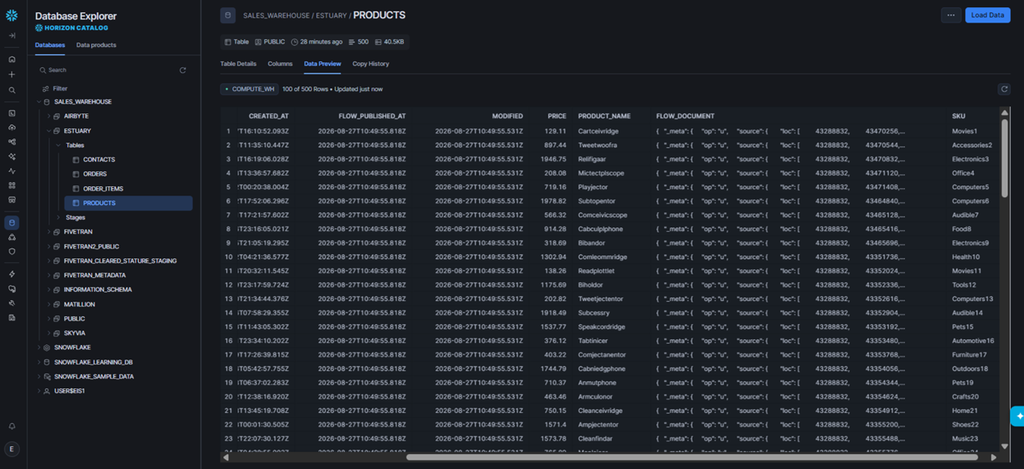
Then, I added the column while the streaming is enabled. It’s similar to what I did with the other ETL tools, and it added the sku column in the next sync. See below:
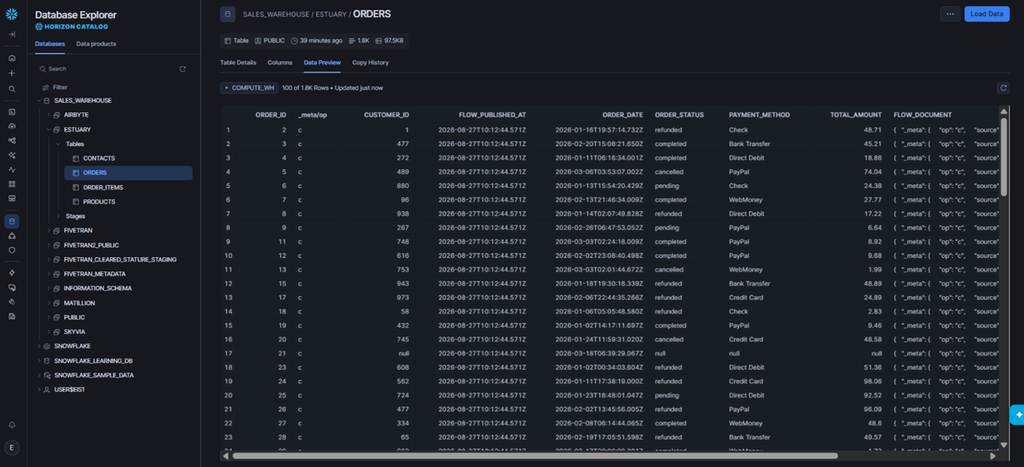
Meanwhile, here’s the preview for the orders table:
And order_items:
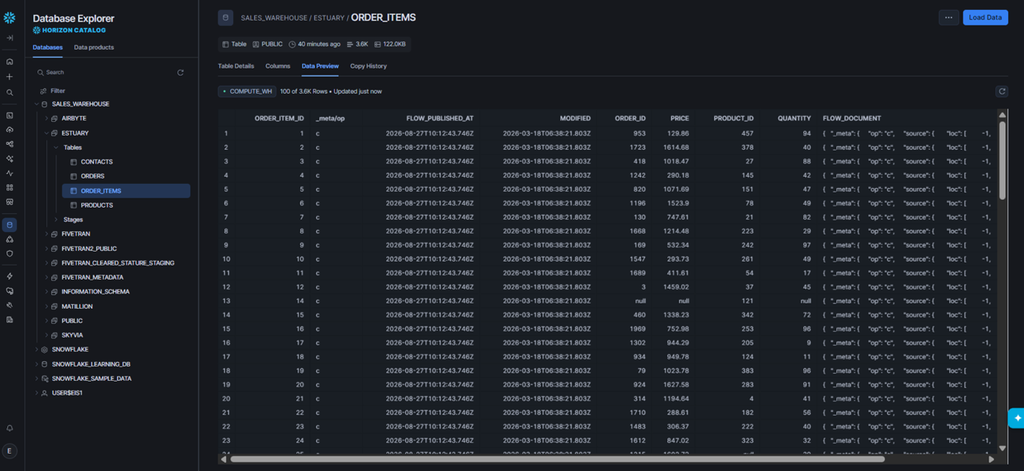
Estuary chose to be defensive for logical schema changes in HubSpot by retaining the raw JSON properties. As for the PostgreSQL tables, it was replicated as-is with additional columns used for processing.
All row counts in Snowflake are the same as the source.
Results in BigQuery
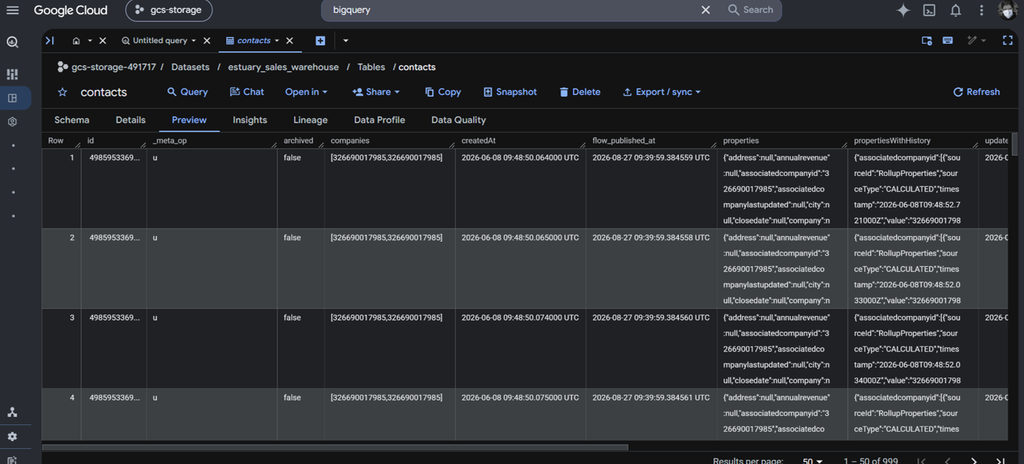
We saw the same results in BigQuery. Unflattened HubSpot contacts columns.
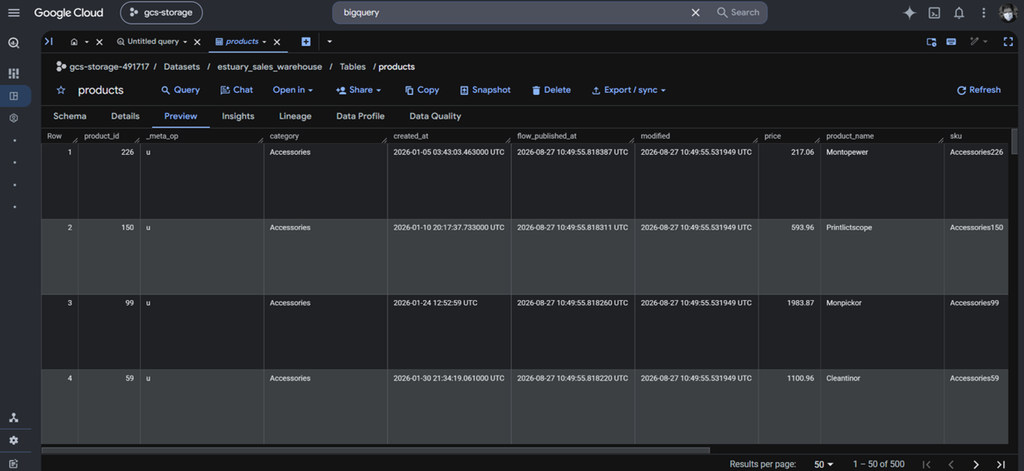
Same with products table:
In orders:
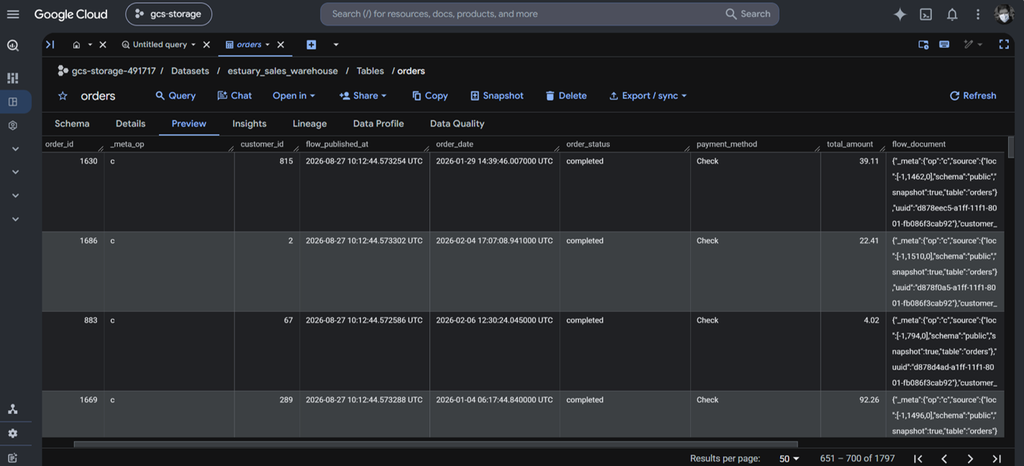
And lastly, in order_items:
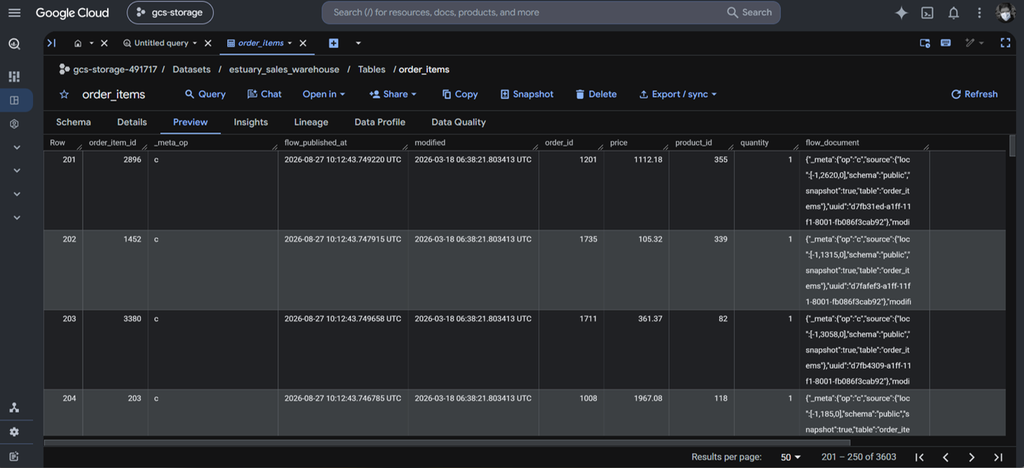
That ends the tests in Estuary.
Pros
- Sub-second streaming architecture for real-time analytics and event-driven apps.
- Low-impact log-based CDC across modern databases.
Cons
- Overkill for standard daily or hourly BI reporting pipelines. If you don’t need sub-second updates, a scheduled batch job is recommended.
- Smaller catalog of SaaS app connectors compared to Skyvia or Fivetran.
How Do You Choose the Right ETL Platform for Your Team?
This test of ETL tools reveals a lot so you can choose which one fits your requirements. It can be summarized to this:
- Choose Skyvia if:
You want a no-code tool that handles ingestion, dbt transformations, Reverse ETL, or orchestration at a predictable volume-based price without needing a dedicated data engineering team. - Choose Fivetran if:
You’re a big data company, you have a large enterprise budget ($12k+/yr if on contract), and have a dedicated data engineering team to manage MAR usage. - Choose Airbyte if:
Your DevOps team demands open-source control, air-gapped on-prem deployment, and custom connector development in Python. - Choose Matillion if:
Your data engineers need to build heavy push-down Python/SQL models directly on Snowflake or BigQuery. - Choose Estuary if:
You need sub-second event streaming and real-time database CDC for your dashboard and reports.

FAQ for Best ETL Tools

What is the difference between log-based CDC and incremental polling, and when does it matter?
Log-based CDC reads database transaction logs for changes, while incremental polling queries changed rows. CDC is usually faster and less taxing for high-volume, frequently changing data.
Is self-hosted open-source ETL actually cheaper than a managed cloud service?
Not always. Open-source software may have no license cost, but you still pay for infrastructure, maintenance, upgrades, monitoring, security, and engineering time. Managed services shift much of that work to the vendor.
How do cloud ETL platforms connect to on-premises databases behind firewalls?
They commonly use a self-hosted agent or connector inside the network. The agent makes outbound connections to the cloud service, so you typically don’t need to expose the database directly to the internet.
How do managed ETL platforms integrate with dbt for warehouse modeling?
Many integrate with dbt by triggering dbt jobs after data ingestion. ETL handles extraction and loading, while dbt transforms the data in the warehouse using SQL models.
What happens to my warehouse data if an ETL pipeline fails mid-execution?
It depends on the tool and operation. Some use transactions or staging tables to prevent partial loads; others may leave partially loaded data. Check the platform’s recovery, rollback, and retry behavior.